Web Filter
Overview
The Web Filter Application performs various content filtering functions and forms a major part of the Secure Web Gateway component of the Crystal Eye XDR. It is designed to cater to the critical capabilities of the secure web gateway enforcing corporate regulatory policy compliance.
The Web Filter App can be setup to scan both http and https traffic which sets the baseline for the monitoring and visibility module of the CE XDR. Monitoring modules of the CE XDR provides visibility to real-time web requests (both http & https) and blocked web requests (both http & https).
Effective setting up of the Web Filter App addresses the most common requirement of enterprises to observe user behaviour over the internet. This information can be used to further fine tune the content filtering policies of the organisation.
The latest user interface of the Web Filter Application (CE XDR version 4.5 onwards) propagates multitenancy in its true sense as it allows users to create various web filtering profiles and align desired policies to it. These web filter profiles can then be assigned to various zones and interfaces of the CE XDR network using the traffic rules feature of the advanced firewall app.
As per ISO 27002:2022 framework (control 8.23 Web Filtering), to reduce the risk of network users accessing suspicious websites known to spread malware infection, the admin should implement customised content filtering policies based on standard web block parameters. The CE XDR’s Web Filter Application features a list of standard web block parameters such as Blacklists, Phrase Lists, MIME Types, File Extensions, Banned Sites, Gray Sites, and Exception Sites.
Gartner Peer Reviews
 Explore more Red Piranha Customer Reviews on Gartner Peer Insights
Video Resources
Installation
The Web Filter App is installed by default and can be accessed from the left-hand navigation panel.
Navigation to Web Filter Application page
Left-hand navigation Panel > Security Configuration > Web Filter
Default Configuration
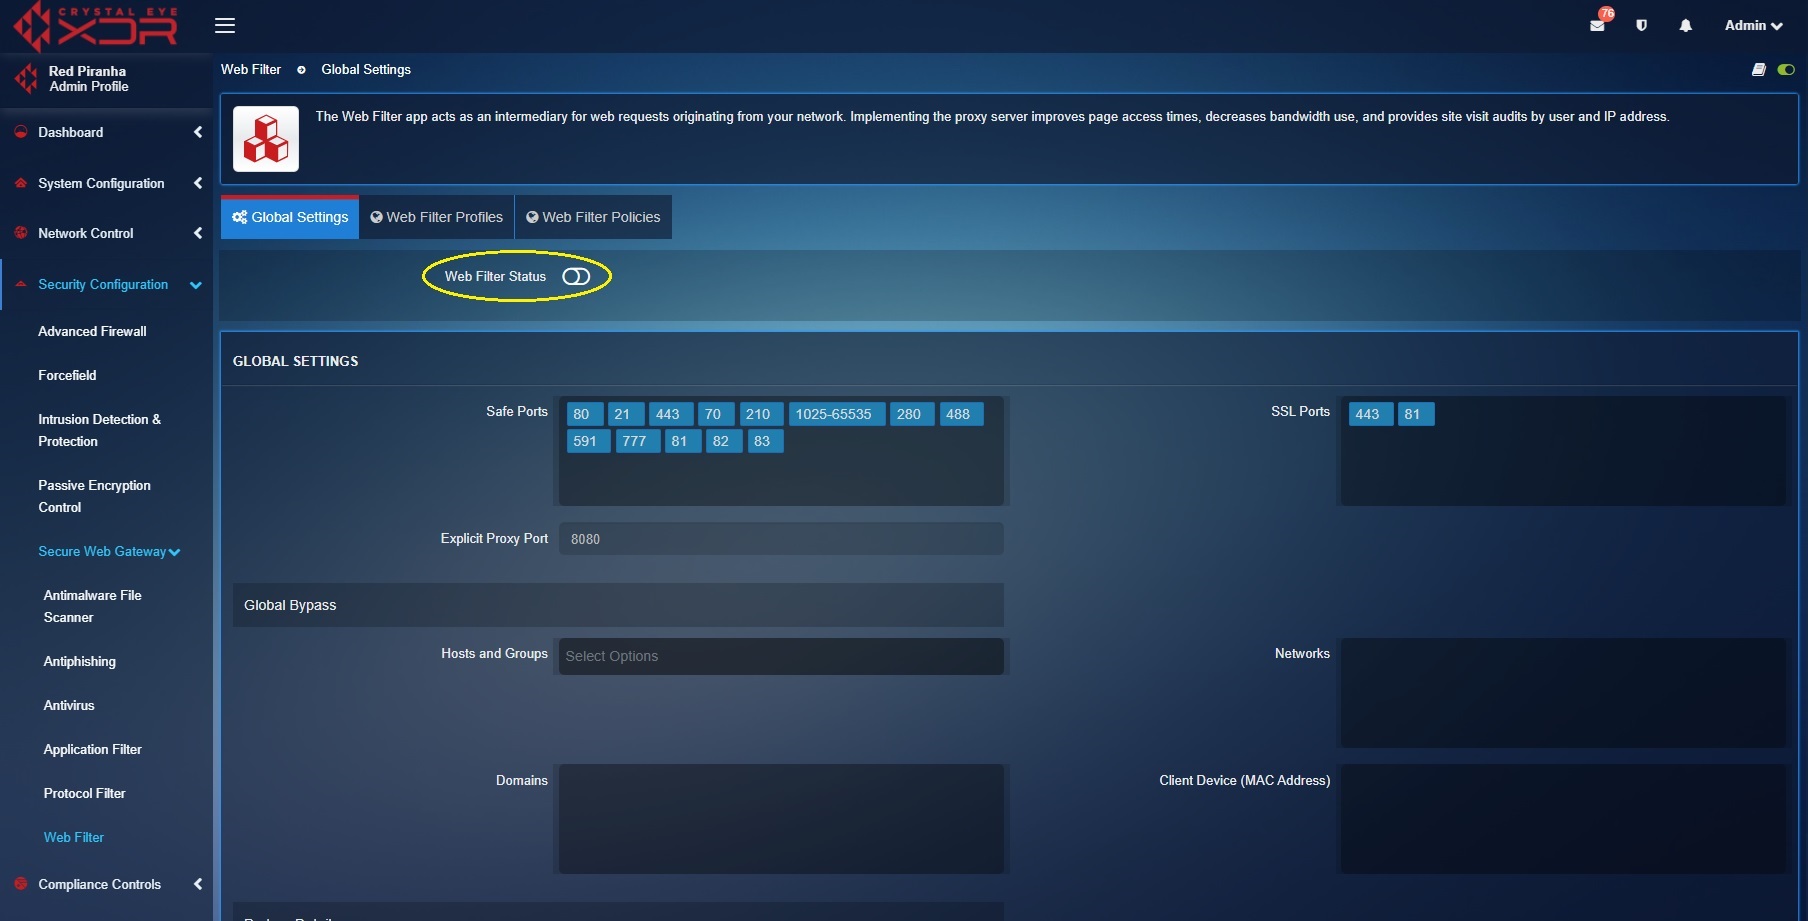
As a default feature, the web filter application is disabled. This is intended to address cases where Web Filter has not yet been configured and if enabled may have an impact on access to some internet delivered resources and services. Enable the web filter application under the Global Settings using the Web Filter Status (See screenshot below).
Important
It is advisable to configure the Wed Filter and associated Filter policies prior to enabling the application.
Gartner Peer Reviews
 Explore more Red Piranha Customer Reviews on Gartner Peer Insights
Understanding Web Filter Configuration
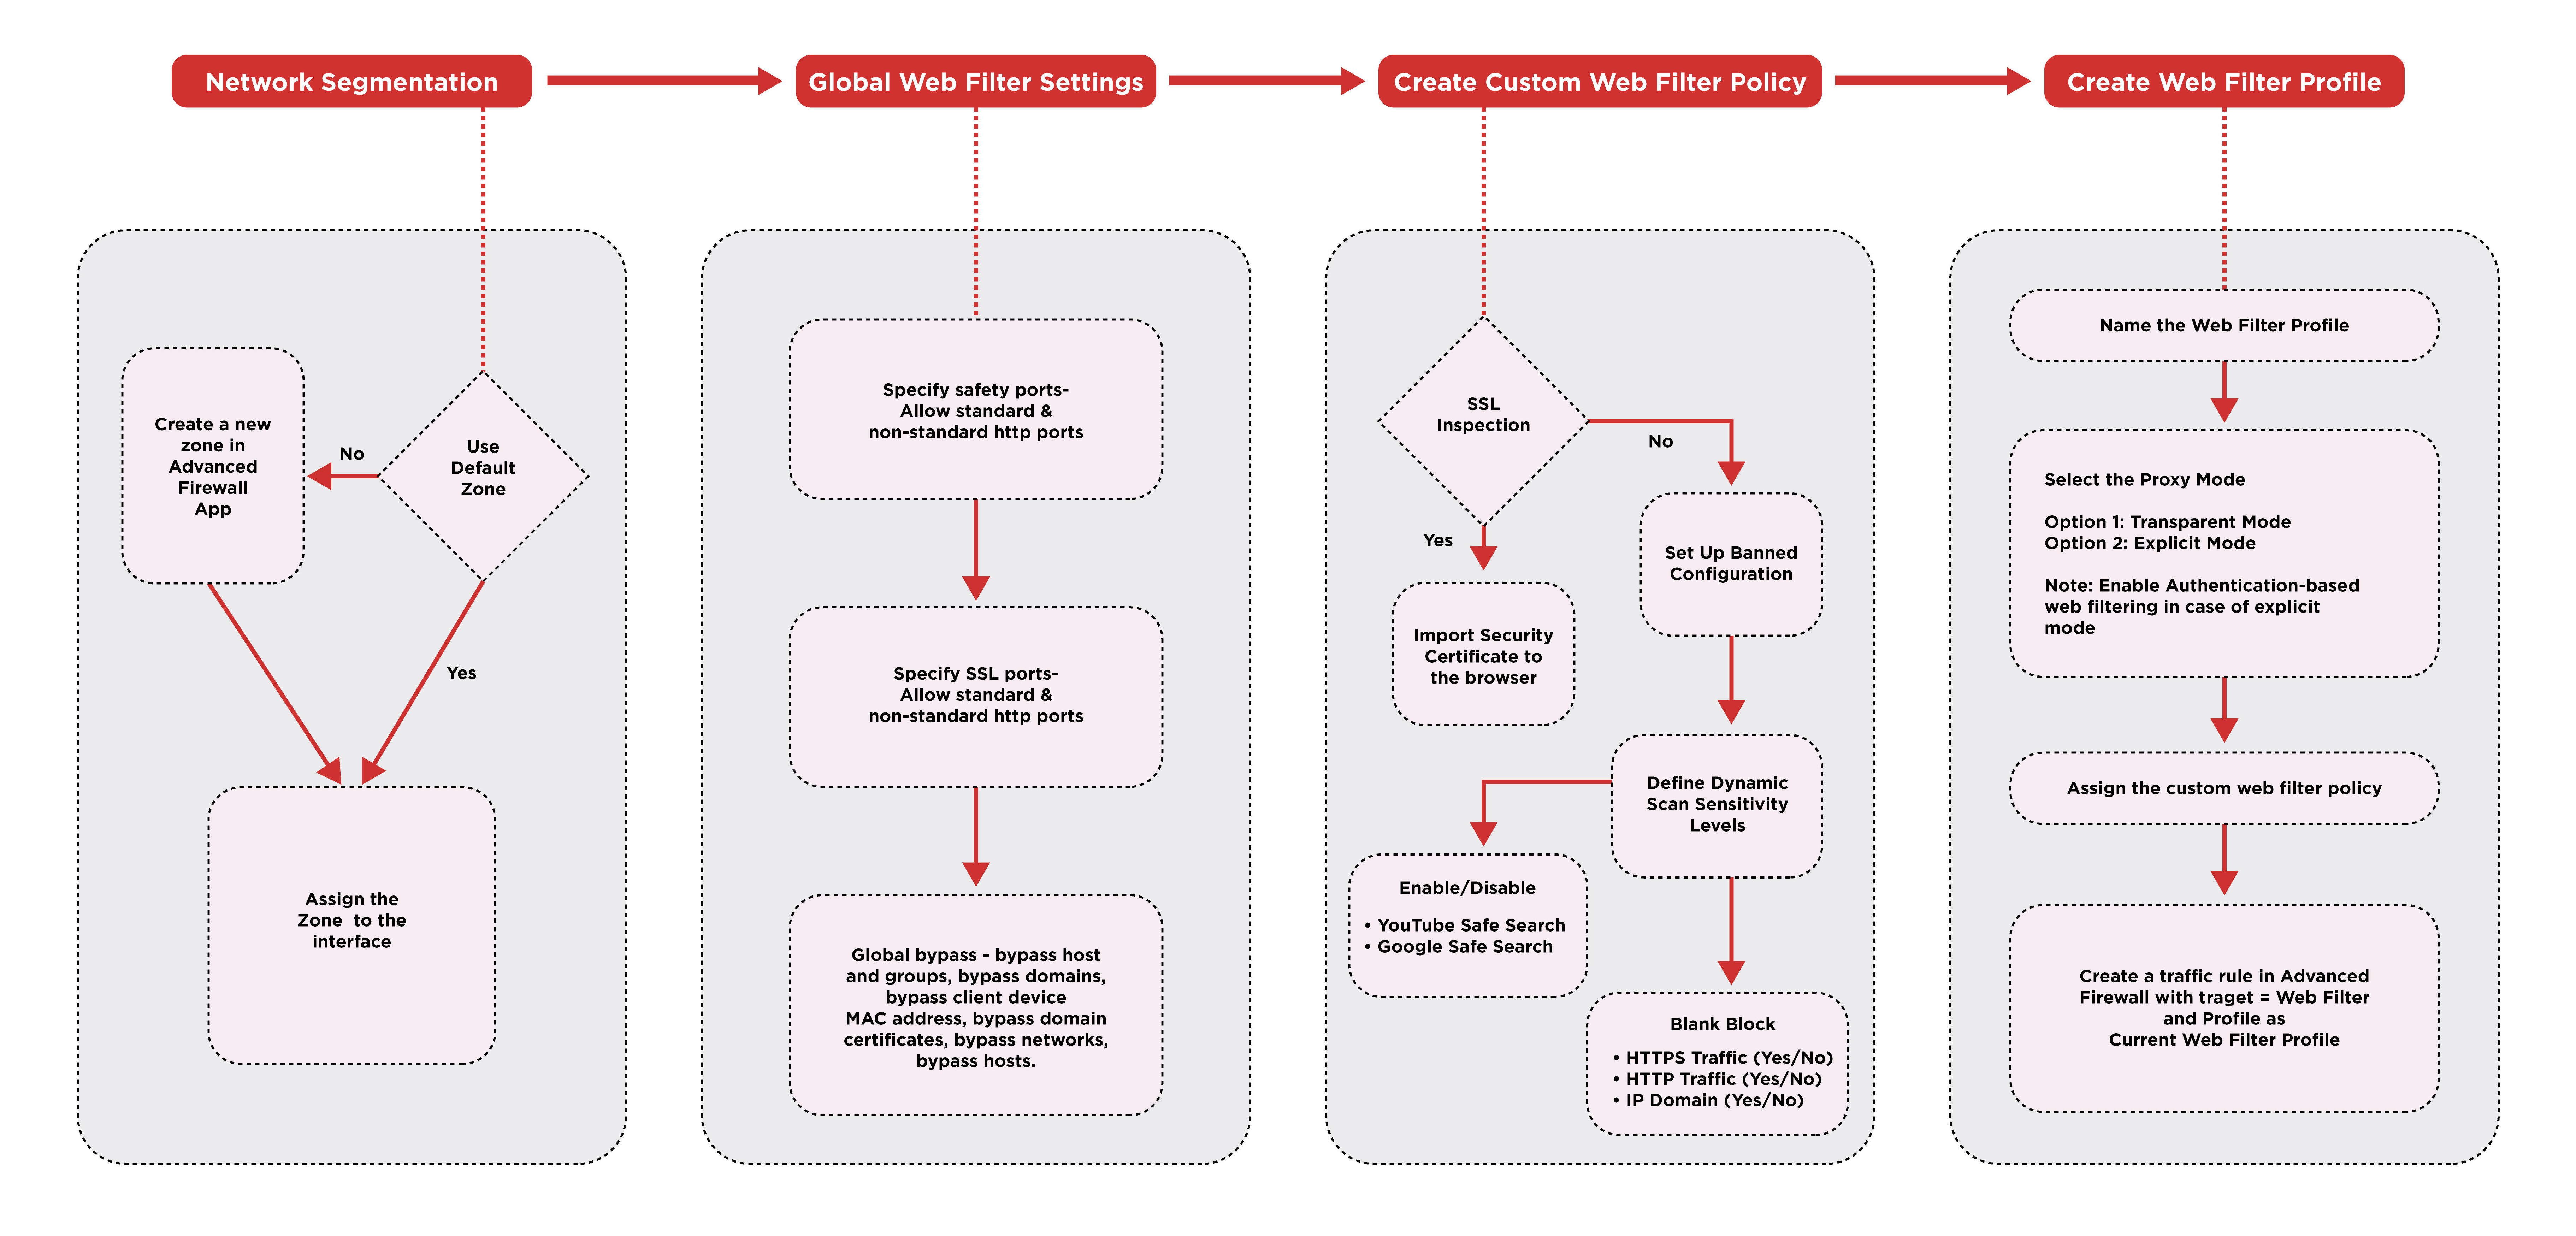
The improved GUI of the Web Filter application supports multiple configurations for various filter related features across the CE XDR network. The configuration elements and parameters are spread over various components of the web filter configuration hierarchy such as Network Segmentation, Global Web Filter settings, Web Filter Policy, and Web Filter Profile. Web Filter Profile can be assigned to a particular outgoing traffic with the help of the traffic rules in the advanced firewall.
The Web Filter Configuration Hierarchy can be best understood with the following flowchart:
The flow chart above shows various features supported in the Web Filter. These stages are described in greater detail below.
Stage 1 Configurations – Network Segmentation
The newly developed CE XDR software version (4.0 onwards) features the new Web Filter Application which propagates multi-tenancy in its true sense.
This also means that now you can create different Web Filter profiles with different types of rulesets and apply it to both internal and external network traffic.
The network segmentation section of the flow chart above shows that you can either create a custom security zone or use default security zones and then assign it to a network interface.
We create these zones so that we can apply multiple web filter profiles with different URL filtering policies to the CE XDR network traffic.
Know how to create custom security zone?
Know more about the default security zones of the CE XDR?
Stage 2 Configurations – Global Web Filter Settings
The global web filter settings are used to define global filtering bypass policies. These bypass parameters can be applied to networks, domains, and client devices (MAC addresses).
Hosts and Groups application can be used to create pre-defined objects and apply these web filter bypass policies on these objects consisting of:
[A] a list of host IP address
[B] a list of network IP address
[C] a group of MAC addresses
Note
Know more about how Hosts and Groups application can be used to create pre-defined objects to group host IP addresses, network IP addresses and MAC addresses.
Important
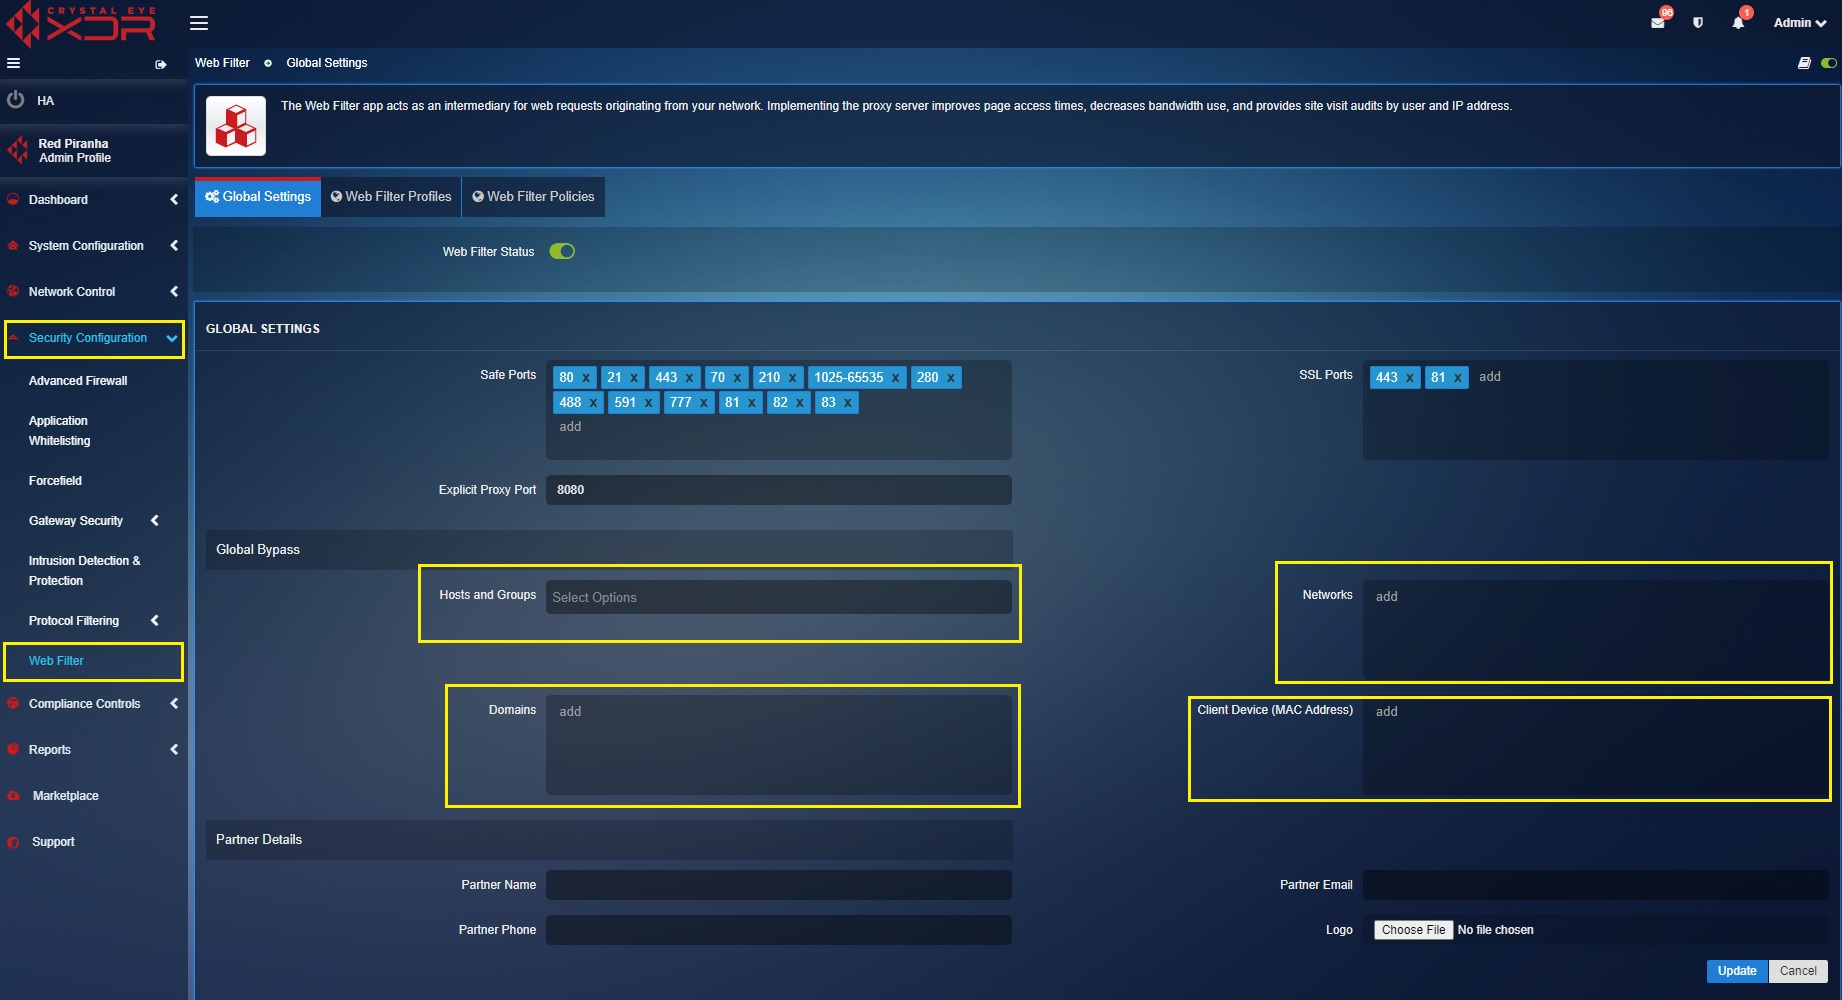
The global web filter settings can be used to allow standard & non-standard HTTP and HTTPS ports. HTTP ports can be added in the safe ports text box and the HTTPS ports can be added to the SSL ports text box (refer to the screenshot below). 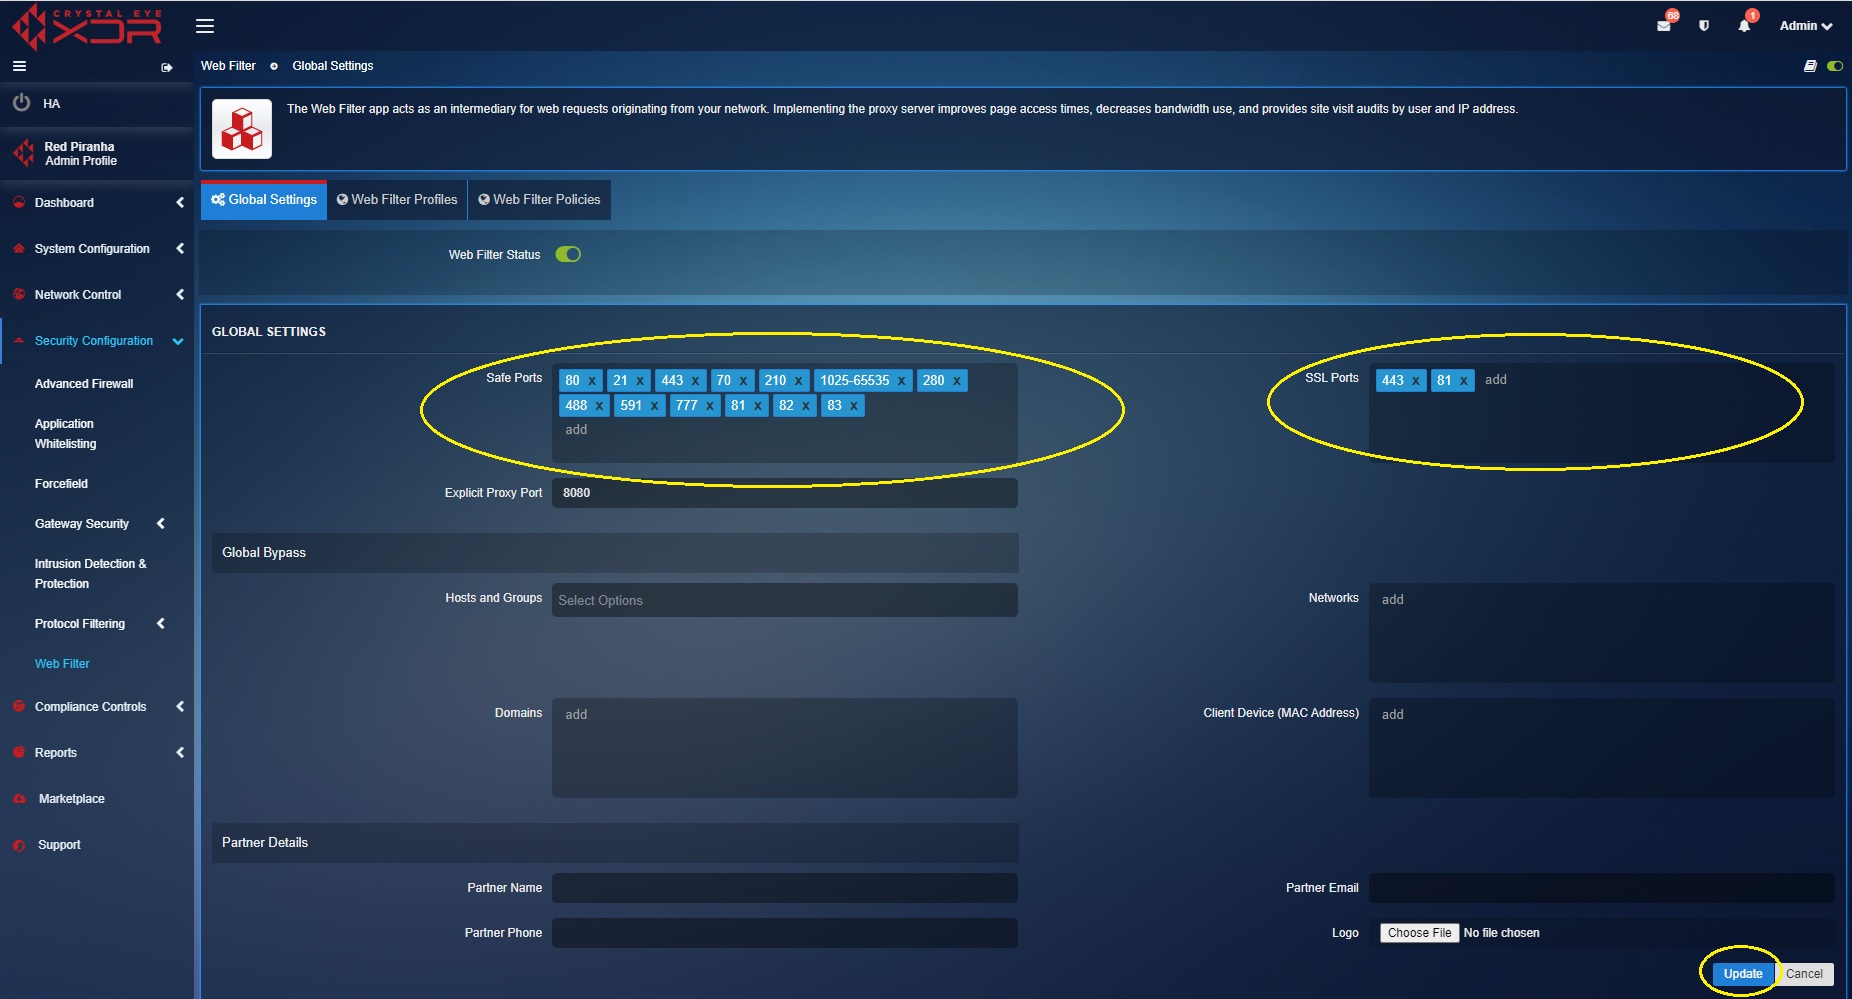
Important
The global bypass configurations can be setup to add device MAC addresses, network IP addresses and domains which will essentially bypass the traffic without taking it through the web filter profiles and policies. 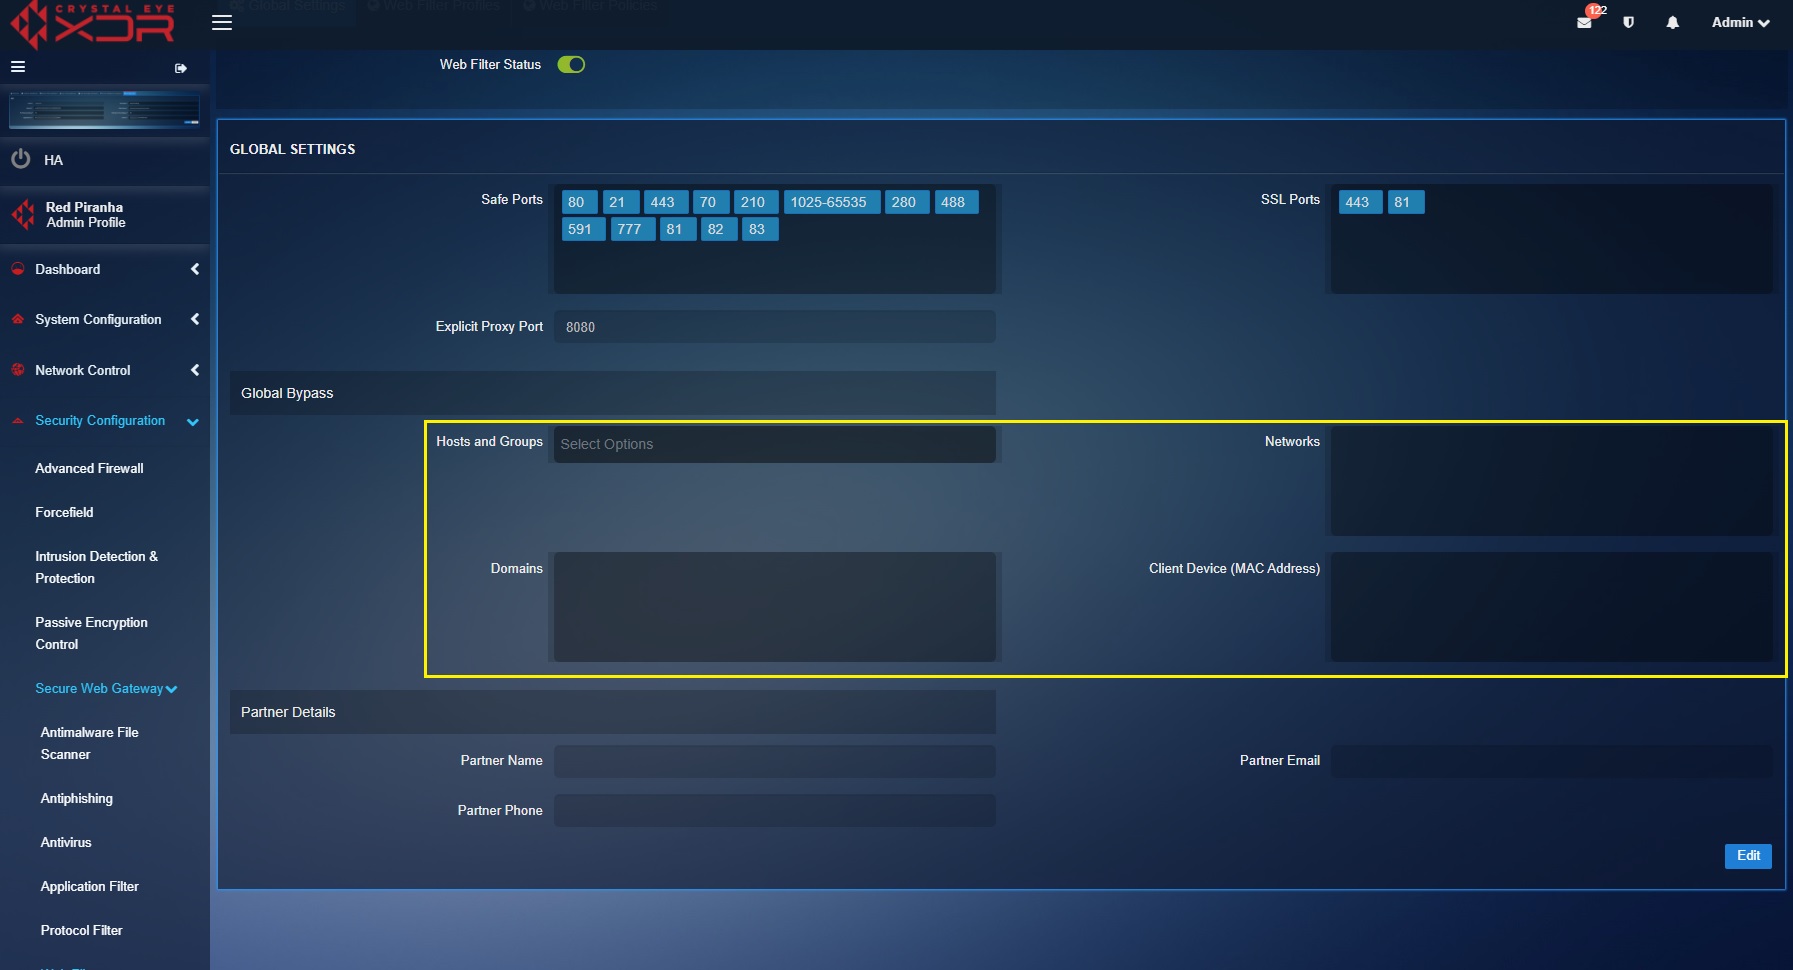
How to bypass web filtering policies for a selective set of user devices or networks in the CE XDR network?
Step 1: Click the Edit button and perform the following tasks as required
- Select the Hosts & Groups from the dropdown (Know how to use hosts and groups app to create a group of IP Hosts, IP Network group or MAC host group)
- Enter the interface IP address in the Network text box
- Enter the Domain name that requires web filter policy bypass in the Domains text box
- Enter the MAC address that needs to be bypassed.
Stage 3 Configurations – Create Custom Web Filter Policies
The web filter policies have been designed to enable a CE XDR administrator to implement security controls such as principle of least privilege (ISO 27002:2022, Control 8.2 – Privileged Access Rights). The policies that can be implemented using the Web Filter Application fulfills all the requirements of the newly introduced security control in ISO 27002:2022, Control 8.23 – Web Filtering.
The web filter policies are set to scan only http web traffic as a default feature. However, this default mechanism of the application can be customised to enable SSL inspection which allows https traffic scanning.
Note
Refer to Stage 4 Configurations – Create Web Filter Profile to know how to enable SSL Inspection.
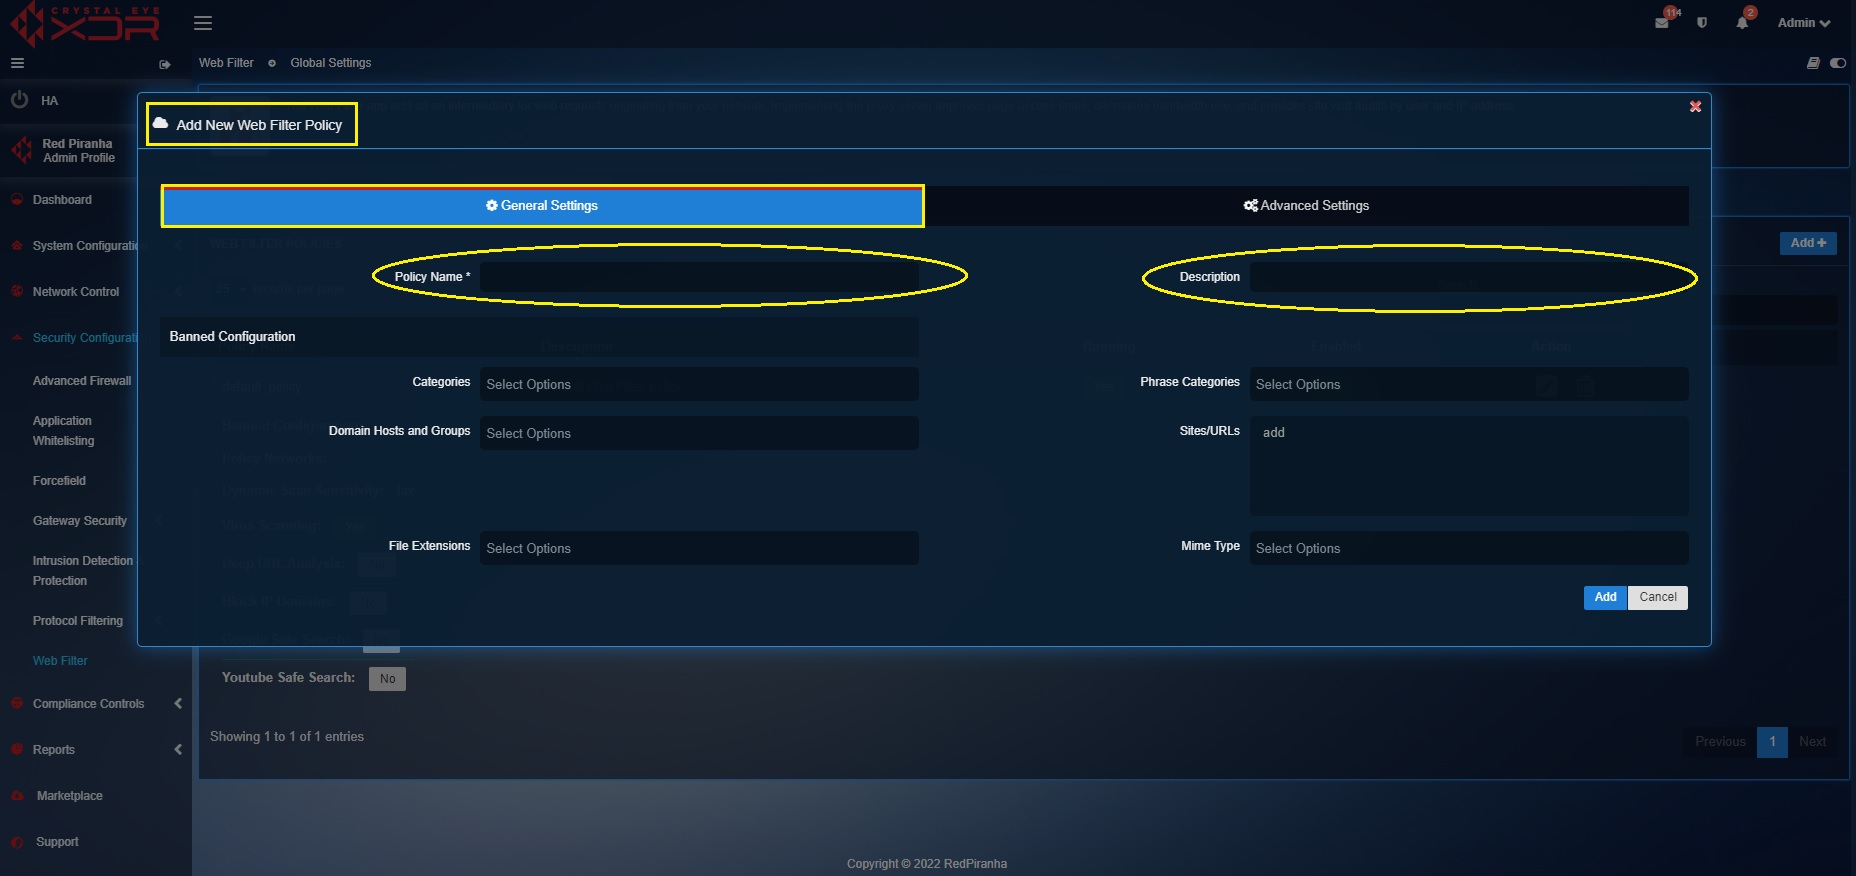
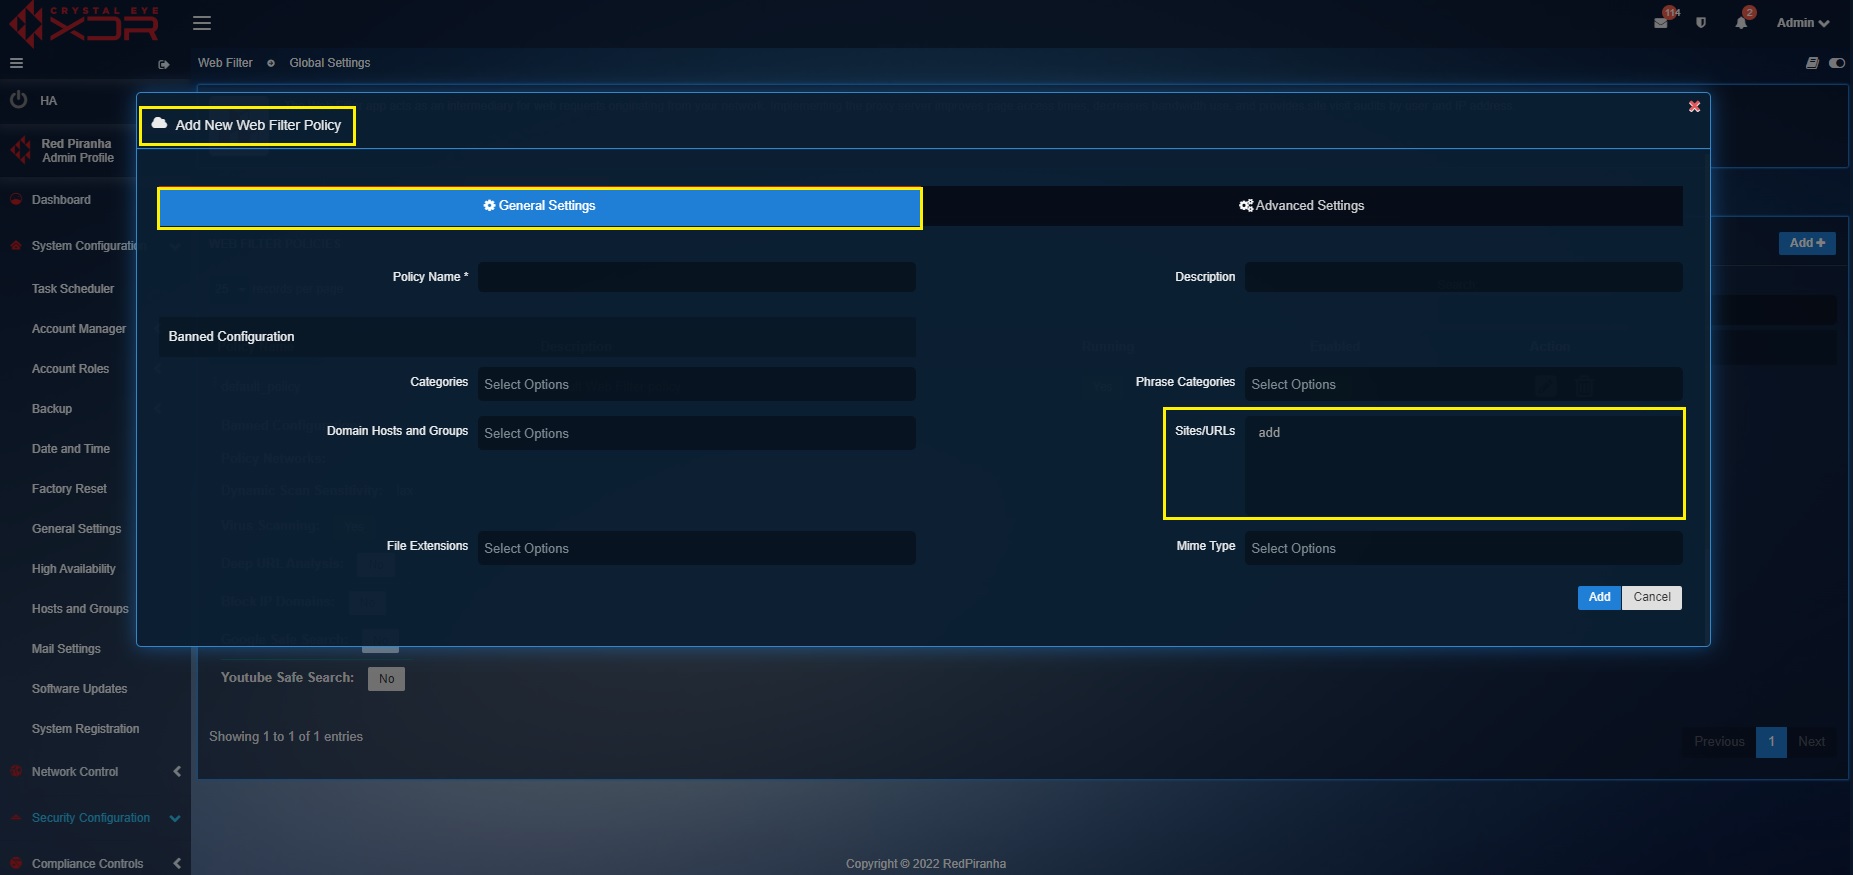
The banned configuration section under the General Settings tab has a list of filtering parameters such as the Banned Categories, Domain Hosts and Groups, File Extensions, Phrase Categories, Sites/URLs, MIME Type.
The Advanced Settings of the policies have configurations that allow administrators to enable Deep URL Analysis, Google Safe Search, Virus Scanning, Youtube Safe Search. The advanced settings also have the master control over the ability of a user to access a website using the IP domain. This setting can be enabled or disabled using the Block IP Domains tick box.
How to Create a Custom Web Filter Policy?
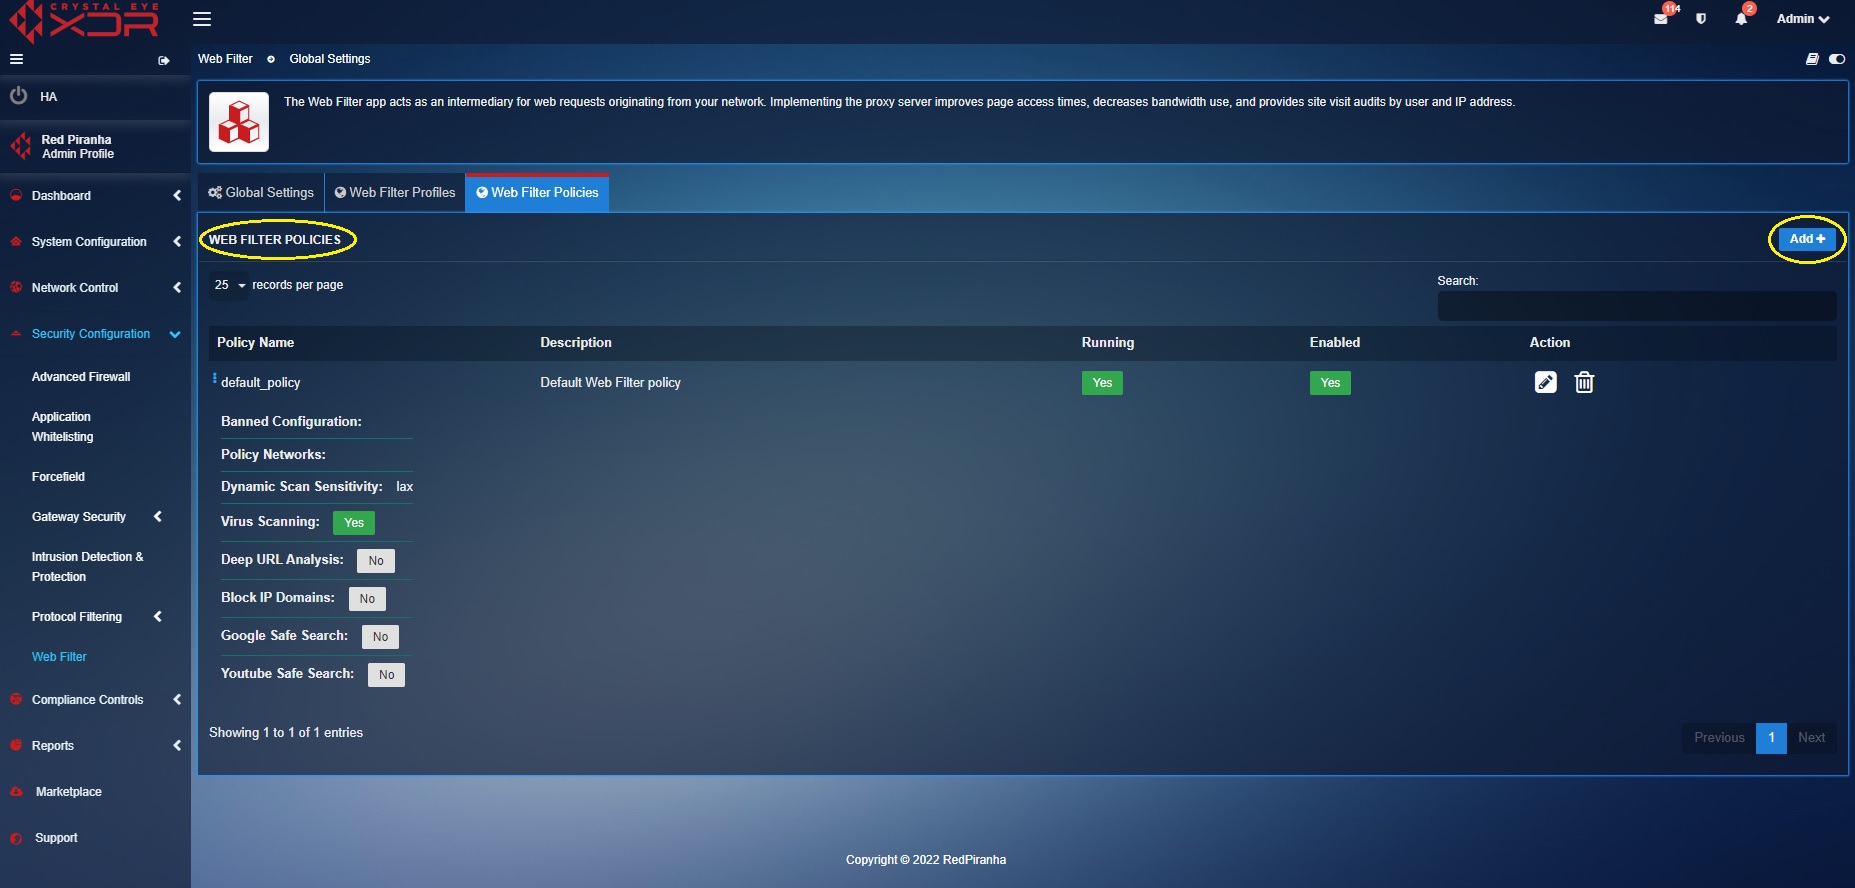
Step 1: Select Web Filter Policies tab in the Web Filter Application page.
Step 2: You will see the Web Filter Policies page. Click the Add button on the top-right corner of the Web Filter Policies section.
Step 3: You will now see the Add New Web Filter Policy pop-up page. Enter the custom Policy Name and Description under the General Settings tab.
Step 4: Select the categories of websites that need to be banned from the dropdown under the Banned Configuration section.
Note
Enable SSL Inspection if you want to ban HTTPS websites. The Web Filter App will block only http websites as a default feature since the SSL Inspection feature is disabled by default. However, if you want to ban https websites, enable SSL Inspection, and import the security certificate to the browsers of all the devices connected to the CE XDR network. Refer Stage 4 Configurations – Create Web Filter Profile to know how to enable SSL inspection and import the Crystal Eye XDR security certificate to the browser.
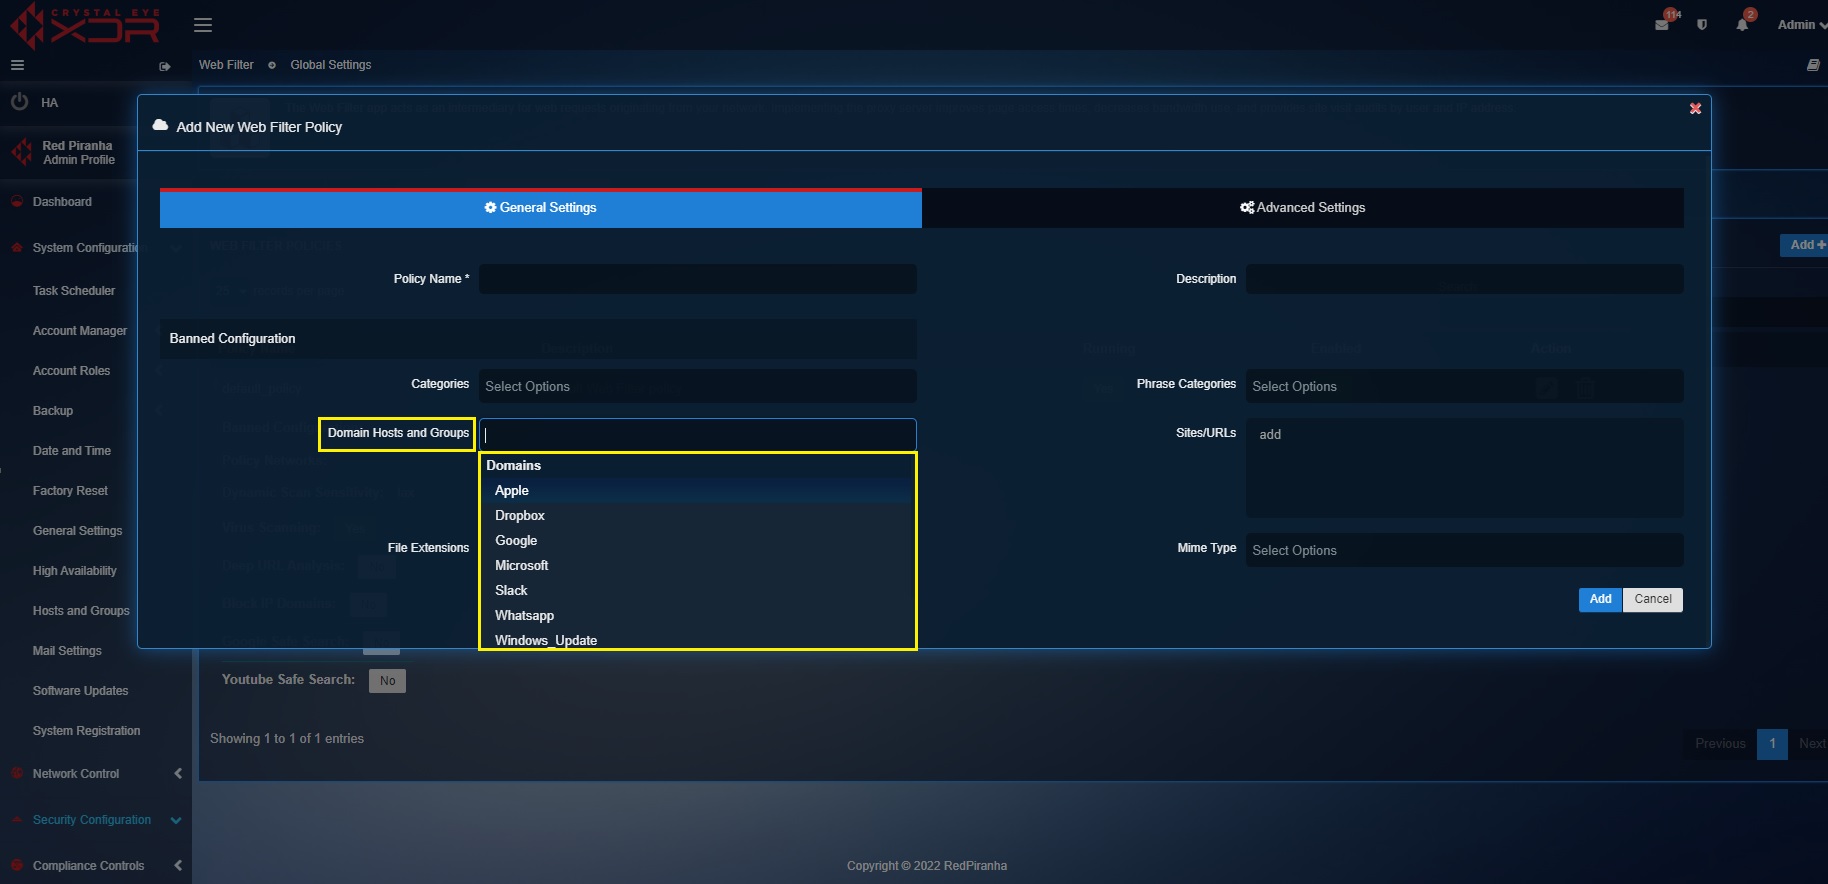
Step 5: Select the Domain Groups that have been created using the Host & Groups application. Click here to know how to create Domain Groups in the Host & Groups application.
Note
Enable SSL Inspection if you want to ban https websites added to the domain group in the Hosts & Groups application. The Web Filter App will block only http websites as a default feature since SSL Inspection is disabled by default. However, if you want to ban https websites mentioned in the Domain Groups created in the Hosts & Groups App, enable SSL Inspection, and import the security certificate to the browsers of all the devices connected to the CE XDR network. Refer Stage 4 Configurations – Create Web Filter Profile to know how to enable SSL inspection and import the Crystal Eye XDR security certificate to the browser.
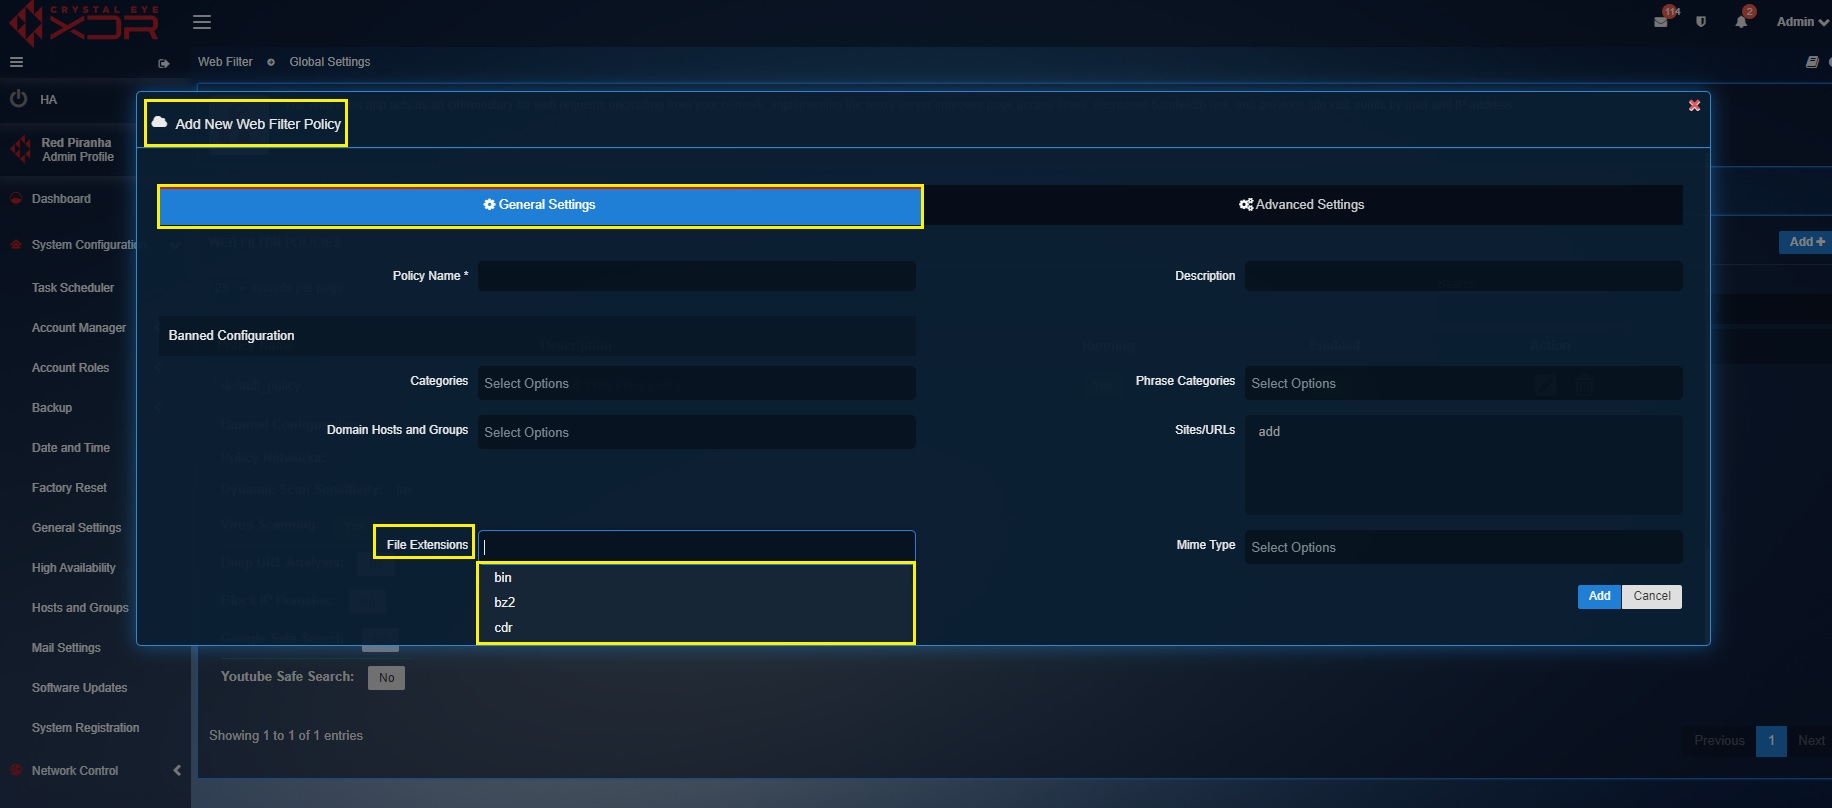
Step 6: Select the file extensions that you intend to block in the CE XDR network from the File Extensions dropdown.
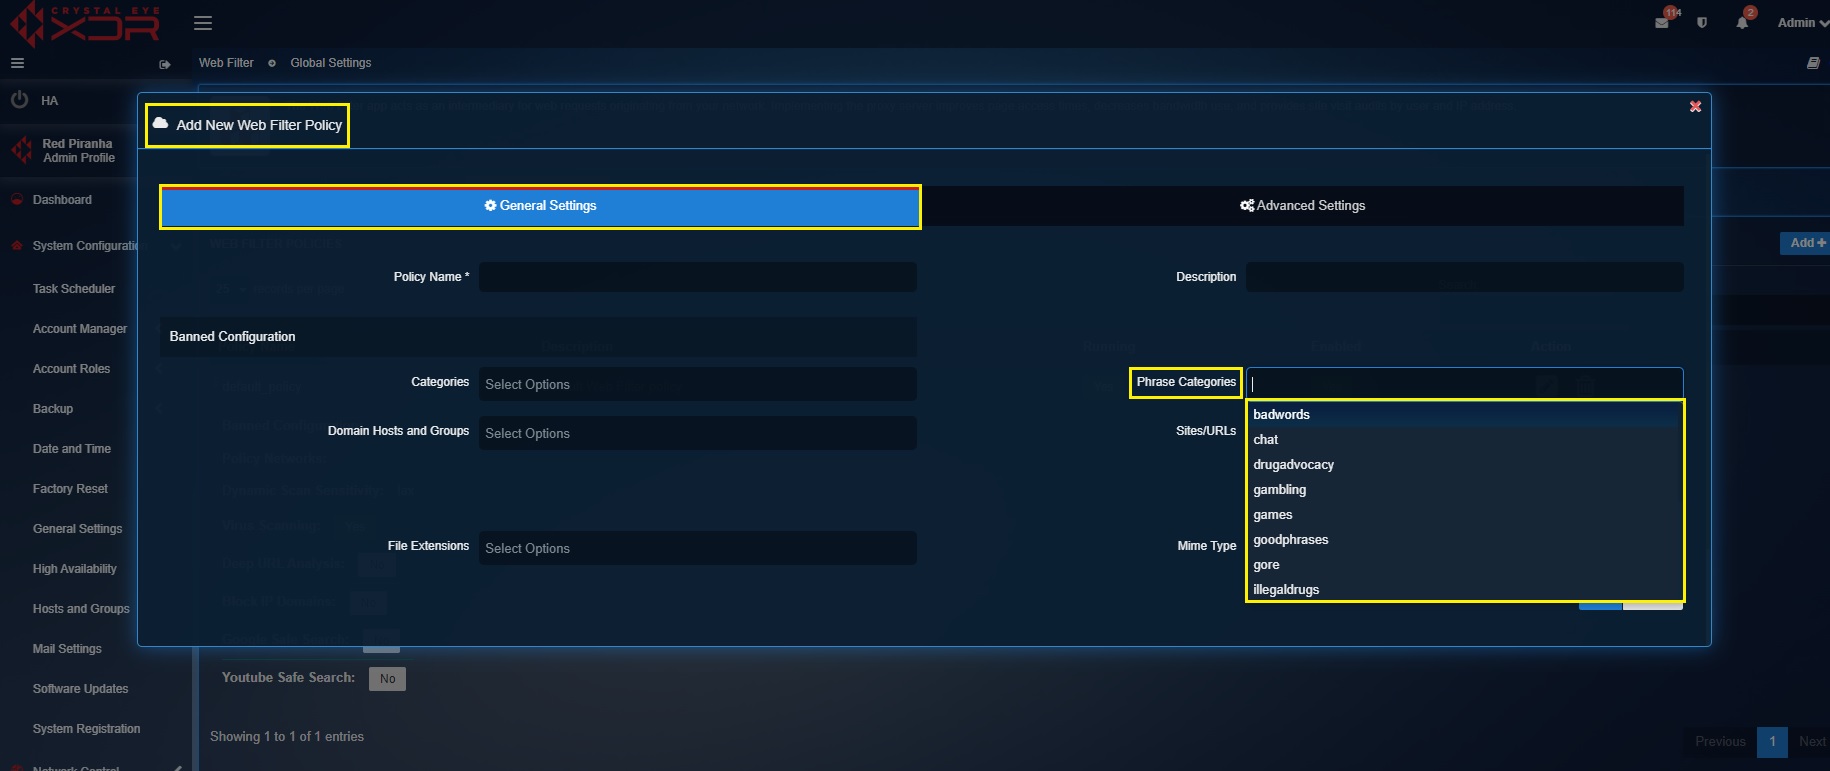
Step 7: Select the Phrase Categories that needs to be banned from the dropdown.
Note
There are a set of Phrase List categories that can be selected to filter relevant browsing content. Once this feature is activated, the Crystal Eye XDR would scan the browsing content for the selected phrase list based on the sensitivity levels opted in the Dynamic Scan Sensitivity dropdown in the Advanced Settings. The content filter application calculates a score for each web page based on the number of times a forbidden phrase is detected and then blocks the content accordingly.
Important
Enable SSL Inspection if you want to ban the selected phrases in https websites. The Web Filter App will block only http web pages as a default feature since SSL Inspection is disabled by default. However, if you want to ban https websites mentioned in the Domain Groups created in the Hosts & Group App, enable SSL Inspection, and import the security certificate to the browsers of all the devices connected to the CE XDR network. Refer Stage 4 Configurations – Create Web Filter Profile to know how to enable SSL inspection and import the Crystal Eye XDR security certificate to the browser.
Step 8: Enter the URL of the sites that needs to be blocked in the text box.
Note
Enable SSL Inspection if you want to ban HTTPS websites. The Web Filter App will block only http websites as a default feature since the SSL Inspection feature is disabled by default. However, if you want to ban https websites, enable SSL Inspection, and import the security certificate to the browsers of all the devices connected to the CE XDR network. Refer Stage 4 Configurations – Create Web Filter Profile to know how to enable SSL inspection and import the Crystal Eye XDR security certificate to the browser.
Step 9: Select the MIME Type as required and click the Add button.
Note
MIME Types are used by browsers to recognise and display the contents of a file. Crystal Eye XDR’s content filter application rigorously scans MIME Types as they play an important role in providing instructions to the browser to use certain applications to display content. However, there could be instances when the applications itself are vulnerable to security exploits turning out to be a soft target for attackers resulting to compromised computers. Taking this into consideration certain MIME Types can be banned by the administrator which results to a blanket block of files containing those MIME Types. This promotes a robust security stance securing the network infrastructure.
Stage 4 Configurations – Create Web Filter Profile
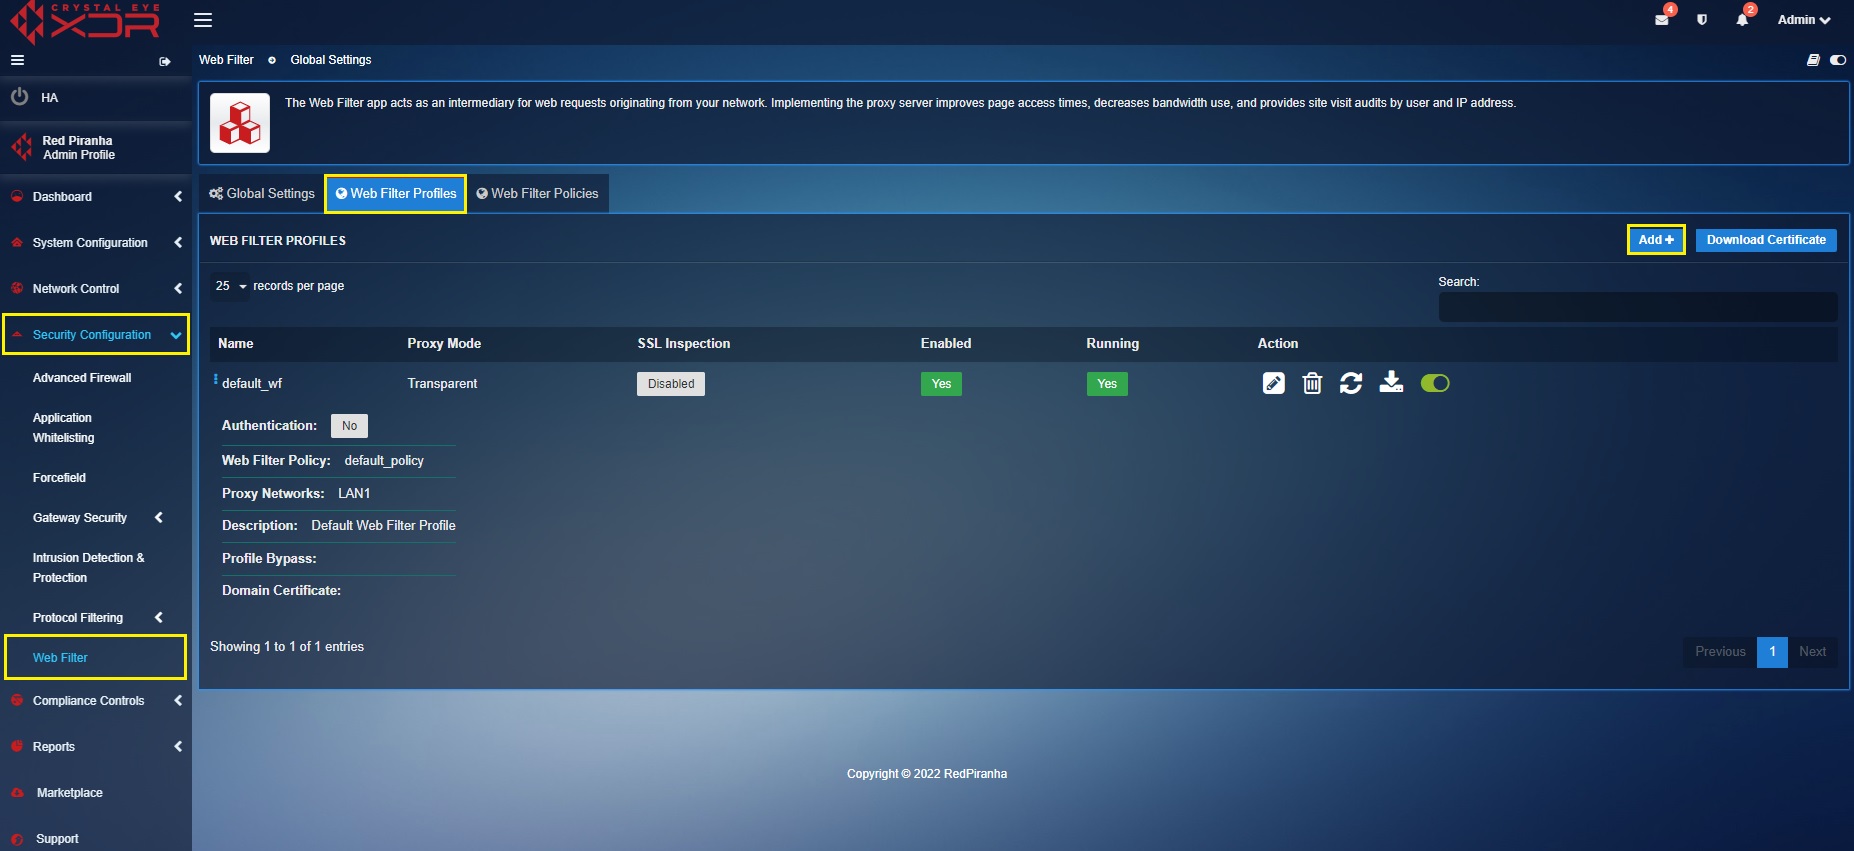
The Web Filter Profile feature leverages CE XDR administrators to create a set of profiles and then assign it to multiple firewall traffic rules using the Advanced Firewall application. The CE XDR’s Web Filter Application comes with a default web filter profile aligned with a default web filter policy. These default configurations can be customised, or a new custom profile can be created with a custom policy assigned to it.
The following web filter profile feature configurations can be activated/deactivated while creating the custom profile:
- Proxy Mode (Transparent/Explicit Mode)
- SSL Inspection
- Authentication-based web filtering
- Profile Bypass Settings—Hosts & Groups
- Profile Bypass Settings—Domains
- Profile Bypass Settings—Client Device (MAC Address)
- Profile Bypass Settings—Networks
- Allow/Block Server Verification Error
How to create a custom Web Filter Profile and align it to a firewall traffic rule?
Step 1: Click the Add button on the top right-corner of the Web Filter Profiles section.
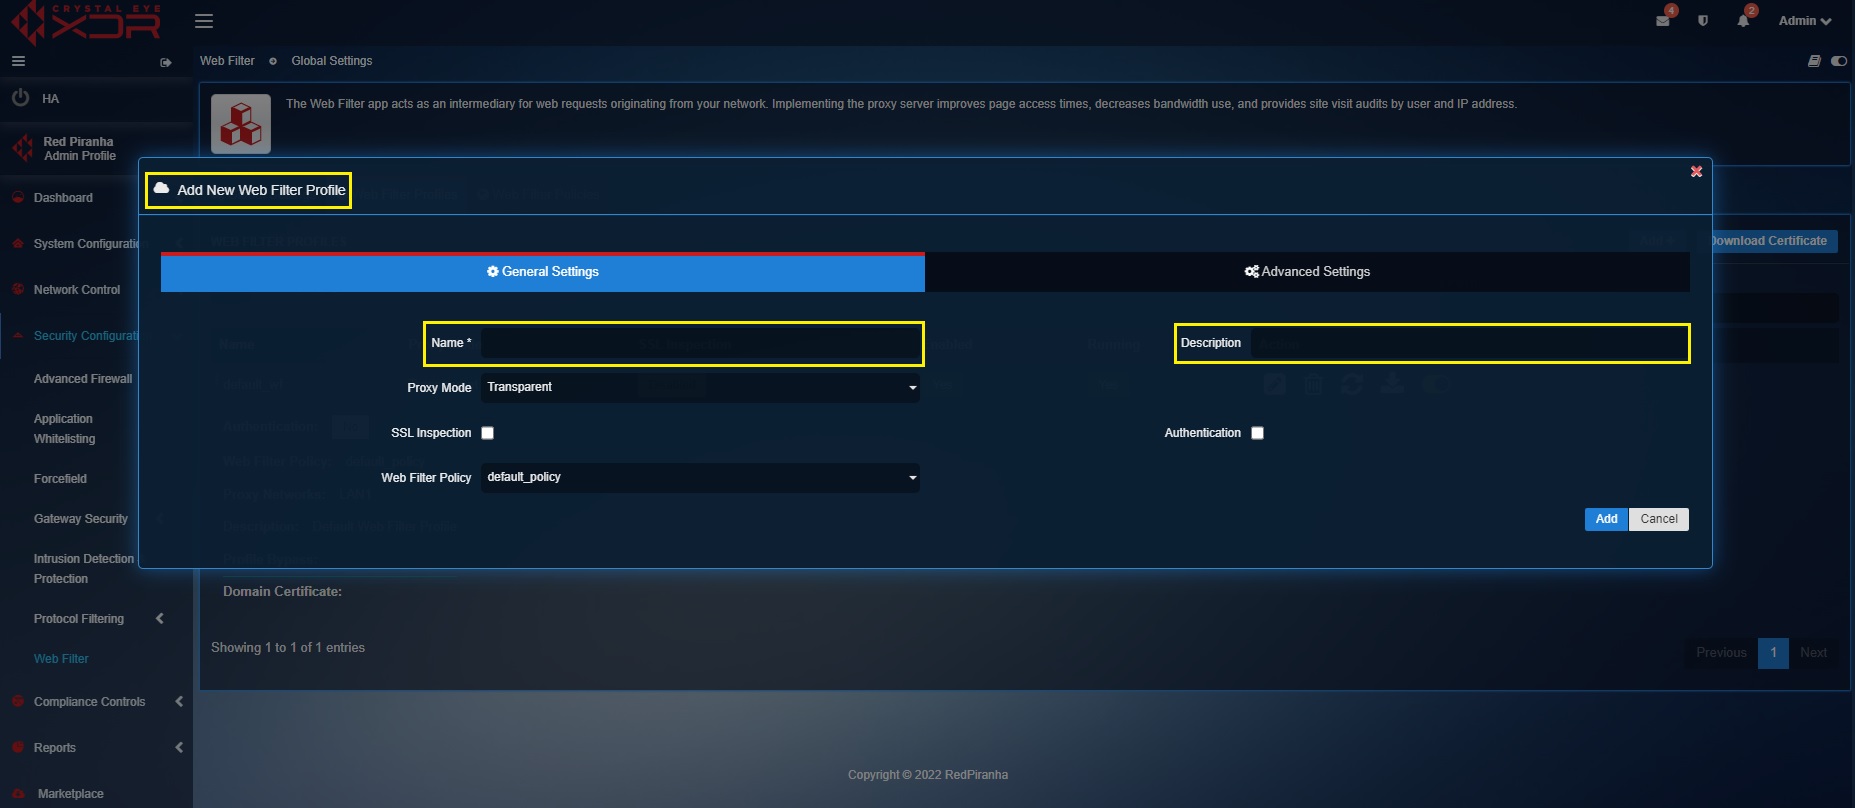
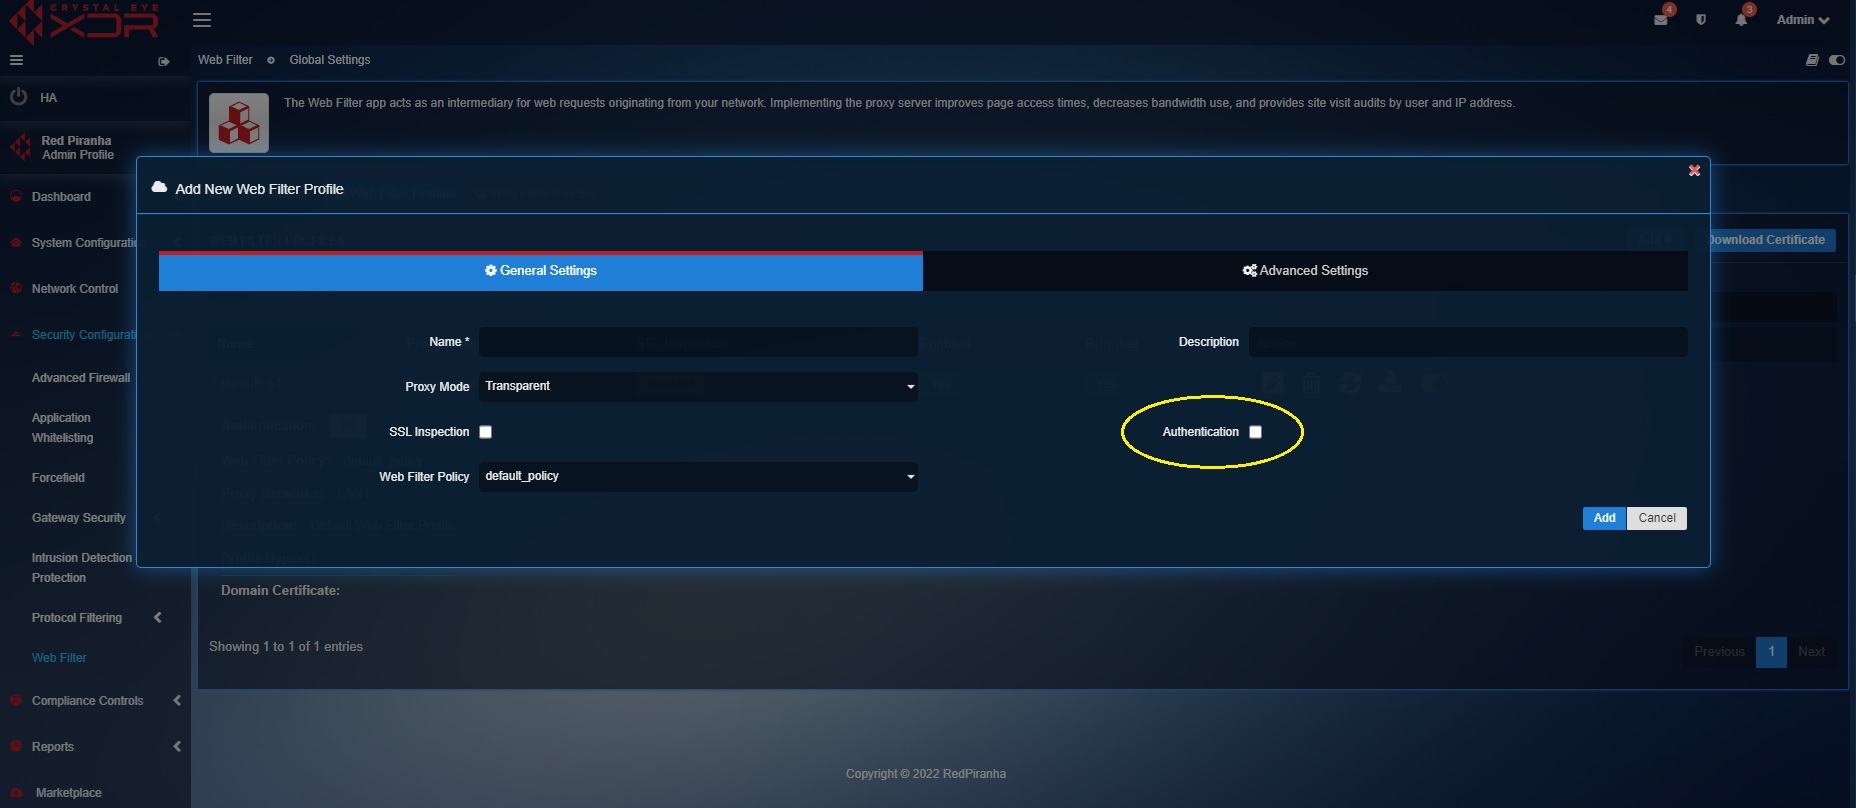
Step 2: You will see the Add New Web Filter Profile pop-up. Enter the Name and the Description of the profile in the textbox.
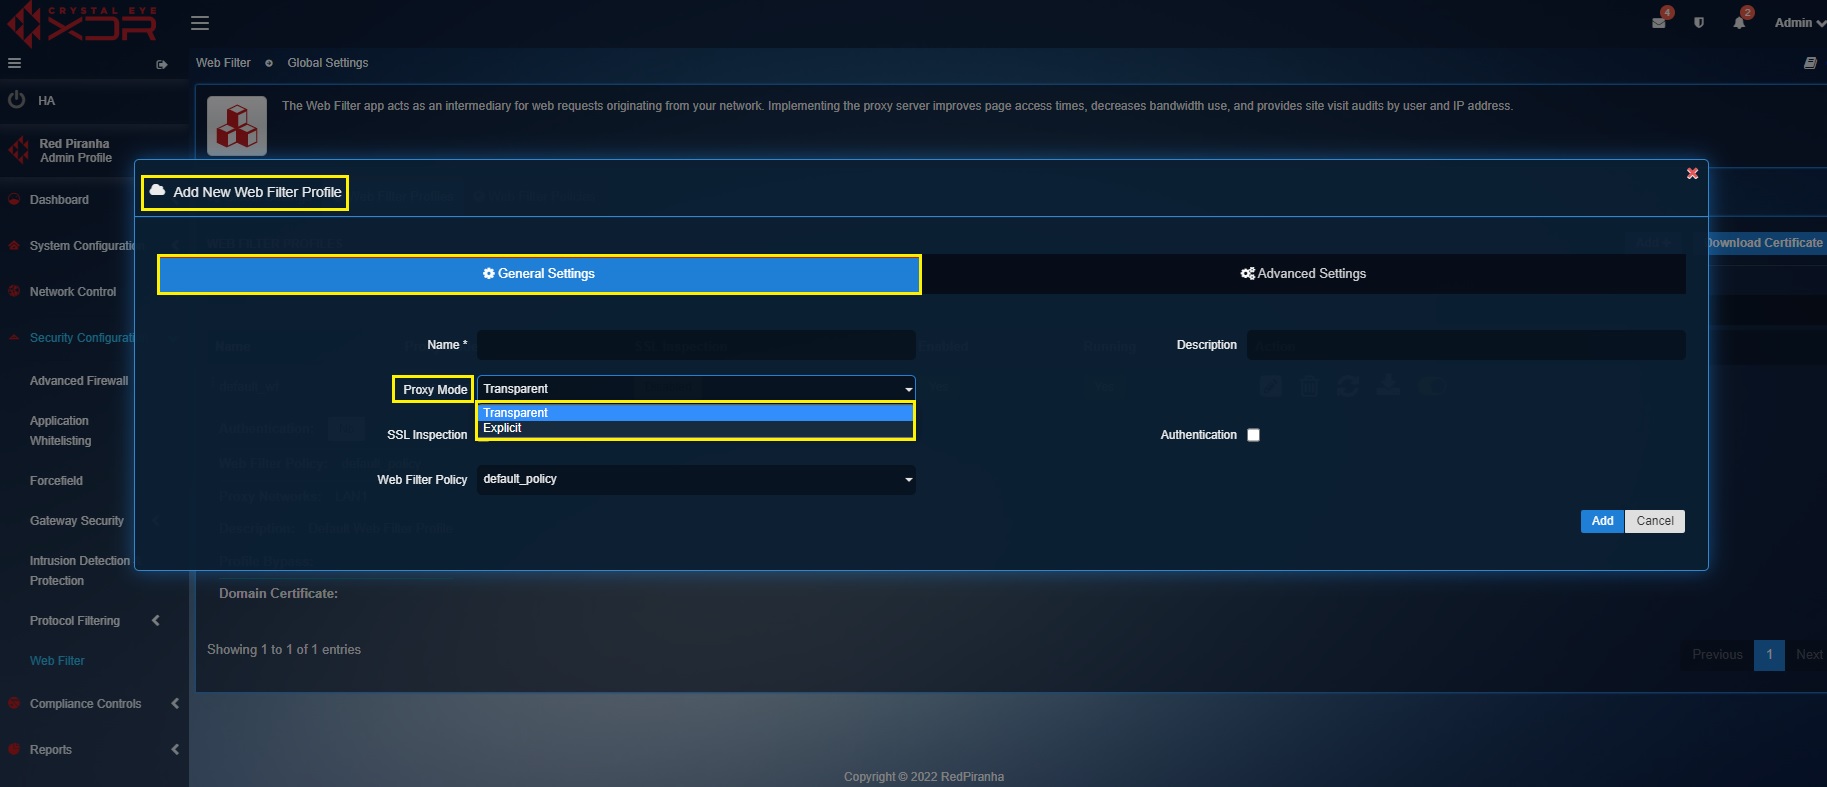
Step 3: Select the Proxy Mode (Transparent Mode or Explicit Mode).
About Explicit Mode
The Explicit mode is designed to cater networking scenarios where authentication-based web filtering is required. The browser uses Crystal Eye XDR as a proxy server in this mode.
About Transparent Mode
In this mode, the web filter application ensures that the communication is agnostic and happens directly with the web server.
Step 4: SSL Inspection is disabled by default. However, if you want to enable it, check the tick box. The Web Filter application scans only HTTP traffic when SSL Inspection is disabled. However, the web filter app can be configured to scan HTTPS traffic by enabling SSL inspection.
Step 5: Select the Web Filter Policy from the dropdown. Click here to know how to create a Web Filter Policy.
Note
The custom web filter policy created under the ‘Web Filter Policies tab’ is displayed in the New Web Filter Profile pop-up under the Web Filter Policy dropdown. In the screenshot below the custom web filter policy (web_filter_test) is visible in the dropdown. 
Step 6: Check the Authentication tick box if there is a requirement to enable authentication-based web filtering in the Crystal Eye XDR network and then click the Add button. Username and credentials can be obtained by creating a user account. Click here to know how to create a user in the User Account application.
Note
The authentication-based web filtering works only in explicit mode. Upon activation of this feature the browser will prompt the user to feed in the user creds obtained while creating a user in the user application.
Enabling SSL Inspection in Crystal Eye XDR for HTTPS traffic scanning
To enable SSL Inspection, check the SSL Decryption tick box as mentioned in the step 4 above while creating the Web Filter Profile. Import the Crystal Eye XDR security certificate to your browser after you have created the Web Filter Profile. The CE XDR security certificate can be downloaded from the web filter profiles page of the Web Filter Application (see screenshot below). 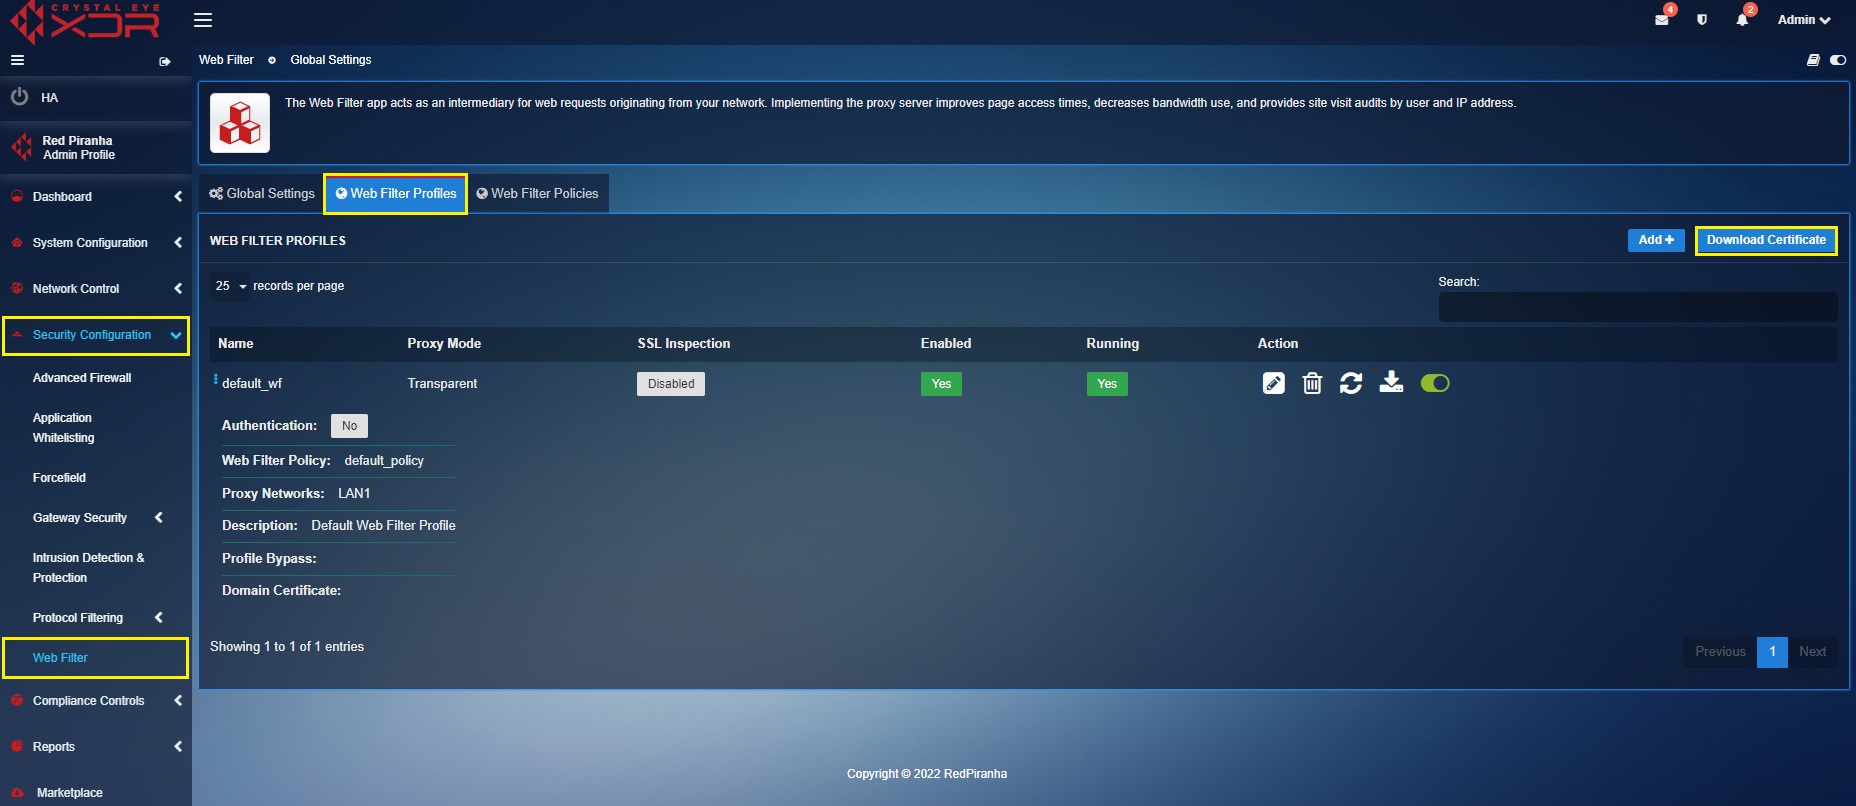
Importing CE XDR Security Certificate in Google Chrome
Follow the steps below to install CE certificate in Google Chrome:
Go to Settings > Privacy and security > Security > Manage Certificates > Intermidiate Certification Authorities > Click Import button and import the Crystal Eye XDR Security certificate 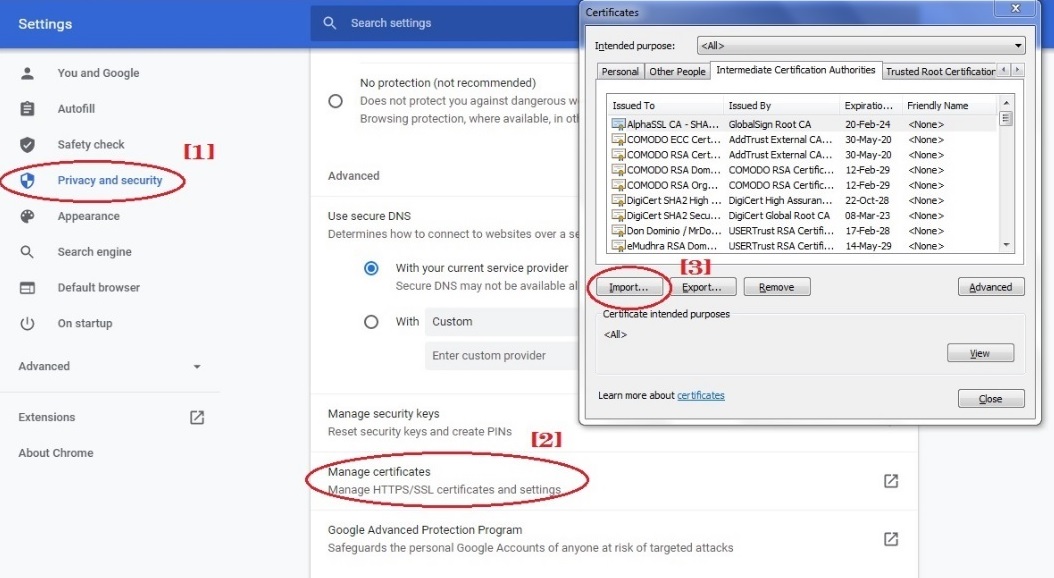
Note: Ensure that the browser is set up to automatically detect proxy settings. 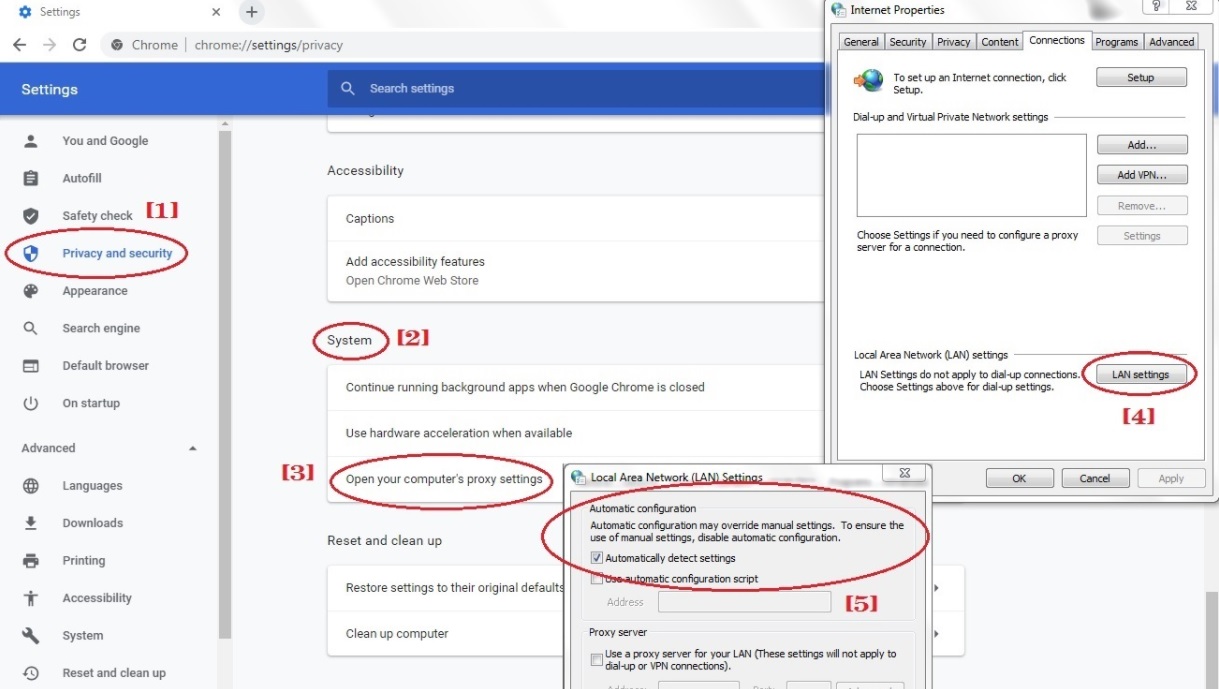
Importing CE XDR Security Certificate in Mozilla Firefox Browser
Follow the steps below to install Crystal Eye XDR security certificate in Mozilla Firefox:
Enter ‘about:preferences’ in the browser > Privacy and Security > Certificates > Certificates Manager > Authorities > Click Import button and import the Crystal Eye security certificate 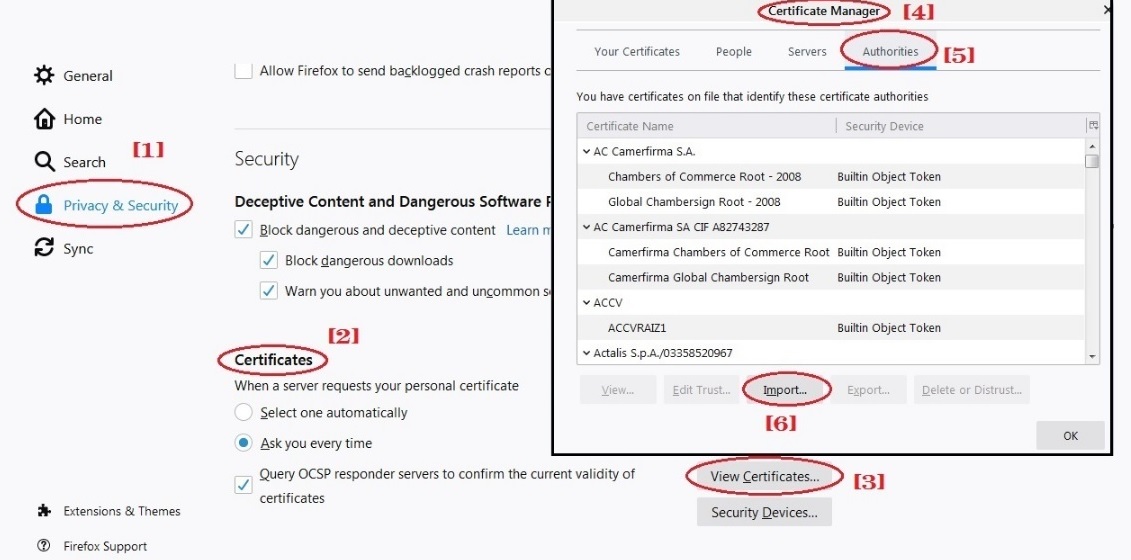
Note: Ensure that the browser is set to automatically detect proxy settings (Go to Network Settings > Select Auto-detect proxy settings for this network) 
Stage 5 Configurations – Assign the Web Filter Profile to a Traffic
Once the web filter profile is created with a web filter policy assigned to it, the next step is centered around having the profile assigned to the desired traffic. This involves creating a traffic rule using the advanced firewall application and then using the target feature of the rule component to assign the web filter rules to the traffic.
How to assign a web filter profile to a specific traffic using the traffic rules feature of the advanced firewall rule?
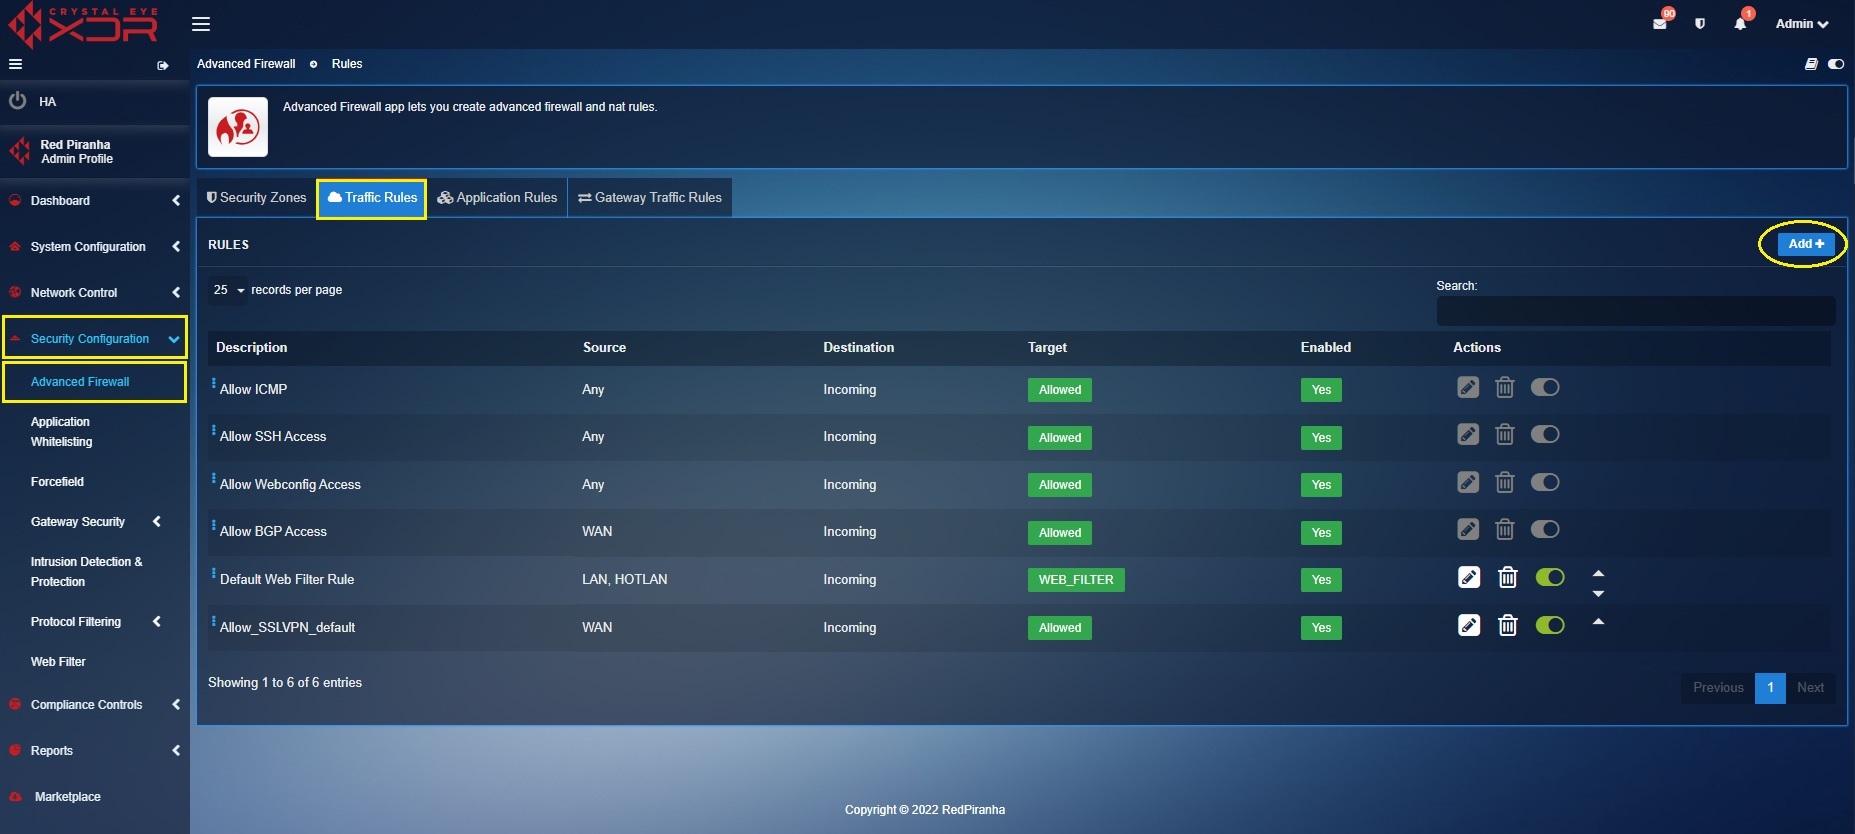
Step 1: Go to Security Configuration > Firewall application > Traffic Rules tab
Step 2: You will now see the Rules section. Click the Add button.
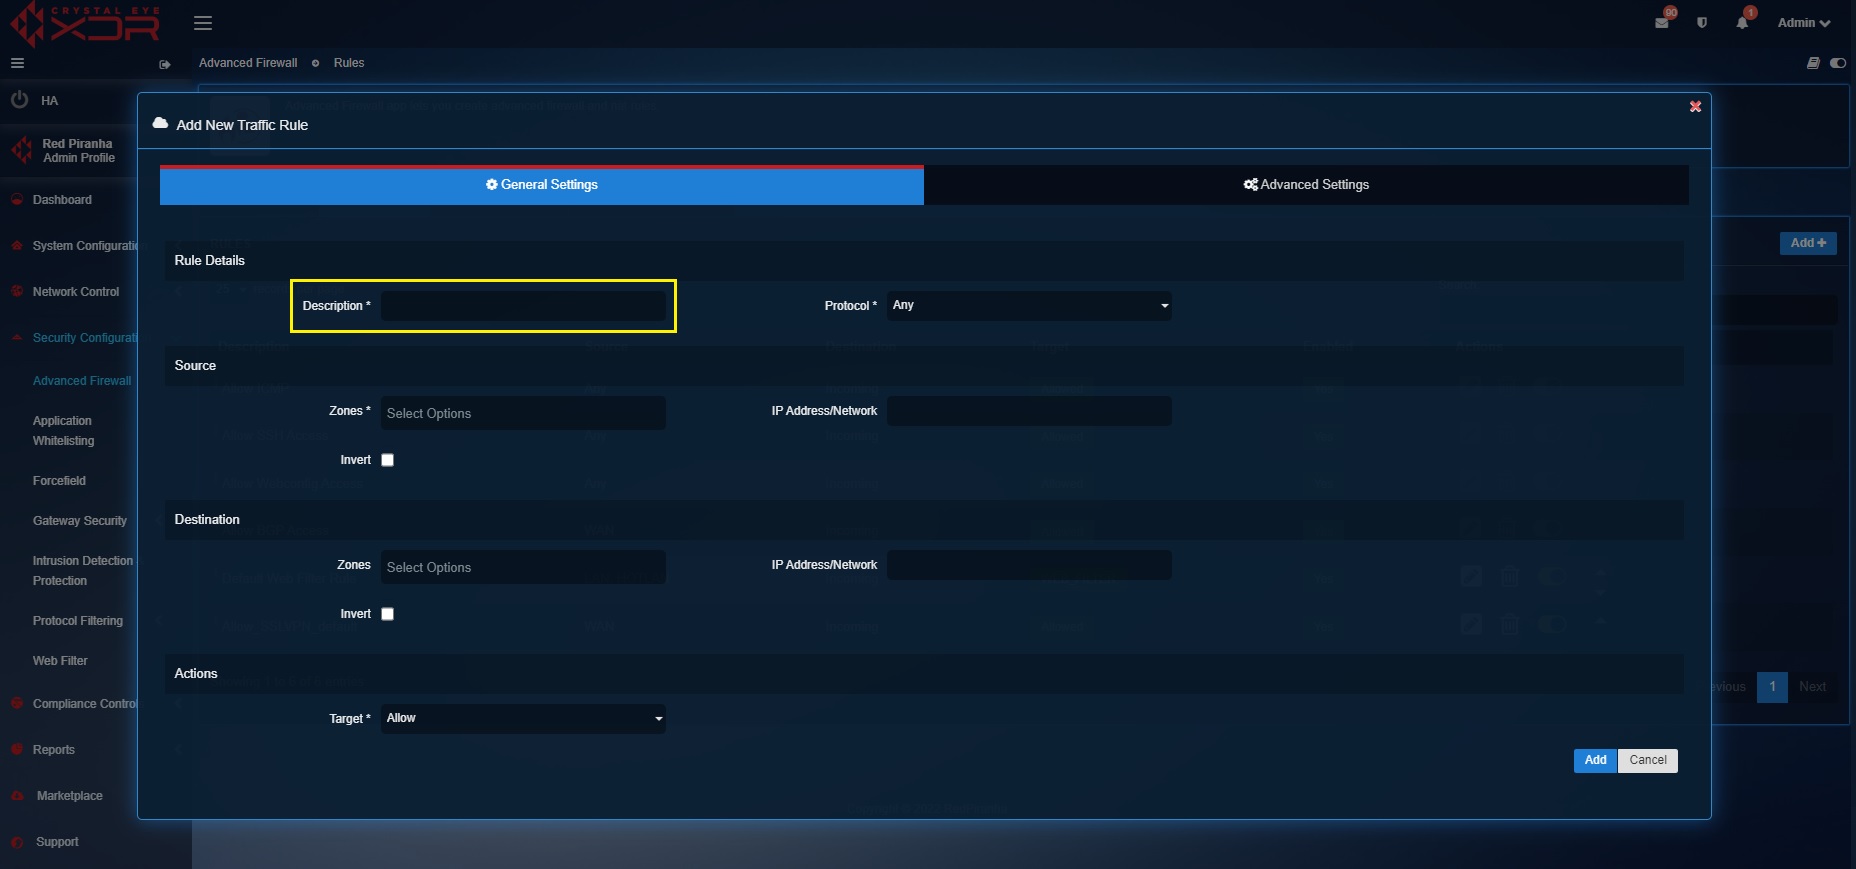
Step 3: Enter the description of the traffic rule.
Step 4: Select the Source Zone.
Note
The default security zones of (LAN, WAN, DMZ and HOTLAN) are listed in the Source Zone dropdown. You will also be able to view the custom security zones in the source zone dropdown. Click here to know more about default and custom security zones.
Important
Select the Outgoing Option in the Source Dropdown if you want to apply the web filter profile on all outgoing traffic.
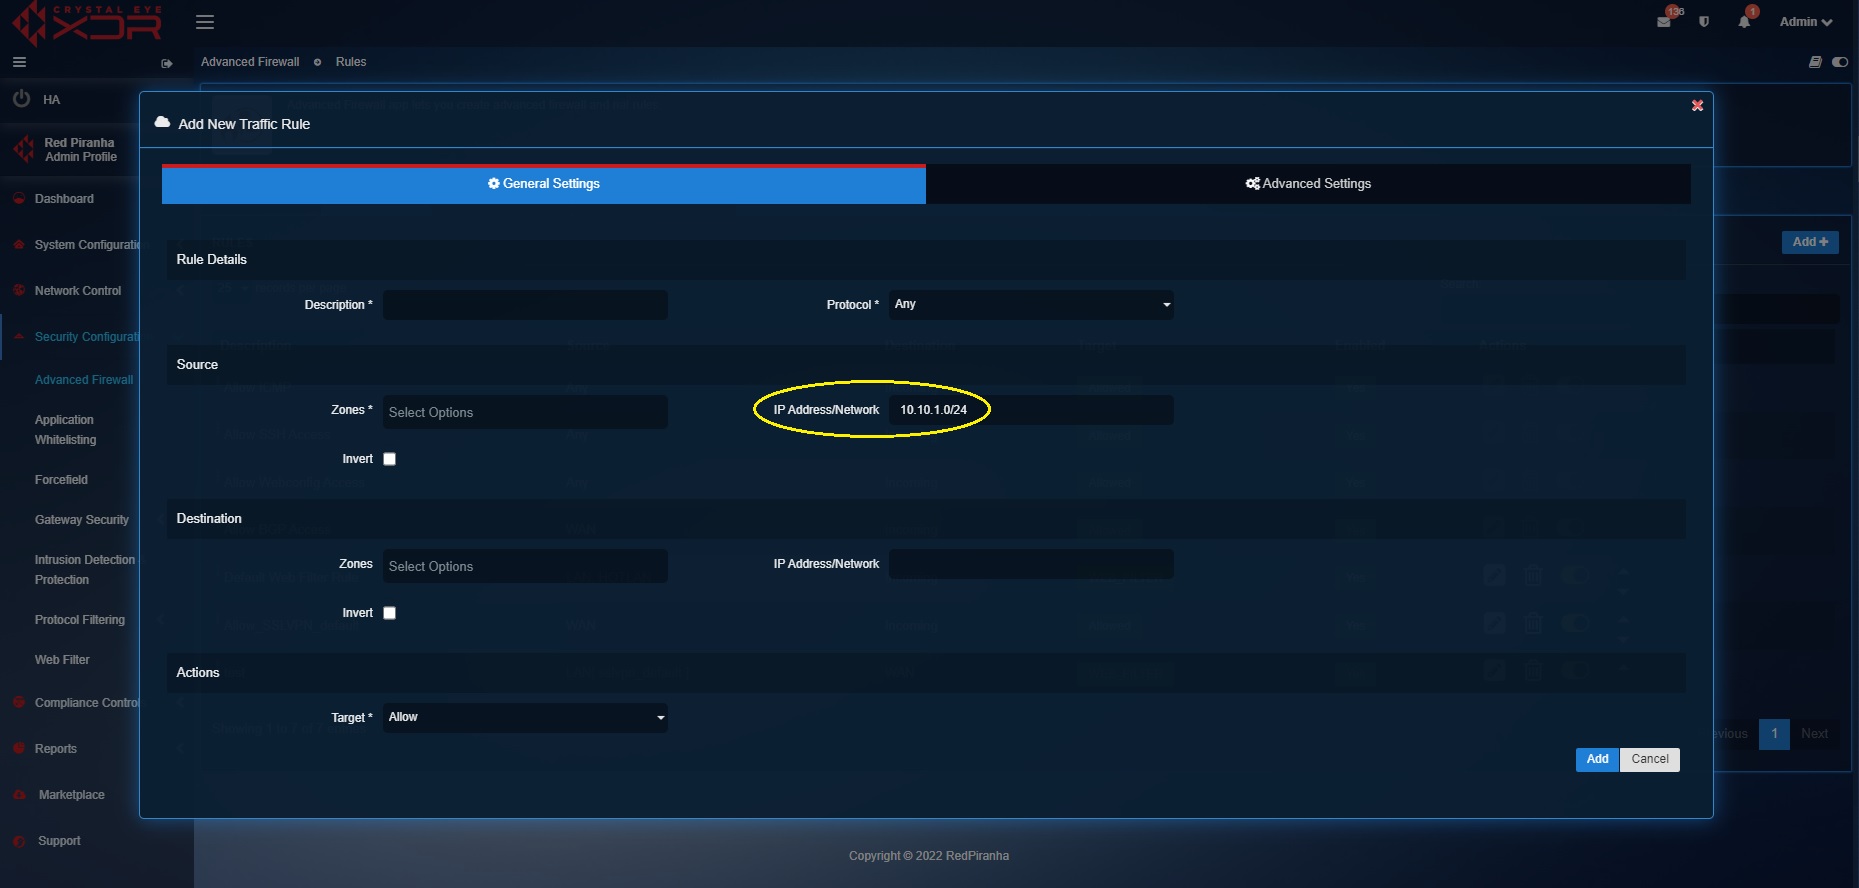
Step 5: Enter the IP address subnet of a network in the Input box in which the web filter rules are to be applied. This IP address of a host or a network must fall under the source zone selected in the previous step.
Note
The Hosts & Groups application can be used to create groups also known as ‘object’. You can create these objects and add a group of IP Hosts, IP Host Group, MAC Hosts, and MAC Hosts Group. These groups can be labelled with a relevant group name/object name which will be selectable in the dropdown of the input box. Click here to know more about the Hosts and Groups application.
Step 6: Select WAN from the Destination Zone.
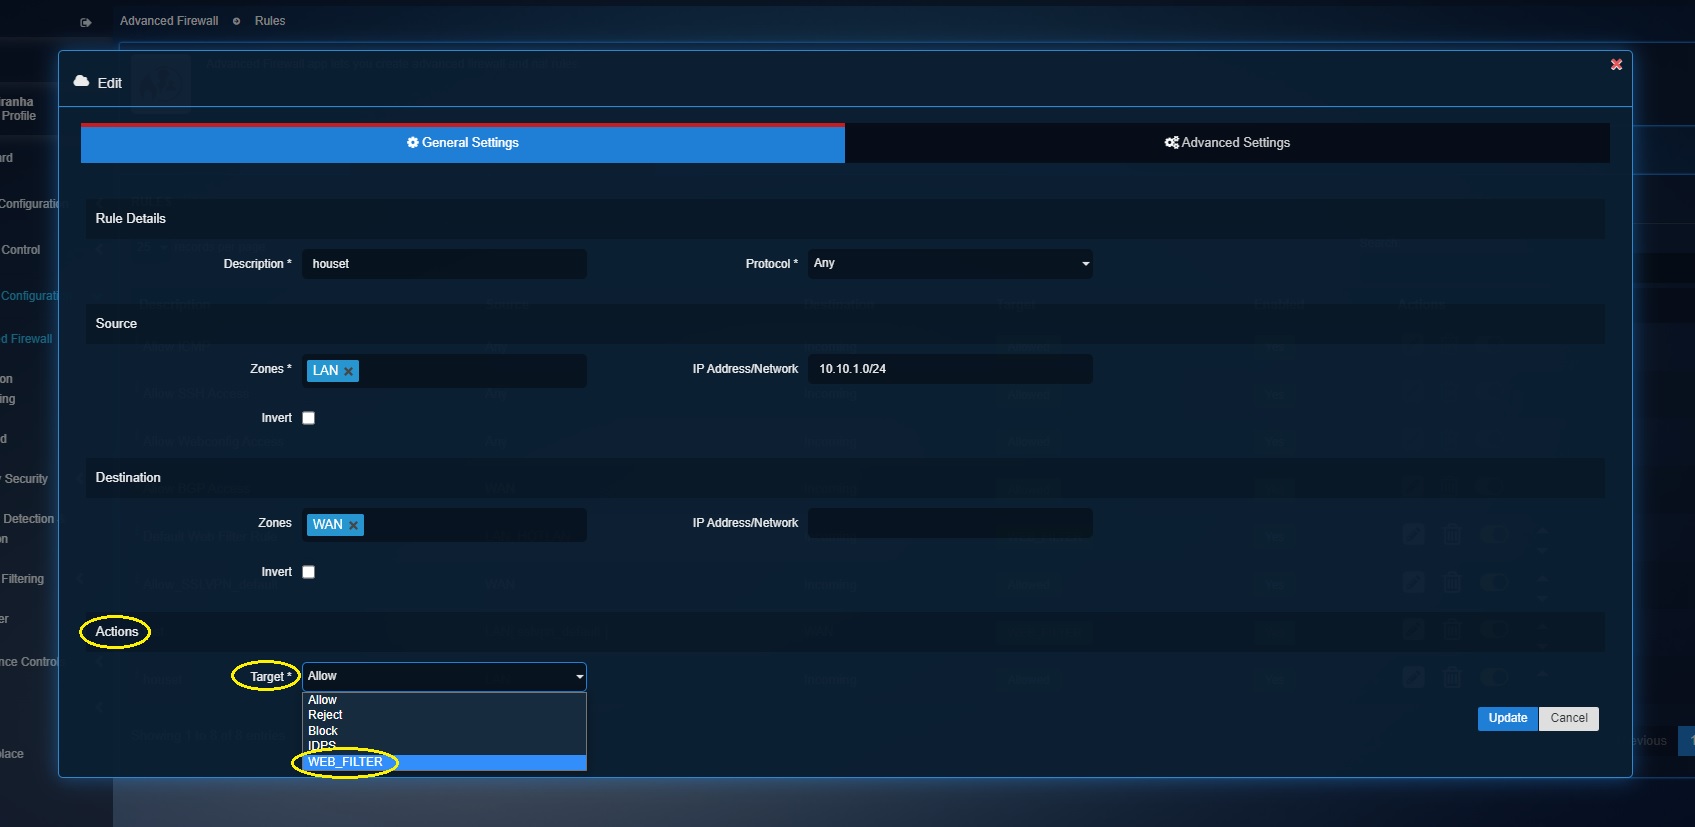
Step 7: Select Web Filter from the Target dropdown.
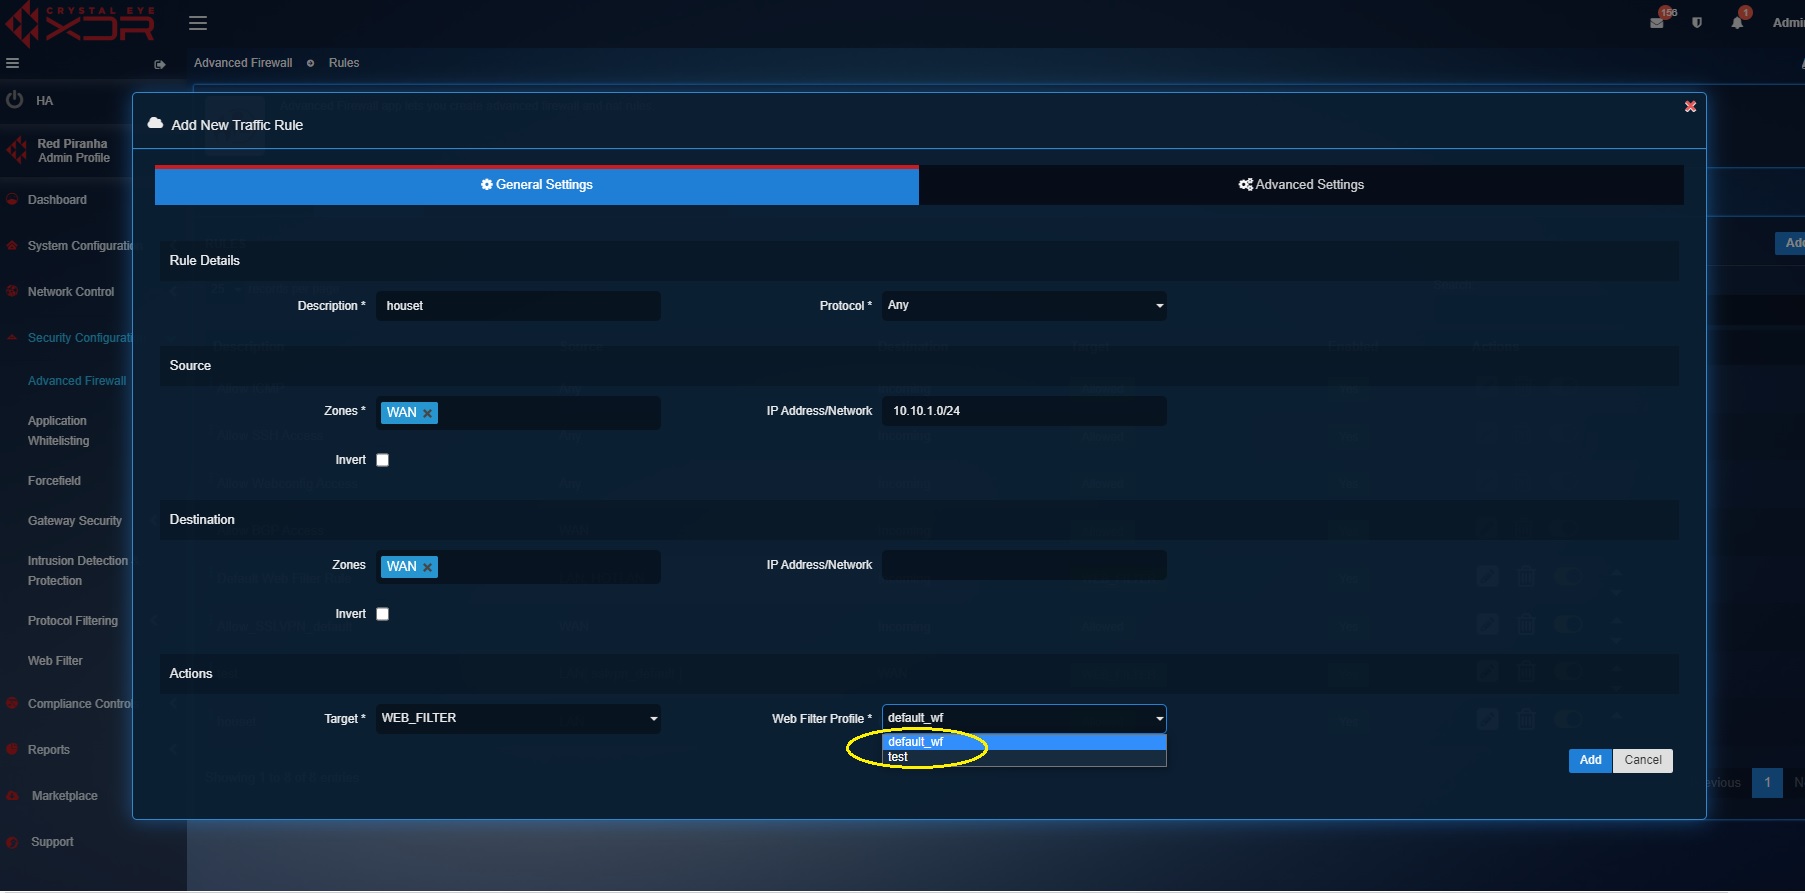
Step 8: You will now see the Web Filter Profile dropdown. Select the default web filter profile or a custom web filter profile and click the Add button.
Note
Know how to create a web filter profile here.

