DNS Server
Overview
The basic functionality of a DNS server is to map IP addresses with its hostname (or the reverse) and provide a caching DNS server for your local area network. Crystal Eye XDR’s DNS server acts as any modern DNS server and plays a vital role in not just ensuring user access to network resources but also provides phenomenal DNS features such as DNS sinkhole, Domain Forwarding, Ban Domains, and DNS Reports.
The DNS Server application’s core functionality is based on the concept of DNS client/server model where a DNS request sent by an end-client is resolved by the designated DNS server.
Note
The Crystal Eye XDR can be used as a DNS server to resolve DNS queries from the end-clients in the network or some other dedicated external DNS server can be deployed to act as a DNS resolver.
Gartner Peer Reviews
 Explore more Red Piranha Customer Reviews on Gartner Peer Insights
Installation
The DNS Server application is installed by default and can be accessed from the left-hand navigation panel.
Video Resources
Navigation to DNS Server application page
Network Control > Infrastructure > DNS Server 
Global DNS Configurations
This section allows CE XDR administrators to configure global DNS settings such as:
- DNS Passthrough: This feature caters to deployments where the Crystal Eye XDR is not required to intercept the DNS requests originating from end-clients and instead forward all the DNS requests to custom configured servers.
Note
View DNS Passthrough feature use cases in Crystal Eye XDR as the DNS Server for Static Clients & DHCP Clients (Default Feature), Assigning an External DNS Server for Static Clients and Assigning an External DNS Server for DHCP Clients.
-
RFC1918 Protection: RFC 1918 addresses are blocks of network IP addresses reserved for private use. As a default feature the CE XDR prevents RFC 1918 Traffic from exiting a WAN Interface.
-
Localise Queries to received interface: This feature is enabled by default. As a default feature the localise queries sends host entry replies that are local to the interface of the incoming request.
-
Domain Required: This feature is enabled by default. As a default feature a domain is always required for resolution. Plain names are not forwarded to upstream servers.
-
Filter Private: This feature is enabled by default. As a default feature when the Filter private feature is enabled it allows filter reverse address lookups for private IP addresses.
-
No negative cache: This feature is enabled by default. When the No Negative Cache box is checked it does not cache negative responses.
-
mDNS: This feature is a multicast DNS reflector for Bonjour. As a default feature it is disabled in the global DNS configurations. mDNS requests can be controlled by allowing /blocking traffic for port 5353 in the advanced firewall.
-
DNS Amplification Protection: This feature is disabled by default. As a default feature, the disabled DNS Amplification Protection feature ensures that the DNS requests are accepted only from the local subnets.
-
Max Concurrent Queries: By default, the max concurrent DNS requests are 1024
-
Cache Size: By default, the feature allows 1024 cached DNS responses.
-
All Servers: This feature is enabled by default. It ensures that the server locality and redundancy is handled. As a default feature, the DNS requests are sent to all servers instead of just a single server.
Crystal Eye XDR as the DNS Server for Static Clients & DHCP Clients (Default Feature)
As a default feature, the Crystal Eye XDR acts as a DNS server for all static & DHCP clients in the network.
Note
As a default configuration, all Crystal Eye XDR DNS features such as DNS sinkhole, Domain Forwarding, Ban Domains, and DNS Reports are enabled in the DNS Server application user interface when DNS passthrough is disabled.
Assigning an External DNS Server for Static Clients
There are provisions to deploy an external DNS server to resolve all DNS requests originating from static clients in the Crystal Eye XDR network. This can be done by enabling DNS passthrough, manually configuring DNS settings in the end-clients and by assigning static IP address for the end-clients).
Note
All Crystal Eye XDR DNS features such as DNS sinkhole, Domain Forwarding, Ban Domains, and DNS Reports are disabled in the DNS Server application user interface if an external DNS server is configured for all DNS requests originating from static clients in the CE XDR network.
Let’s learn how the DNS passthrough feature can be used in the following use case:
An external DNS Server is assigned to resolve all DNS queries originating from Static clients in the Crystal Eye XDR network.

How to Add a custom external DNS Server to resolve DNS queries from end-client devices having static IP addresses in the CE XDR network?
Step 1: Go to Network Control > Infrastructure > DNS Server

Step 2: Click the Edit button in the Global DNS Configurations section.

Step 3: Now check the DNS Passthrough Tick Box and click the Update button.

Note
Once DNS Passthrough is enabled, ensure that the end-clients have been configured to have a static IP address manually and the DNS server IP address 8.8.8.8 is updated.
Important
All Crystal Eye XDR DNS features can be availed while the DNS passthrough feature is enabled for all DHCP clients if the default upstream servers are not changed. The diagram below shows that while the DNS requests originating from static clients have been directed to the external DNS server with the IP 8.8.8.8, the DNS requests originating from the DHCP clients are directed to the default DNS servers ensuring availability of all DNS features.

Assigning an External DNS Server for DHCP Clients
There are provisions to deploy an external DNS server to resolve all DNS requests originating from DHCP clients in the Crystal Eye XDR network. This can be done by enabling DNS passthrough and entering the IP address of the external DNS server in the Upstream DNS Servers Text box.
Note
All Crystal Eye XDR DNS features such as DNS sinkhole, Domain Forwarding, Ban Domains, and DNS Reports are disabled in the DNS Server application user interface if an external DNS server is configured for all DNS requests originating from DHCP clients in the CE XDR network.
Let’s learn how the DNS passthrough feature can be used in the following use case:
An external DNS Server is assigned to resolve all DNS queries originating from DHCP clients in the Crystal Eye XDR network.

How to Add a custom external DNS Server to resolve DNS queries from DHCP end-client devices in the CE XDR network?
Step 1: Go to Network Control > Infrastructure > DNS Server

Step 2: Click the Edit button in the Global DNS Configurations section.

Step 3: Now check the DNS Passthrough Tick Box, delete the existing upstream DNS servers configuration, enter the IP address of the external DNS server i.e 8.8.8.8 and click the Update button.

Associate IP Address to its Hostname (Host Entries)
There might be instances when there is a requirement to create a custom DNS mapping in the internal network. This functionality helps CE XDR administrators to ensure users reach a server with the help of its assigned domain name/host name. The Host Entries feature of the CE XDR can be used to perform the DNS mapping in the internal network.
Let’s understand the core functionality of the Host Entries feature of the DNS application with the help of the following scenario:
Scenario: ABS Pvt Ltd. has a web server placed in its premises in the LAN Zone behind the Crystal Eye XDR with its private IP address as 10.1.1.2 and its public address is 51.1.1.11. The public URL of the website is www.exampleabs.com which can be accessed by users from the WAN side. It has been observed that the devices of the marketing team of the company placed behind the CE XDR aren’t able to access the website causing hindrances in their daily work. The company’s infrastructure team considers this as a major issue and works out a plan to deal with it.
Solution: The CE XDR administrator would have to create a host entry in the DNS application to point the internal IP address of the web server (10.1.1.2) with the public URL. This solution would ensure that the user devices belonging to the segregated network of the marketing team are able to access the internal web server with the public URL.
The following steps can be pursued to achieve the above:
How to add host entries in the DNS application?
Step 1: In the DNS application page, click the Host Entries tab and click the Add button in the gateway hosts file entries for domain resolution section.

Step 2: You will now be directed to the Add New Host section. Enter the public URL www.exampleabs.com (as discussed in the above scenario) in the Host Name text box.

Note
As discussed in the scenario above, www.exampleabs.com is the public URL of the website hosted in the web server in the LAN zone of the CE XDR network.
Step 3: Enter the private IP address of the web server in the IP address text box.

Step 4: Enter the Description in the text box and click the Add button.

DNS Zones
A DNS zone is used to host the DNS records for a particular domain. The DNS Zones feature of the Crystal Eye XDR is used to enforce DNS policies related to various commonly used record types. The record types can be setup for devices connected to a particular subnet of the CE XDR network.
The record types that can be set-up for a particular CE XDR network subnet are:
- A/AAAA Record
- TXT Record
- CNAME Record
- MX Record
- SRV Record
Note
A DNS zone is used to host the DNS records for a particular domain.
Let’s understand the concept of DNS Zones in the Crystal Eye XDR with the help of the following scenario.
We shall create a DNS Zone for the domain 'redpiranha.net' which would contain several DNS records, such as 'mail.redpiranha.net' (for a mail server) and 'www.redpiranha.net’ (for a web site). As per requirement we will ensure that these DNS record types are implemented for the subnet 10.10.3.1/24 used by the marketing team of the company.
How to create a DNS Zone for a subnet in the CE XDR?
Step 1: In the DNS Server application page, click the DNS Zones tab and click the Add button on the top-right corner of the Manage Authoritative Domains section.

Step 2: You will now see the Add New Zone section. In our scenario, we are creating a DNS Zone for the domain 'redpiranha.net' for the subnet 10.10.3.1/24. Enter the following in the designated textboxes on this page and click the Add button.
- Domain Name – redpiranha.net
- Subnet - 10.10.3.1/24
- Description – DNS zone for the marketing team

Step 3: You will now see the domain name redpiranha.net, subnet 10.10.3.1/24 in the Manage Authoritative Domains dashboard. Click the Globe icon.

Step 4: You will now see the option to Add New Zone Records. Click the Add New Zone Records button.

Note
You will now see the Add Zone Records section consisting various tabs for various record types such as A record, AAAA record, TXT record, CNAME record, MX record, and SRV record. 
In our scenario, we will add:
- MX records for the mail server mail.redpiranha.net with its server IP address as 10.10.3.2
- AAAA record for the website www.redpiranha.net and the web server IPV6 address.
Note
These record types will be entered and implemented only for the subnet 10.10.3.1/24
Step 5: Click on the MX records tab. Execute the following:
• Enter the MX Name as mail.redpiranha.net
• Enter the Destination as 10.10.3.2
• Enter the Priority as 10
• Enter the Description as mail server MX record
• Click the Add button

Note
You will see the MX records on the Domain Zone Records for redpiranha.net section.
We will now add Quad A record also known as AAAA record to point www.redpiranha.net to the IPv6 address of the web server.
Step 6: Now click the Add New Zone Record button. You will now see the AAAA record entry section. Enter the following:
* Host Name – www.redpiranha.net
* IPv6 - 2001:db8:3333:4444: 5555:6666:7777:8888
* Time To Live (TTL) – 3600
* Click the Add button

Note
Time to Live (TTL), measured in seconds, determines how long the record is cached in resolvers.
DNS Sinkhole in Crystal Eye XDR
DNS Sinkholing is a proactive defense mechanism that involves redirecting malicious or unwanted domain name system (DNS) traffic to a predefined location, often a "sinkhole." The term "DNS Sinkhole" refers to the process of capturing and containing harmful DNS queries before they reach their intended malicious destinations.
DNS Sinkholing has been incorporated into Crystal Eye XDR Solution which significantly enhances the network’s security posture and helps in staying one step ahead of cyber adversaries. This feature when used effectively, contributes to a robust defence against a wide range of cyber threats.
The DNS Sinkhole update server which updates the Crystal Eye XDR deployed worldwide with a comprehensive list of malicious domains that are active in the wild is updated by Red Piranha secops team and through other sources.

Banning Domains in Crystal Eye XDR
Prerequisites to be considered before manually banning domains in CE XDR:
As a default feature the Crystal Eye XDR bans only the desired malicious HTTP traffic as per the intended policies. However, if there is a requirement to ban malicious HTTPS traffic using automated DNS Sinkholing features of Crystal Eye XDR or the manual domain banning features then enable SSL Inspection in the relevant web filtering profile and then assign the profile to the internal web traffic.
Refer here to know how to enable SSL Inspection in Crystal Eye XDR:
Use Case 1: This use case explains how Top-Level Domains (TLD) and Sub-Level Domains (SLD) can be blocked using "*Wildcard Features".
Consider a scenario where you want to block all the subdomains of msn.com i.e banning of the TLD and SLD of msn.com
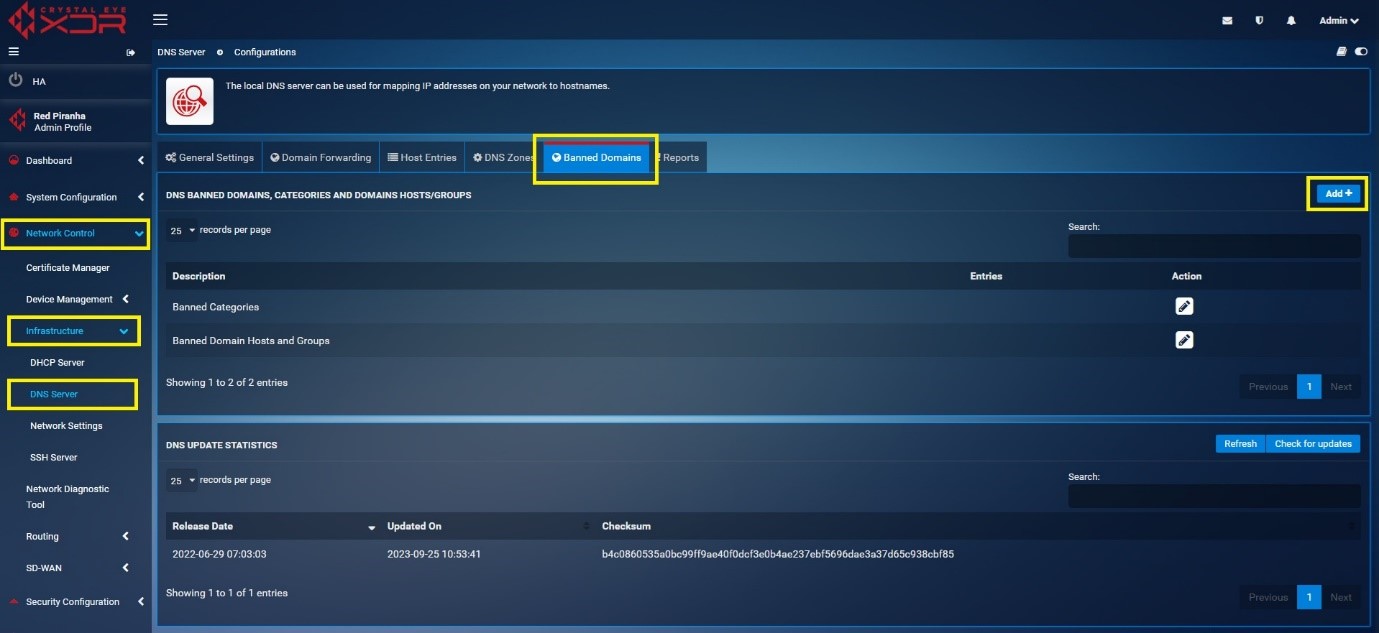
Step 1: Go to Network Control > Infrastructure > DNS Server > Banned Domains tab. Click Add button.
Step 2: You will now see the Add DNS Banned Domains page. As per our scenario we will block both TLD and SLD of the domain msn.com by entering .msn.com in the Domains textbox, mention its description as required and click Add button.

You will now see the entry visible in the user interface as mentioned in the screenshot below.

Use Case 2: This use case explains how selective domains can be blocked using the Banned Domain Hosts and Groups
Consider a scenario where you want to block a selective domain [shop.msn.com] from a set of sub level domains belonging to msn.com while whitelisting the other sub domains.
Note
One of the prerequisites of executing the steps of the above-mentioned use case is creating a host and group object under the Domain section of the host and group application. Refer here to know how a host and group object for a domain can be created.
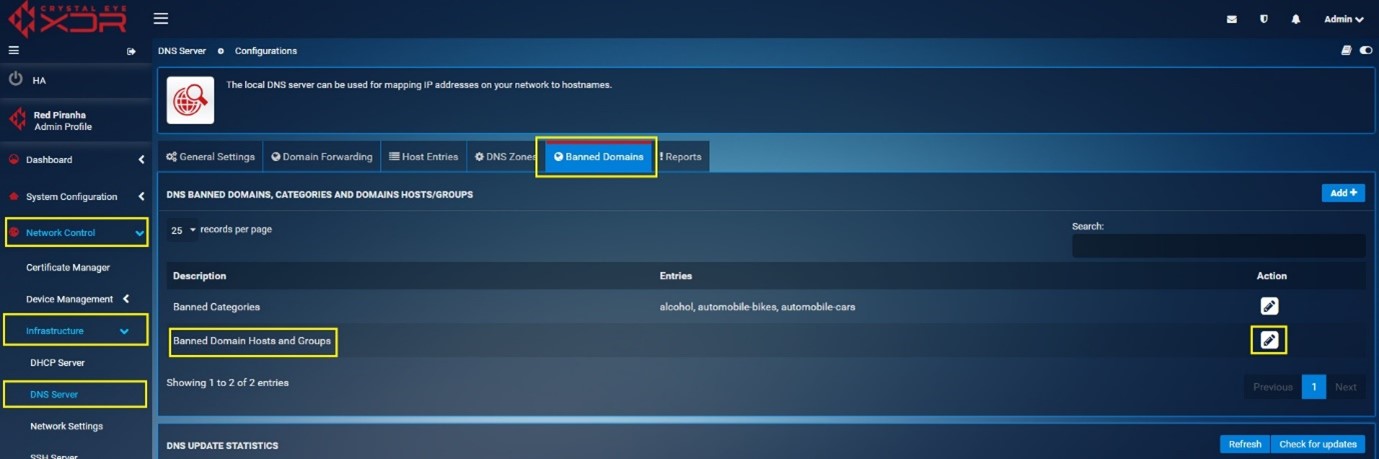
Step 1: Go to Network Control > Infrastructure > DNS Server > Banned Domains tab.
Click the Edit icon under the Actions Column Button next to Banned Domains Hosts and Groups.
You will see shop.msn.com and mention its description as required and click on Add Button.
Step 2: You will now see Banned Domain Hosts and group page. Select the relevant host and group object for the domain shop.msn.com (after creating the object as suggested in the prerequisite above) from the Domain Hosts and group dropdown menu and click Update button.

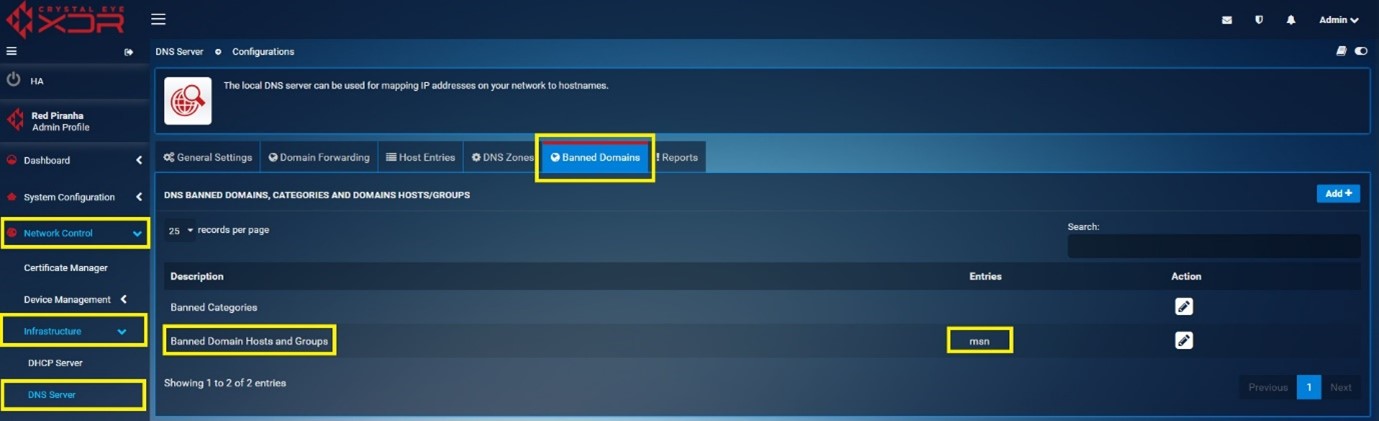
You will now see the entry visible in the user interface as mentioned in the screenshot below.
Use Case 3: This use case explains how the Banned Domain category feature of the crystal eye can be used to ban specific domain categories.
Consider a scenario where you want to block selective domain categories such as alcohol, automobile-bikes and automobile-cars.
Step 1: Go to Network Control > Infrastructure > DNS Server > Banned Domains tab.
Click the Edit icon under the Actions Column button next to Banned categories.
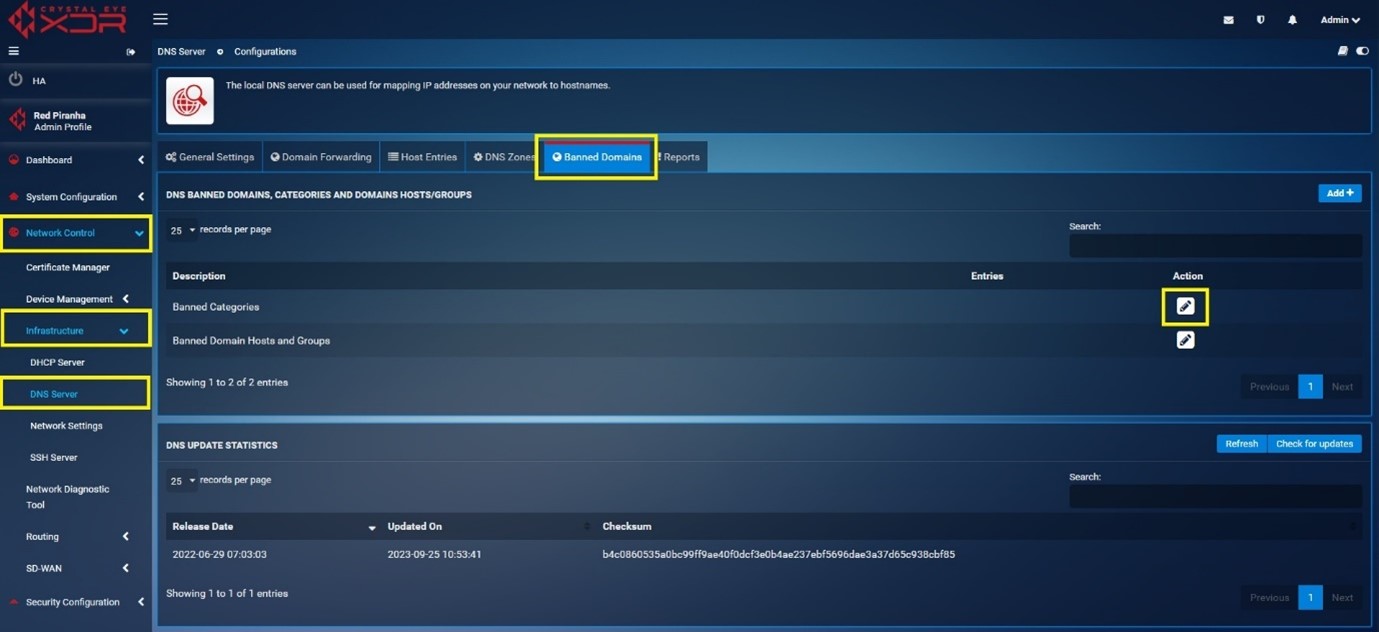
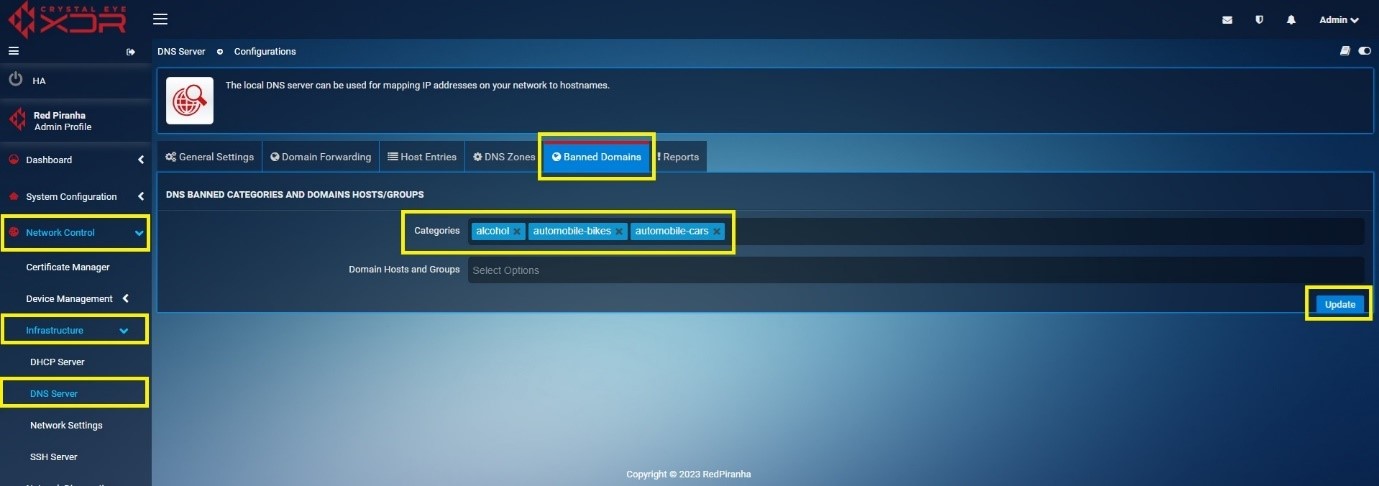
Step 2: You will now see DNS Banned categories and Domain Host/Groups page. Select the banned domains category from the Categories dropdown menu and click Update button. In our use case, we have selected Alcohol, automobile-bikes and automobile-cars.
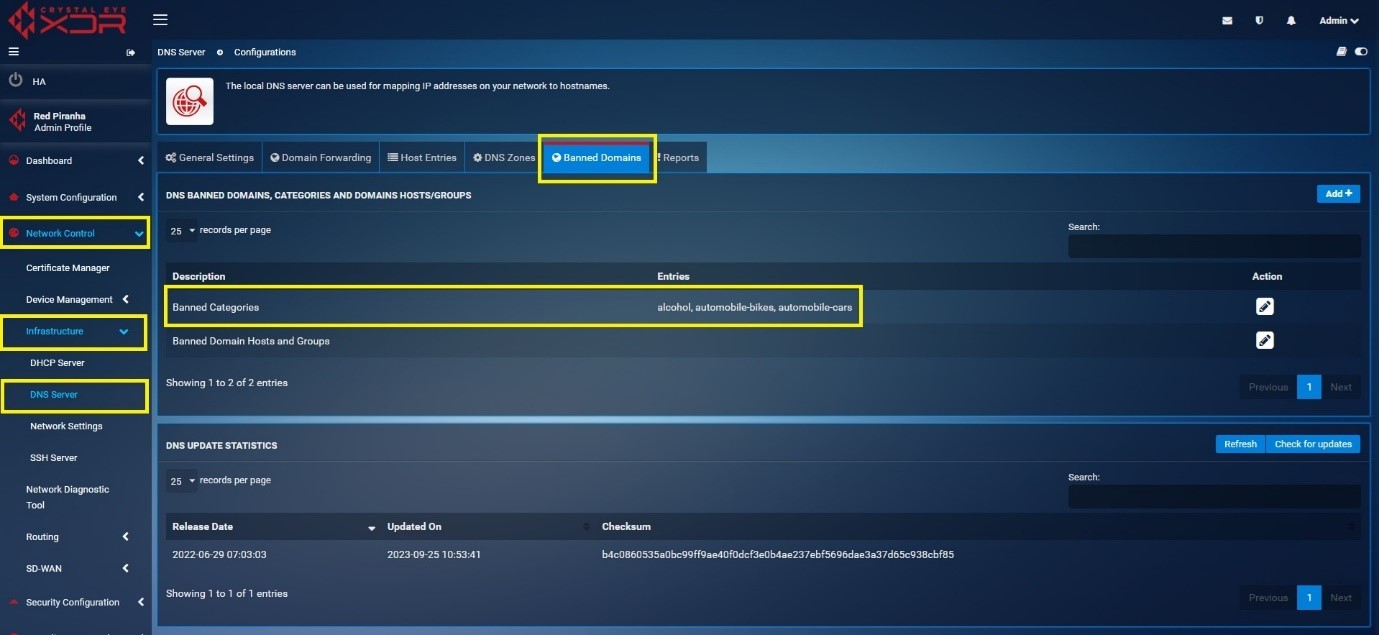
You will now see the entry visible in the user interface as mentioned in the screenshot below.
Manually Updating/Refreshing DNS Sinkhole Data in CE XDR
The malicious domain data i.e updated in DNS Sinkhole server of Red Piranha by the security operations team and various other sources can be fetched manually to update the Crystal Eye XDR at any given time.
To manually update/refresh DNS Sinkhole data in Crystal Eye XDR, click the refresh button in the DNS Update Statistics section.
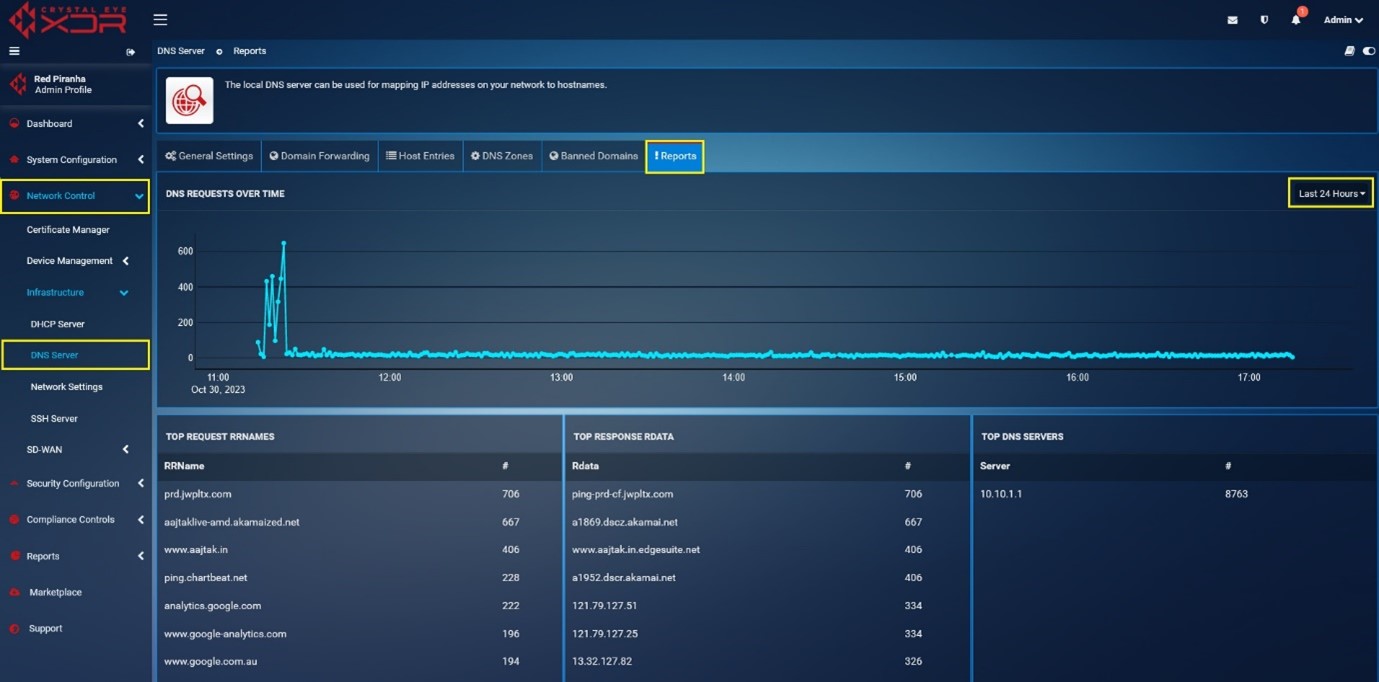
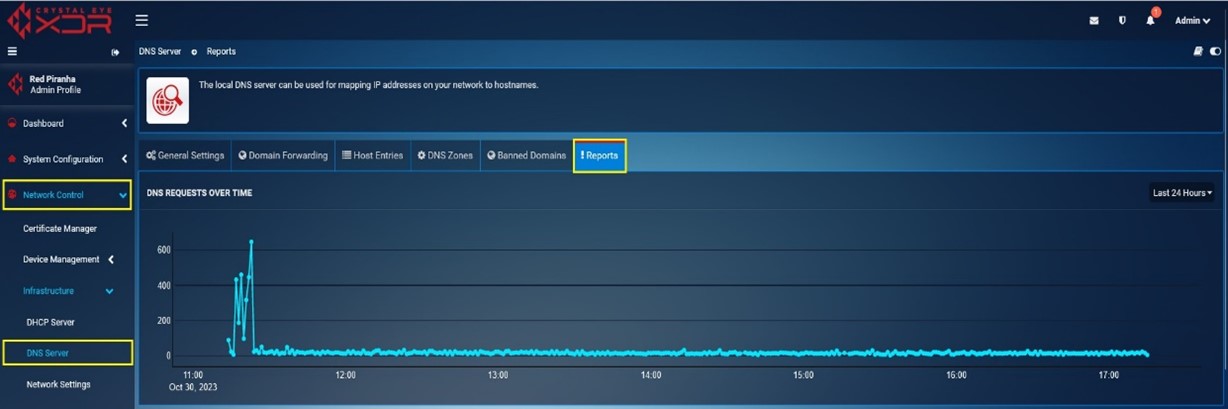
DNS Reports
DNS Reports can be viewed by navigating to Network Control > DNS Server > ! Reports as shown in the screenshot below. Reports Can be fetched as per the required period options [Last Hour to Last 30 Days] DNS Reports displays below mentioned Seven Services:
- DNS Requests Over Time
- Top Request RRNames
- Top Response RData
- Top DNS Servers
- Top Request Types
- Top Response Codes
-
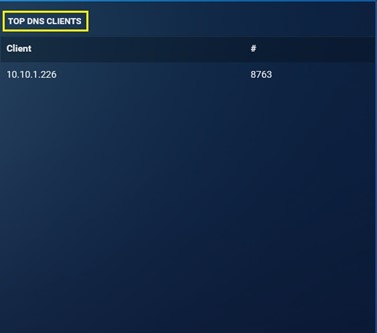
Top DNS Clients
-
DNS Requests Over Time: This graph displays the DNS Requests over a particular period of time. In the graph below, the highlighted point shows that there were more than 600 DNS Requests between 11:00 AM to 12:00 PM.
-
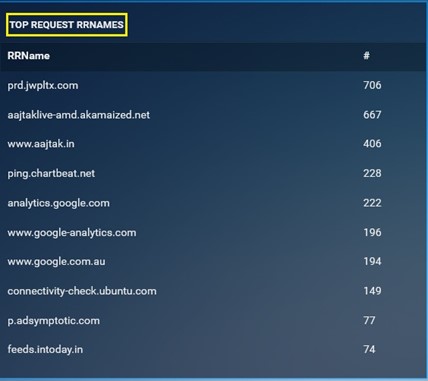
Top Request RRNames: It shows the top request RRNames that has been detected by the Crystal Eye XDR for the time period selected while downloading the report. This monitoring metric also consists of the total count of the top request RRNames.
-
Top Response RData: It shows the top Response RData that has been detected by the Crystal Eye XDR for the time period selected while downloading the report. This monitoring metric also consists of the total count of the top Response RData.

-
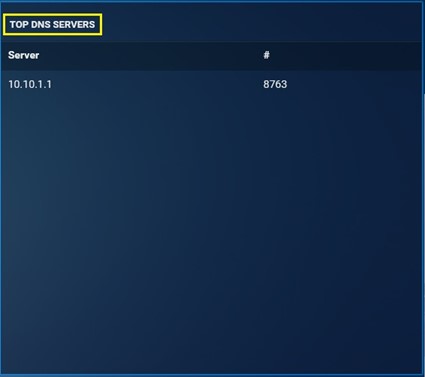
Top DNS Servers: It shows the top DNS Servers that has been detected by the Crystal Eye XDR for the time period selected while downloading the report. This monitoring metric also consists of the total count of the top DNS Servers.
-
Top Request Types: It shows the top Request types that has been detected by the Crystal Eye XDR for the time period selected while downloading the report. This monitoring metric also consists of the total count of the top Request Types.

-
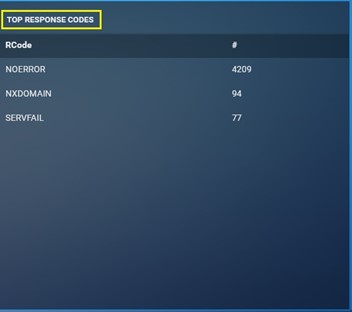
Top Response Codes: It shows the top Response codes that has been detected by the Crystal Eye XDR for the time period selected while downloading the report. This monitoring metric also consists of the total count of the top Response Codes.
-
Top DNS Clients: It shows the top DNS Clients that has been detected by the Crystal Eye XDR for the time period selected while downloading the report. This monitoring metric also consists of the total count of the top DNS Clients.