Forcefield
Overview
The Forcefield application scans the system for authentication failures across various types of services installed in the system. If the failure threshold is exceeded, the app blocks the attacking system. There are two switch views of Forcefield namely, Forcefield Settings and Automated Actionable Intelligence. The Forcefield app provides excellent protection against both malicious "Internet background noise" and motivated attackers aiming to leverage weak, common, or harvested passwords.
Installation
The Forcefield application is installed by default and can be accessed from the left-hand navigation panel.
Navigation to Forcefield Application Page
Left-hand Navigation Panel > Security Configuration > Forcefield 
Forcefield Settings
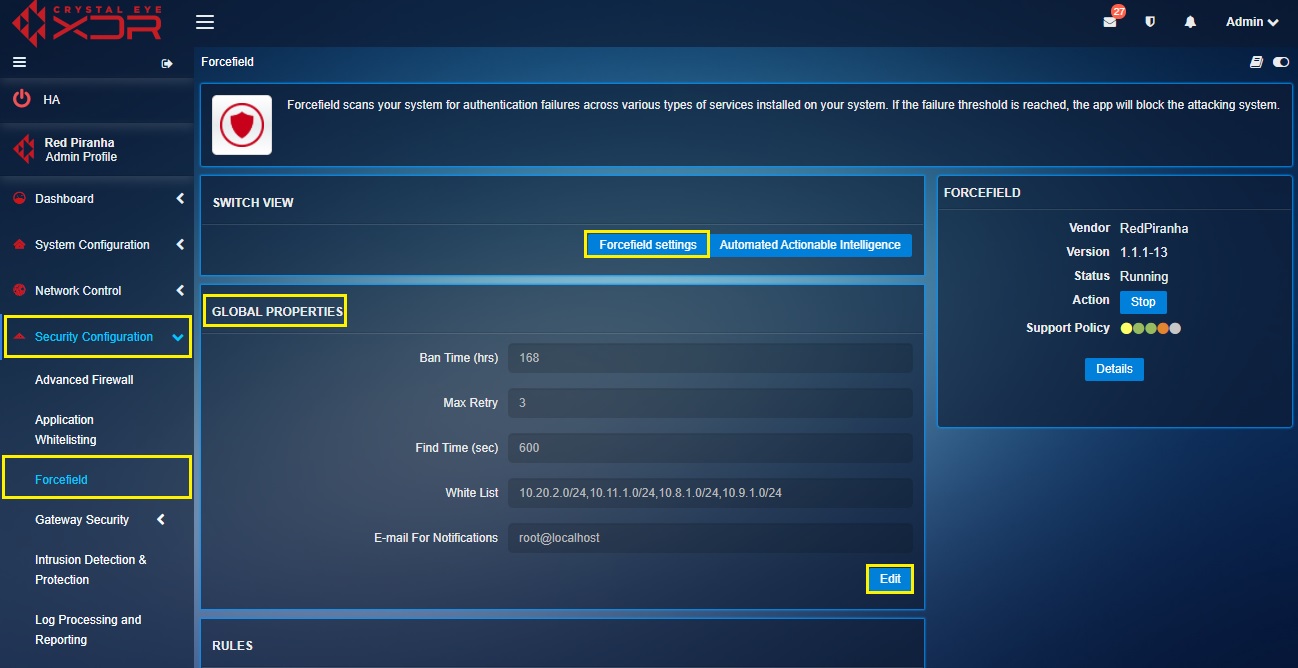
The Forcefield Settings are made up of three sections, Global Properties, Rules and Log (Last 7 days). The Global properties section of the application enables the administrator to set the criteria to ban an IP address if the login failure threshold has exceeded. The criteria’s that can be adjusted in this section are Ban Time (hrs), Max Retry, Find Time (sec), White Listand Email For Notifications.
The Forcefield application has three Rules based on which an IP ban is triggered. The names of the rules are postfix-sasl, sshd, and sshd-ddos. The administrator can use the Rules section to define the number of hours an IP address must be banned in case it violates one of these rules. All these three rules can also be disabled as well.
The Logs Section of Forcefield Settings shows the IP addresses that were banned by Crystal Eye. The display table in this section provides a detailed overview of the banned IP addresses for the past 7 days. Some of the vital information that can be seen out here is the Time Stamp (the date and time the IP address was banned), the IP Address, the Rule which triggered the ban, the present Status, Country of origin, the City and the Region to which the IP Address belongs.
The display table in the Logs Section provides the data of the banned IPs for the past 7 days. However, there is a functionality in this section that enables the administrator to extract a report that reflects logs of the past 3 months. This Report can be extracted in the PDF format.
Navigation to Forcefield Settings
Left-hand Navigation Panel> Security Configuration > Forcefield > Click Forcefield Settings button 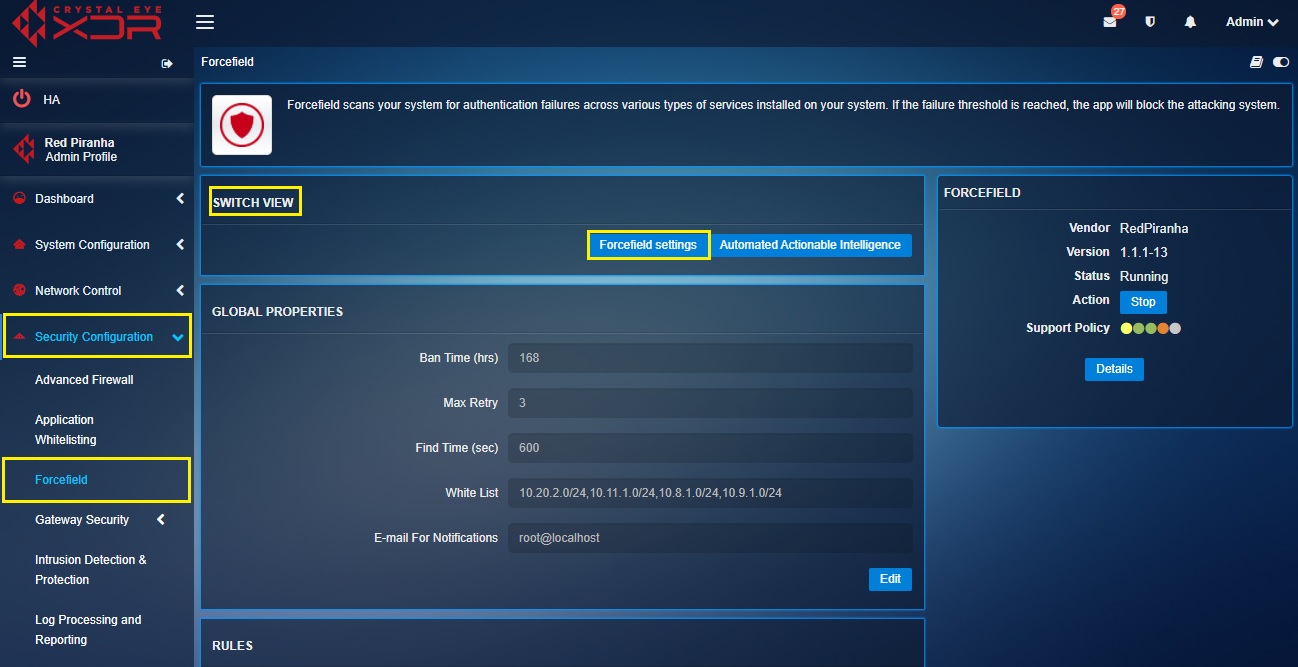
Global Properties
The global properties section of the forcefield application allows users to configure global threshold settings that defines for how many hours the violator will be banned, the maximum number of violations that triggers a ban and the time period between which the maximum number of trials is exceeded.
These settings would come into play only when Crystal Eye is being accessed from an external IP address. The administrator can assign an internal (LAN) IP addresses to be whitelisted for which forcefield rules will not be applicable.
The three main parameters which define the reason why a ban is enforced on a particular external IP address post violation of forcefield rules are Ban Time (hrs), Max Retry, and Find Time (sec).
The Ban Time (hrs) parameter of forcefield settings allows administrators to define the total amount of time an IP address would be banned If the failure threshold is reached or exceeded.
The Max Retry parameter of forcefield settings allows to set the maximum number of failed attempts by an IP address that would trigger a ban on it.
Find Time (sec) is a parameter that defines the period of time between which the IP address is banned if the maximum amount of failed attempts is exceeded. For instance according to the default global settings, if the user violates a forcefield rule for more than 5 times in a span of 600 seconds then the violator (IP address) will be banned for 168 hours.
White List are those IP Addresses that are deemed internal and are not to be brought under the ambit of Forcefield application rules. In fact, the attack detector apparatus of forcefield will never consider the White List IP addresses as a threat even if it violates the set forcefield policies.
How to Set Ban Time (hrs), Max Retry, Find Time (sec), White List and Email For Notifications?
Step 1: In the Forcefield Settings Switch View page, click the Edit button in Global Properties section.
Step 2: You will now see the Global Properties section. Enter the desired Ban Time in the Ban Time (hrs) text box. 
Step 3: Enter maximum failed login attempts in the Max Retry text box.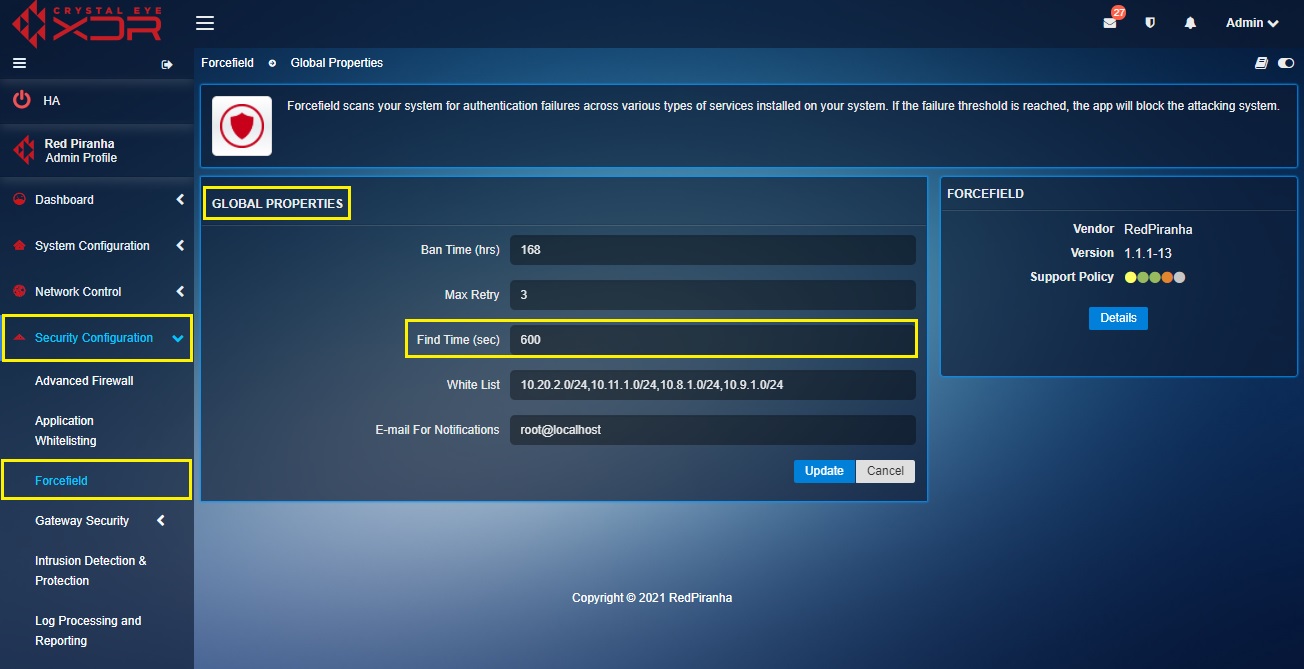
Step 4: Enter the time period within which the login attempt failure threshold is reached, and a ban is triggered on an IP Address in the Find Time (sec) text box.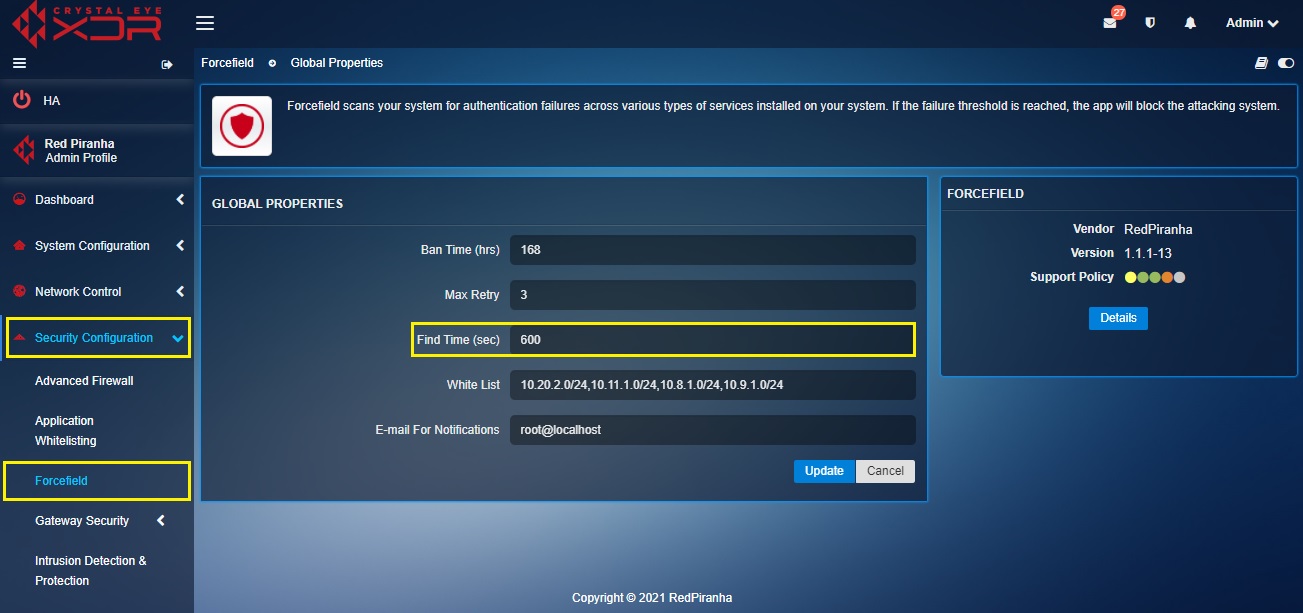
Step 5: Enter the exception IP addresses which are not to be brought under the ambit of Forcefield in the White List text box.
Step 6: Enter the email Id that will get notifications of any Forcefield policy violations in the E-mail For Notifications text box and click the Add button.
Forcefield Rules
There are three Forcefield rules related to postfix-sasl, sshd, and webconfig, which are primarily aimed at blocking malicious attacks on postfix mail server and ssh attacks on the Crystal Eye appliance itself. The post-fix sasl forcefield rule provides protection against spammers while both sshd and webconfig rules provides protection against unauthorised ssh attempts to access the Crystal Eye appliance.
Using the controls provided in the graphic user interface the administrator can enable/disable all the aforementioned Forcefield rules and also edit the ban time that would be enforced if these rules are violated.
Note
The global ban time set in the Global Properties section which is applicable for all the Forcefield rules will be overwritten by the ban time assigned for each forcefield rule.
How to Disable postfix-sasl, sshd, and webconfig Rules?
Step 1: In the Forcefield Settings Switch View page under the Rules section, click the Disable button against each rule in order to stop them from triggering alerts.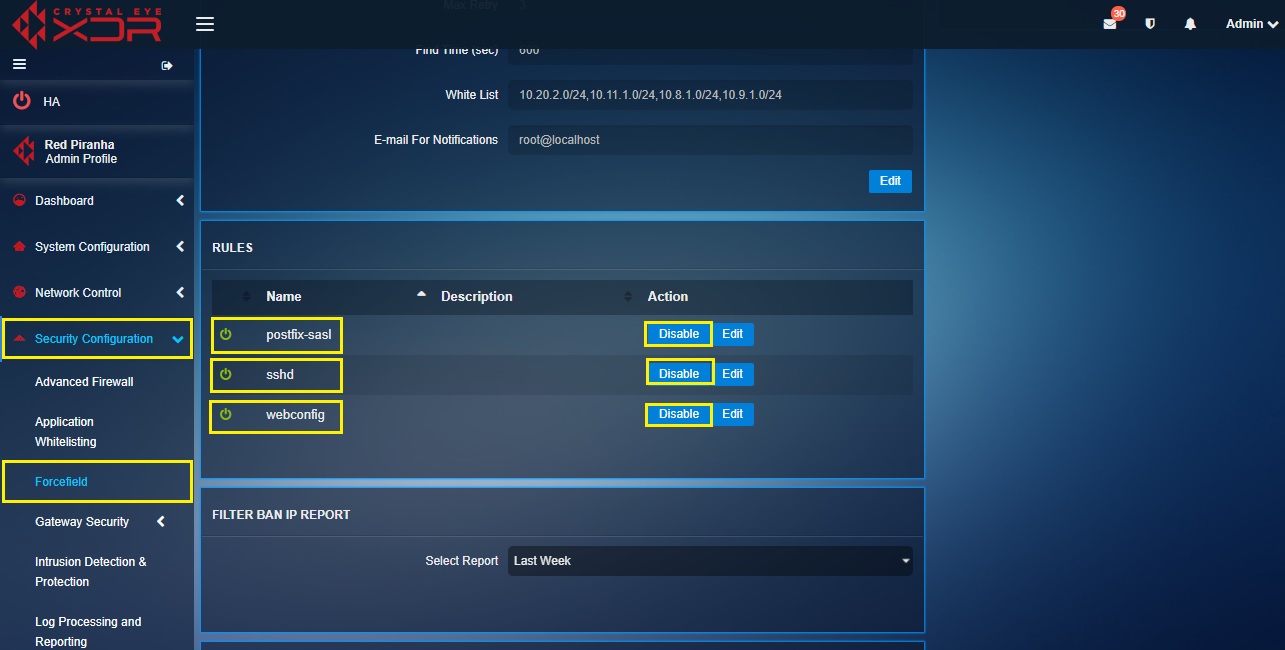
How to Edit the Ban Time Period if an IP Address Violates postfix-sasl, sshd, and sshd-ddos Rules?
Step 1: In the Forcefield Settings Switch View page under the Rules section, click the Edit button in the Rules section.
Step 2: You will now see the Edit Properties section. Enter the ban time in the Ban Time (hrs) text box and click the Update button.
Banned IP Logs Reports
The Banned IP Logs Report provides the details regarding the IP address that was banned due to violated forcefield rules. The log details include the date and time at which the IP address was banned, the banned IP address, the violated rule due to which the IP address was banned, the status of ban, the country to which the banned IP address belongs, the city and the region.
Note
All IP addresses banned by Crystal Eye’s Forcefield can be whitelisted from the Banned IPs Table in the Security Dashboard and the Banned IPs Table in the IP Attack Map application.
How to Extract a PDF Format Report of the Banned IP Logs?
Step 1: In the Forcefield Settings Switch View page under the Ban IP Report Section. Click the Export Report as PDF dropdown and select the time period for which the report is required.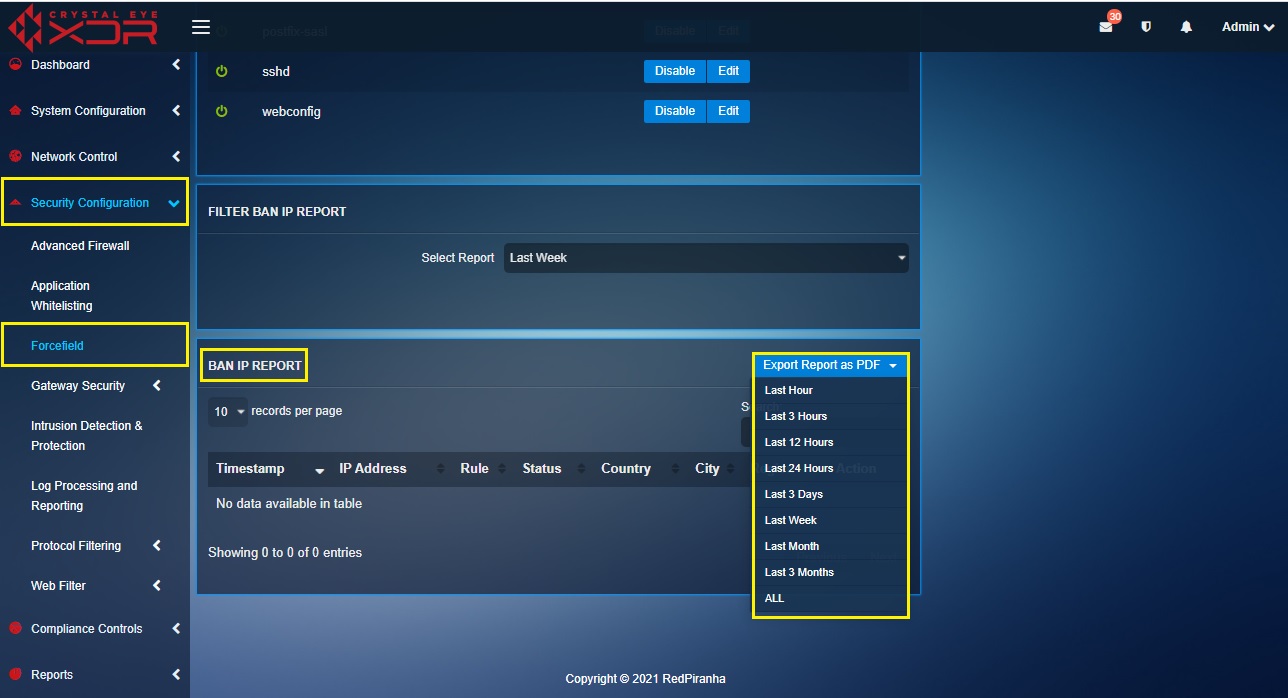
Note
The administrator can attain the Banned IPs Log reports for the past hour, past 3 hours, past 12 hours, past 24 hours, past 3 days, Last week, Last Month, and Last 3 Months
Automated Actionable Intelligence
Automated Actionable Intelligence (AAI) by definition is the intelligence that can be acted upon and followed up. The primary objective of Crystal Eye’s AAI is to gather a list of bad hosts and known good IP addresses from Red Piranha’s Service Delivery Network (SDN). While this is done, the Intrusion Protection System (IPS) and the Intrusion Detection System (IDS) of the Crystal Eye detects bad hosts and blocks them. The bad hosts and known good IP addresses are labelled as Reputation Lists in the application and these can be automatically pre-scheduled to be updated Daily, Twice a Day, Every Two Hours and on an Hourly Basis. The AAI feature of the forcefield application can be enabled and disabled from the Edit Properties section.
Navigation to Automated Actionable Intelligence (AAI)
Left-hand Navigation Panel > Security Configuration > Forcefield > Automated Actionable Intelligence button 
Scheduling Automated Actionable Intelligence Update
The AAI Updates of Bad Hosts and Known Good Hosts can be scheduled to be received Daily, Twice a Day, Every Two Hours, and Hourly. The automated scheduler comes in handy and is a very useful and convenient feature of the application.
How to Set the Schedule for Updates of Automated Actionable Intelligence?
Step 1: In the Automated Actionable Intelligence Switch View page, click the Edit button in Edit Properties section.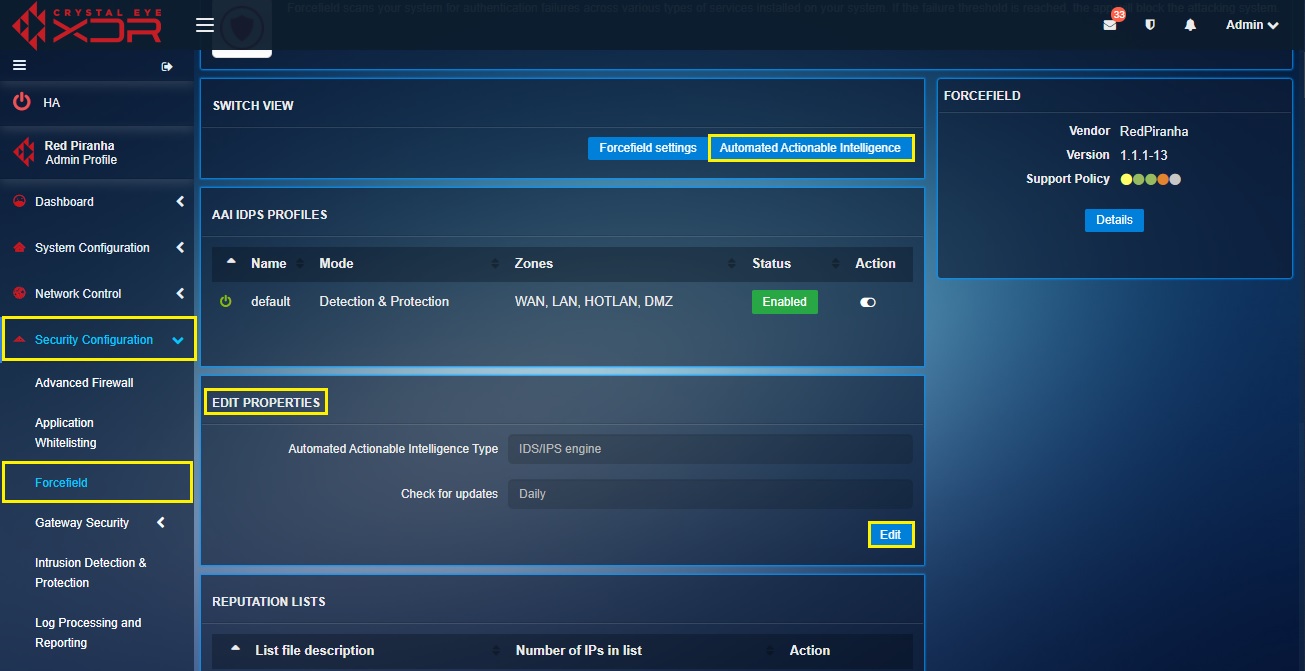
Step 2: You will now see the Edit Properties section. Select the desired schedule update from the Check for Updates dropdown.
Note
The schedule update for Automated Actionable Intelligence can be selected from the** Check for Updates dropdown. The options are **Once a Day, Twice a Day, Thrice a Day and Four times a Day.
Reputation Lists
The Reputation Lists section shows the total number of Bad Hosts and Known good IP’s that are updated with the help of Red Piranha’s Service Delivery Network (SDN). Once these bad and good IP address lists have been updated in the Crystal Eye appliance the AAI feature starts blocking the Bad Hosts and allows the Known good IPs.
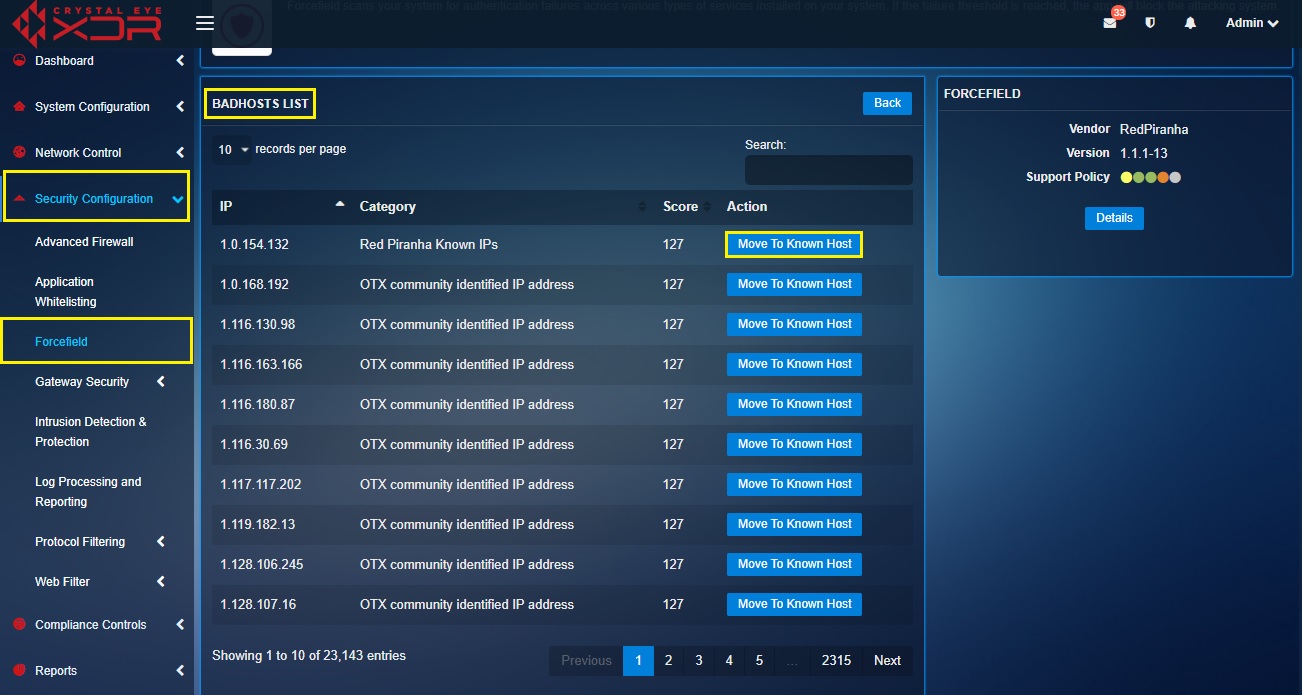
The Crystal Eye administrator can view all the bad hosts and whitelist an IP address if it’s a false positive.
Note
The bad hosts are identified by the Crystal Eye appliance through the updates received by Red Piranha’s Service Delivery Network (SDN). Once the bad hosts are identified, its reputation is decreased. Due to its low reputation an IP address deemed as bad host by Crystal Eye is banned if any kind of connection is established with devices in the CE network. The administrator can also allow a banned IP address from the Banned IPs Table in the IP Attack Map section of the Security Dashboard.
How to View the Reputation List or the Bad host and the Known Good IPs List?
Step 1: Click the Details button in the Reputation Lists section.
How to Remove an IP Address from the Bad Hosts List in Case it’s a ‘False Positive’?
Step 1: In the Forcefield application page, click the Automated Actionable Intelligence button.
Step 2: You will now see the Automated Actionable Intelligence page. Click the Details button in the Bad Hosts row.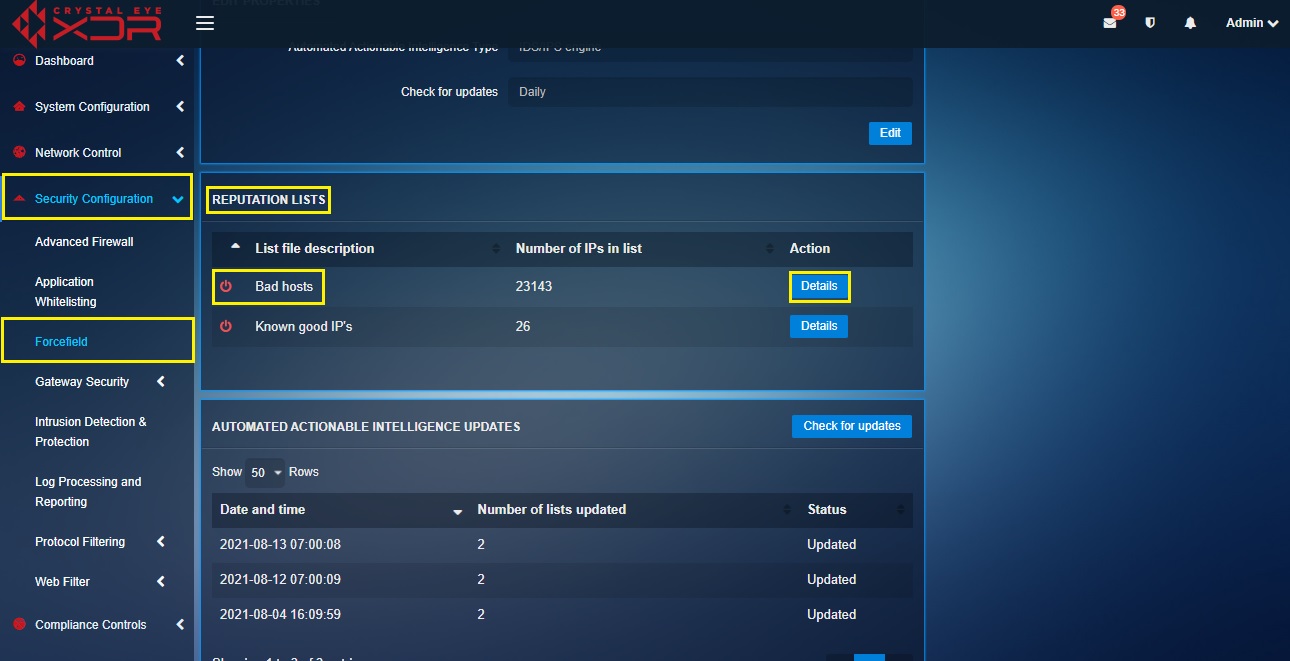
Step 3: You will now see the Bad Hosts List page. Click the Move to Known Host button.