M365 Risk and Compliance
Application relocated
M365 Risk and Compliance is formally Azure AD which has been renamed and relocated to the Microsoft 365 application group.
Overview
Monitoring Azure Active Directory (Azure AD) events can help you track changes and activities in your Azure AD environment.
This can be useful for a variety of reasons, such as:
Ensuring the security of your Azure AD environment: By monitoring Azure AD events, you can identify potential security threats, such as unusual login activity or unauthorized changes to user accounts.
Troubleshooting issues: Monitoring Azure AD events can help you diagnose and resolve problems in your Azure AD environment. For example, if you notice a spike in failed login attempts, you can use this information to investigate the cause and take appropriate action.
Auditing and compliance: Many compliance regulations require organisations to track and audit certain activities in their IT systems. Monitoring Azure AD events can help you meet these requirements by providing a record of changes and activities in your Azure AD environment.
Overall, monitoring Azure AD events can provide valuable insights and help you maintain a secure and efficient Azure AD environment.
Gartner Peer Reviews
 Explore more Red Piranha Customer Reviews on Gartner Peer Insights
Navigation to Azure AD application
Left-hand navigation Panel > Compliance Controls > Microsoft 365 > M365 Risk and Compliance
Video Resources
Installation
The Azure AD app is installed by default and can be accessed from the left-hand navigation panel.
Configuring Crystal Eye XDRs Azure AD App
The Azure AD application not only monitors user activities in OneDrive, Sharepoint and across MS 365 mail exchange, but also extracts threat intelligence info of phishing attacks on your organisation.
The configuration parameters in the Crystal Eye XDR Azure AD app constitutes of 4 components that can be copied/extracted from the Azure Portal. In order to do so, the first requirement involves creating an application in the Azure portal.
Note
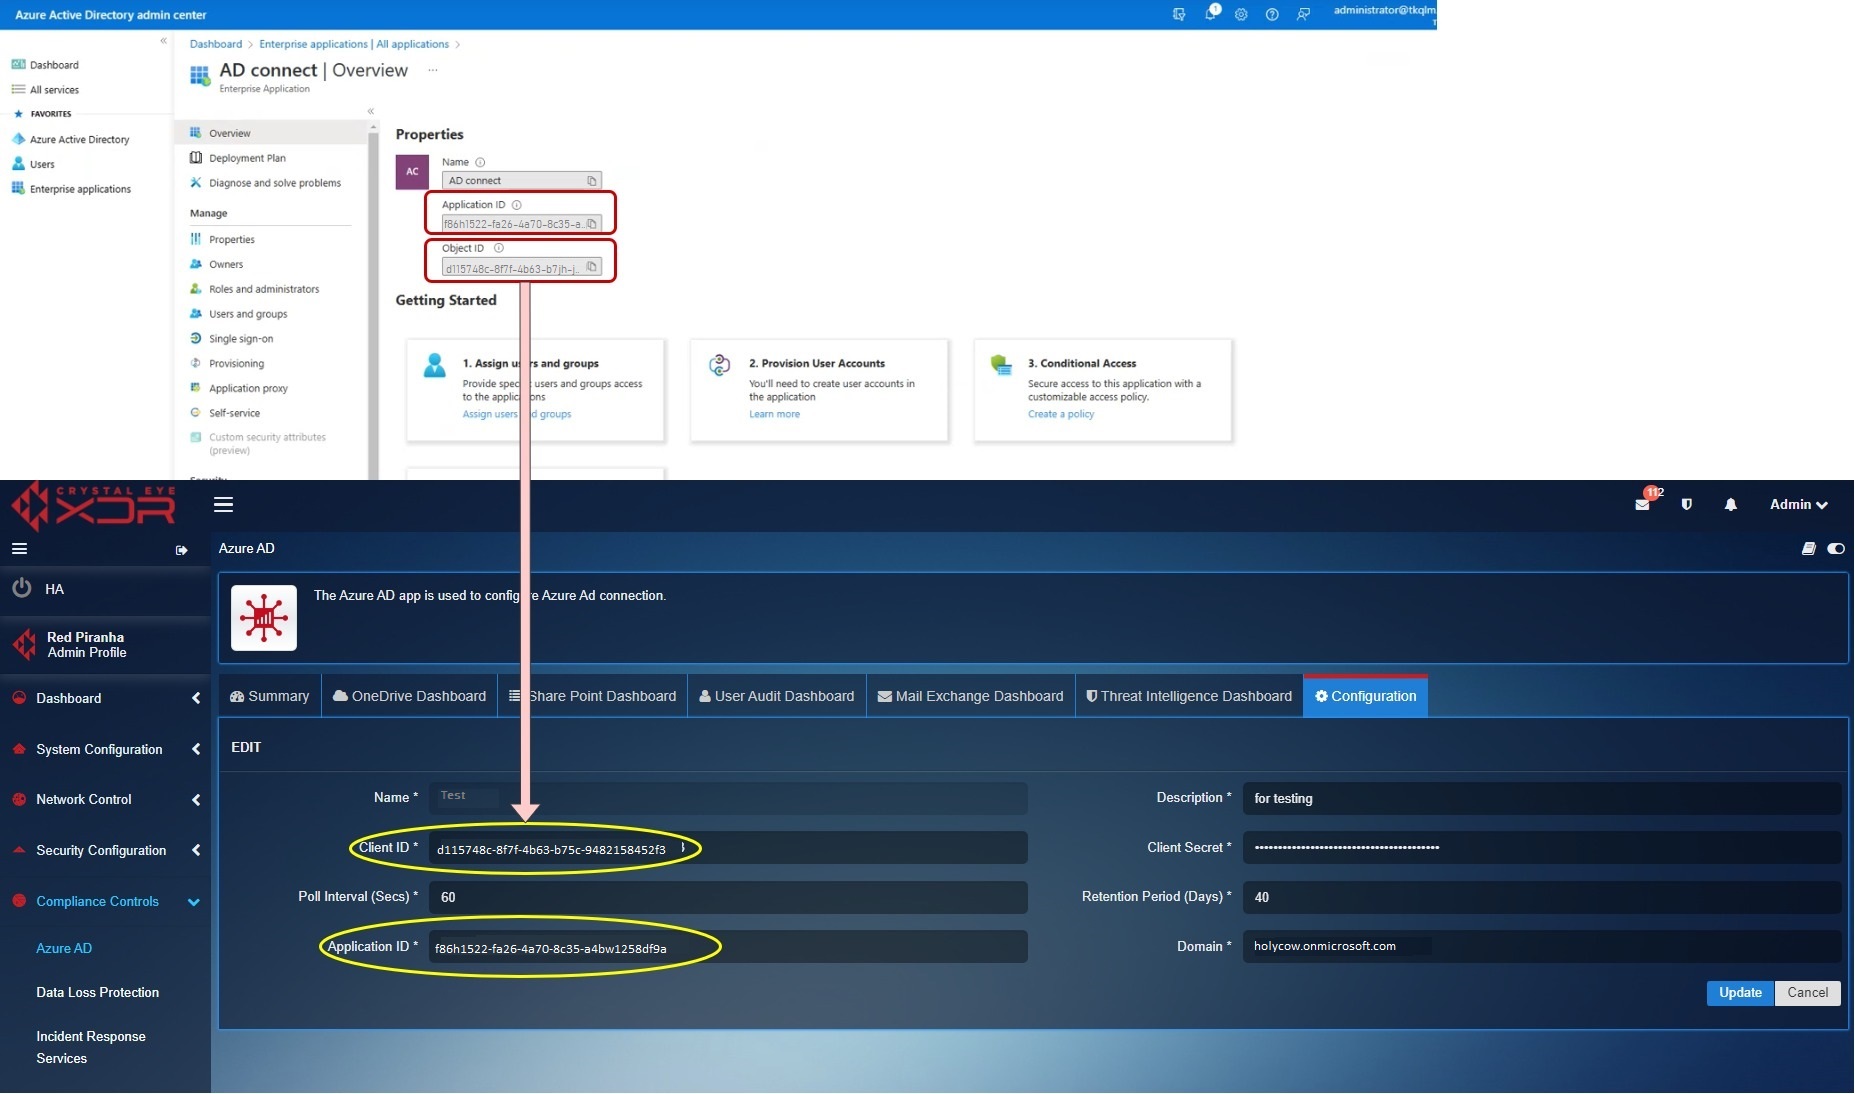
After registering an application in the Azure portal, we will extract the Client ID, Application ID, Client Secret and the Domain and enter it in the field highlighted in the screenshot below. 
Perform the following steps to connect the Azure AD platform with the Crystal Eye XDR to view OneDrive, Sharepoint, Mail Exchange, and User activities including a dedicated Threat intelligence dashboard outlining threats deriving from phishing attempts.
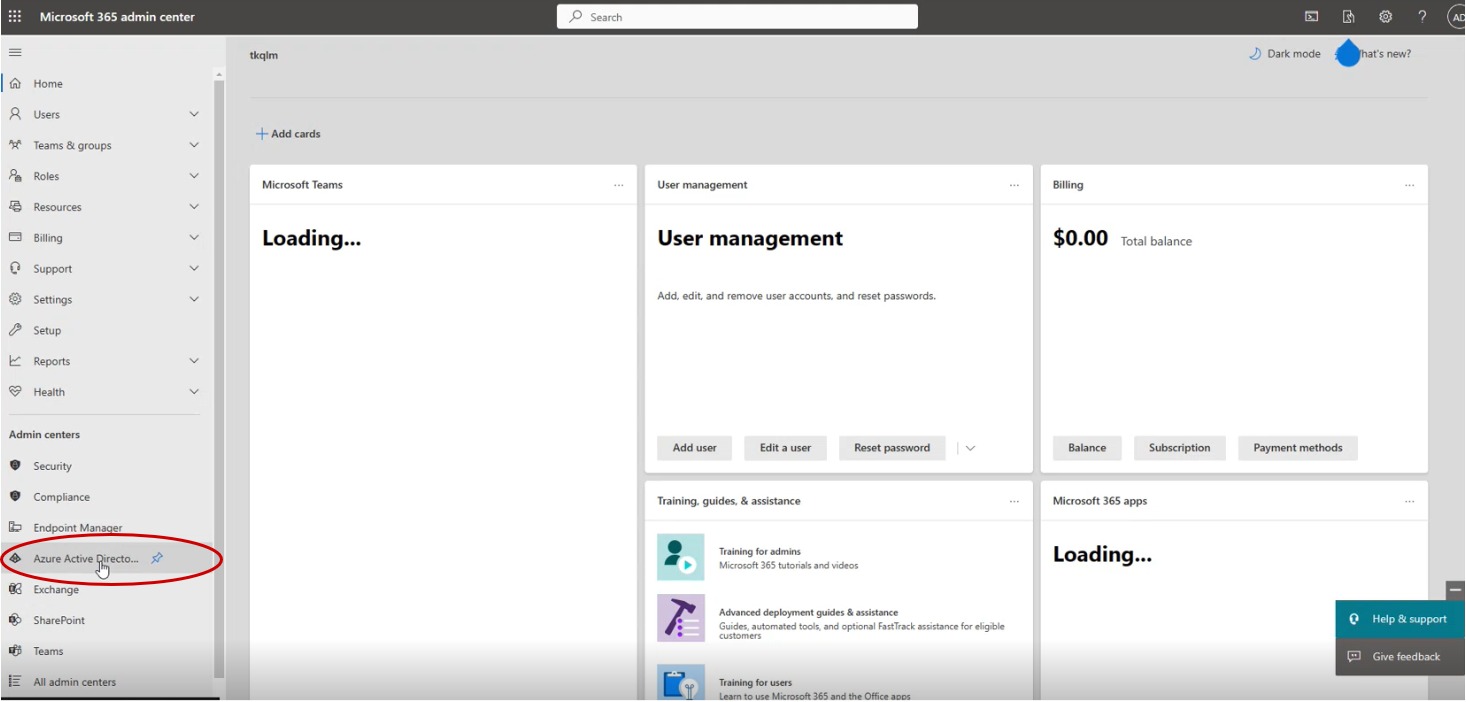
Step 1: Login to your Microsoft 365 admin center and select Azure AD Directory in the navigation menu.
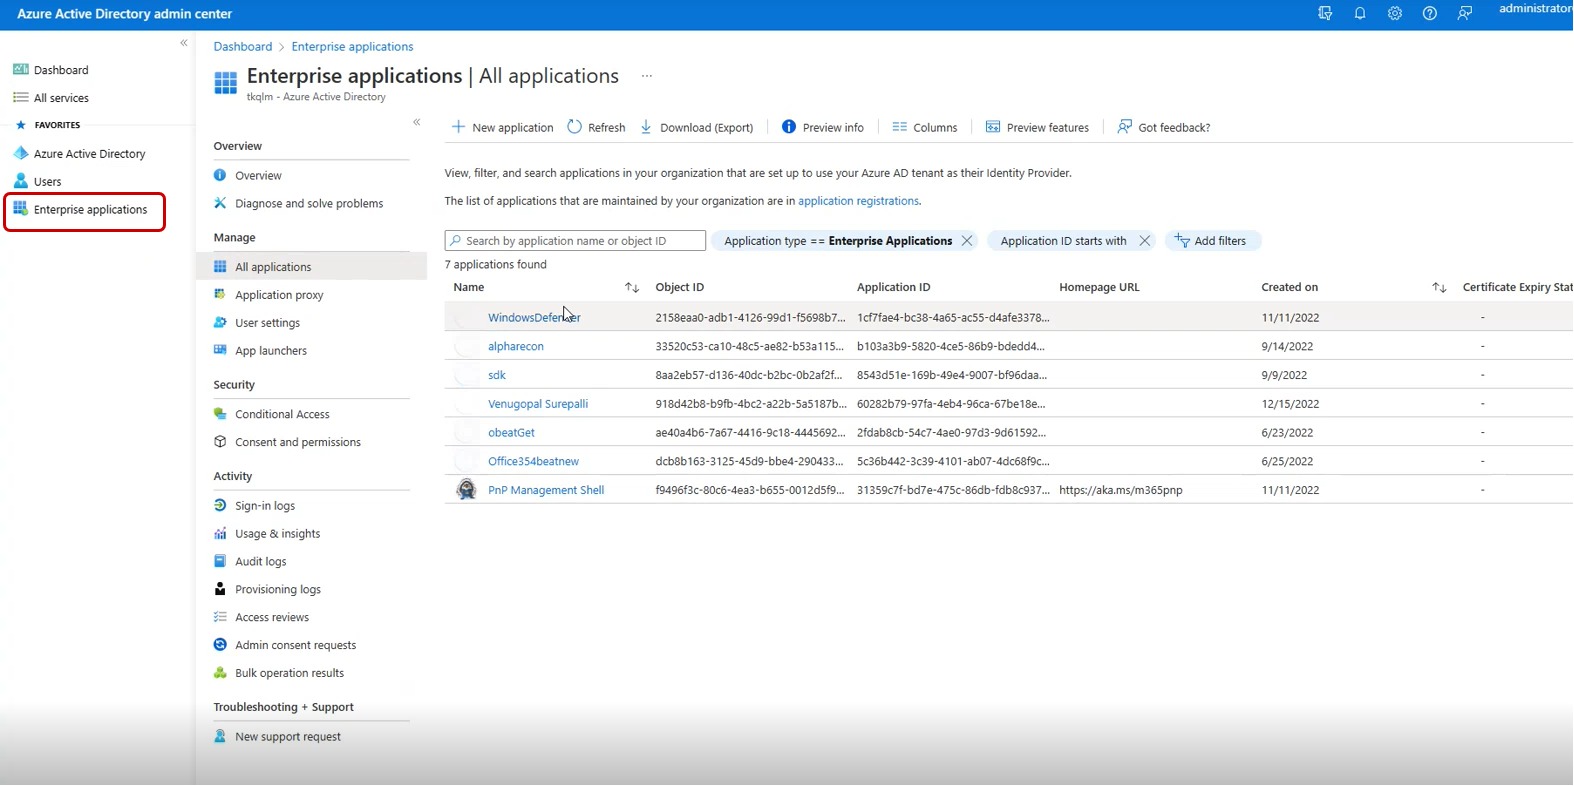
Step 2: You will be directed to the Azure Active Directory admin center. Click Enterprise applications in the navigation menu.
Step 3: Click the Add Application button in the top-panel.
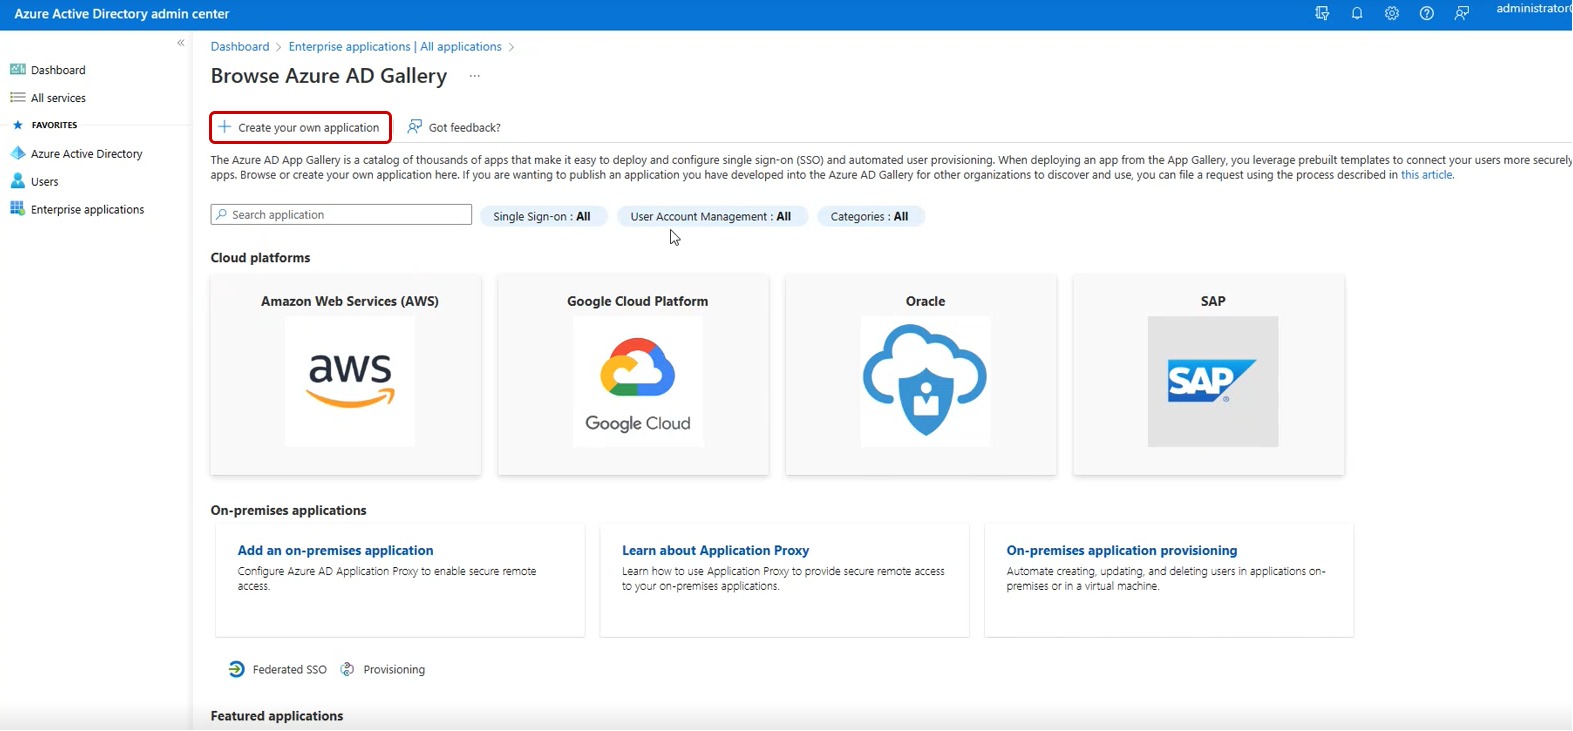
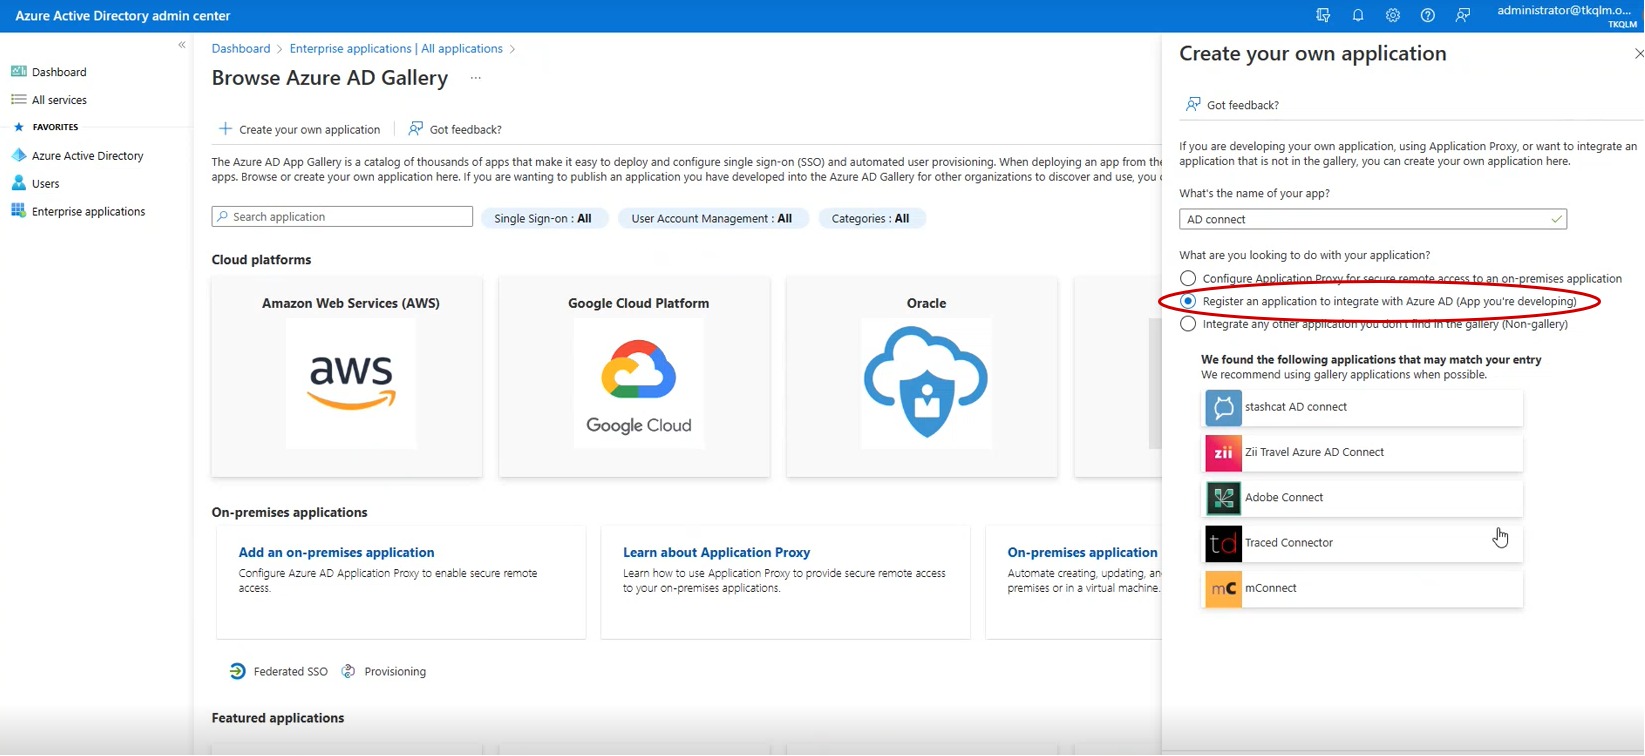
Step 4: You will be directed to the Browse Azure AD Gallery. Click the Create your own application button on the top-panel.
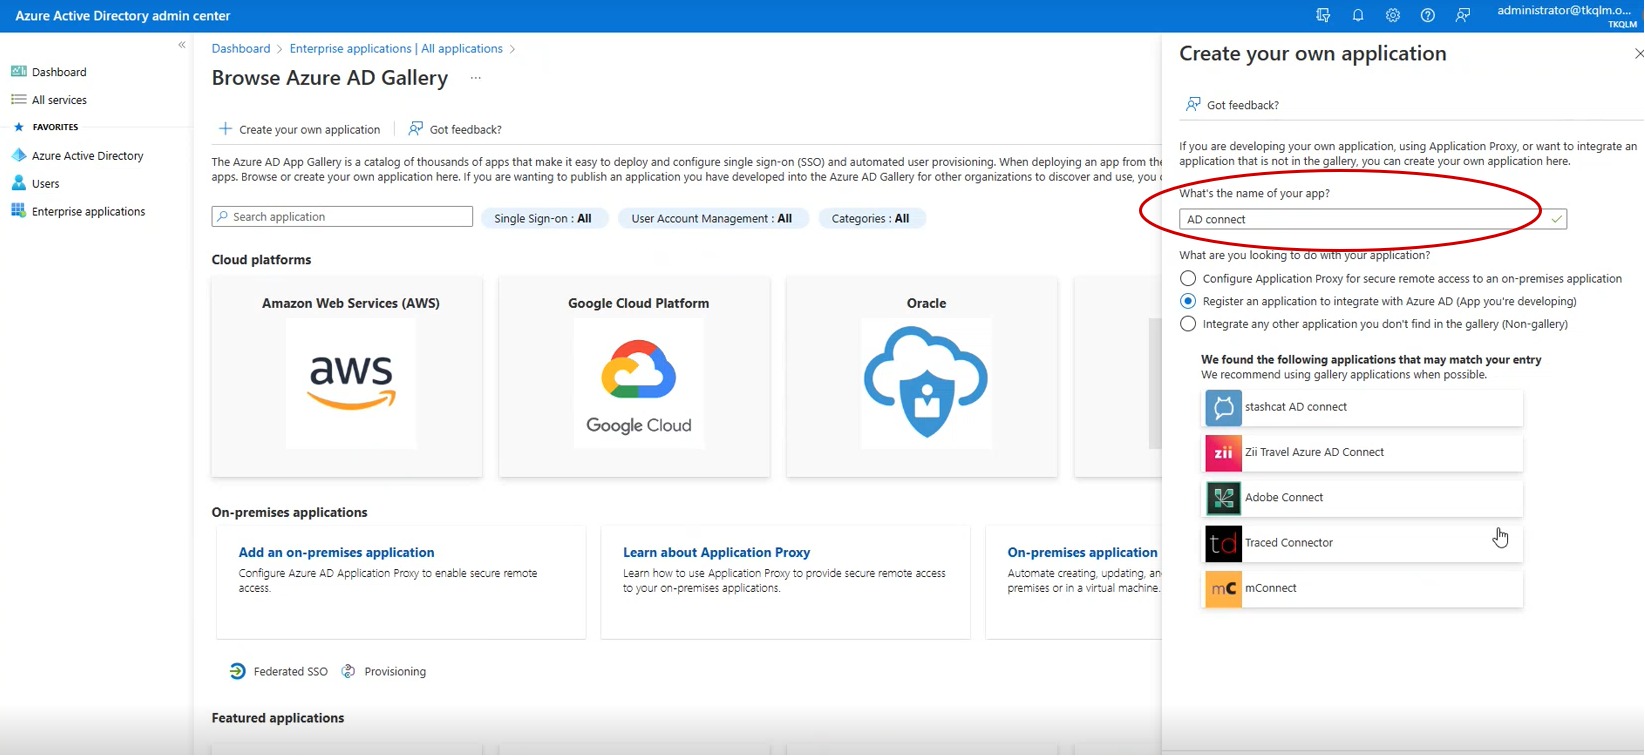
Step 5: You will now see the Create your own application pop-up in the right-hand navigation panel. Enter an application name in the Input Name textbox.
Step 6: Select the Radio button, “Register an application to integrate with Azure AD” and click the Create button.
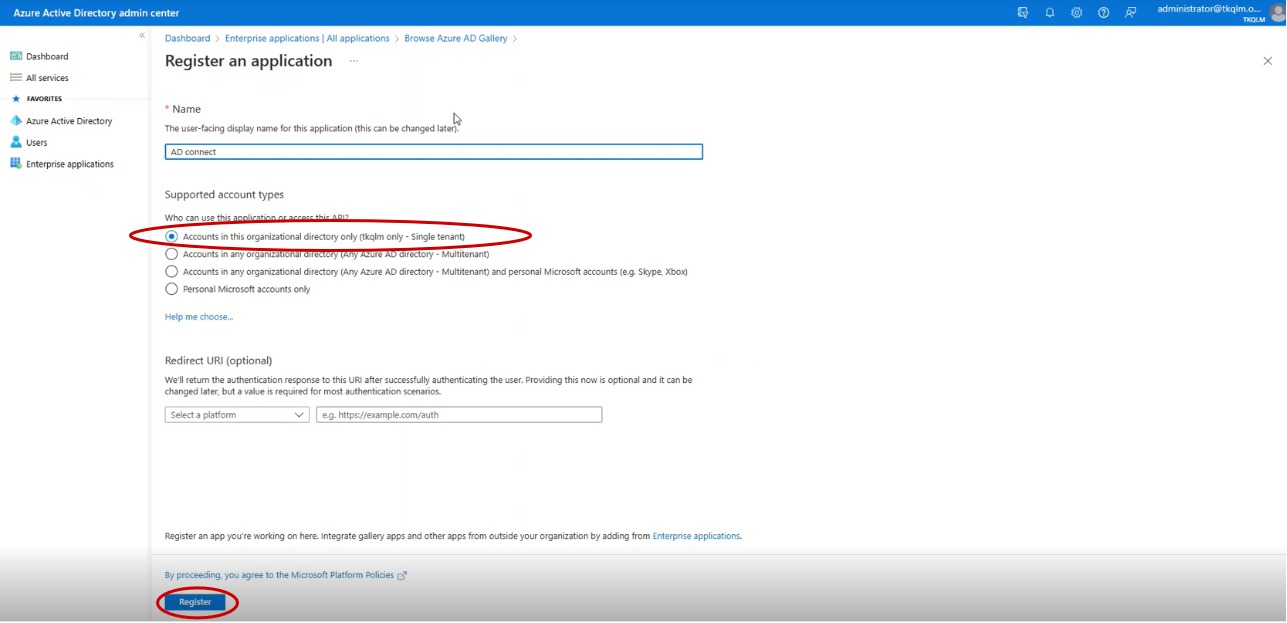
Step 7: You will now see the Register an application page. Select the radio button, “Accounts in this organizational directory only (single tenant)” and click the Register button.
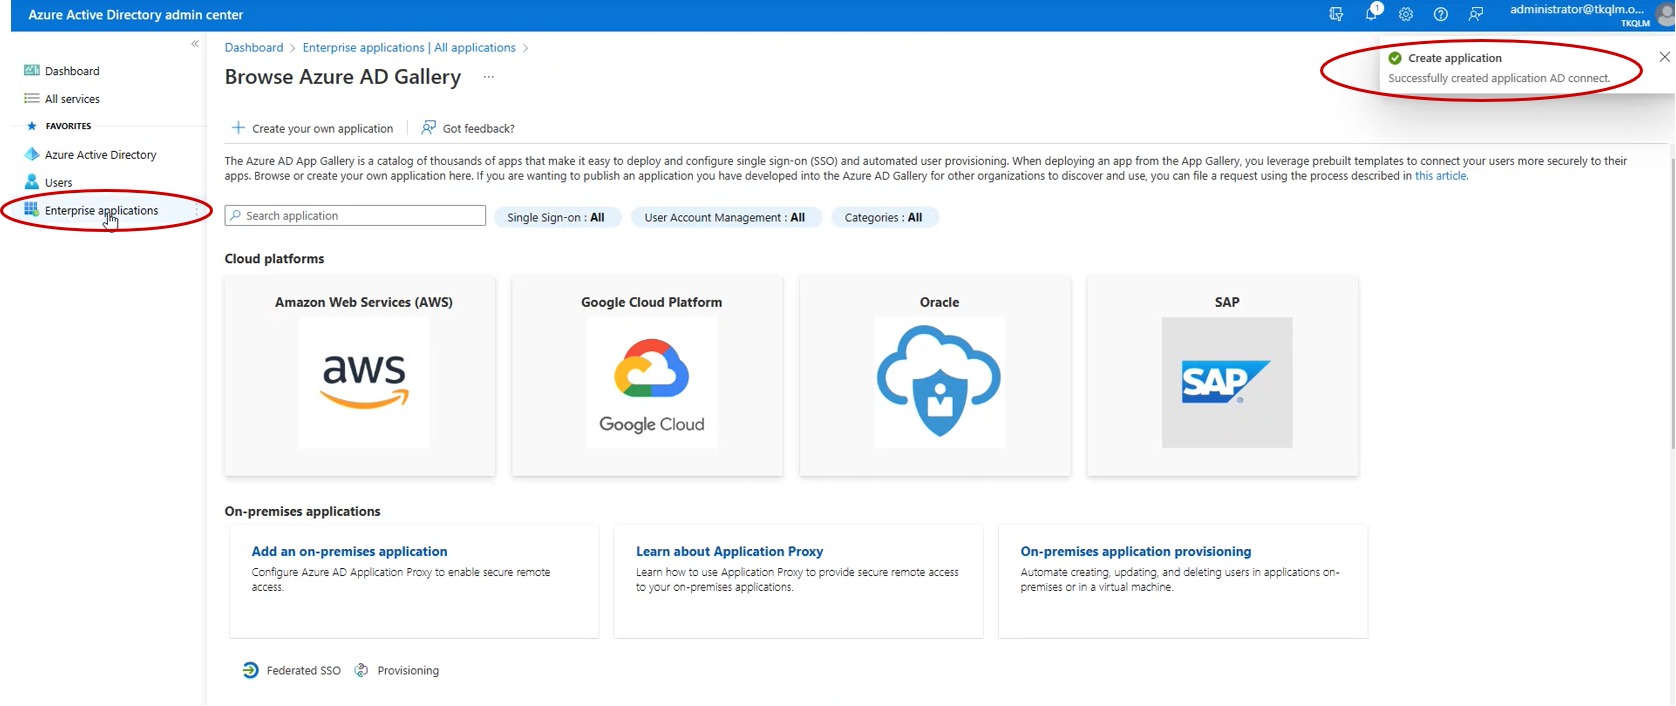
Step 8: You will see the message, “Successfully created application”. Click Enterprise application in the navigation menu.
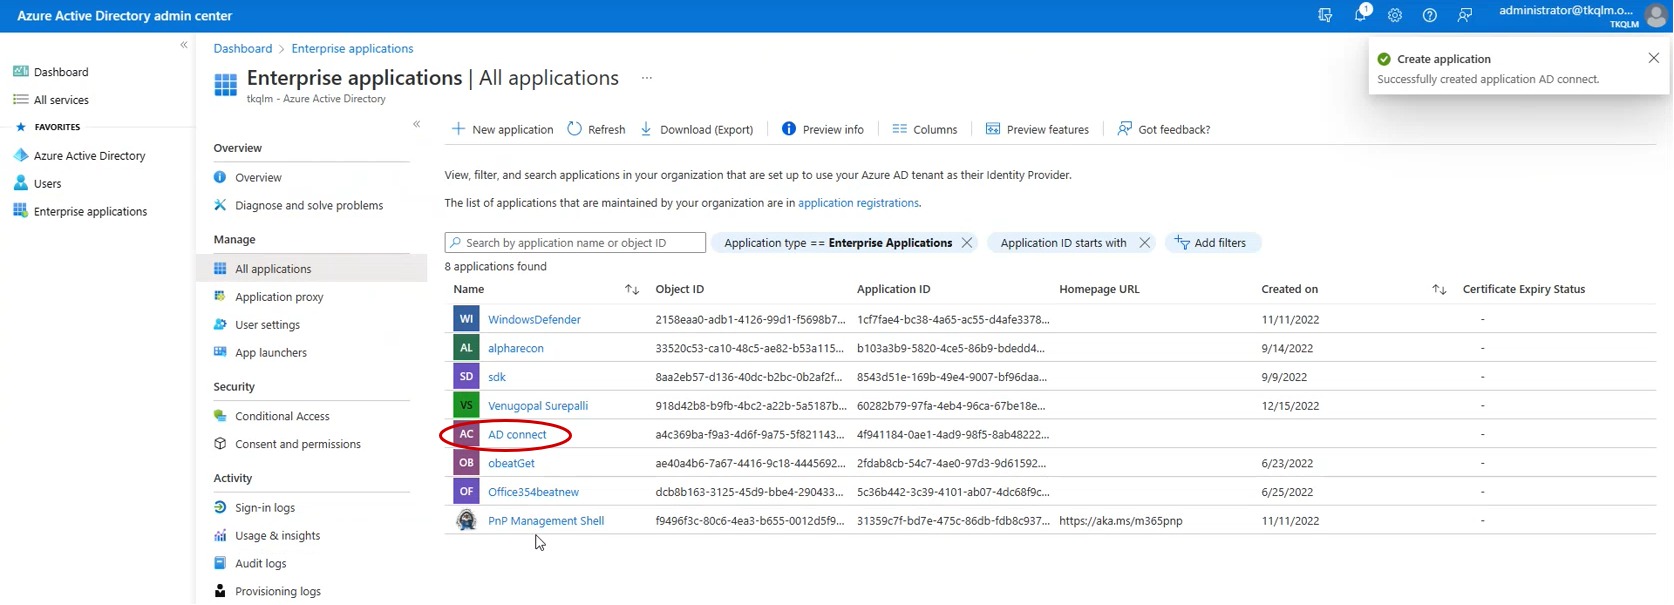
Step 9: You will now be directed to the All applications dashboard. Click on the application you have created.
Step 10: You will now be directed to the Application Overview page. Copy the Application ID and the Object ID. Now login to your Crystal Eye XDR and go to Compliance Controls > Microsoft 365 > Risk and Compliance > Configuration Tab. Paste the Object ID (copied from the Azure portal) to the Client ID textbox in the CE XDR user Interface. Similarly, paste the Application ID as shown in the screenshot below.
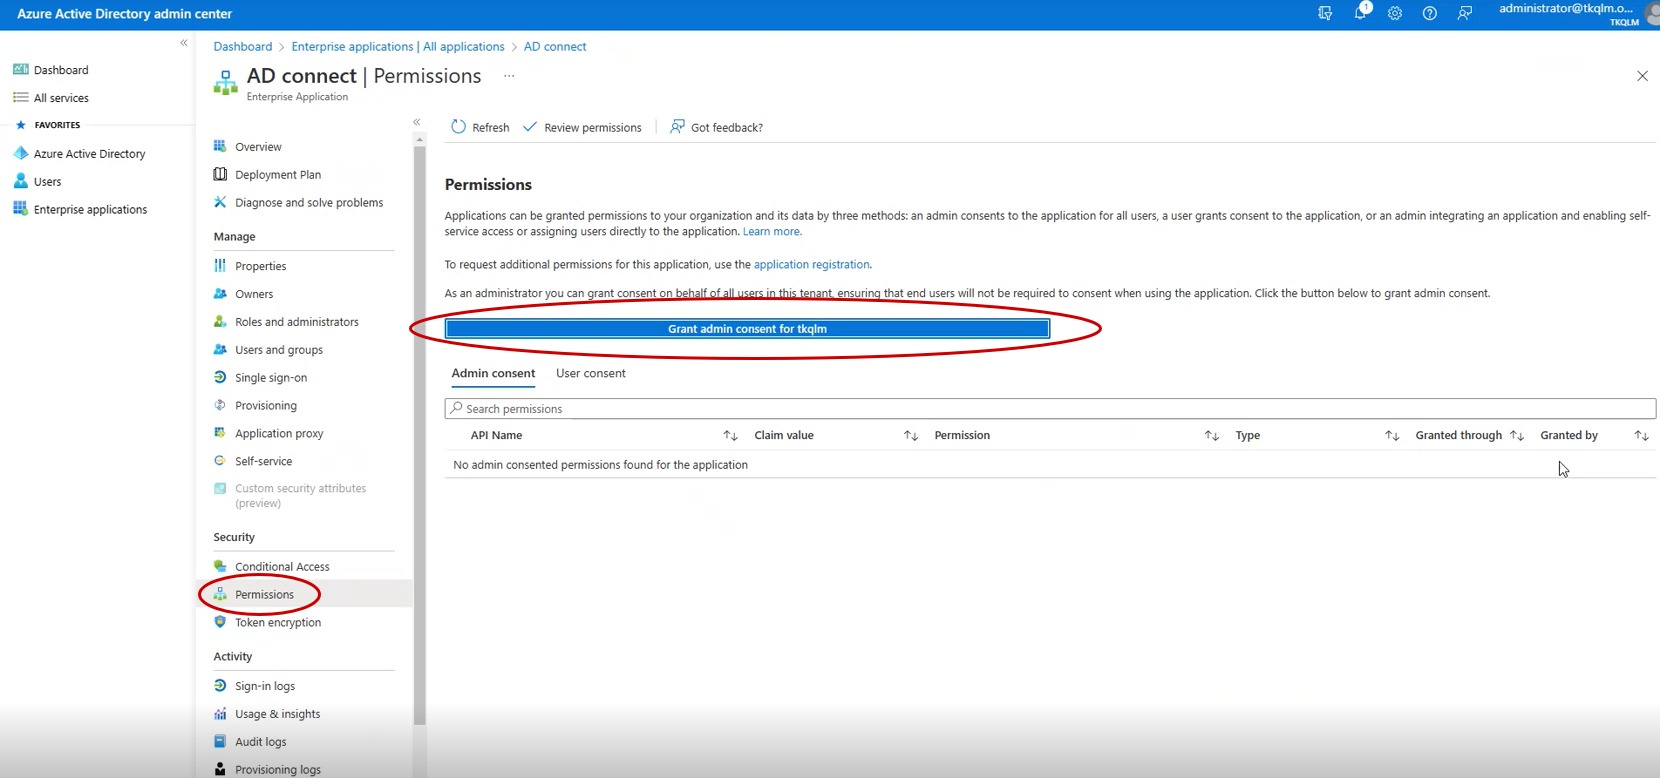
Step 11: Click Permissions button in the navigation menu and then click the Grant admin consent button.
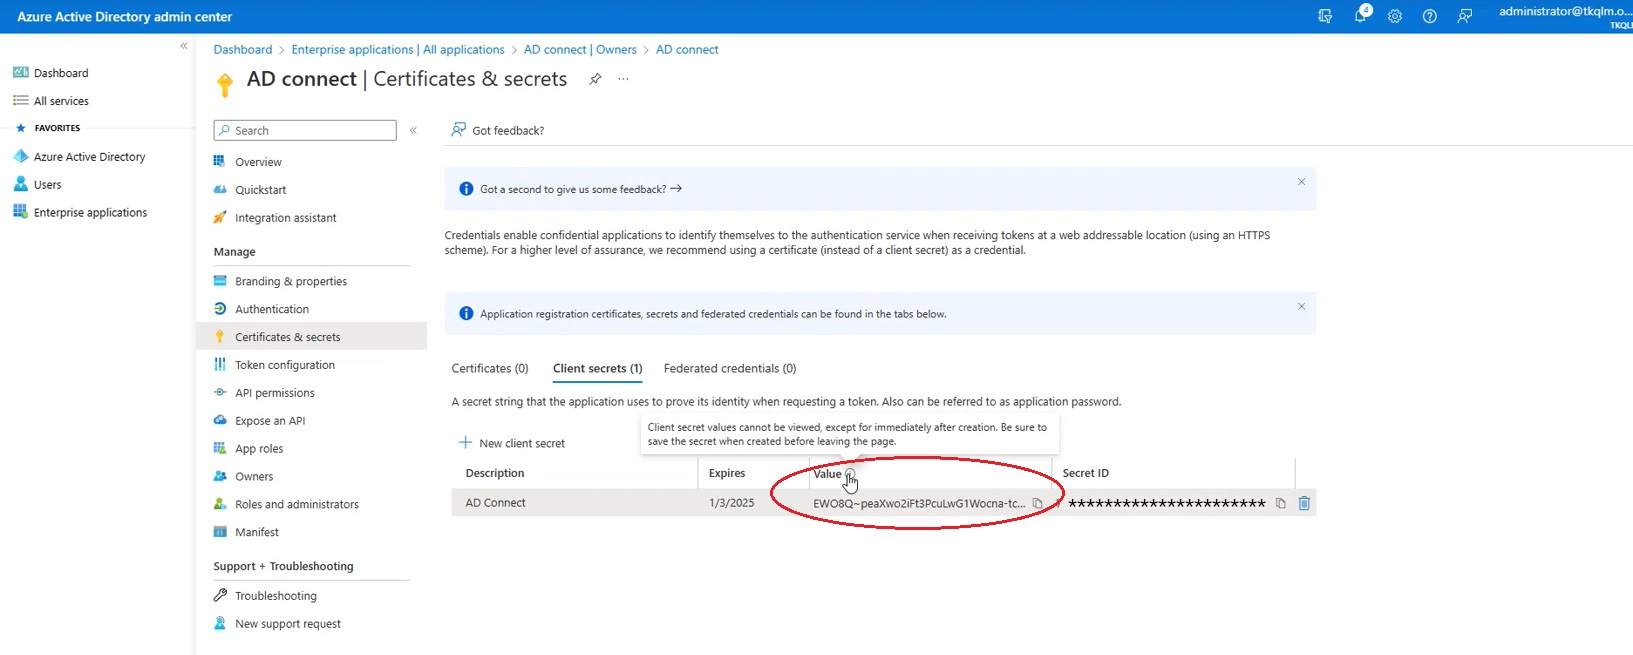
Step 12: Click the Certificates & secrets button in the navigation menu. Copy the secret value and paste it in the Client Secret textbox in the CE XDR user interface.
Azure AD Summary Dashboard
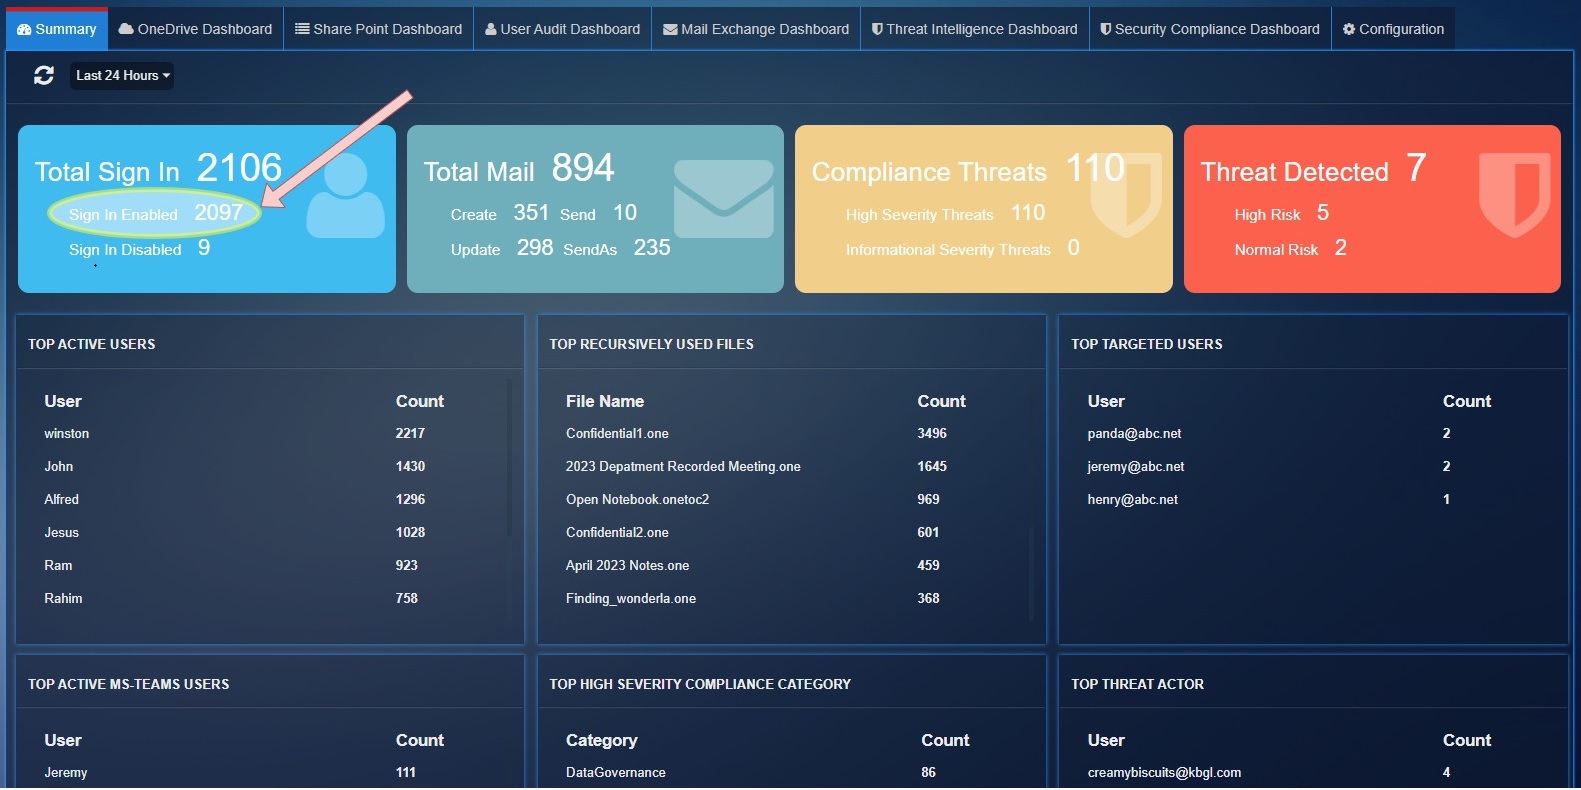
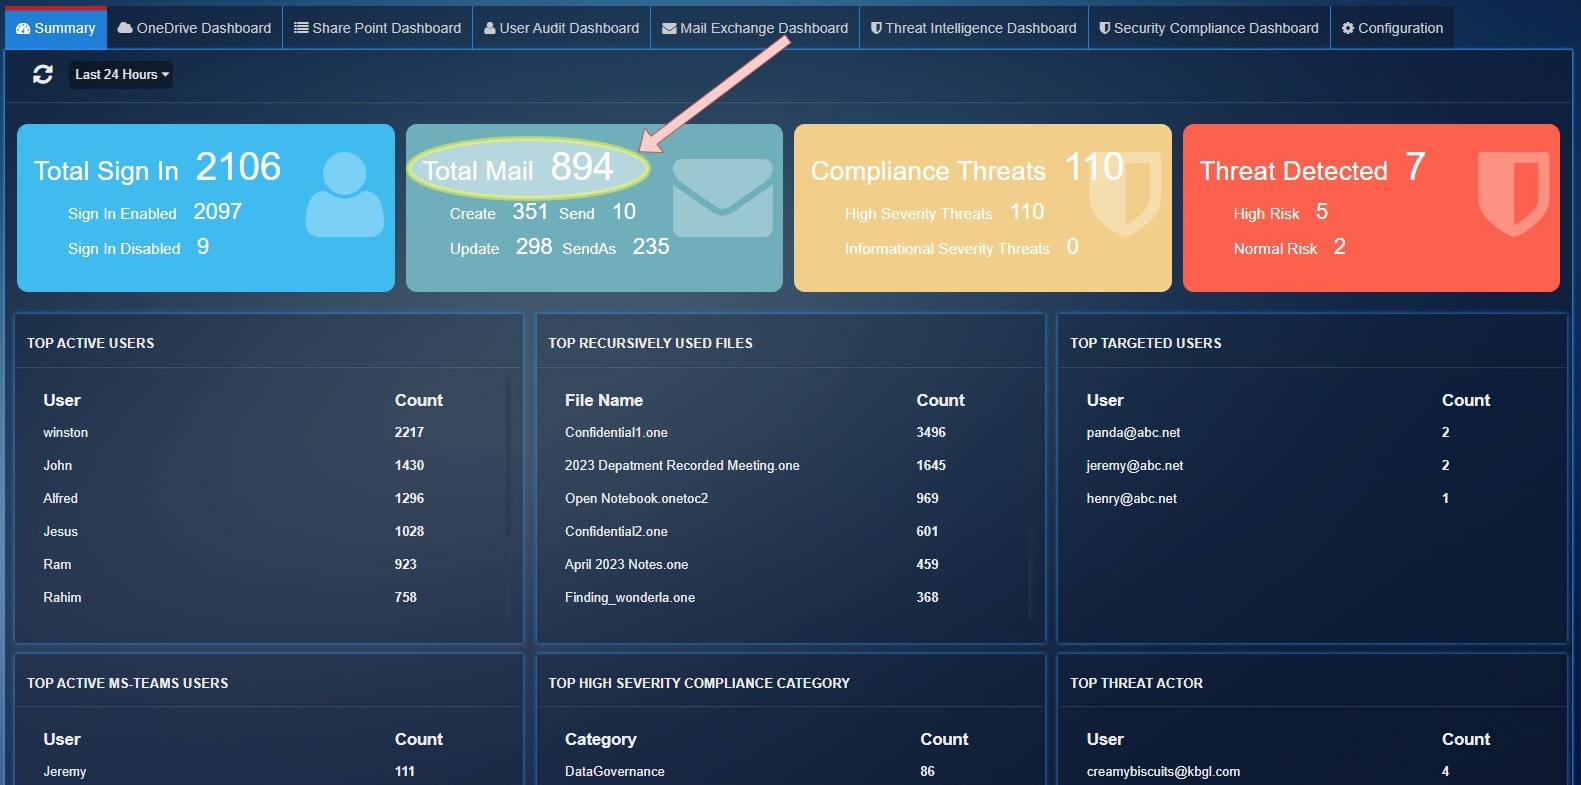
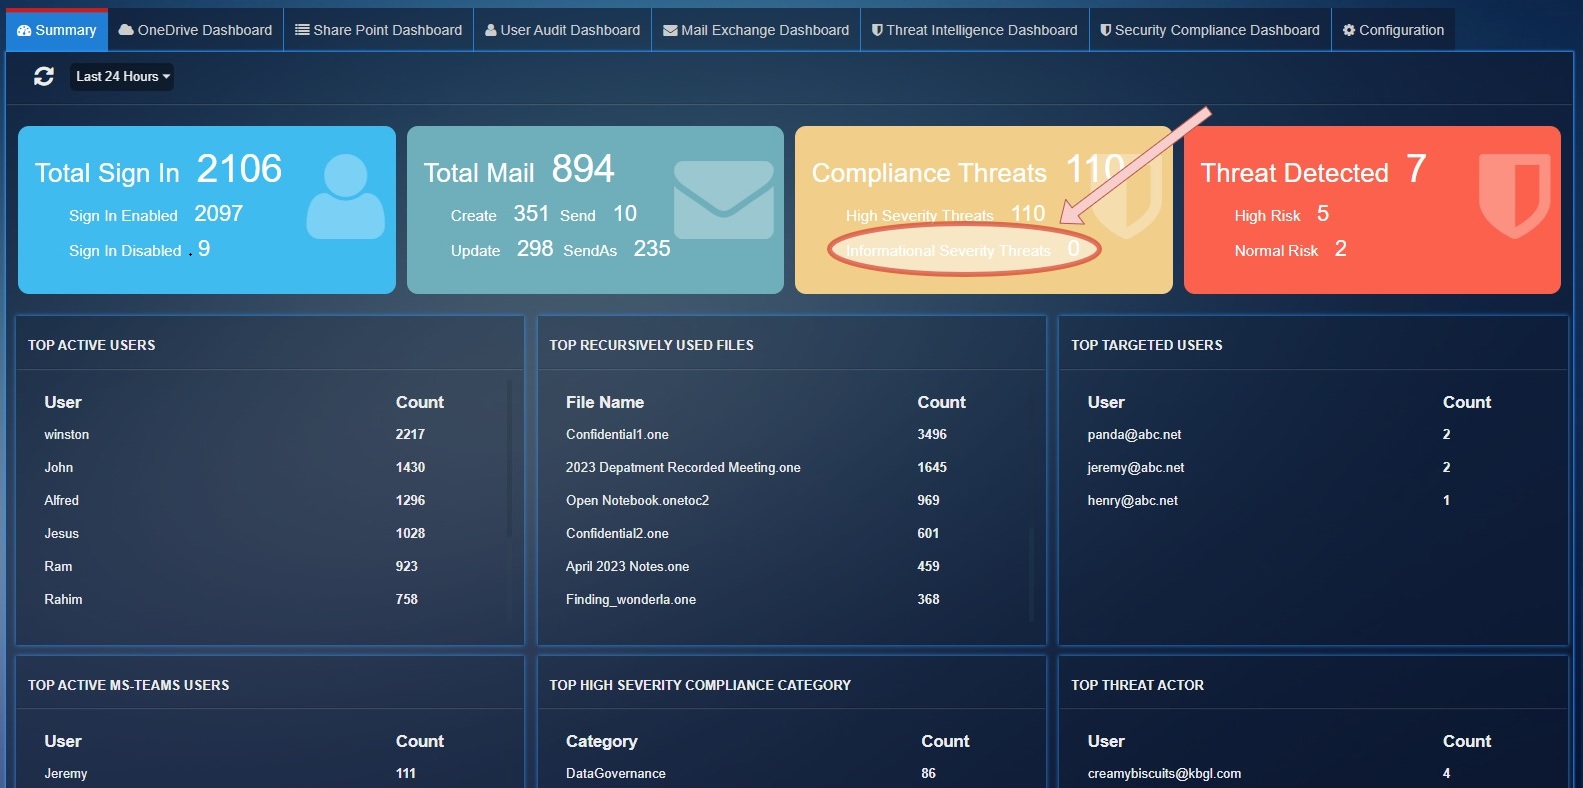
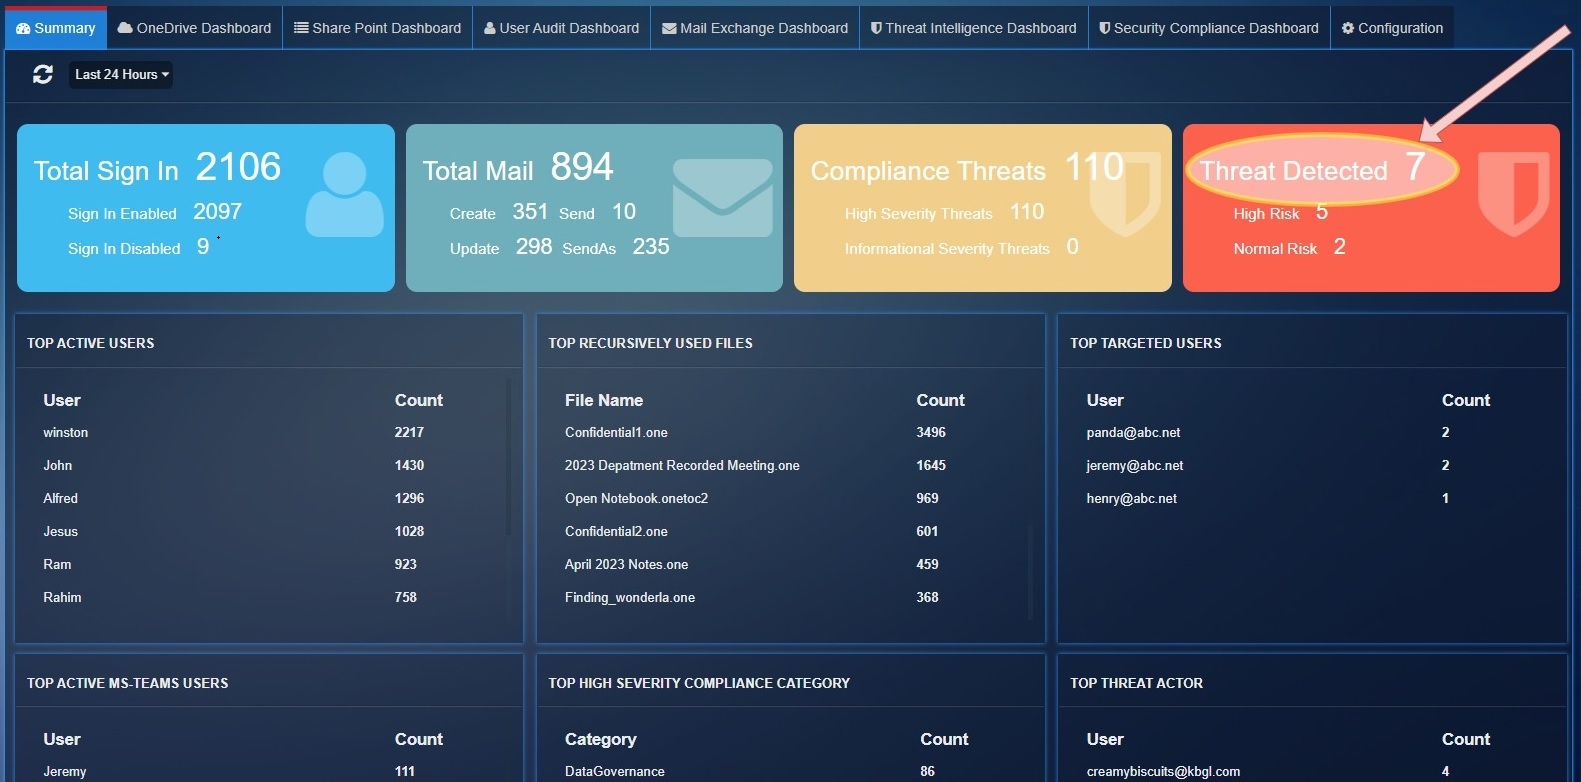
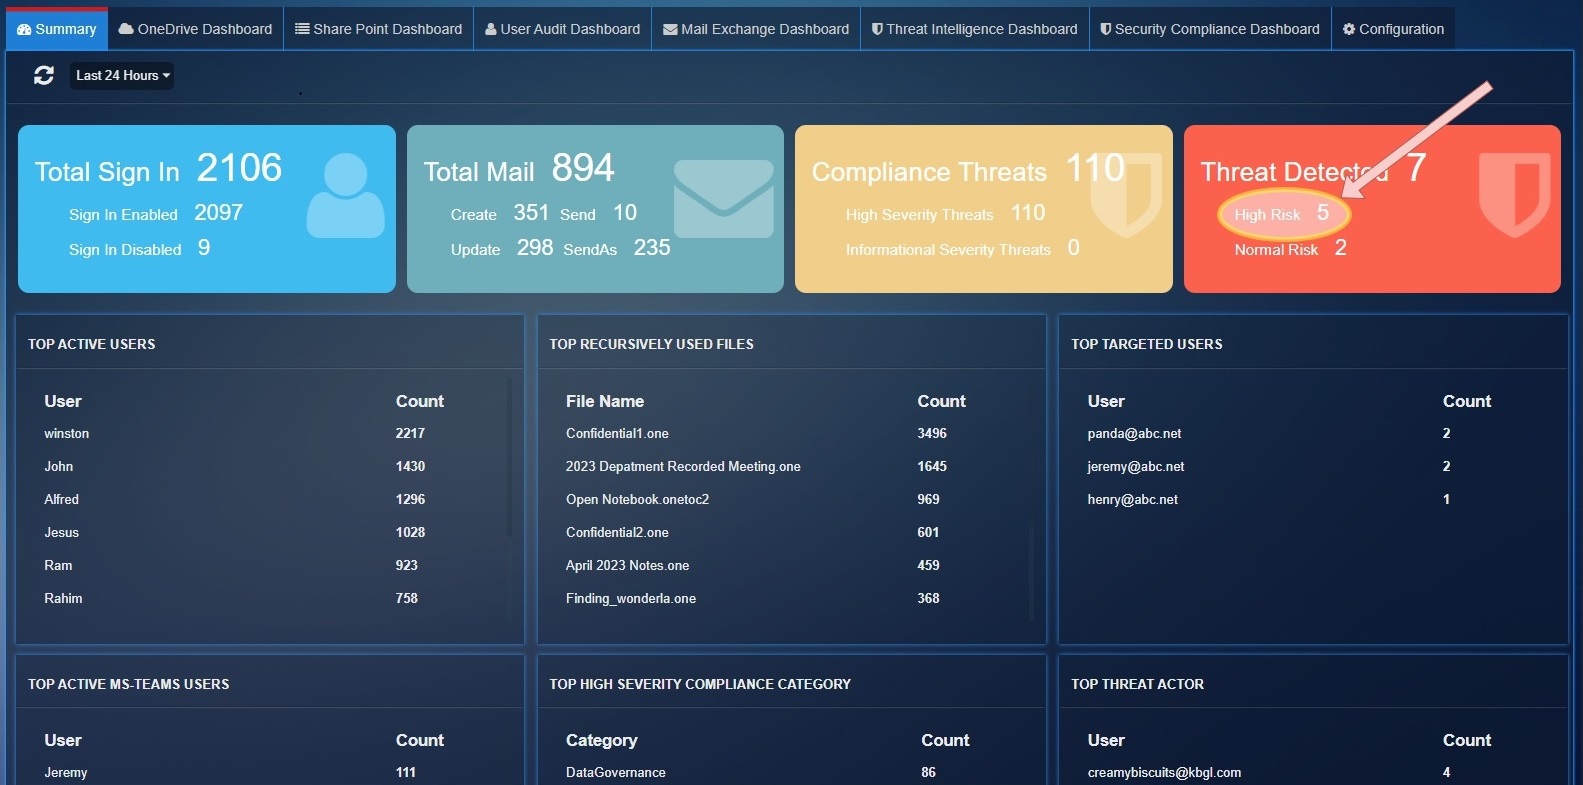
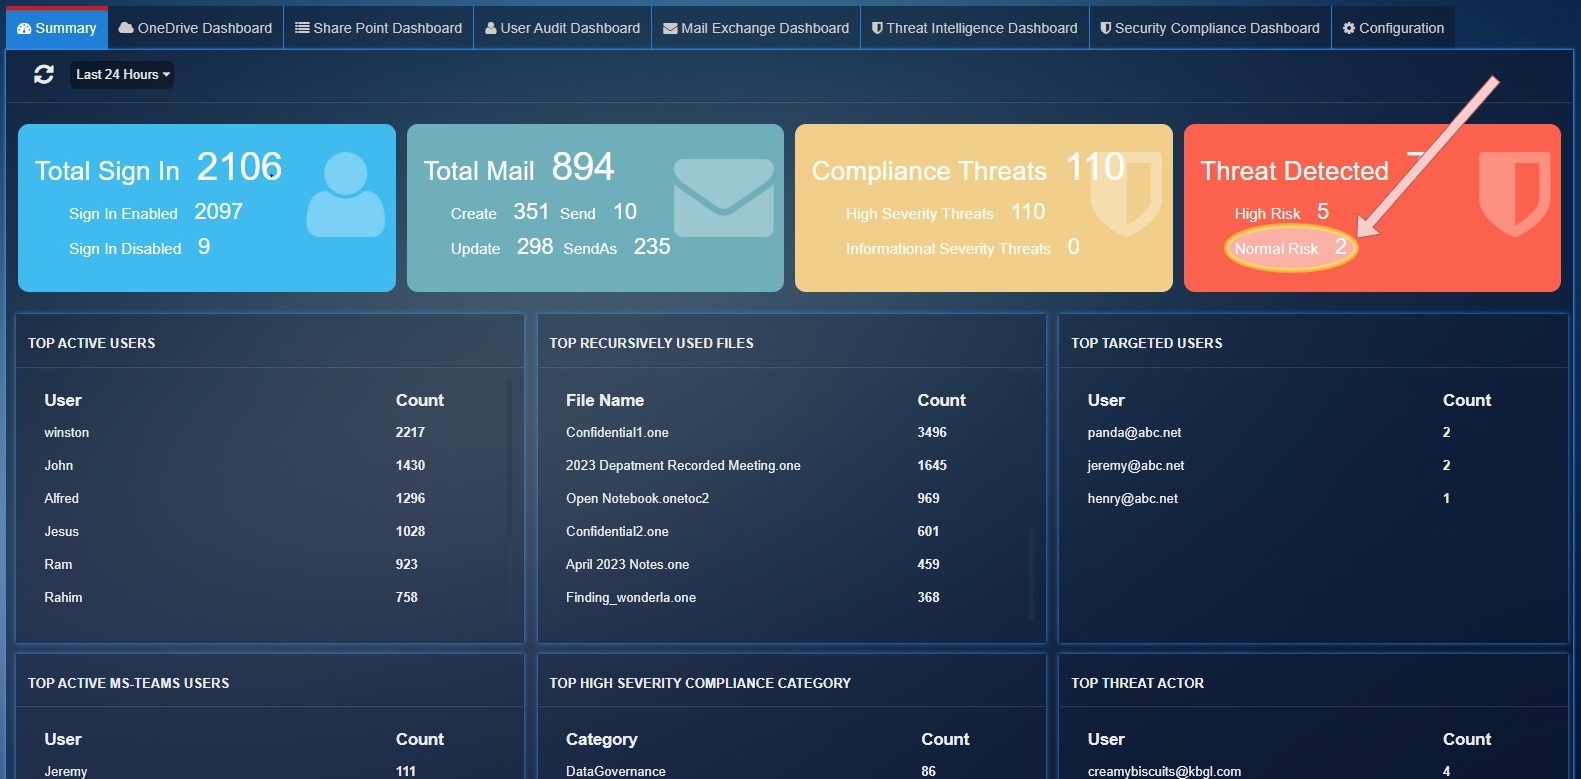
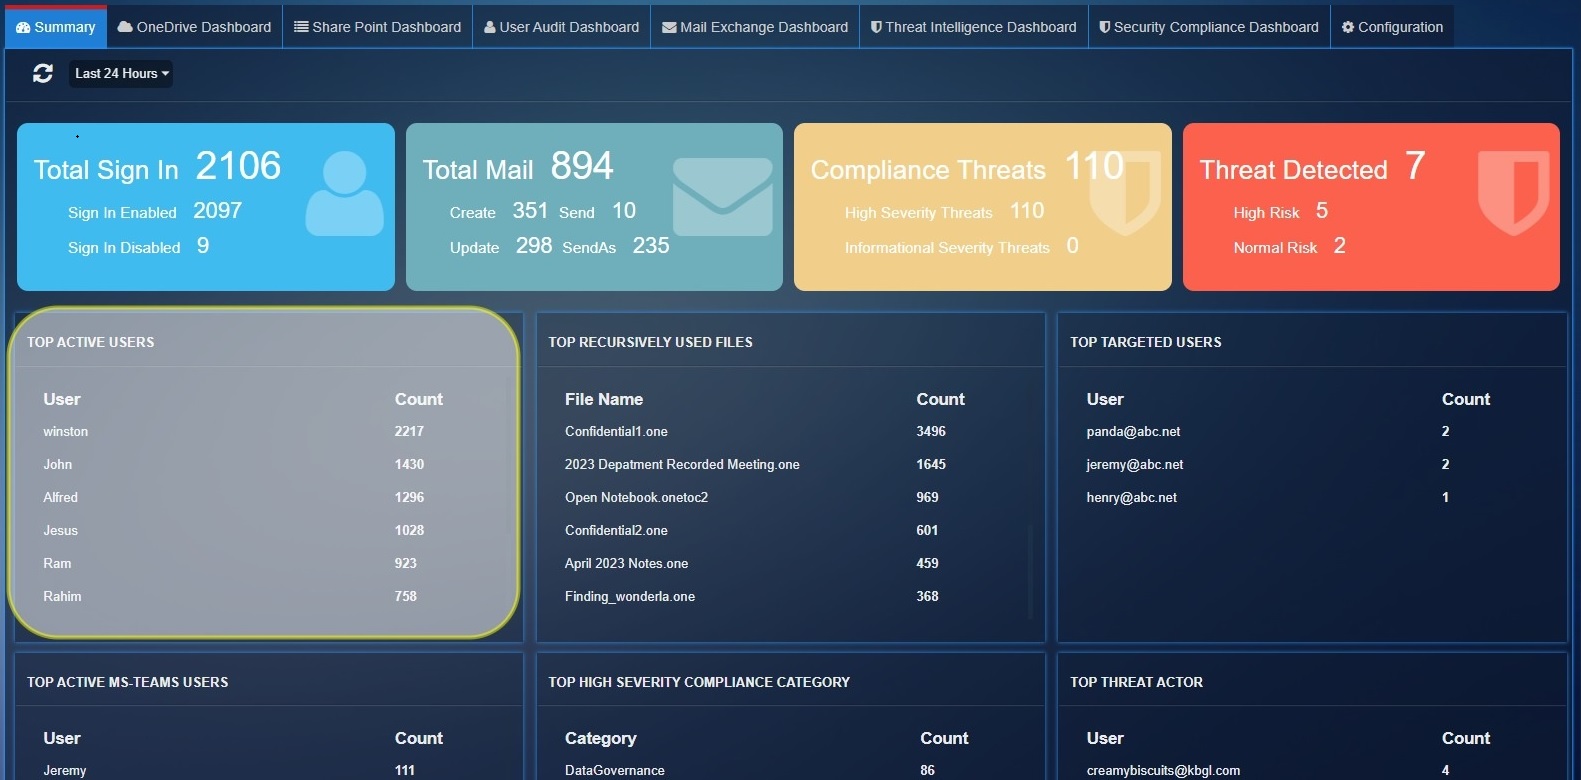
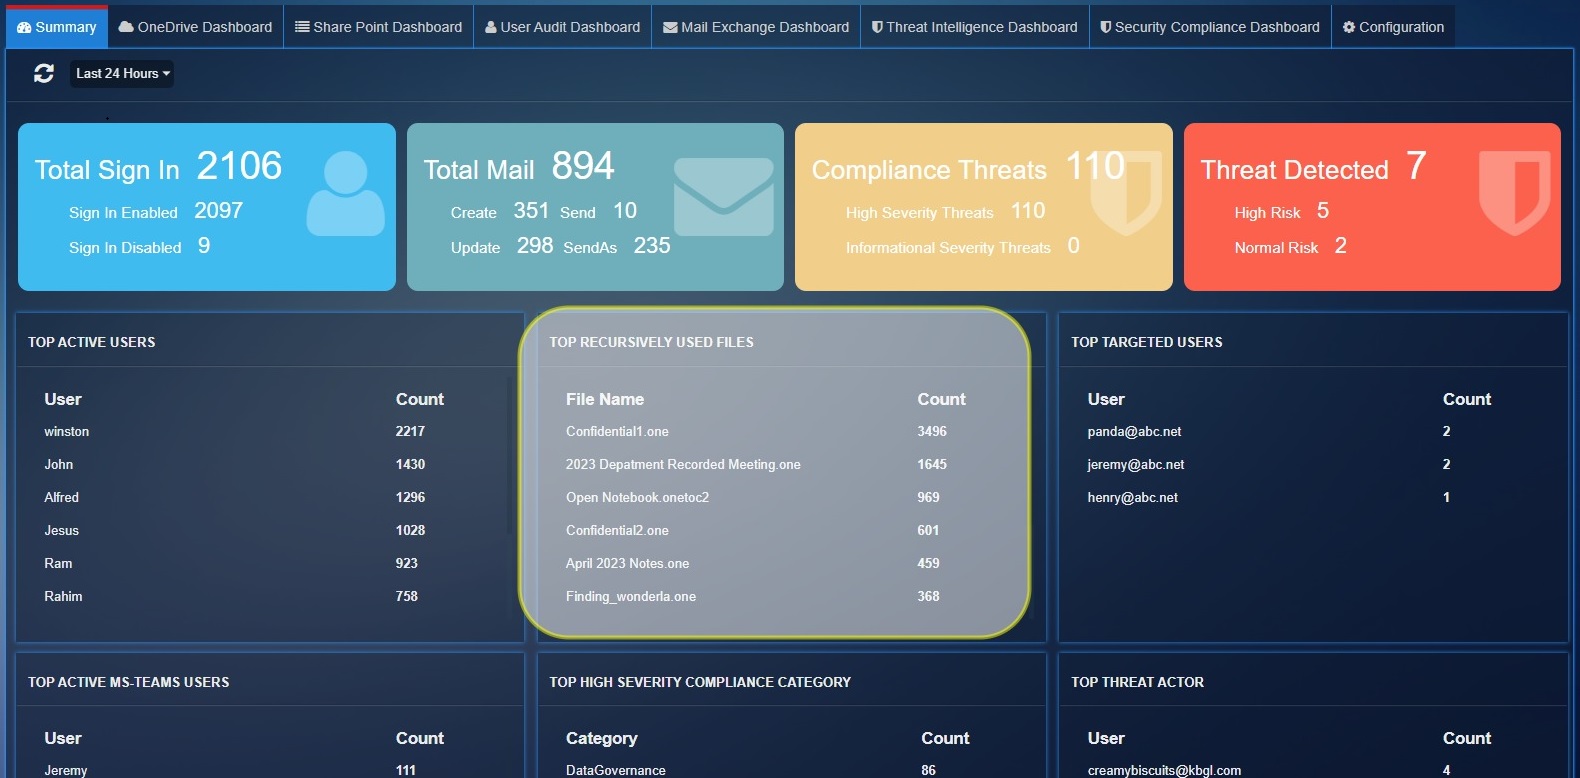
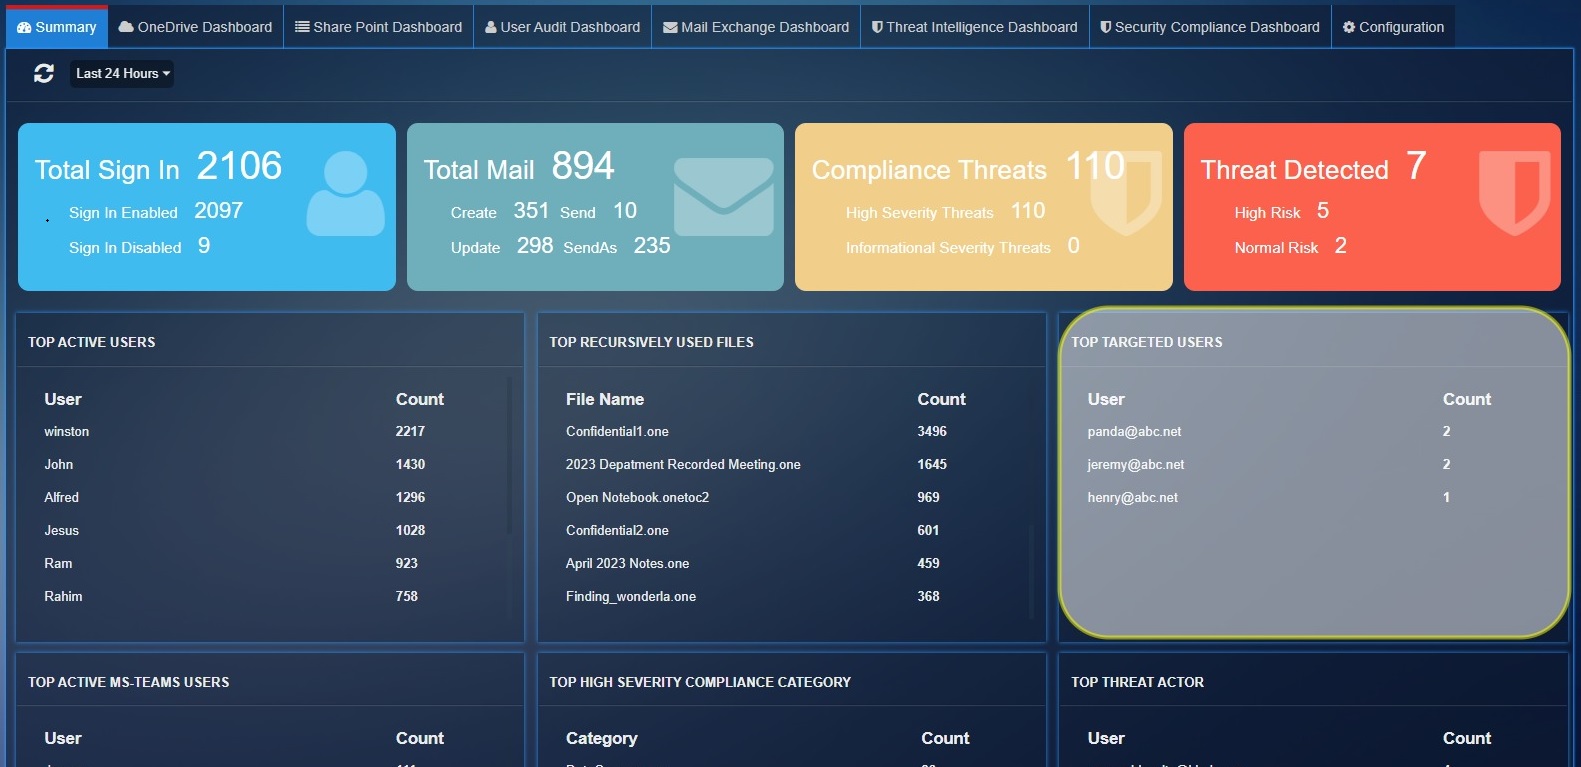
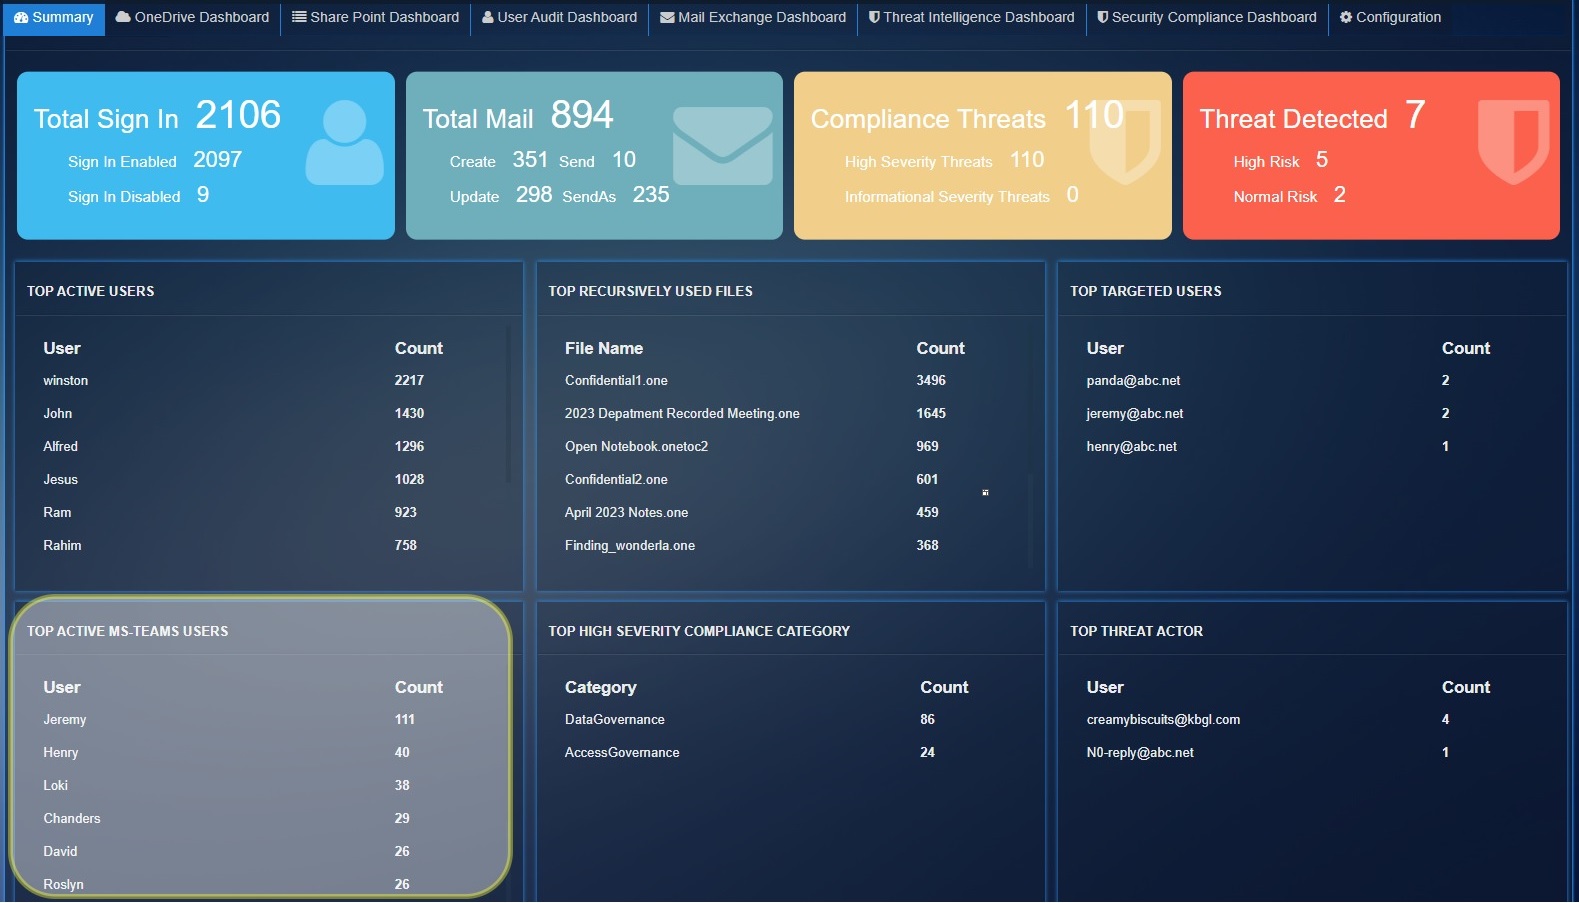
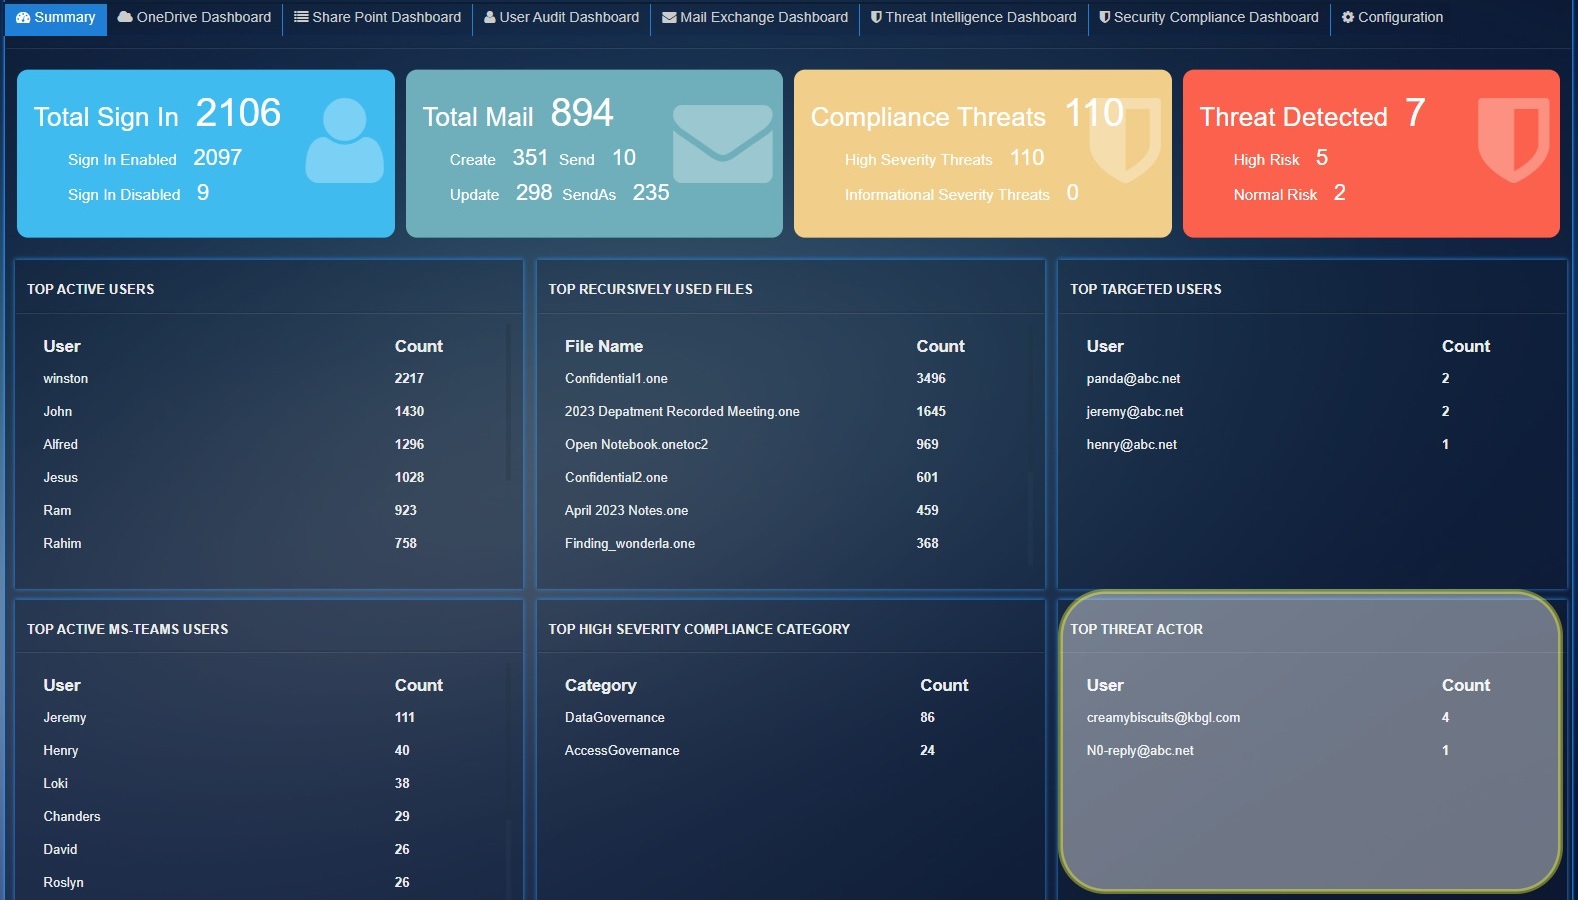
The Azure AD summary page have following statics with time filter options:
Total Sign In: This stat shows the total number of successful user logins and total number of user login failures.
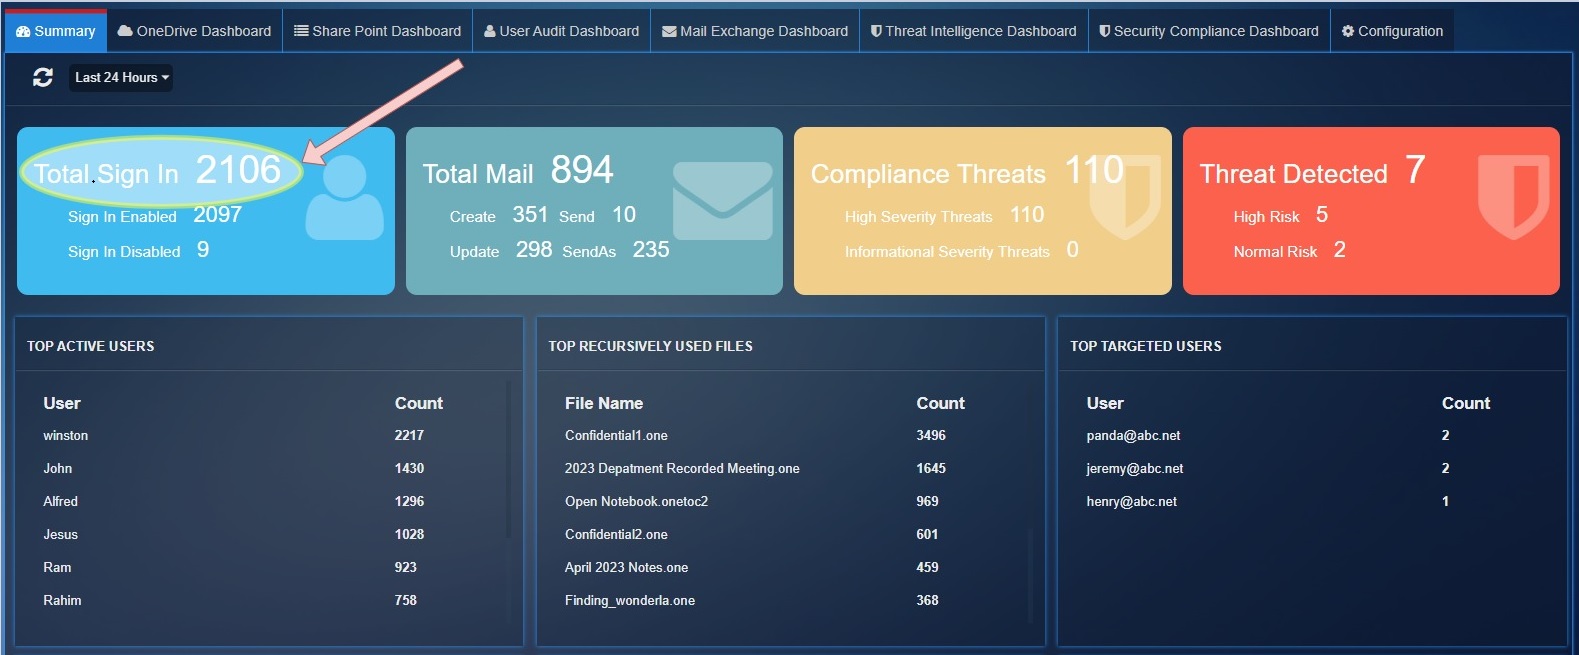
Sign In Enabled: Shows the total number of successful logins
Sign In Disabled: Shows the total number of failed logins
Total Mail: This parameter shows the total mail count detected by exchange service for operation Create, Send, Update, SendAs.
Create: Total number of times an email is created during the filtered time.
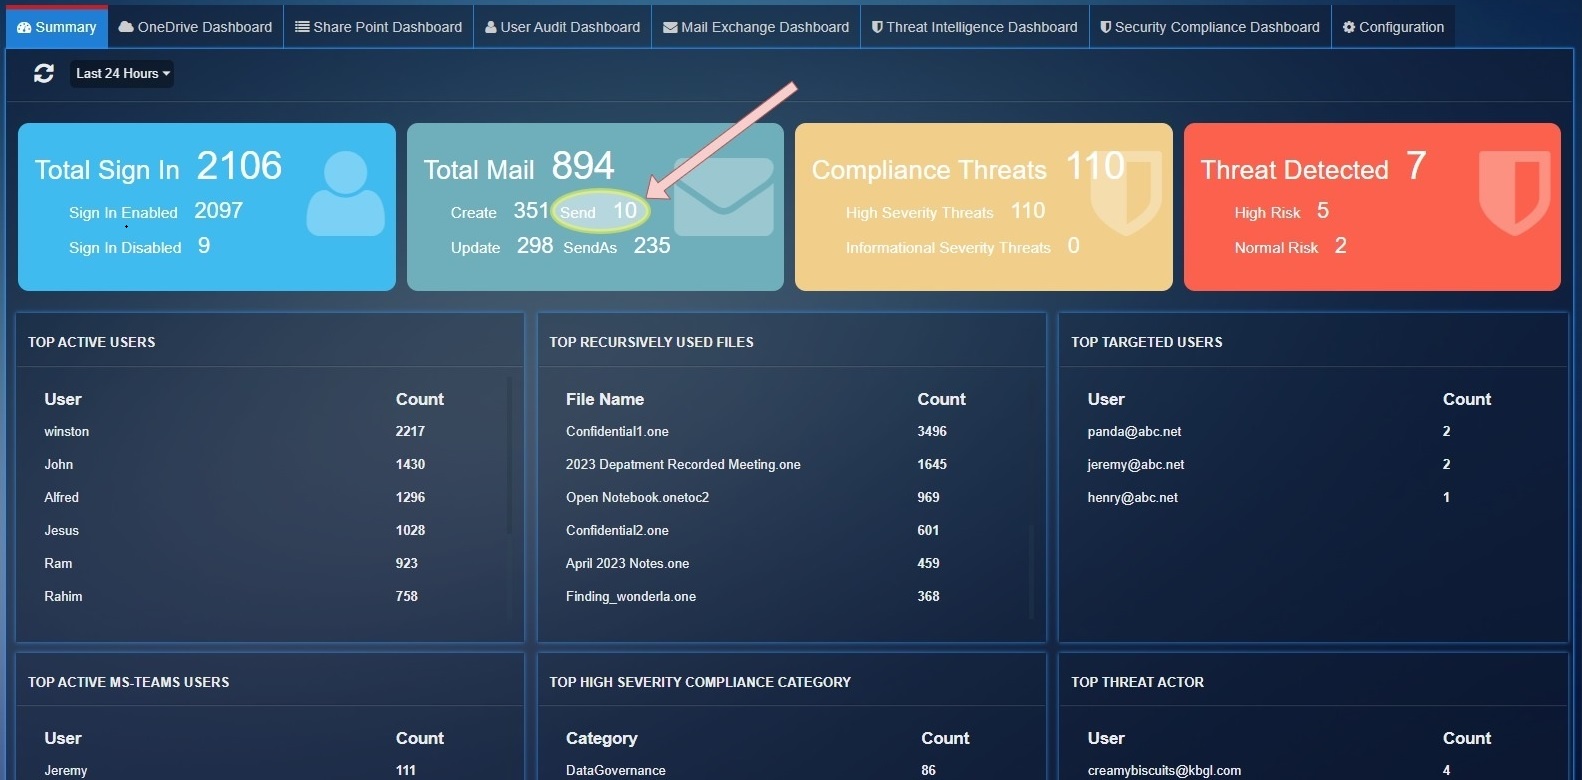
Send: Shows the total number of emails sent during the filtered time.
Update: Shows the total number of times an email thread was updated.
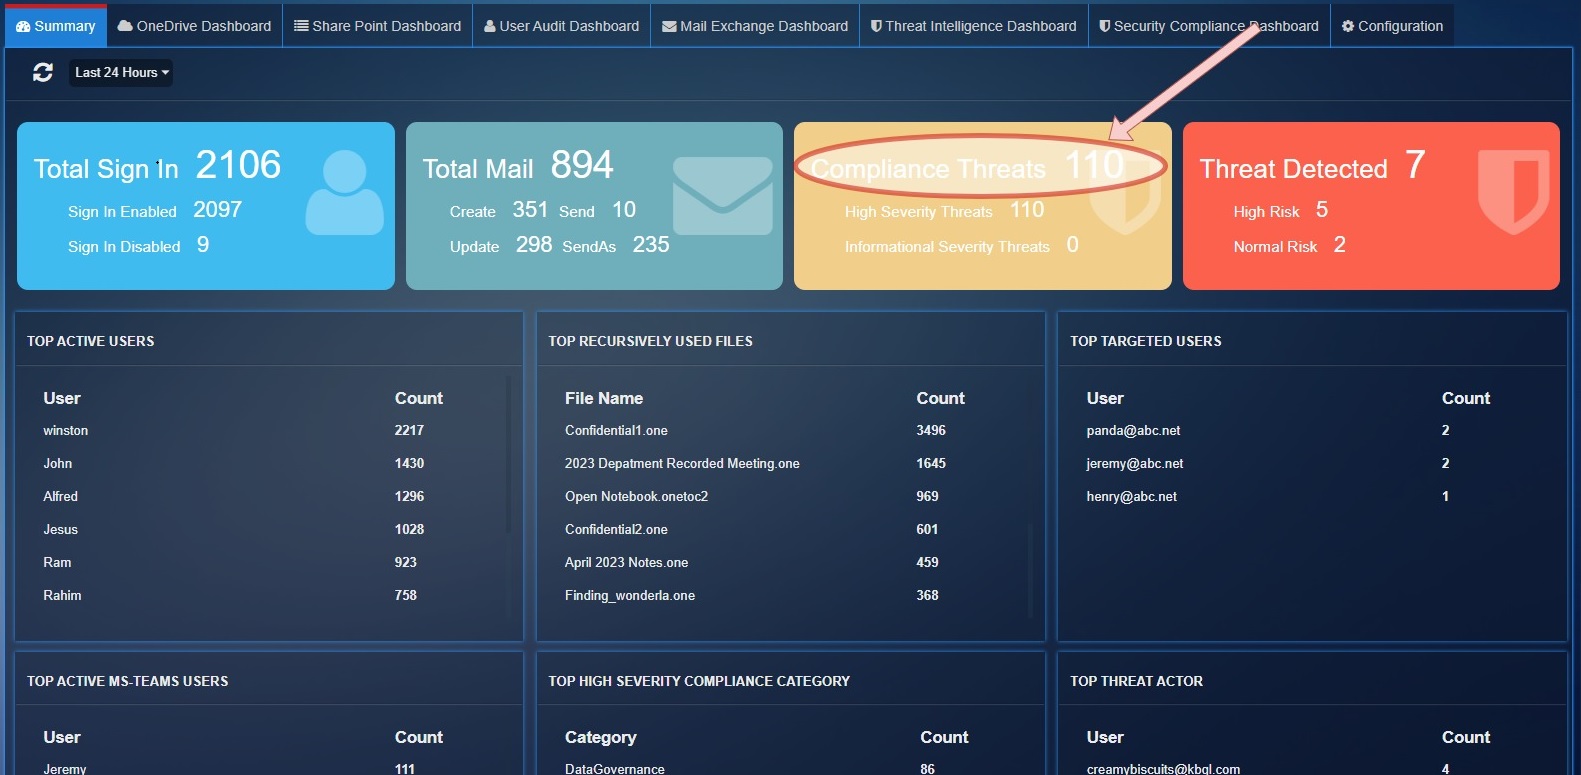
Compliance Threats: Shows the total number of threats count detected by 'SecurityComplianceCenter' service for severity "High", "Informational".
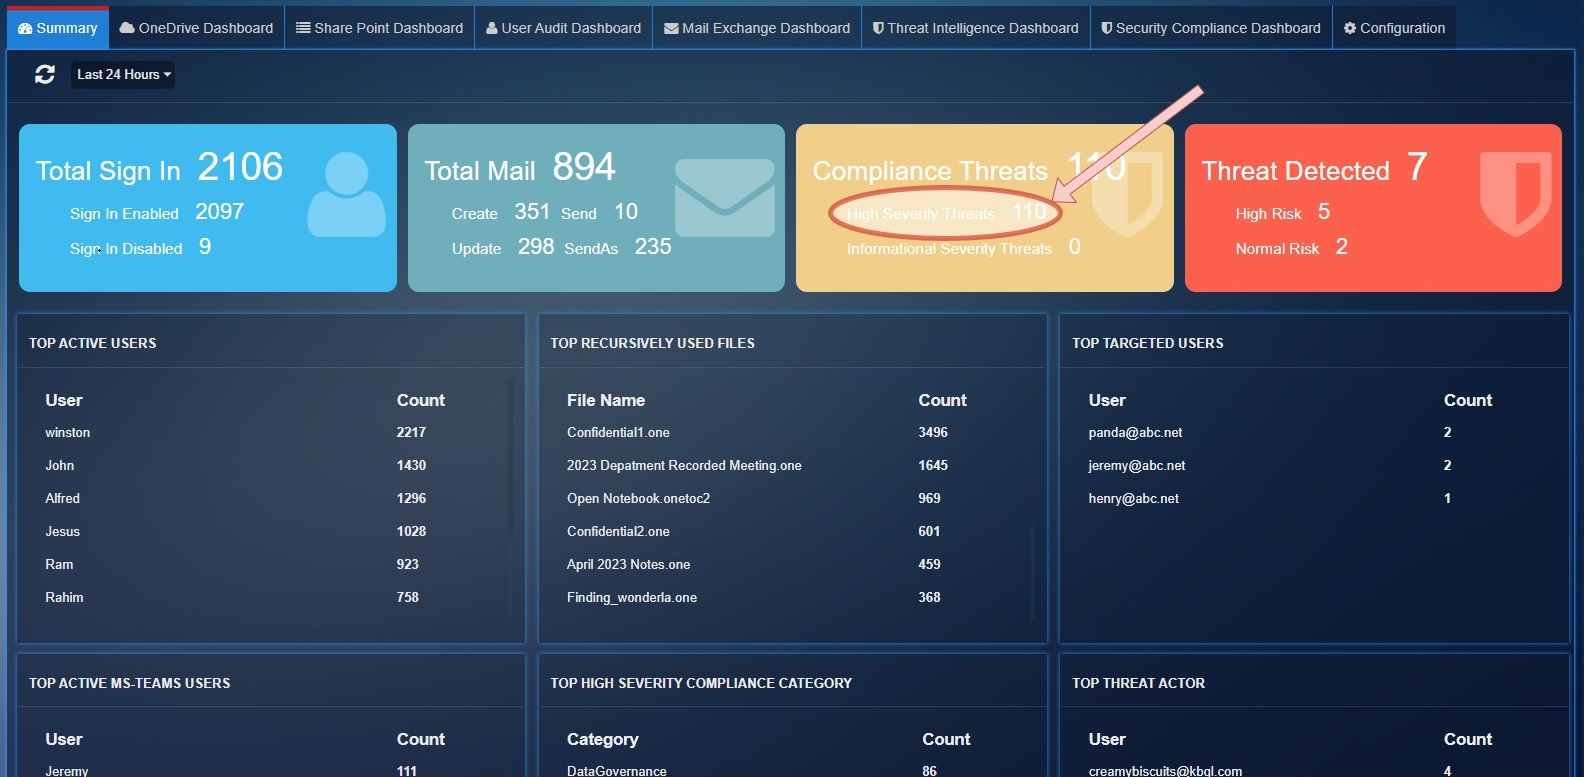
High Severity Threats: Total Threats count for severity 'High'.
Informational Severity Threats: Total Threats count for severity 'Informational'.
Threat Detected: Total threats count detected by 'ThreatIntelligence' service
High Risk: Total threats count for PhishConfidenceLevel 'High'.
Normal Risk: Total threats count for PhishConfidenceLevel 'Normal'.
Top Active Users: These are top users who have registered highest count of user activity.
Top Recursively Used Files: Show the top 10 files which have highest activity count in 'OneDrive', 'SharePoint'.
Top Targeted Users: Show the top 10 recipient users list which have 'High' PhishConfidenceLevel detected by Threat Intelligence Services.
Top Active MS-Teams Users: Shows the top 10 users activities count for Microsoft Teams.
Top Threat Actor: Show the top 10 phishing email sender email list which have 'High' PhishConfidenceLevel detected by Threat Intelligence services.
OneDrive Dashboard
This Dashboard provides comprehensive insights related to the user’s interaction with files on OneDrive. The data displayed here helps in monitoring and understanding the level of collaboration going on by looking at the number of files shared.
Filtering OneDrive Dashboard Reports Using the Time Filter Option
Use the time filter option to view OneDrive related user activity/collaboration for a particular time period. 
Filtering OneDrive Dashboard Reports Using the Operations Type Filter
Use the operations dropdown to select the OneDrive collaboration activities that you want to view in the dashboard. 
Detailed View of a Particular OneDrive Operation of a User
Click the User to view the Details pop-up which displays the granular version of the User Details & the Events Details. 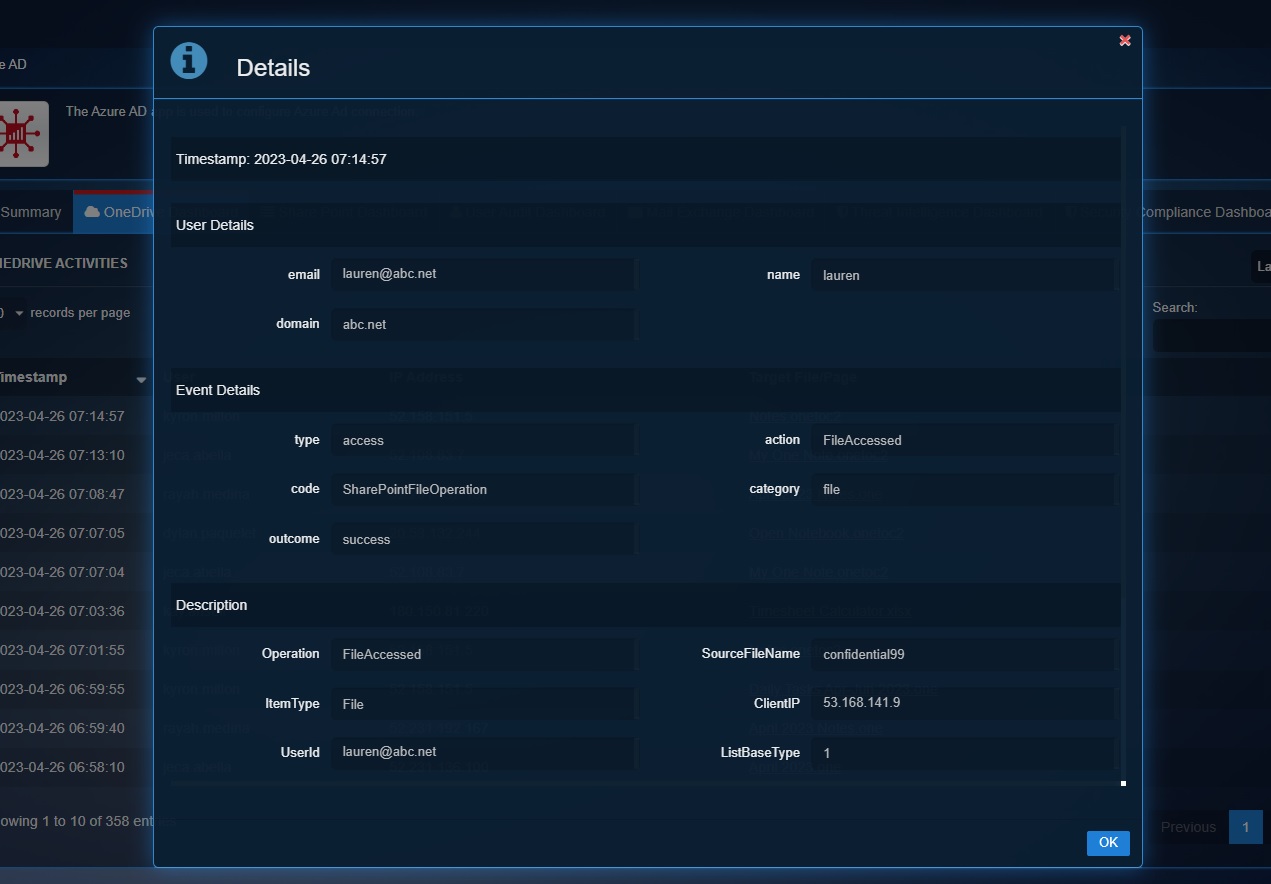
The following are the OneDrive collaboration activities that can be viewed in the dashboard after selecting them in the operations dropdown:
File Accessed: This event is captured when a user accesses a file.
File Modified: This event is captured when a user saves a file or when a file is auto-saved.
File Deleted: This event is captured when a user saves a file or when a file is auto-saved.
File Downloaded: This event is captured when the user downloads a copy of a file to his or her hard drive.
File Renamed: This event is captured when a user renames a file.
File Previewed: This event is captured when a user previews the file
File Restored: This event is captured when a user restores his or her file from the site recycling bin.
File Moved: This event is captured when a user moves a file located in document library into another folder located in document library.
File Recycled: This event is captured when a user deletes a file and after its recycled.
File Copied: This event is captured when a user creates a copy of a file located in a document library.
File Malware Detected: This event is captured when a malware is detected.
Folder Renamed: User renames a folder on a site.
Folder Created: User creates a folder on a site.
Folder Moved: User moves a folder to a different location on a site.
Folder Recycled: This event is captured when a user deletes a folder and after its recycled.
Folder Modified: User modifies a folder on a site. This includes changing the folder metadata, such as changing tags and properties.
Sharing Revoked: This event is captured when a user revokes the sharing permission to a file or folder to a designated user, in other words the designated user will not have access to the resource.
Sharing Policy Changed: This event is captured when the sharing policy of the file is changed.
Sharing Set: This event is captured when a user creates or updates a permission sharing to a file or folder.
List item Created: This event is created when a list item is created.
List Item Deleted: This event is created when a list item is deleted.
List Updated: This event is created when a list is updated.
Company Link Created: A link that works for people in the company was created.
Secure Link Created: A link that only works for specific people was created. It's usually followed by a series of AddedToSecureLink operations, which signify the users who were secured to the link.
Secure Link Updated: A secure link's settings were changed.
Added to SecureLink: A user was added to the list of entities who can use a secure sharing link.
Access Request Approved: This event is captured when a user approves an internal user to access a file or folder.
SharePoint Dashboard
The SharePoint Dashboard provides a comprehensive view of the users interaction with files on SharePoint. The data displayed here helps in monitoring and understanding the level of collaboration going on by looking at the number of files shared.
Filtering SharePoint Dashboard Reports Using the Time Filter Option
Use the time filter option to view SharePoint related user activity/collaboration for a particular time period. 
Filtering SharePoint Dashboard Reports Using the Operations Type Filter
Use the operations dropdown to select the SharePoint collaboration activities that you want to view in the dashboard. 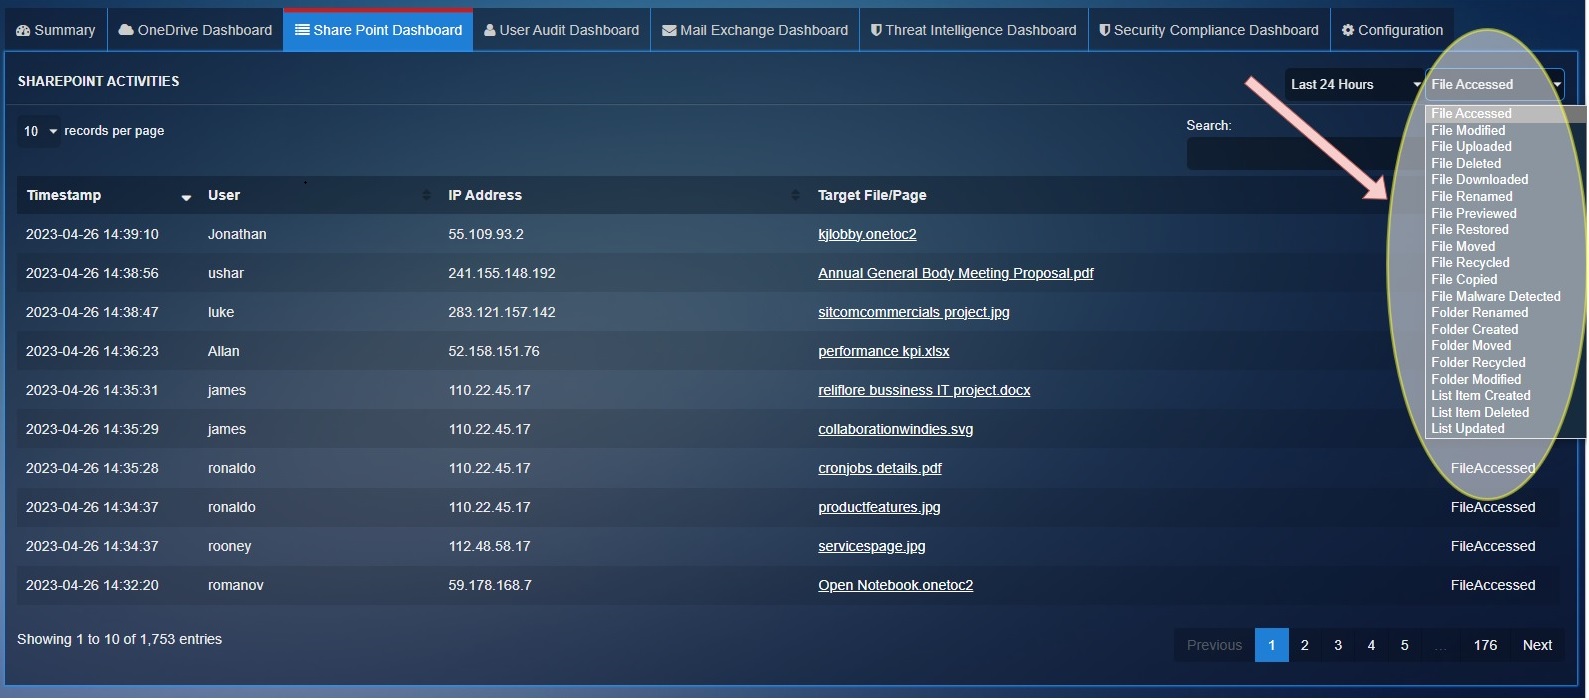
Detailed View of a Particular SharePoint Operation of a User
Click the User to view the Details pop-up which displays the granular version of the User Details & the Events Details. 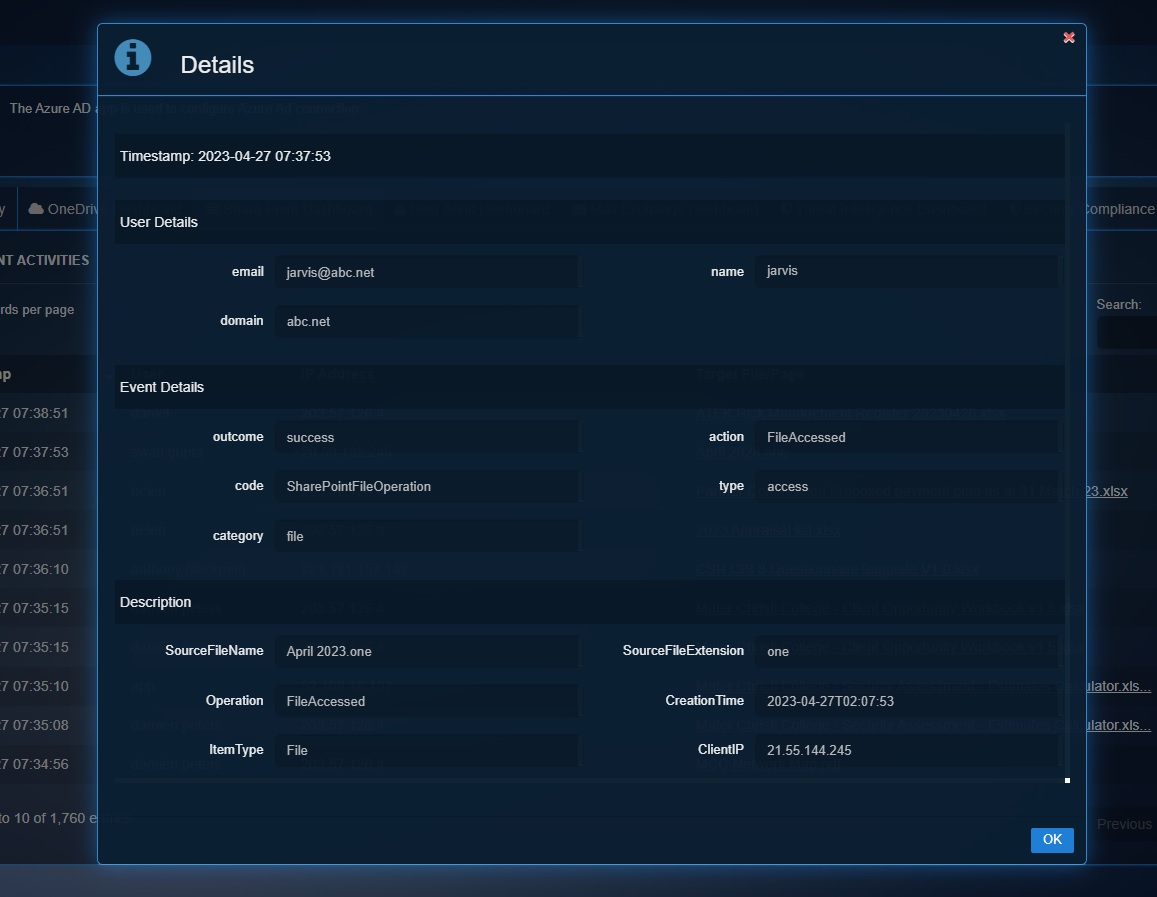
The following are the SharePoint collaboration activities that can be viewed in the dashboard after selecting them in the operations dropdown:
File Accessed: This event is captured when a user accesses a file.
File Modified: This event is captured when a user saves a file or when a file is auto-saved.
File Deleted: This event is captured when a user saves a file or when a file is auto-saved.
File Downloaded: This event is captured when the user downloads a copy of a file to his or her hard drive.
File Renamed: This event is captured when a user renames a file.
File Previewed: This event is captured when a file is previewed.
File Restored: This event is captured when a user restores his or her file from the site recycling bin.
File Moved: This event is captured when a user moves a file located in document library into another folder located in document library.
File Recycled: This event is captured when a user deletes a file and recycles it.
File Copied: This event is captured when a user creates a copy of a file located in a document library.
File Malware Detected: This event is captured when a file malware is detected in sharepoint.
Folder Renamed: User renames a folder on a site.
Folder Created: User creates a folder on a site.
Folder Moved: User moves a folder to a different location on a site.
Folder Recycled: This event is captured when a user deletes a folder and after the deleted item is moved to the recycle bin.
Folder Modified: User modifies a folder on a site. This includes changing the folder metadata, such as changing tags and properties.
Sharing Revoked: This event is captured when a user revokes the sharing permission to a file or folder to a designated user, in other words the designated user will not have access to the resource.
Sharing Policy Changed: This event is captured when the sharing policy of the file is changed.
Sharing Set: This event is captured when a user creates or updates a permission sharing to a file or folder.
List item Created: This event is captured when a list item is created.
List Item Deleted: This event is captured when a list item is deleted.
List Updated: This event is captured when a list is updated
Company Link Created: A link that works for people in the company was created.
Secure Link Created: A link that only works for specific people was created. It's usually followed by a series of AddedToSecureLink operations, which signify the users who were secured to the link.
Secure Link Updated: A secure link's settings were changed.
Added to SecureLink: A link that only works for specific people was secured to a user.
Access Request Approved: This event is captured when a user approves an internal user to access a file or folder.
User Audit Dashboard
The User Audit Dashboard lists a variety of user administration activities logged when an admin adds or changes a user account.
Filtering User Audit Dashboard Reports Using the Time Filter Option
Use the time filter option to view user administration activities for a particular time period. 
Filtering User Audit Dashboard Reports Using the Operations Type Filter
Use the operations dropdown to select the user administration activities that you want to view in the dashboard. 
Detailed View of a Particular Operation of a User
Click the User to view the Details pop-up which displays the granular version of the User Details & the Events Details. 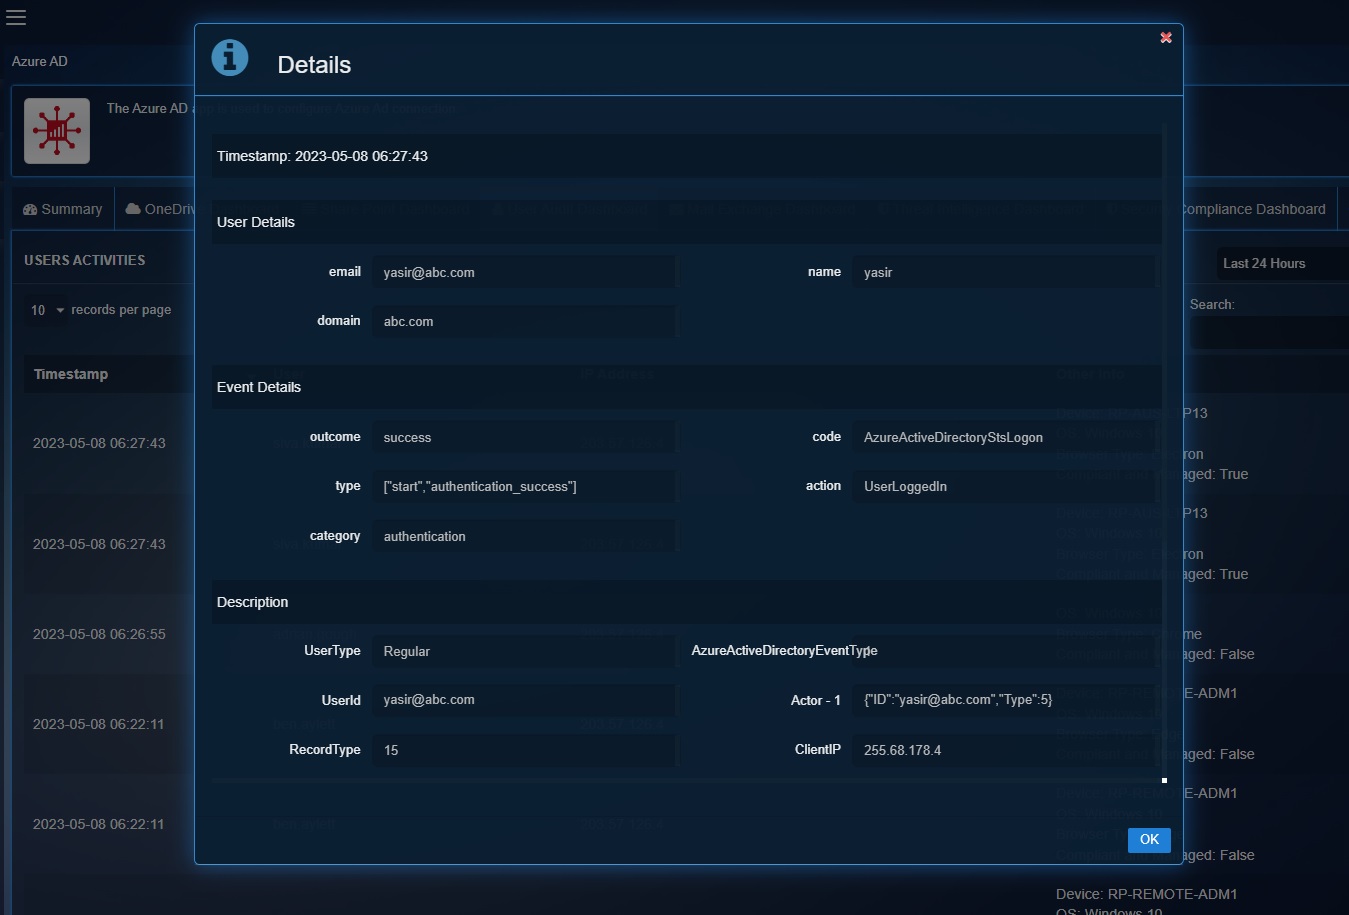
The following are the user administration activities that can be viewed in the dashboard after selecting them in the operations dropdown:
UserLoggedIn: Lists when a user logs in
UserLoginFailed: Lists when a user login was failed.
Add user: A user account was created.
Delete user: A user account was deleted.
Update user: Administrator changes one or more properties of a user account.
Restore user: This event is created when the user is restored.
Change user password: A user changes their password. Self-service password reset has to be enabled (for all or selected users) in your organisation to allow users to reset their password. You can also track self-service password reset activity in Azure Active Directory.
Reset user password: Administrator resets the password for a user.
Change user license: The license assigned to a user what changed. To see what licenses were changes, see the corresponding Updated user activity.
Set user manager: A manager was set for a user.
Add group: This event is created when an admin or a user creates a MS 365 group.
Update group: A property of a group was changed.
Delete group: This event is created when an admin deletes a group.
Add member to group: This event is created when a member was added to the group.
Add owner to group: This event is created when the admin adds name of one or more people who will be designated to manage the group.
Remove member from group: This event is created when a member was removed from a group.
Update policy: This event is created when a communication compliance administrator has performed a policy update.
Add Policy: This event was created when a communication compliance administrator has added a policy.
Update device: This event is created when a SharePoint or global administrator changed the unmanaged devices policy for your organisation. This policy controls access to SharePoint, OneDrive, and Microsoft 365 from devices that aren't joined to your organisation. Configuring this policy requires an Enterprise Mobility + Security subscription.
Disable account: This event is created when an account is disabled.
Disable Strong Authentication: Disable strong authentication for a single user.
Update device configuration:
Delete application password for user: This event is created when an application password is deleted for a user.
Add registered owner to device:
Add member to role:
Mail Exchange Dashboard
The Mail Exchange Dashboard provides a granular insight about the mailbox activities performed by the mailbox owner, a delegated user, or an administrator.
Filtering Mail Exchange Dashboard Reports Using the Time Filter Option
Use the time filter option to view Mail Exchange related user activity for a particular time period. 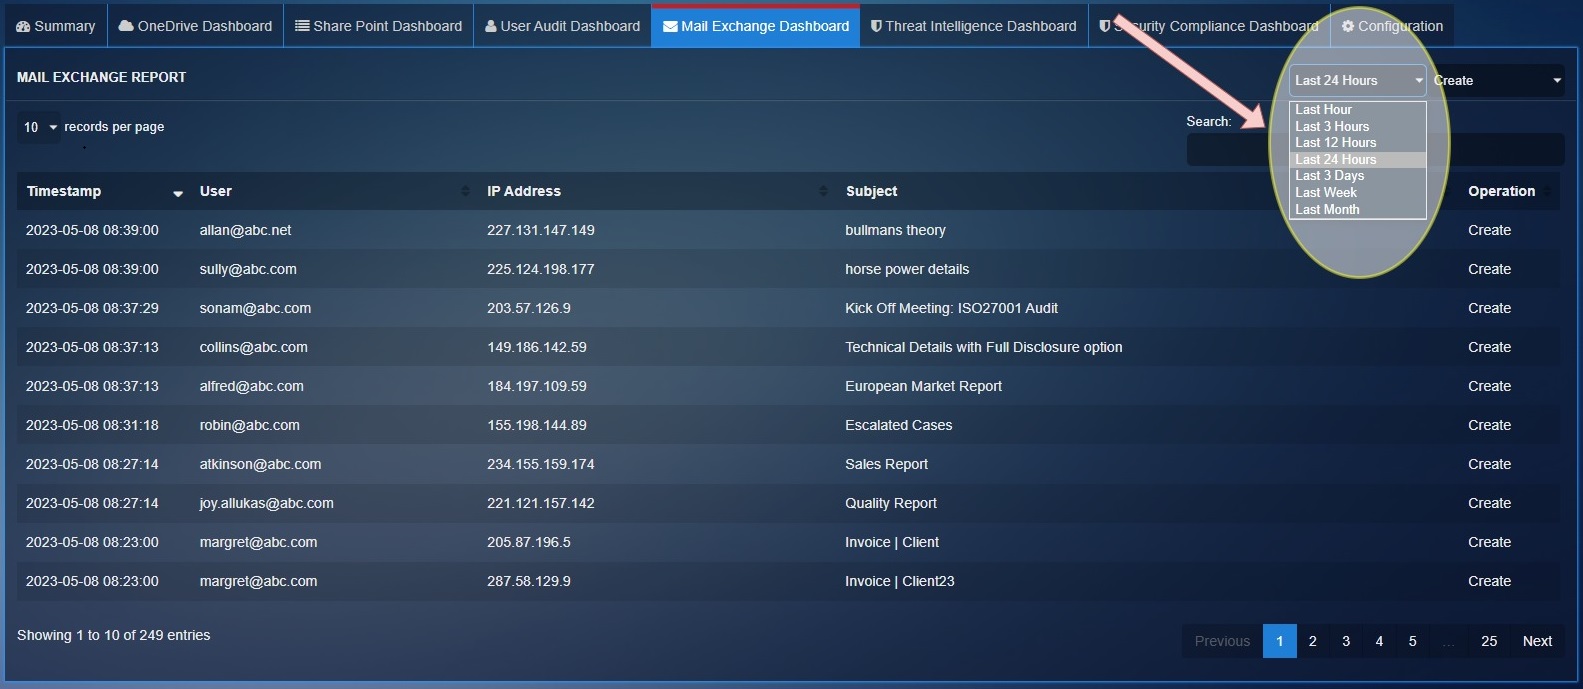
Filtering Mail Exchange Dashboard Reports Using the Operations Type Filter
Use the operations dropdown to select the O365 Mail Exchange related activities that you want to view in the dashboard. 
Detailed View of a Particular Mail Exchange related Operation of a User
Click the User to view the Details pop-up which displays the granular version of the User Details & the Events Details. 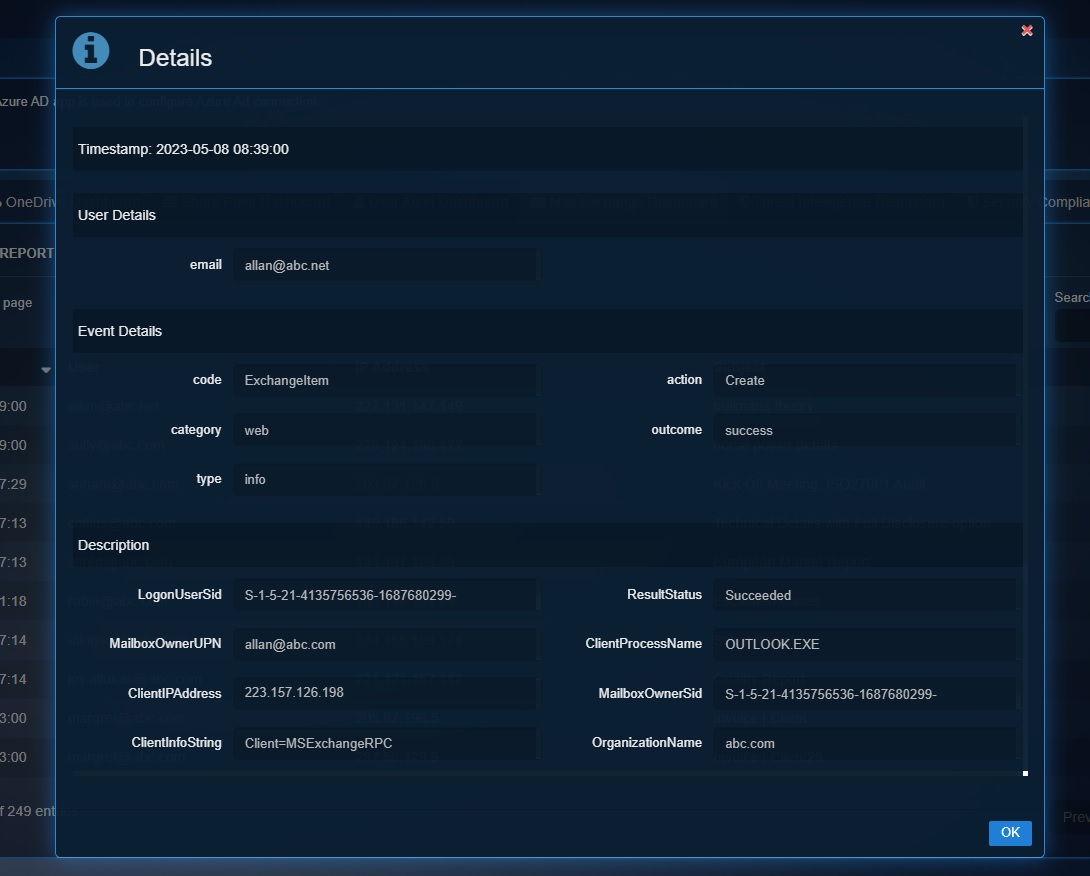
The following are the mailbox activities that can be viewed in the dashboard after selecting them in the operations dropdown:
Create: An item is created in the Calendar, Contacts, Notes, or Tasks folder in the mailbox. For example, a new meeting request is created. Creating, sending, or receiving a message isn't audited. Also, creating a mailbox folder isn't audited.
Send: A message was sent, replied to or forwarded. This activity is only logged for users with an Office 365 or Microsoft 365 E5 license.
SendAs: A message was sent using the SendAs permission. This means that another user sent the message as though it came from the mailbox owner.
Update: A message or its properties was changed.
Mail Items Accessed: Messages were read or accessed in mailbox. Audit records for this activity are triggered in one of two ways: when a mail client (such as Outlook) performs a bind operation on messages or when mail protocols (such as Exchange ActiveSync or IMAP) sync items in a mail folder. This activity is only logged for users with an Office 365 or Microsoft 365 E5 license. Analyzing audit records for this activity is useful when investigating compromised email account.
The MailItemsAccessed event is a mailbox auditing action and is triggered when mail data is accessed by mail protocols and mail clients. This event can help investigators identify data breaches and determine the scope of messages that may have been compromised.
If an attacker gained access to email messages, the MailItemsAccessed action will be triggered even if there's no explicit signal that messages were actually read (in other words, the type of access such as a bind or sync is recorded in the audit record).
Send on Behalf: A message was sent using the SendOnBehalf permission. This means that another user sent the message on behalf of the mailbox owner. The message indicates to the recipient whom the message was sent on behalf of and who actually sent the message.
Mailbox Login: The user signed in to their mailbox.
Hard Delete: A message was purged from the Recoverable Items folder (permanently deleted from the mailbox).
Soft Delete: A message was permanently deleted or deleted from the Deleted Items folder. These items are moved to the Recoverable Items folder. Messages are also moved to the Recoverable Items folder when a user selects it and presses Shift+Delete.
Add Recipient Permission: A user was granted a permission. The only permission that can be granted with this is the SendAs permission.
Set User: A user's attributes have been modified.
Threat Intelligence Dashboard
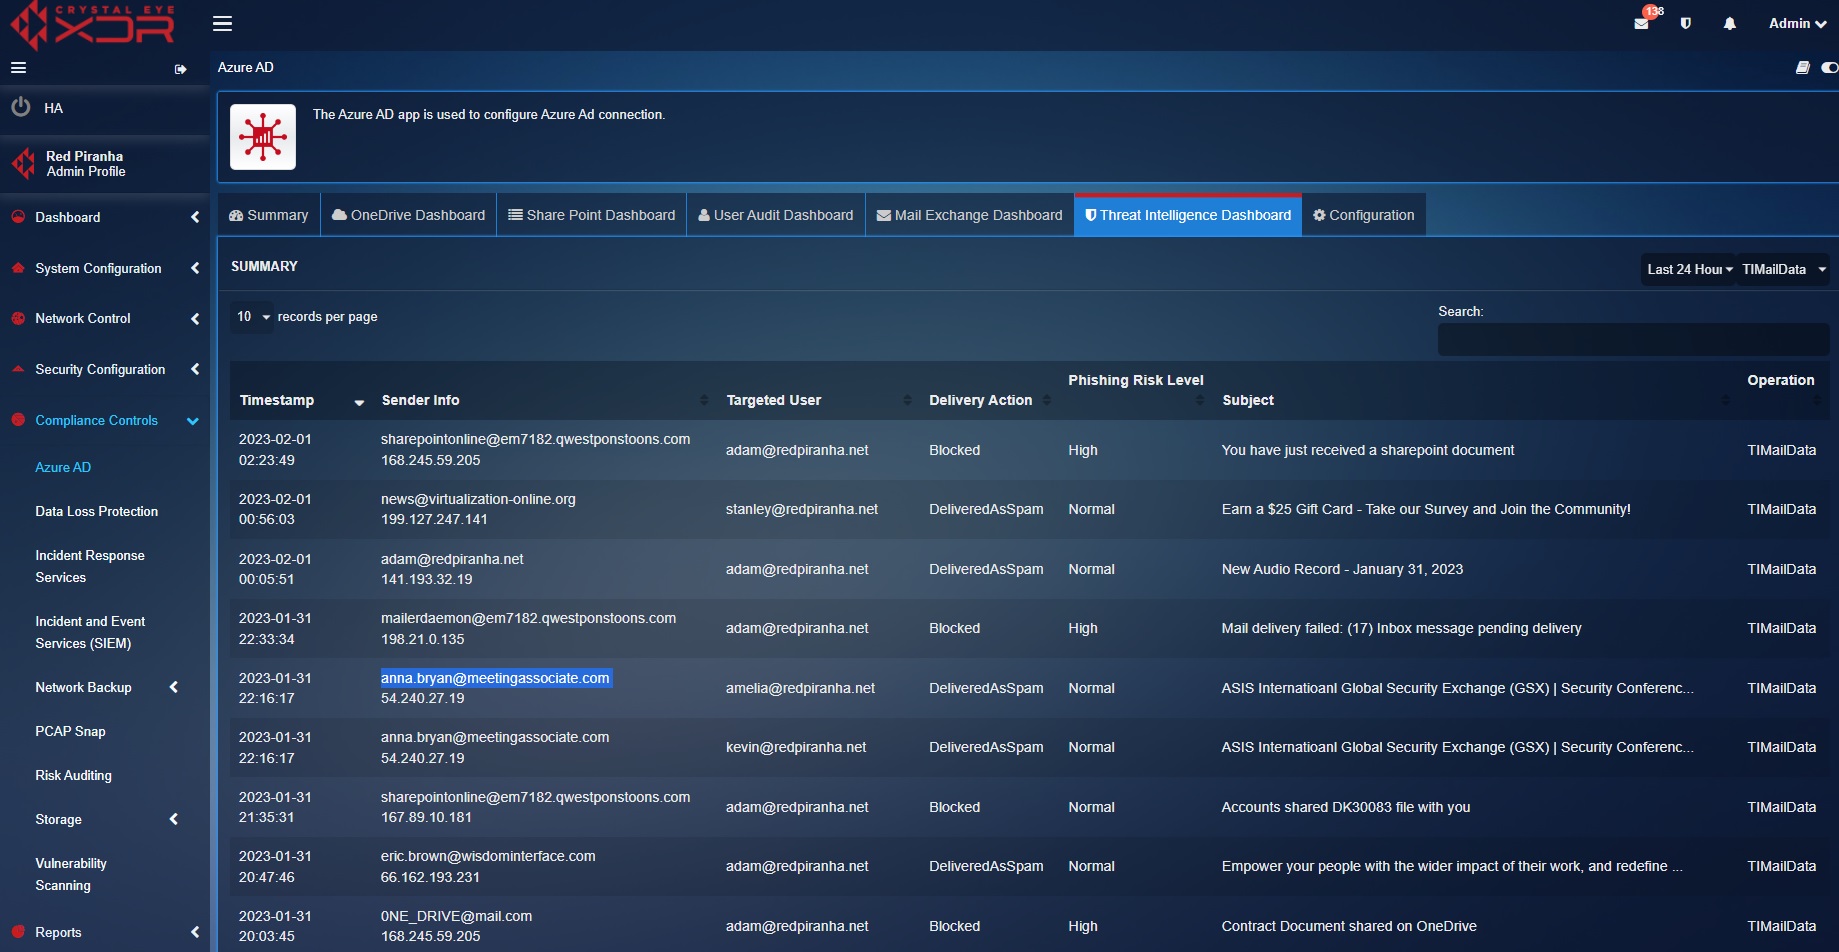
The Threat Intelligence Dashboard displays information regarding phishing attempts detected by the system. The dashboard provides in-depth insights of spam mails identified as phishing attempts which includes Timestamp, Sender Info, Targeted Internal User, Delivery Action, Phishing Risk Level, and the Subject of the Email.
The screenshot below clearly depicts the email related threat intelligence:

