Vulnerability Scanning
Overview
The Vulnerability Scanning application is a comprehensive vulnerability assessment system that is built to detect, and flag known and potential security weaknesses in devices located in the Crystal Eye XDR network.
The Vulnerability Scanning feature of the Crystal Eye XDR allows scanning of both network devices and network hosts running in virtual machines. The major pre-requisite to successfully run scans is to ensure that the network devices and the hosts running in VMs are deployed in the Crystal Eye XDR network.
Note
Once the vulnerability scan is completed it can take up to 3 business days for the report to be available in the Orchestrate depending on the size of the network being scanned and selected options.
Warning
Running a vulnerability scan during business hours poses a risk to availability of business services. There is a possibility of interruptions to business-critical services like phones and internet. The recommendation is to leave devices to be scanned powered on and then running scans overnight. A scan during business hours may capture more active devices, but the increased risks of service interruption should be given serious consideration by the business prior to scheduling a Vulnerability Scan.
Installation
The Vulnerability Scanning application is not available by default. It can be installed from Marketplace in the left-hand navigation panel.
Navigation to Vulnerability Scanning Application
Left-hand Navigation Panel > Compliance Controls > Vulnerability Scanning
Configuring Vulnerability Scanning Application
The Vulnerability Scanning application needs to be configured before it can be used. This app is not a default app so it needs to be downloaded from the marketplace and then configured as explained below.
How to Configure Vulnerability Scanning Application?
Step 1: In the Vulnerability Scanning application page, click the Configure Vulnerability Scanning button.

The configuration process will then commence while displaying the screen below:
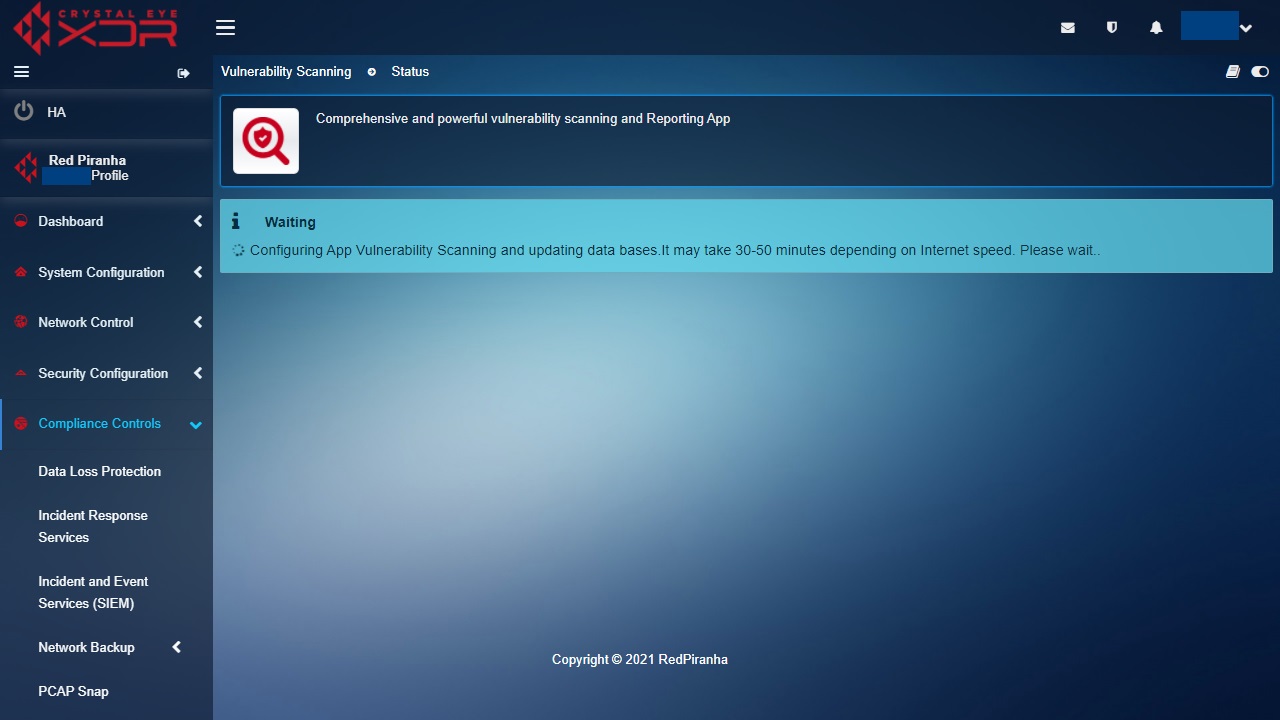
Note
The configuration process of the vulnerability Scanning application may take 30-50 minutes depending on the internet speed.
Network Scan
The Network Scan feature of the Crystal Eye XDR allows users to initiate a comprehensive vulnerability scanning of all physical devices such as Laptop, Desktop, Phones, Tablets, Servers etc. The user interface of the Network Scan feature has enhanced capabilities to tailor the scans as per organisational requirements.

Stage 1 Configuration—Create Scan Profile
The Scan Profiles feature of the vulnerability scanning application can be used to create multiple profiles with various combinations of device data. For example, Scan Profile 1 can be created to scan only desktops and laptops in the network whereas; Scan profile 2 can be used to scan only servers and tablets.
Vulnerability Scanning and Operation Technology: Due to the increased risk of unpredictable behaviour of OT systems while being scanned for vulnerabilities, special consideration of OT segregation and Vulnerability Scan timing is recommended using Scan Profiles feature. Best practices recommend that OT systems are monitored for availability during scans and that OT networks are scanned separately. It is also highly recommended that OT systems are not exposed to external threats via the Internet. OT Systems segregation can be done by creating a custom scan profile having only OT Systems IP address.
How to create a Scan Profile?
Note
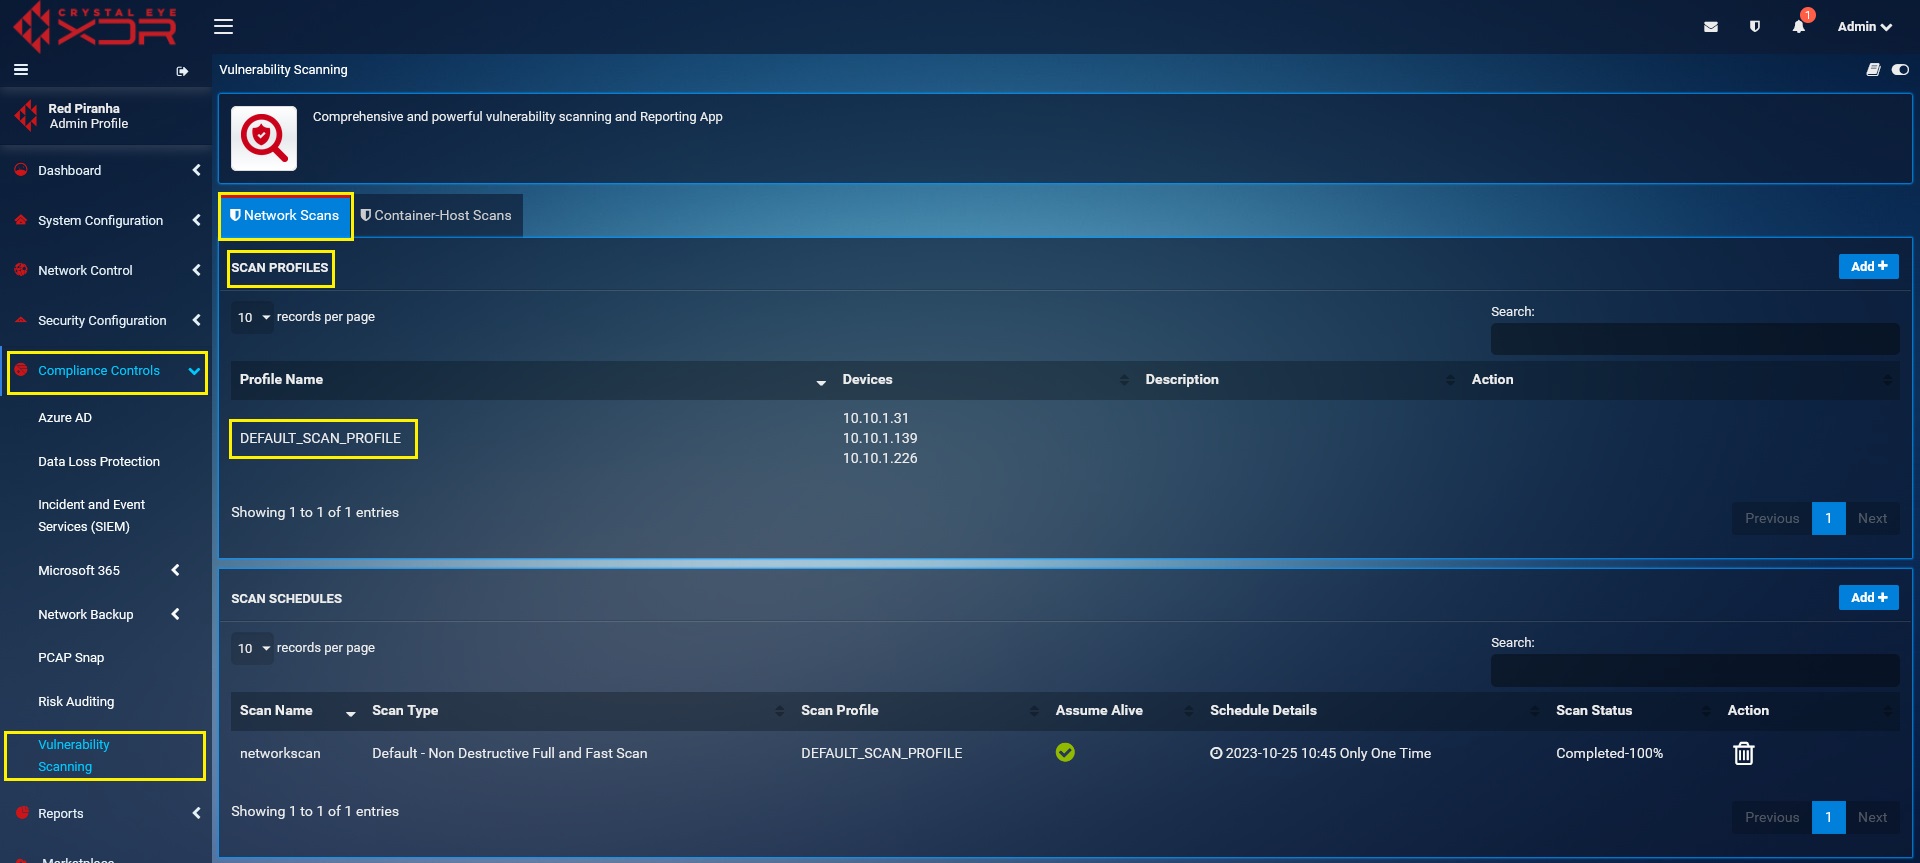
As a default feature, the Crystal Eye XDR’s Vulnerability Scanning Application provides a default profile (see screenshot below) which can be used to scan all the devices in the network. However, if there is an explicit requirement to scan only certain devices, a new custom profile can be created.
Step 1: To create a custom profile, click Add Button in the Scan Profile section.

Note
If the aim is to scan all the devices connected to the Crystal Eye XDR network and not a specific list of devices, then skip the below mentioned steps and create the scan schedule with the default profile selected as discussed in Stage 2 Configuration—Create Scan Schedule.
Step 2: You will see the Add New Profile page. Enter Profile Name, select the Devices that needs to be scanned from Select Devices dropdown, enter the Description in the textbox and click Add Button.

Step 3: You will now be directed to the Scan Profiles dashboard where the newly created custom profile will be visible.

Stage 2 Configuration—Create Scan Schedules
Vulnerability Scans can be scheduled using the Scan Schedules feature specifying the various scan parameters as per the explicit organizational requirements. The vulnerability scanning application can be configured to perform three types of scanning:
-
Deep – Non Destructive Full and Slow Scan,
-
Default – Non Destructive Full and Fast Scan,
-
Ultimate – Full and Fast Scanning Including Destructive.
Crystal Eye XDRs fully automated Vulnerability Scanning application builds the core base of vulnerability management helping organizations to conform to security control A.12.6.1 within Annex A of the ISO 27001:2022 standard. It identifies security loopholes in the network and classifies weaknesses that might lead to a security incident. It helps in predicting the effectiveness of the various countermeasures taken to secure networks and assists in remediating any risks that are targeted towards external facing servers deployed in the Crystal Eye XDR network.
How to Schedule Vulnerability Scans using the Scan Schedules feature?
Note
If you do not intend to use the “Assume Alive” option, ensure that ICMP is enabled on the devices in the CE XDR network before the vulnerability scan is initiated. Scheduling is handled via the Task Scheduler which allows flexible management of Vulnerability Scanning and other functions. Read more to know how to create schedules in Task Scheduler app.
Step 1: In the Vulnerability Scanning application page, click the Add button in the Scan Schedules section.

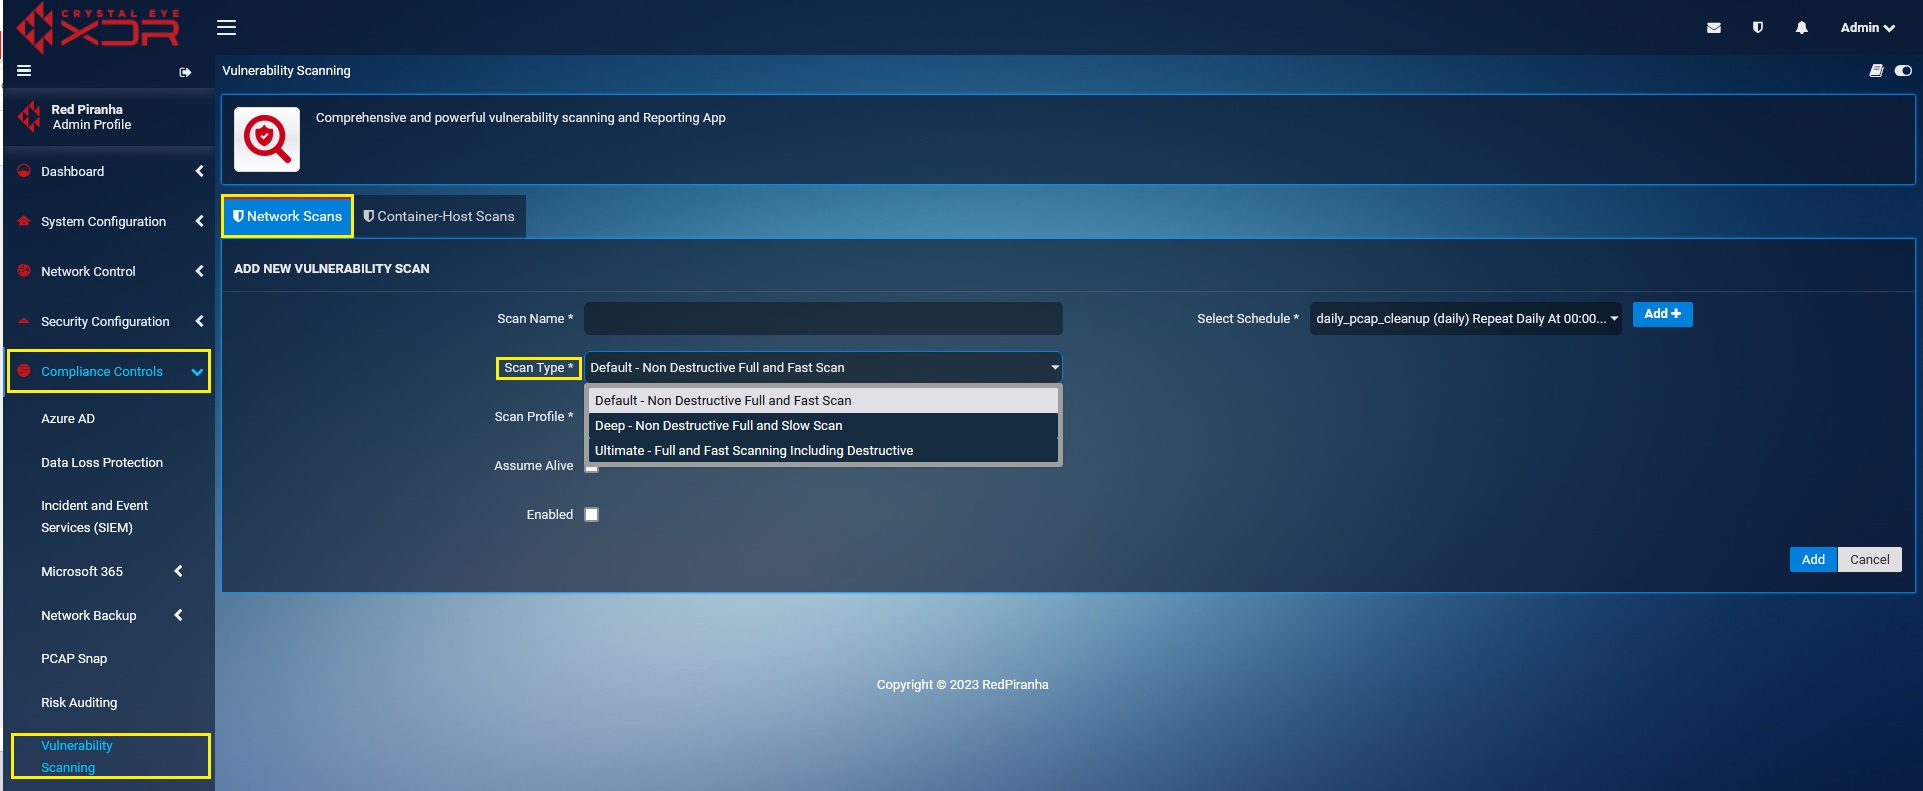
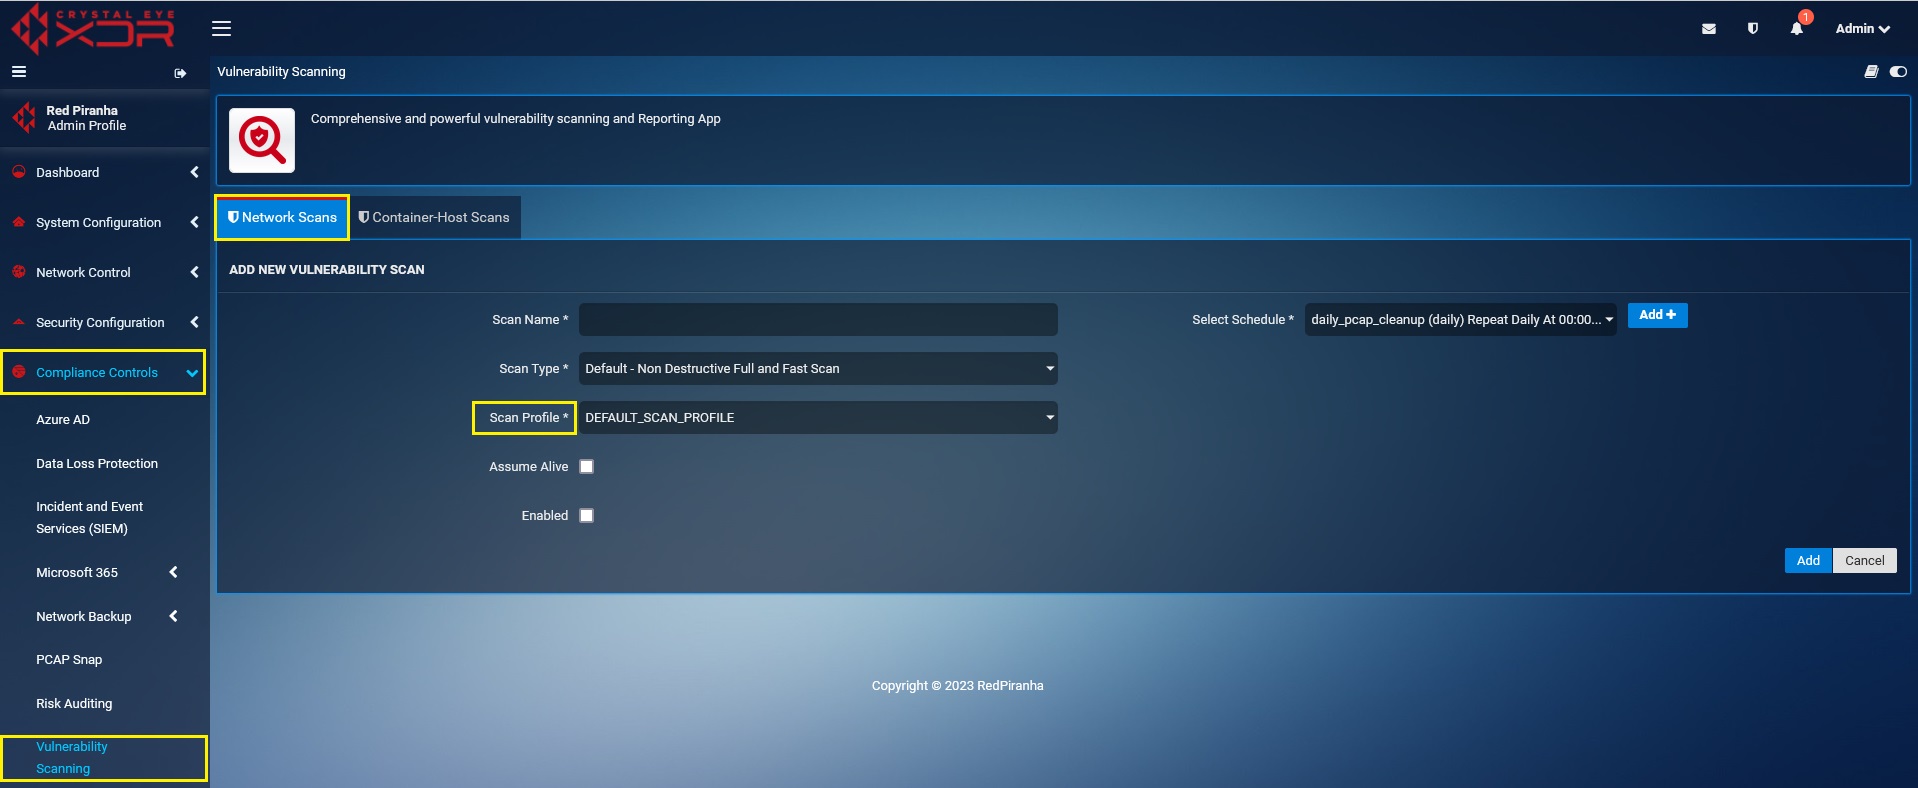
Step 2: You will now see the Add New Vulnerability Scan page. Enter the Scan Name in the text box.

Step 3: Select the Scan Type from the dropdown.
Note
The scan type is the depth to which the vulnerability scan would be done. The 3 scan types that can be selected are Deep – Non Destructive Full and Slow Scan, Default – Non Destructive Full and Fast Scan, and Ultimate – Full and Fast Scanning Including Destructive.
Step 4: Select the Profile to be scanned from the Scan Profile dropdown.
Note
Refer to Stage 1 Configuration—Create Scan Profile to know how to create a scan profile.
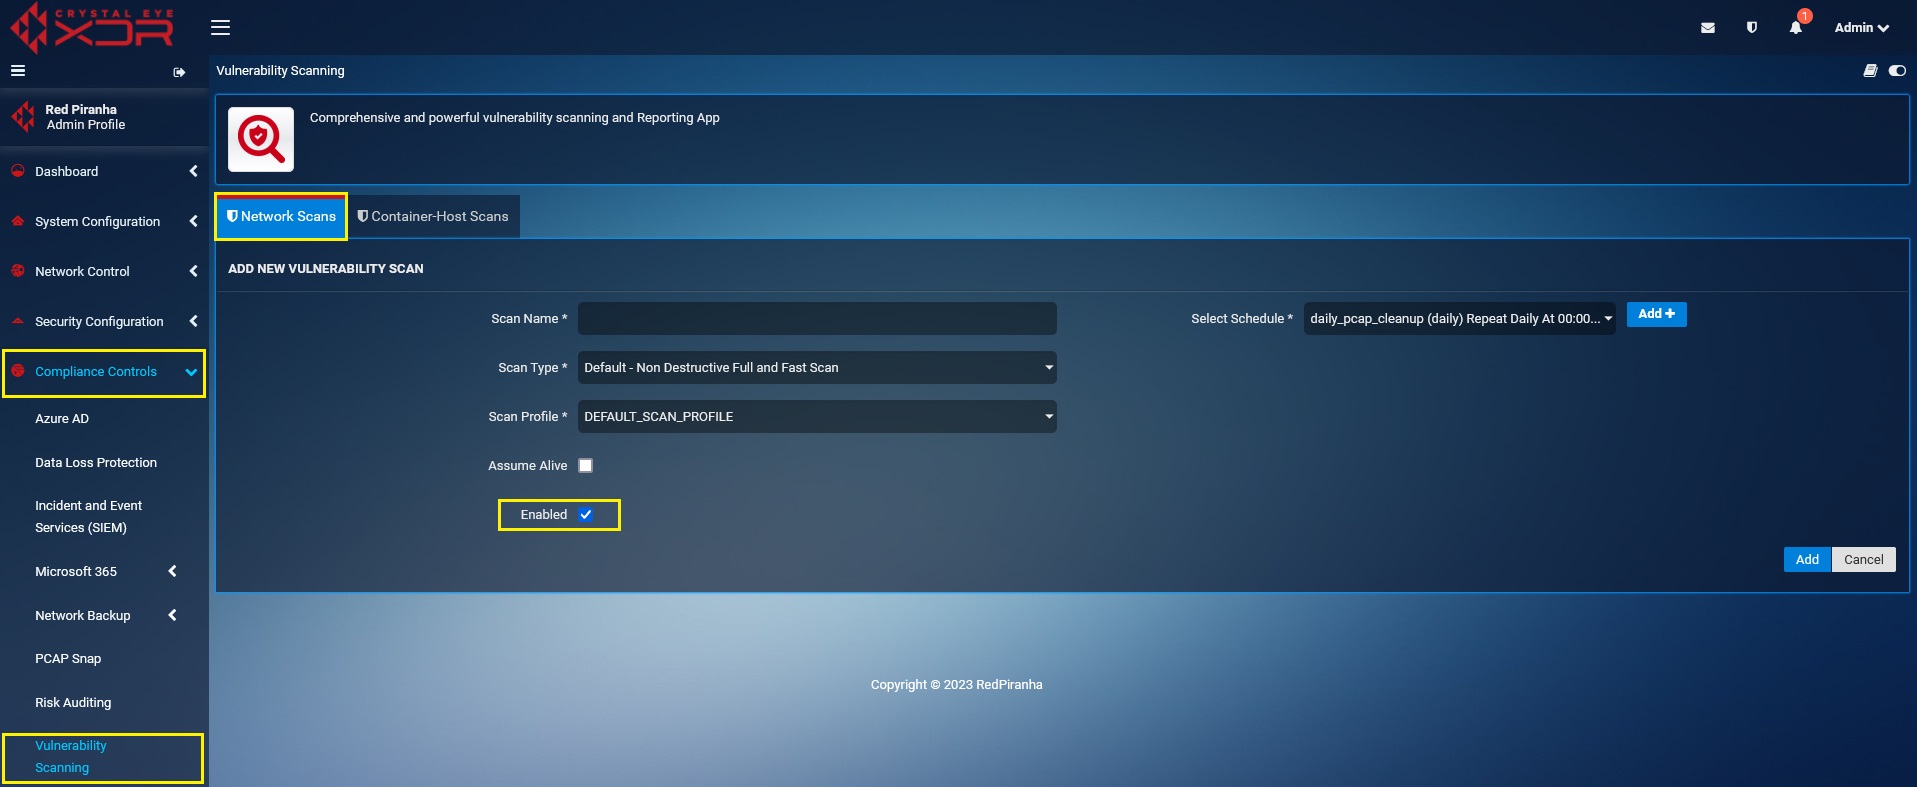
Step 5: To ensure scanning of devices which are not responding to ping requests, select the Assume Alive tick box as shown below. This will provide a more comprehensive scan result but may result in a longer scan time.

Step 6: Select the Enabled tick box, to confirm the schedule.
Step 7: Click the Add+ button to enter a Scan Schedule.

Step 8: You will now see the Add Schedule pop-up. Add the Schedule Name in the text box.
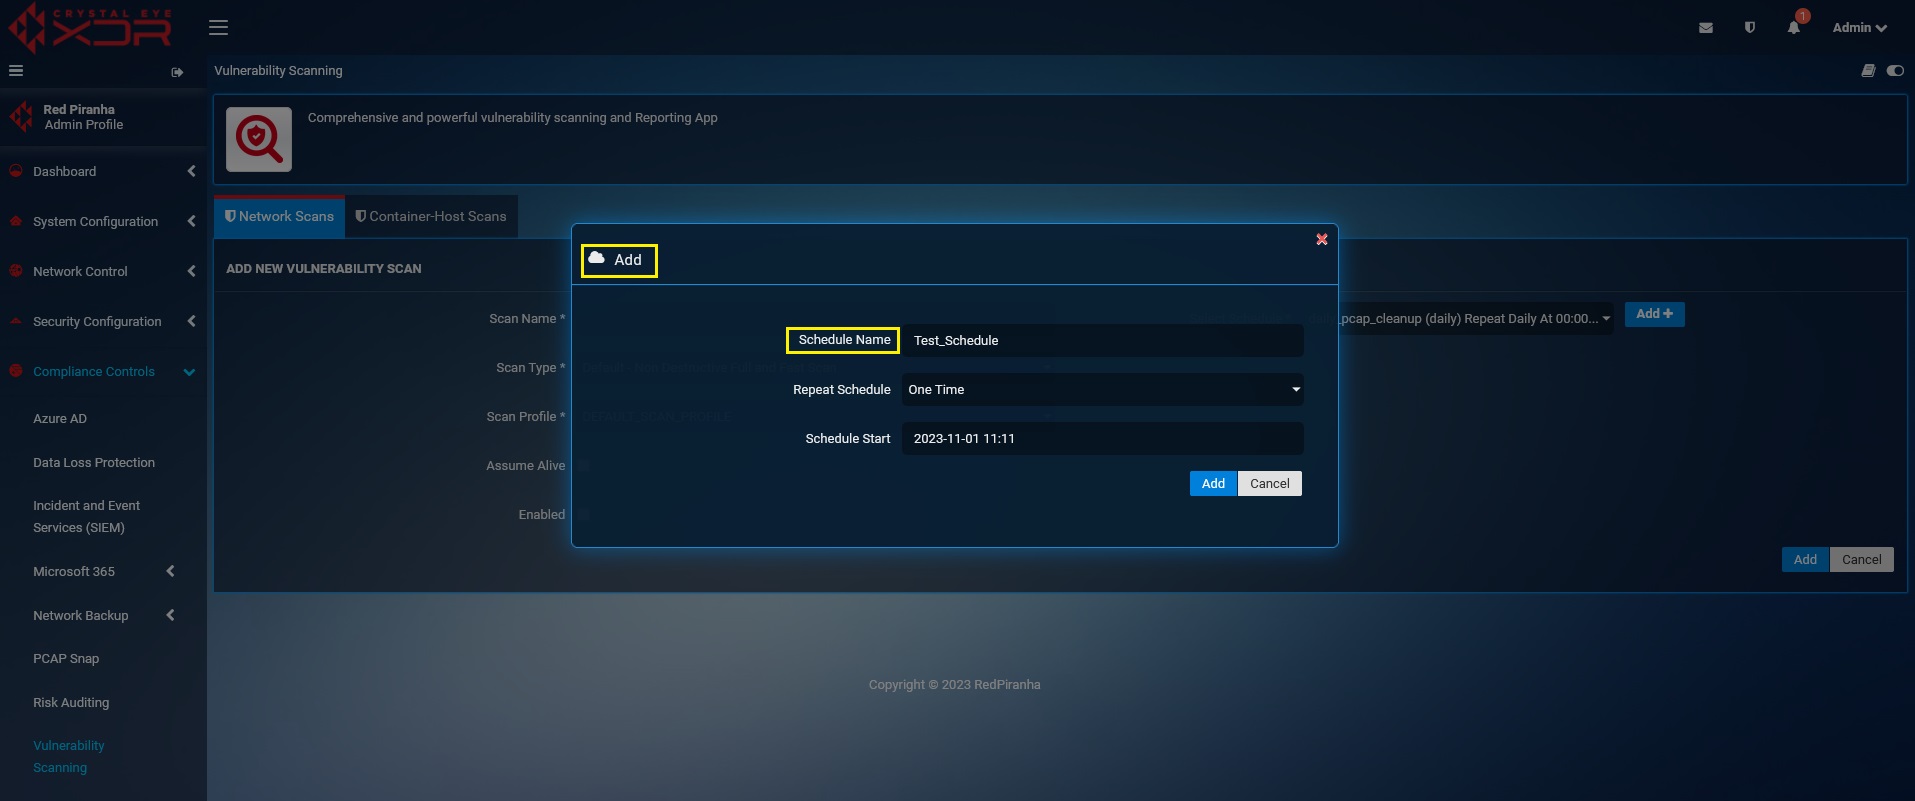
Step 9: Specify whether it’s a One Time Scan, Daily Scan, Weekly Scan, Monthly Scan or Advanced Scan from the Repeat Schedule dropdown and click the Add button.

Step 10: You will now see the Add New Vulnerability Scan application page. Click the Add button.

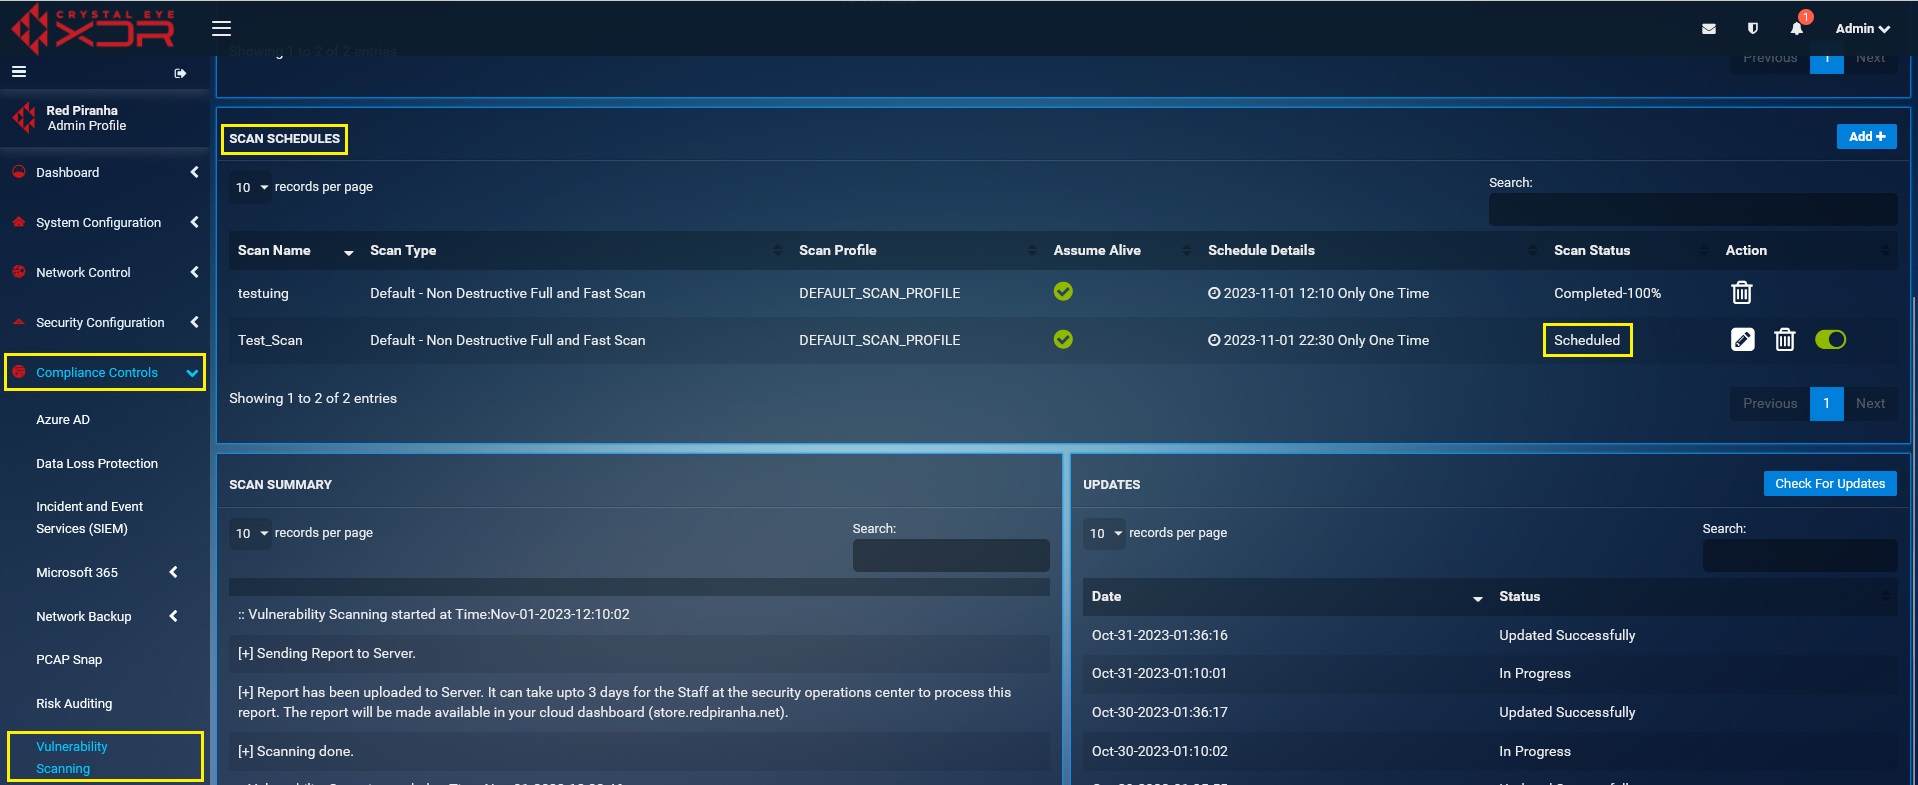
You will now be directed to the Vulnerability Scanning application page. The vulnerability scan details would appear in the Scan Schedules section.
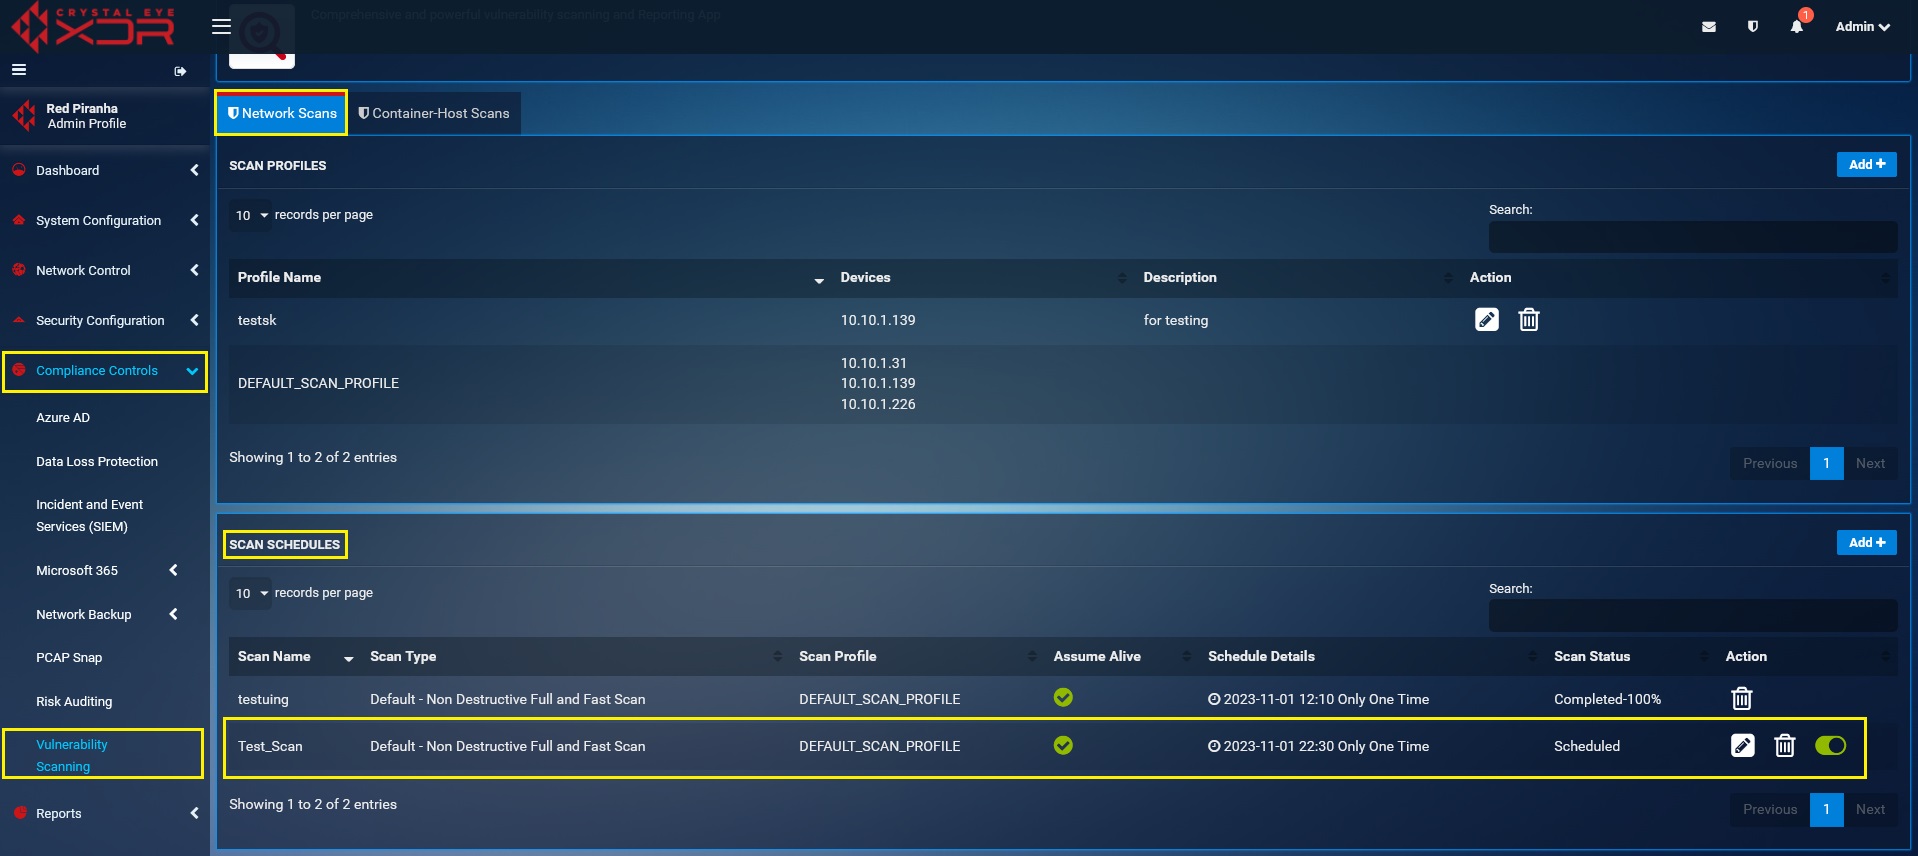
Note
Once the Vulnerability Scan has been scheduled the Status section will show whether the scan is ‘Scheduled’, ‘Running’, or ‘Completed’. Refer to the screenshot below.
Stage 3—Monitoring Vulnerability Scanning Logs
The Vulnerability Scanning Logs provides a comprehensive view of the date and time at which a scan was initiated or stopped. Apart from this the scan schedule details are also displayed upon scan completion.
The screenshot below shows an example of the vulnerability scanning log details:

Vulnerability Scan Updates
It shows Scanner updates log, also have option for check updates as shown in the screenshot below.

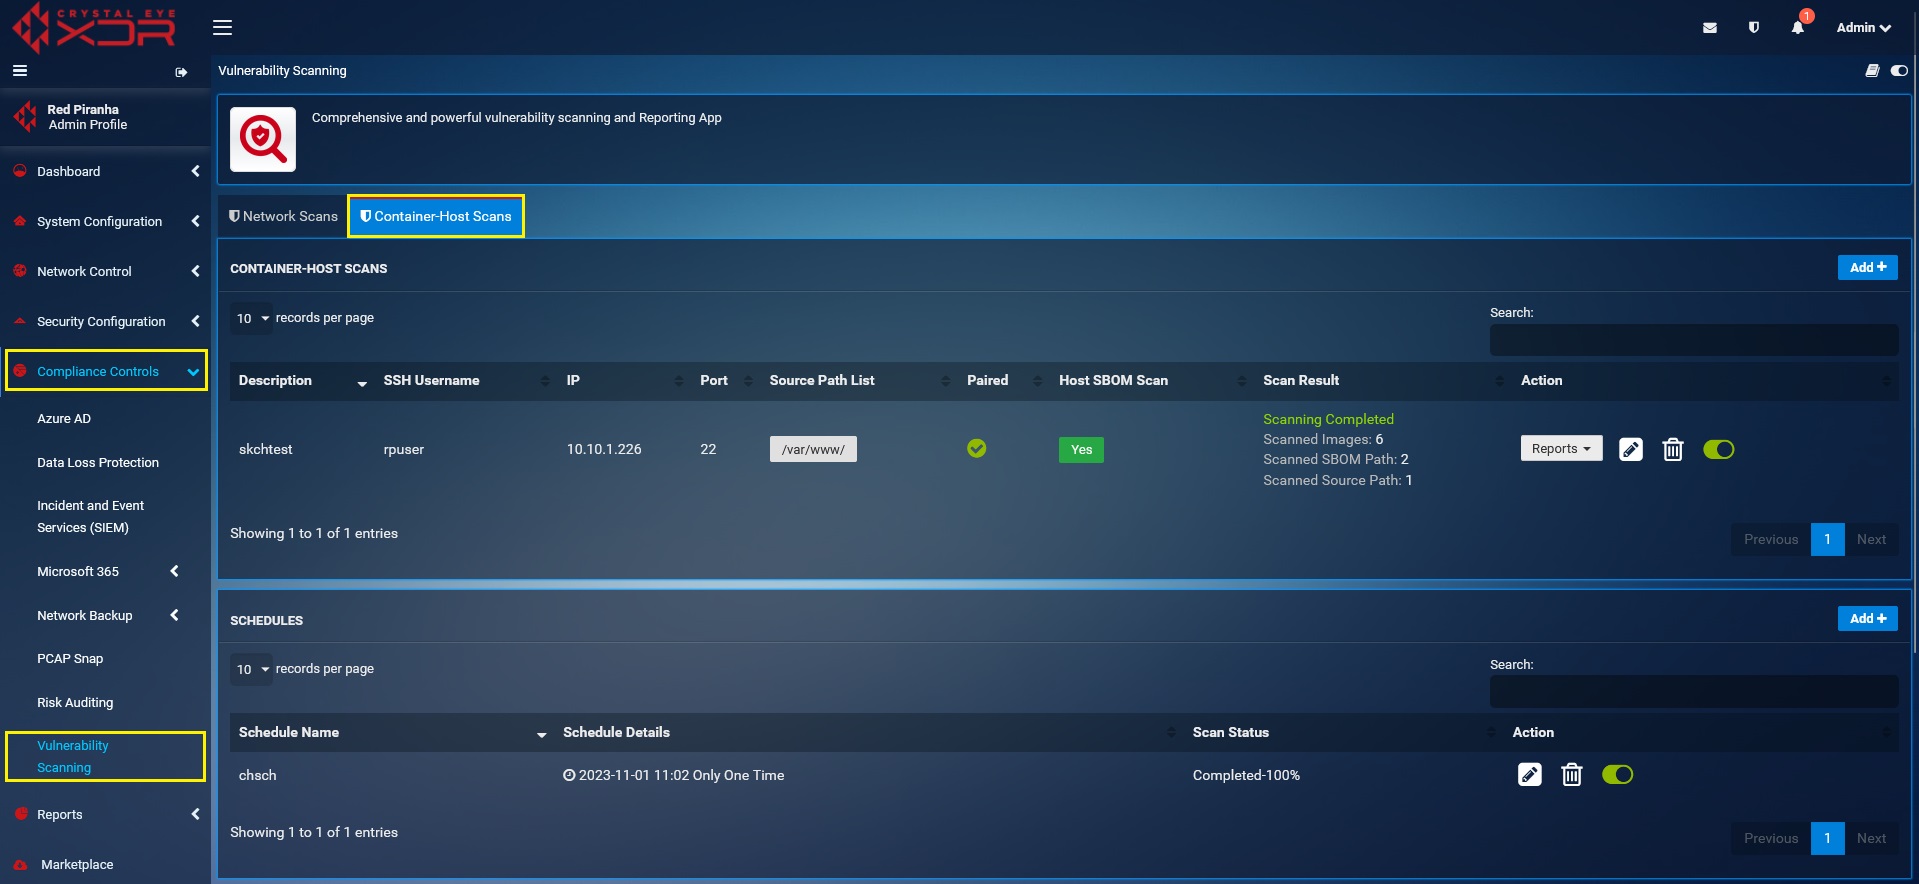
Container-Hosts Scan
The vulnerability Scanning application of the Crystal Eye XDR has extended capabilities to detect and scan for vulnerabilities in container hosts.
The container hosts scanning feature of the CE XDR allows organizations having their own development team to comply with ISO 27002:2022 control A.14.2.6 Secure Development Environment. Finding vulnerabilities in docker containers which are used by development teams addresses a list of security checkpoints during development. Scanning container hosts provides the much-required ability to find vulnerabilities and a plan to fix them.
It is an excellent tool to uncover vulnerabilities across your container images through deep inspection of operating system packages and software artifacts such as Jar files. One of the most important features of this scan tool is its ability to find security breaches post integration with the CI/CD Pipeline.
Note
One of the pre-requisites of successfully scanning container hosts are that the container hosts must be deployed in the Crystal Eye XDRs network.
Left-hand Navigation Panel > Compliance Controls > Vulnerability Scanning > Container-Hosts Scan
How to Scan Container Hosts Using the Crystal Eye XDR?
Step 1: If you have installed the vulnerability scanning application for the first time the system will prompt you to configure the application and update the database. This is an automated process which might take 30-50 mins depending on the internet speed.

The configuration process will then commence while displaying the screen below:
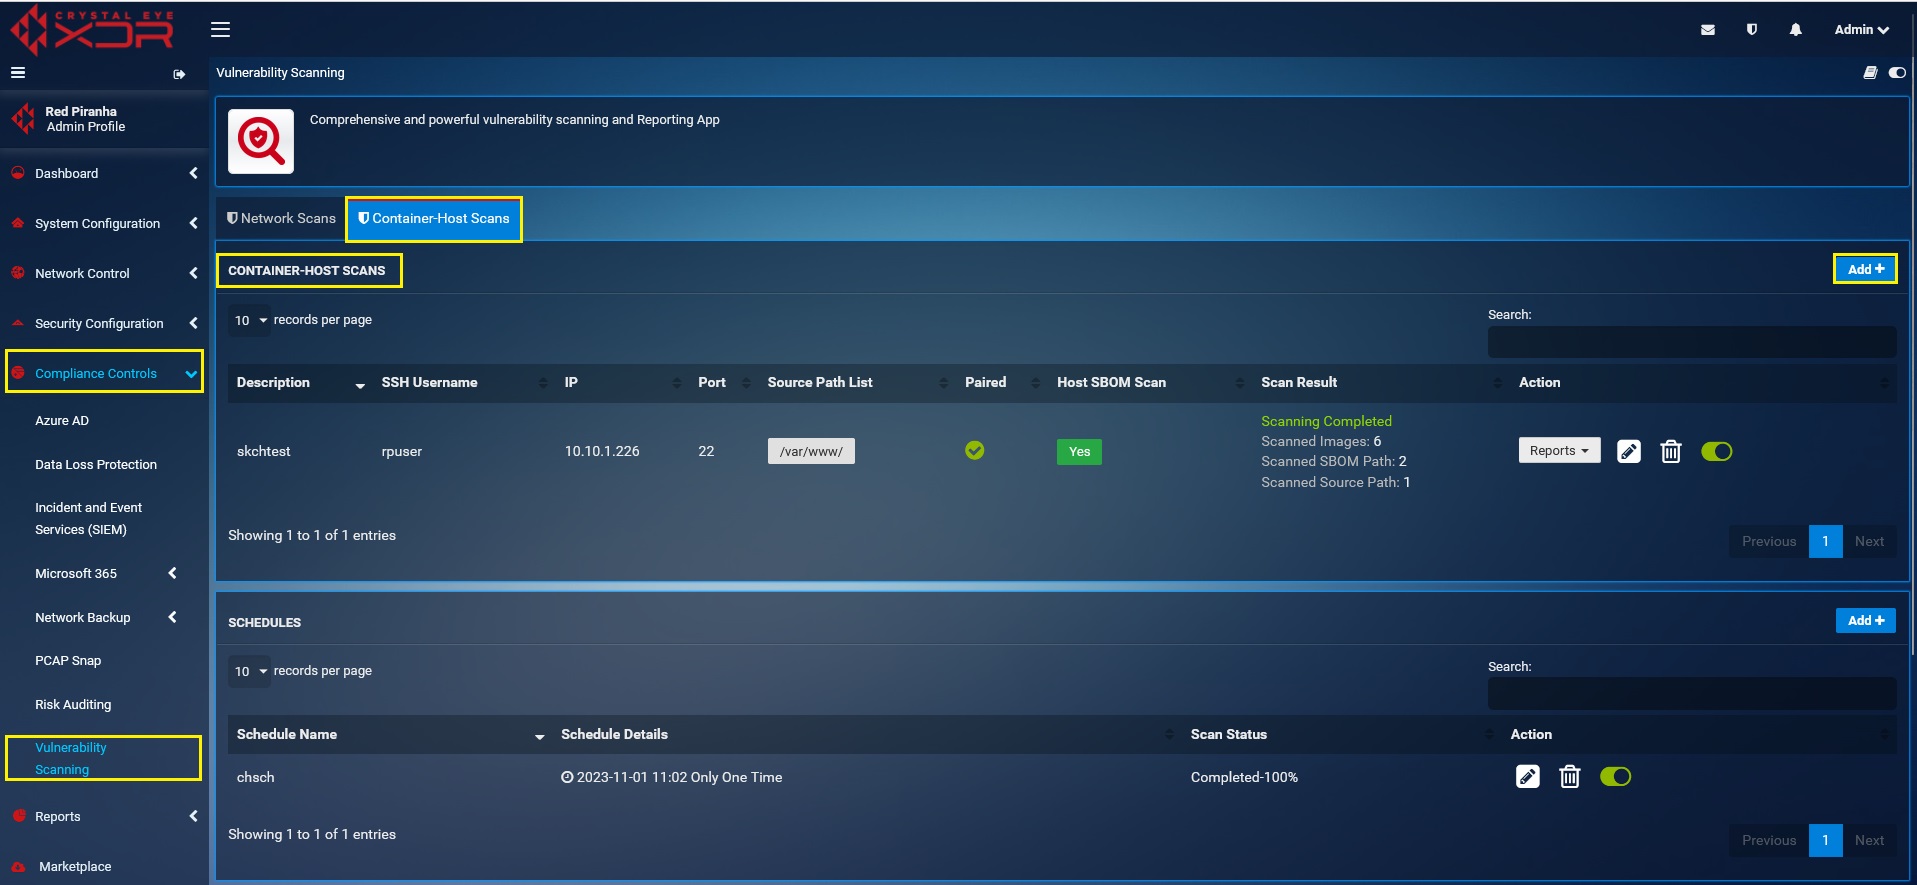
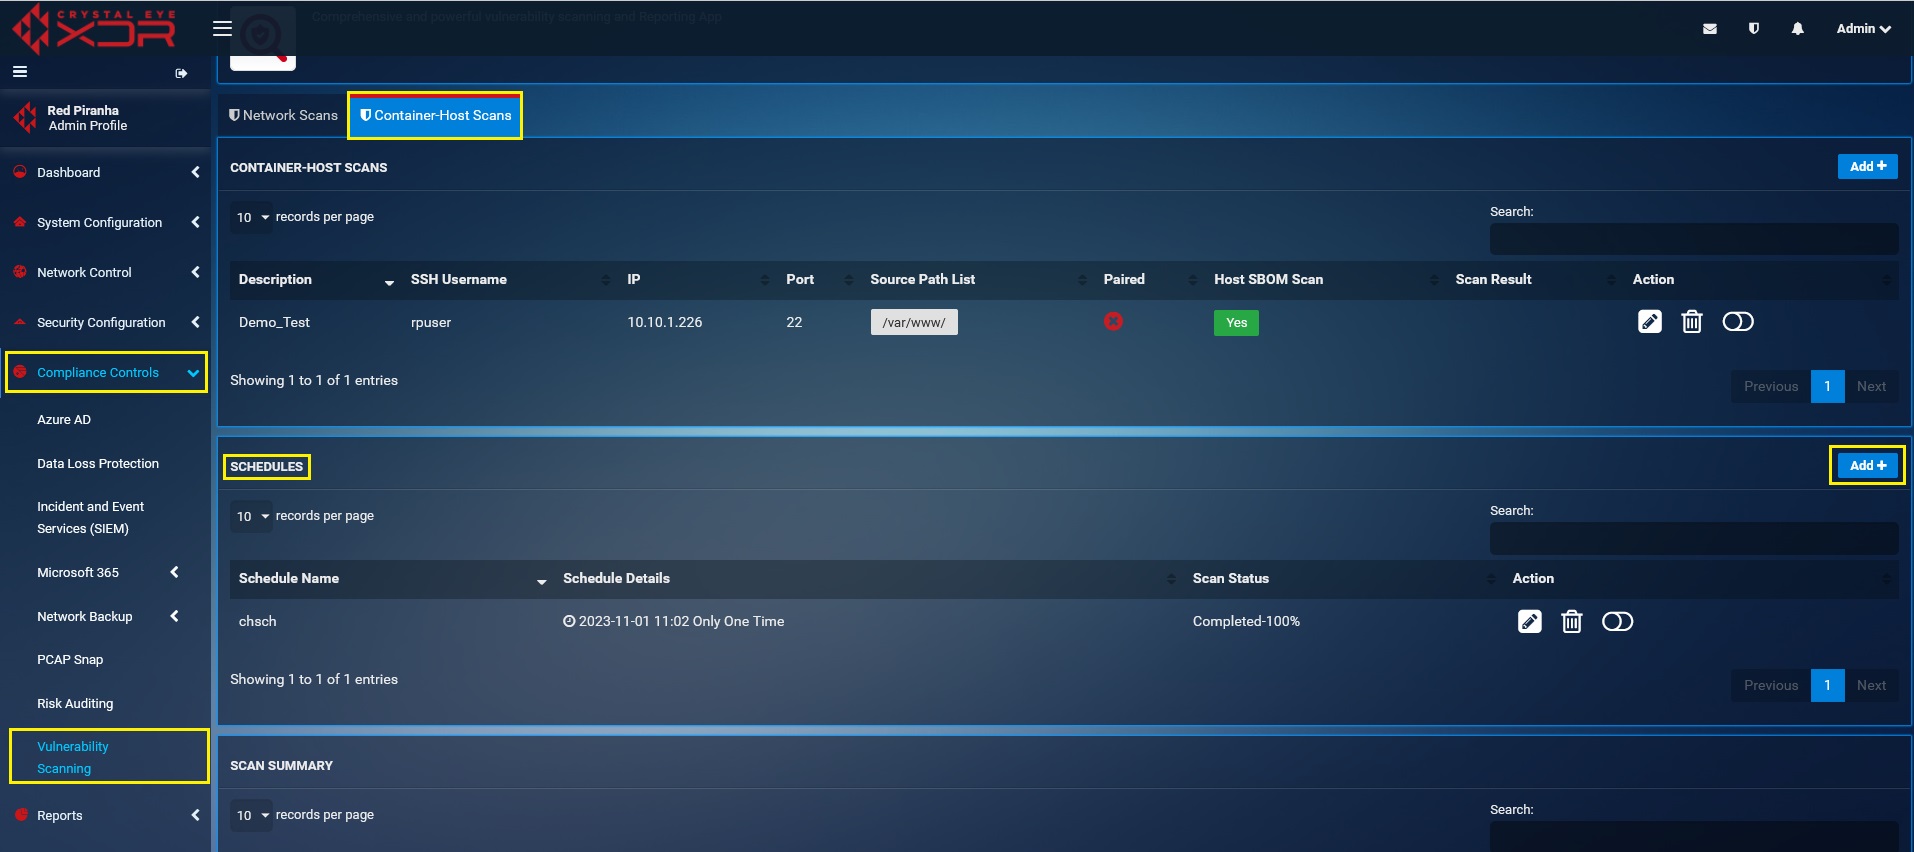
Step 2: Click the Add button on the top-right corner of the Container-Host Scans section.
Step 3: You will now see the Add New Host page. Enter the Description, IP, Port, Source Path List, SSH credentials of the container host and Tick the Host SBOM Scan checkbox and click the Add button.
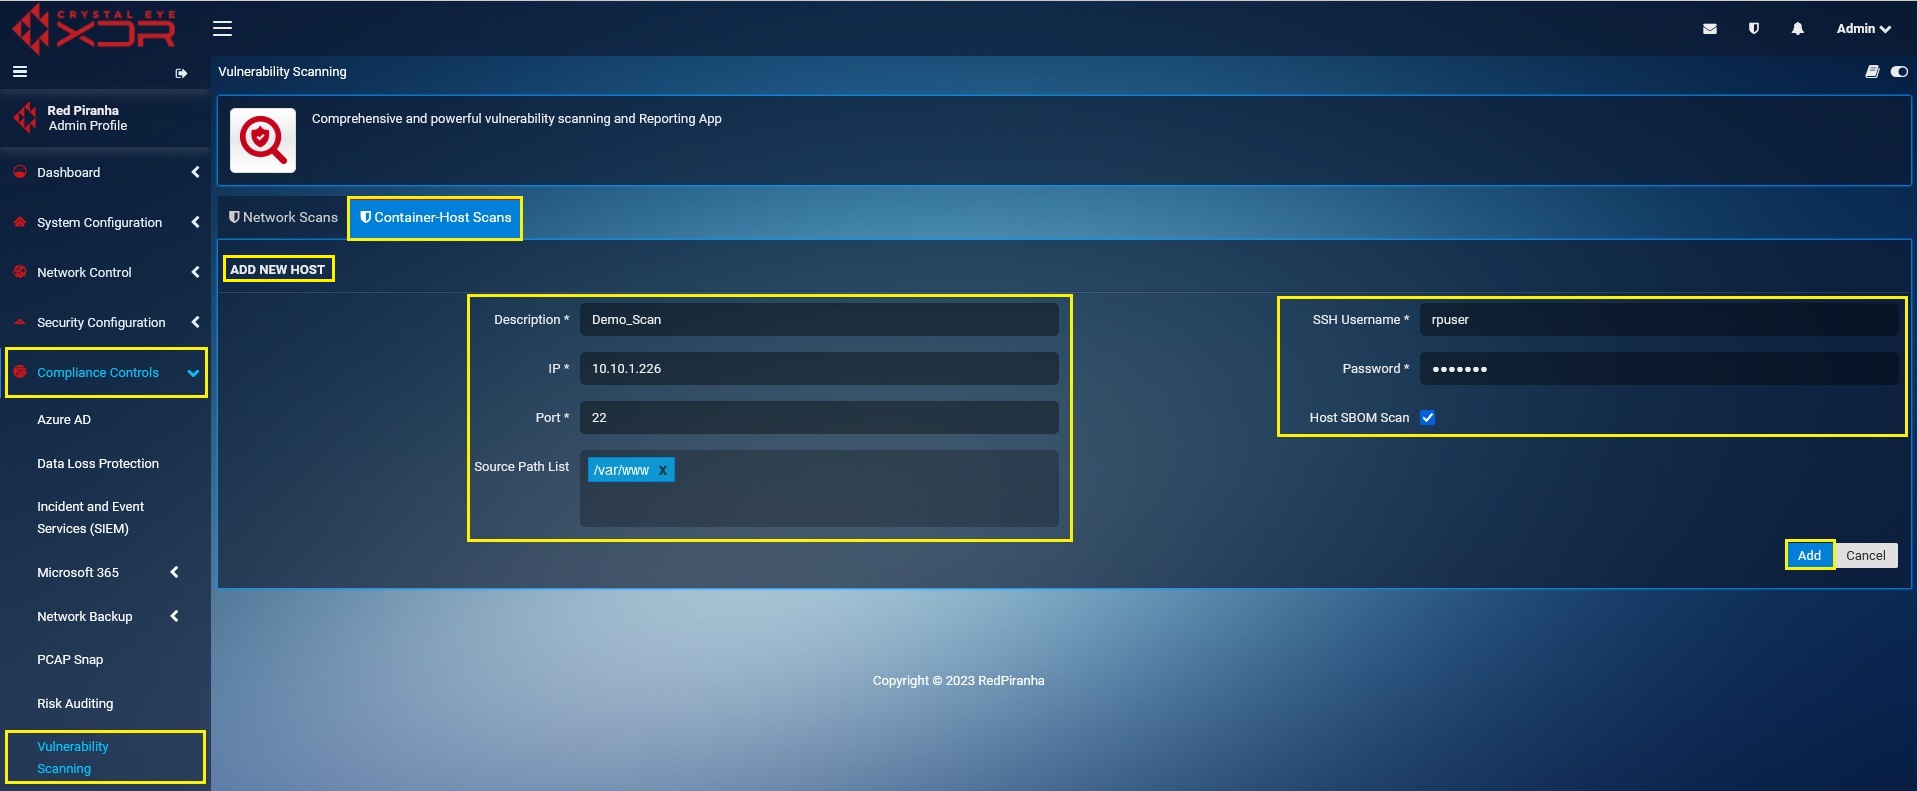
Note
Please enter the SSH port of the host which is to be scanned in the Port textbox.
Step 4: The docker container details will get listed in the Container-Host Scan section.
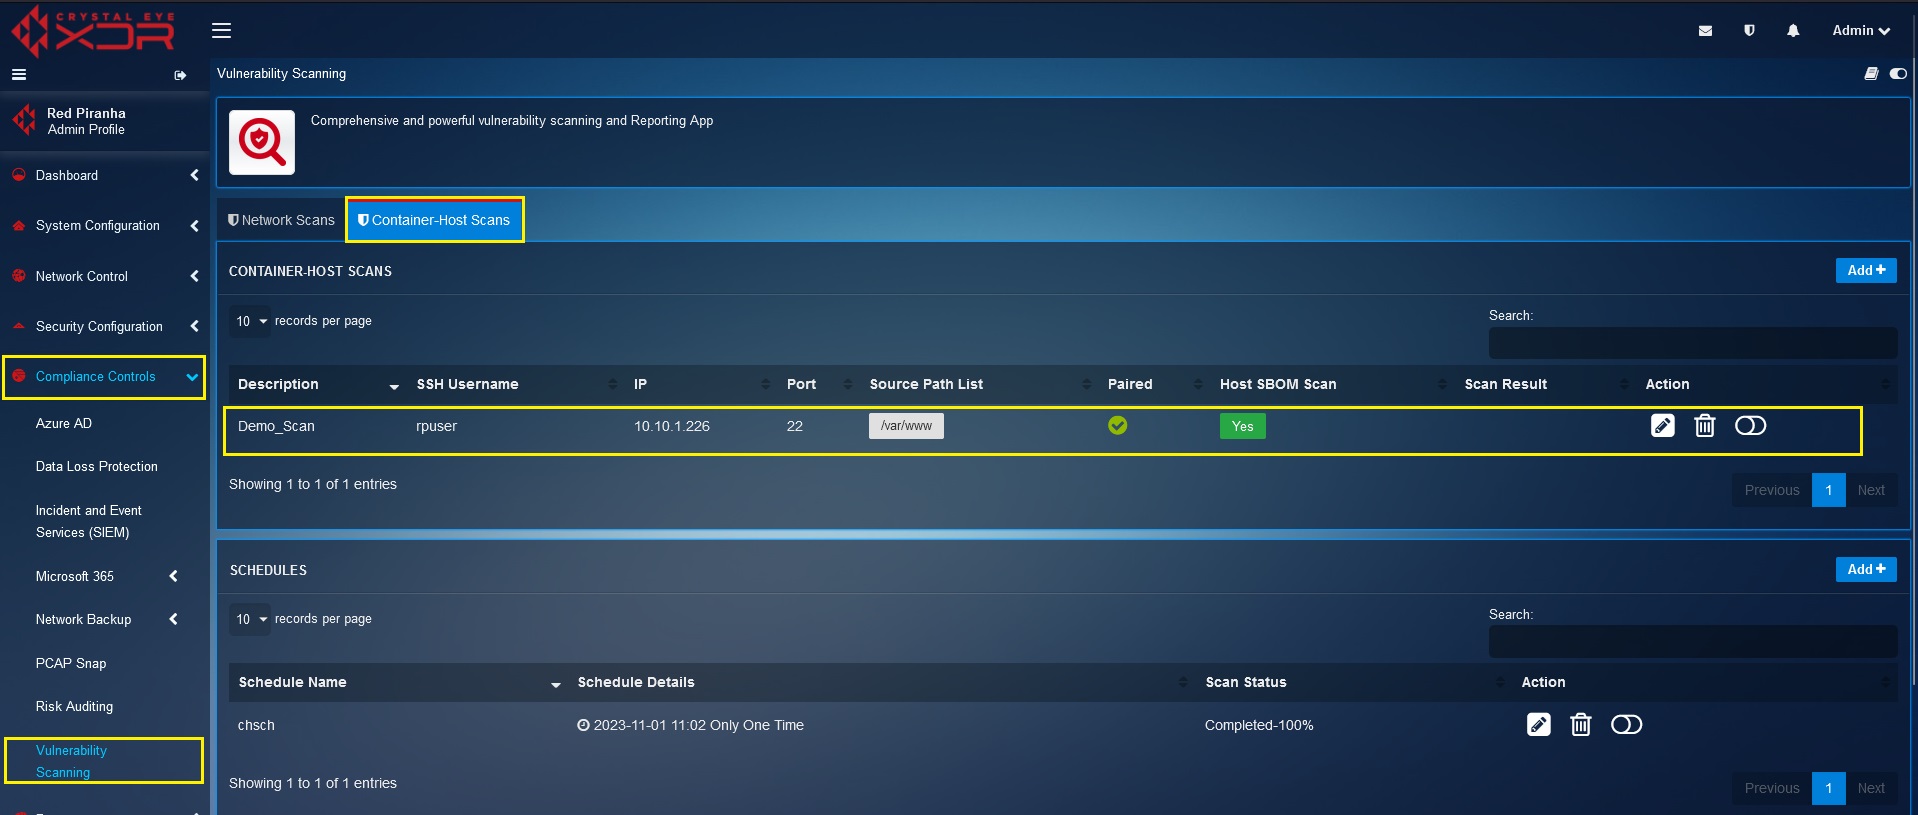
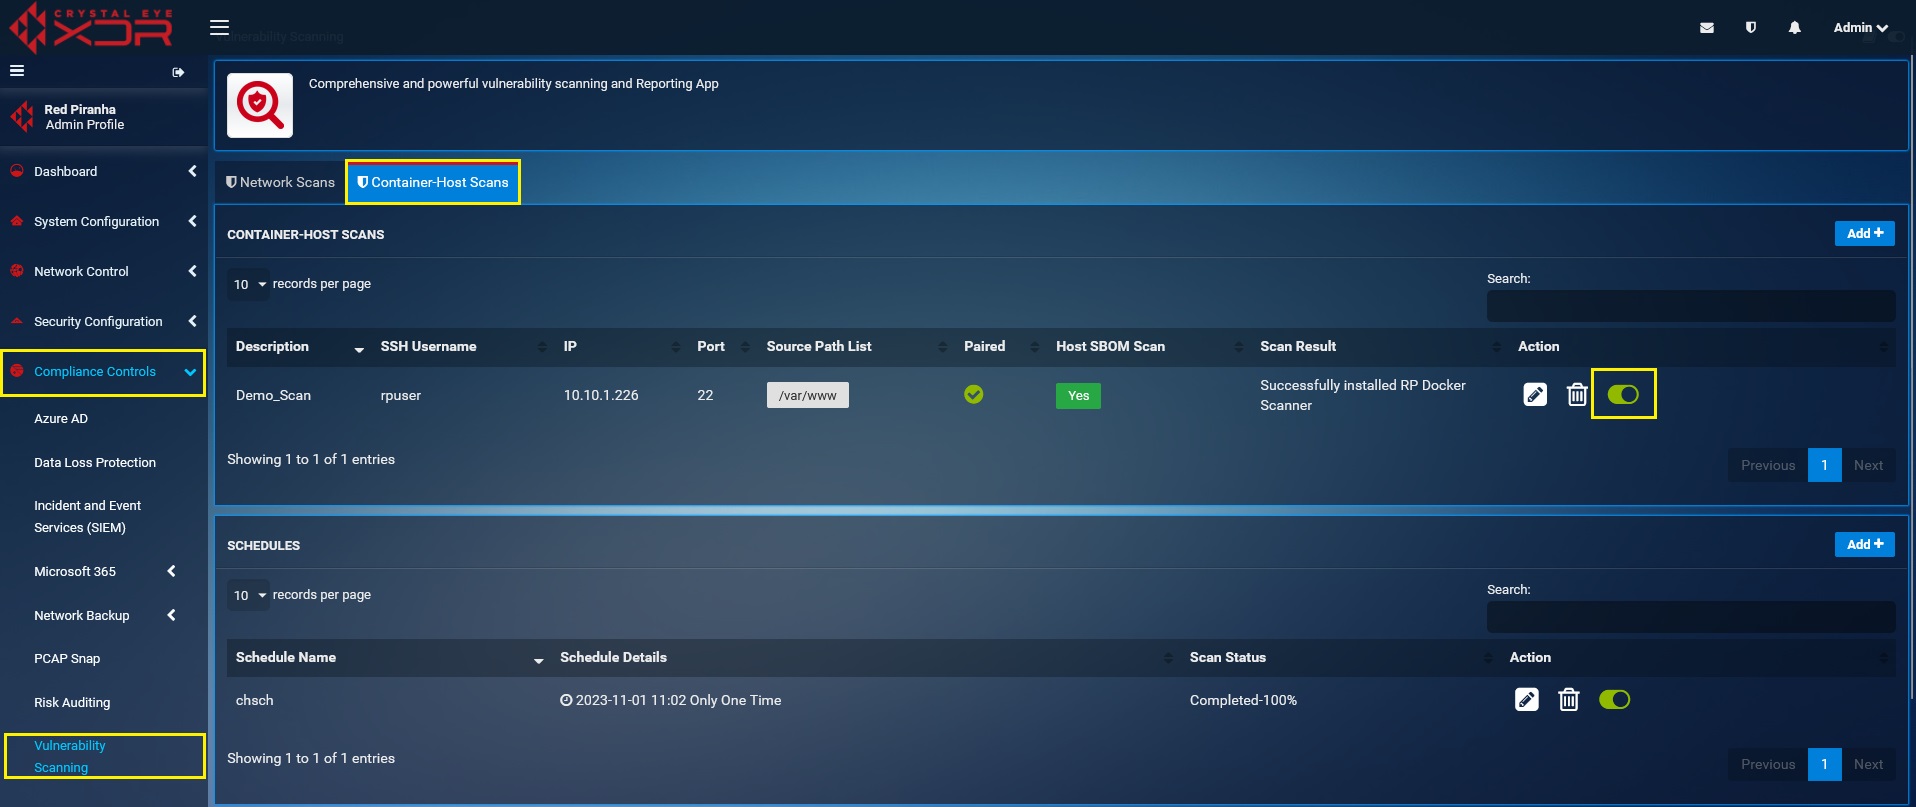
Step 5: Click the Enable button in the Container Host section.
Step 6: Create a Scan Schedule by clicking the Add button in the Schedule section.
Step 7: You will now see the Add New Schedule Page. Enter Schedule Name, Tick the Enabled checkbox and select the Schedule from Select Schedule drop-down menu and click Add button.

Step 8: The newly created schedule will now be visible in the Schedule Section.

Step 9: Wait for a few minutes for the scan to complete. You will notice the updated successful scan status (highlighted in the screenshot below). Please note that the scan status will also show the number of Scanned Images along with SBOM Path and Source Path.

Step 10: Click the Reports dropdown button. You will see all the scanned container hosts listed in the dropdown. Pull up the vulnerability report of the desired container host by clicking it.

Sample Container Host Vulnerability Report

Vulnerability Scan Reports
The Vulnerability Scan Report appears in Red Piranha’s client dashboard after the scan is completed. However, it must be noted that it takes 3 business days for the report to be generated and made available for download.
The report can be downloaded in PDF format from Red Piranha’s client dashboard. The dashboard can be accessed using the same user credential that was used while registering the Crystal Eye appliance.
Note
The report can either be viewed on the client dashboard or it can be downloaded in PDF format.
How to View the Vulnerability Scan Reports in the Client Dashboard?
Step 1: Go to https://www.redpiranha.net/
Step 2: Click the Store button on the homepage navigation panel.

Step 3: You will now be directed to Red Piranha’s Store Website. Click the Login button on the top-right corner of the web page.

Step 4: You will now see a Login pop-up box. Enter your user credentials and click the Login button.

Note
Enter the email account and password that was used while registering the Crystal Eye appliance. You may re-generate the password through the forgot password feature in case you lost/forgot it.
Step 5: Select Client Dashboard from the Welcome dropdown.

Step 6: You will now be directed to the Client Dashboard. Click the Devices button.

Step 7: You will now see the list of devices. Click the View button next to the device name where the vulnerability scan was scheduled.

Step 8: You will now see the Vulnerability Scan Report in the schedules section of the dashboard. Click the View Report button to explore the report and access the Export to PDF function.

Components of CE XDR’s Vulnerability Scan Report
Crystal Eye XDR’s vulnerability scan report consists of the following components:
Scan Information: Displays the date on which the report was downloaded, the commencement and completion date & time of the scan, number of assets scanned, new asset since last scan (if any), and resolved vulnerabilities since last scan (if any). Refer to the screenshot below.

Open Ports: This section displays open TCP ports in hosts connected to the CE XDR in a tabular format (Refer to the screenshot below).

Top 20 Open Ports: This pie chart provides insights on the top 20 ports open in the hosts scanned by the CE XDR (Refer to the screenshot below).

Vulnerabilities Identified by Risk Rating: This pie chart quantifies the vulnerabilities identified during the scan as per its risk rating which could be low, medium, or high (Refer to the screenshot below).

Vulnerabilities Count by Host: This bar graph shows the total number of vulnerabilities found in each host scanned by the CE XDR (Refer to the screenshot below).

Host Count by CVE: This bar graph provides insights on the total number of hosts aligned with a particular vulnerability CVE (Refer to the screenshot below).

Vulnerability Summary: The summary is displayed in a tabular format containing information about the severity levels of the vulnerability found in the hosts scanned by the CE XDR. Clicking on a particular entry provides insights on the CVSS score of the vulnerabilities and suggests a solution type which could either be that a vendor patch is available (Vendor Fix), a mitigation by configuration is available (Mitigation), a workaround is available, and no solution exists (Refer to the screenshot below).
