Passive Encryption Control
Overview
The ever-changing data exfiltration techniques through covert network channels are increasingly enabling attackers to hide data from security monitoring systems. Most of these attacks are caused by external malicious actors who use malware to create backdoors designed to initiate covert communication.
The Passive Encryption Control application is designed to passively model benign traffic originating from an IoT device. This is defined as the baseline state of a network created during network segmentation. Any behaviour outside baseline activity is flagged and the user can take appropriate actions which includes block traffic, allow traffic, block the IoT device from accessing the internet and/or pinhole a particular traffic to the IoT device.
Passive Encryption Control can display alerts for anomalous communication detected between a monitored IoT host and a potentially malicious C&C server.
Generally, IoT devices communicate in tightly defined ways to a small and specific set of hosts and servers. For instance, a Nest thermostat would communicate with only Nest servers or Google resources at the most using a set protocol. In this example, any network traffic that does not follow the defined baseline detected by Passive Encryption Control would indicate that the monitored IoT device may be attempting to communicate with a malicious server.
Using Passive Encryption Control & Advanced Firewall to implement IEC 62443 Framework Guidelines to electronically secure industrial automation and control systems (IACS)
Passive Encryption Control is built to meet the defence in-depth requirements stated in the IEC 62443 framework which also involves creation of zones, conduits, and security levels using Crystal Eye’s Advanced Firewall features.
The IEC 62443 framework is a set of cyber security standards built around core concepts involving identification of Systems under Consideration (SuCs), Security Levels (SLs), Zones, and Conduits forming the basic requirements of securing Industrial Automation and Control Systems (IACS).
The Crystal Eye XDRs Advanced Firewall and Network Settings app can be used for network segmentation and network isolation which forms the baseline before selecting the System under Consideration (SuC) to assign pre-defined Security Levels (SLs).
These Security Levels can be applied to devices arranged into zones and conduits where:
- zones are defined as a group of logical or physical assets having similar security requirements
- conduits are elements grouped together which are dedicated exclusively to communications between zones.
Zones allow segregation and access control for IoT devices or groups of similar IoT devices. Conduits group the elements that allow communication between two zones. They provide security functions that enable secure communication and allow the coexistence of zones with different security levels.
The traffic flowing through these conduits are grouped IoT devices pin-holed to communicate with a defined set of servers or domains for create a baseline. Any deviation from this baseline can be blocked immediately from the Passive Encryption Control application user interface.
Further granular control can be extended to communication between a particular application running on a single IoT device. By fingerprinting the application, traffic between the IoT application and a server can be identified and pinholed so that the data packets are transmitted only between the IoT application and the relevant server.
Navigation to Passive Encryption Control Application Page
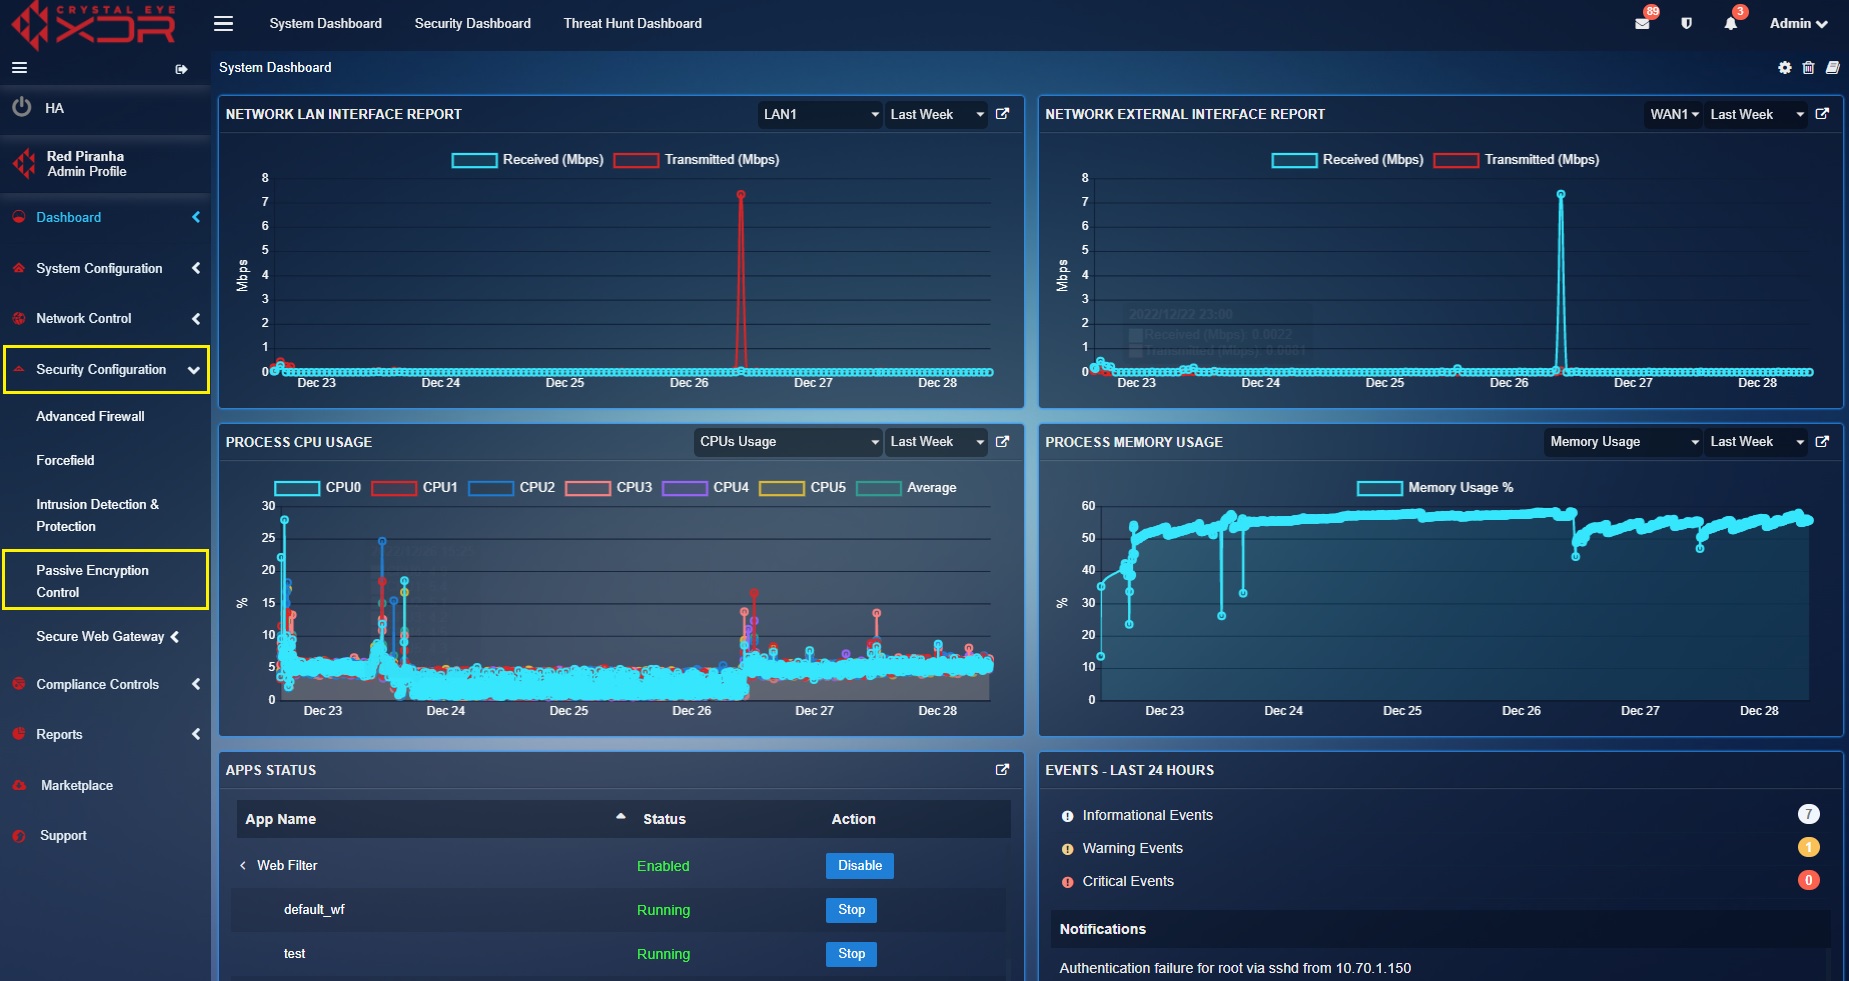
Left-hand Navigation Panel > Security Configuration > Passive Encryption App
Video Resources
Installation
The Passive Encryption Control application is not a core application and can be installed from Marketplace found via the left-hand navigation panel. No additional license or subscription is required to install or use Passive Encryption Control.
Identifying Anomalies in an IoT and OT Segment—Use Case
The Crystal Eye XDRs Passive Encryption Control application has the capability to address a variety of challenges revolving around securing the IoT environment. Some of these challenges that it addresses are:
- Missing Access Controls
- Vulnerability Management shortfalls
- Intrusion Detection blind spots
Let’s try and address some of the pain points discussed above with the help of the use case below:
Scenario: XYZ Ltd. uses the popular Nest thermostat technology to sense the building temperature and manage HVAC systems. However, malicious actors have exploited existing vulnerabilities in the thermostat to compromise the IoT device which also acts as a beachhead to attack other nodes in the local network.
Objective: Secure the thermostat from further compromise by limiting communications only to trusted systems and prevent lateral movement to other XYZ Ltd. network assets.
The plan is to create a baseline state of the network where a separate zone is created for the Nest thermostat and then the traffic from this IoT segment is pinholed to communicate with Nest Servers. Any behaviour outside the set network baseline set will be alerted via passive encryption user interface which can be blocked or allowed in line with risk policies.
The Solution! Crystal Eye XDRs Passive Encryption and successful network segmentation to the rescue:
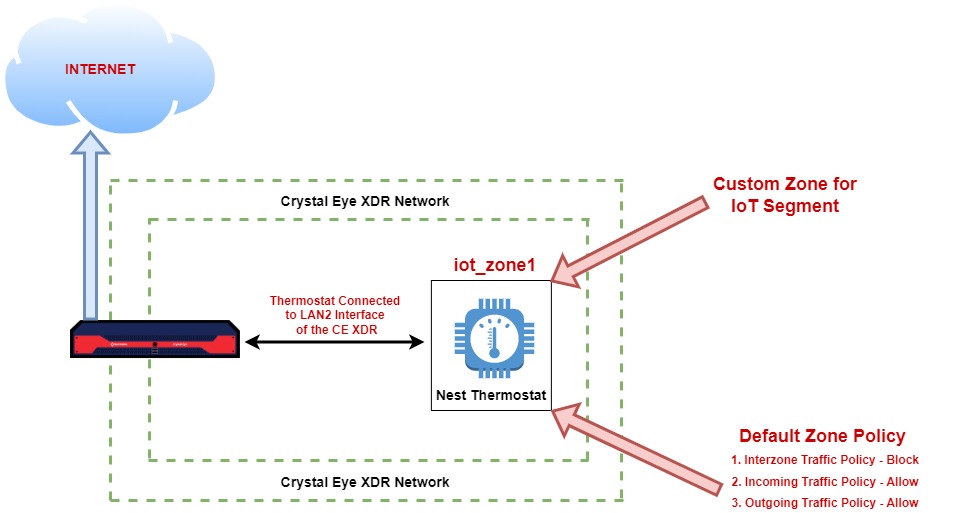
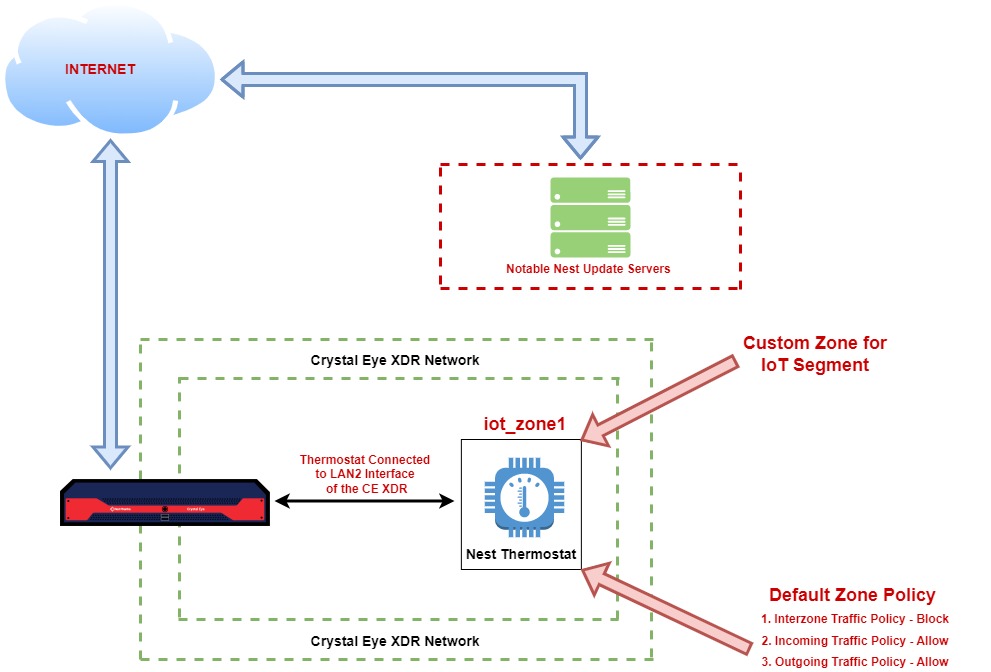
We will use the features of Network Settings app and the Advanced Firewall app to segment a dedicated zone for the Nest Thermostat as shown in the diagram below.
Pursue the following steps to create a dedicated zone for the IoT device segment:
Note
The Nest thermostat in this network is connected to the LAN 2 interface of the Crystal Eye XDR and a custom zone (iot_zone1) is assigned to it.
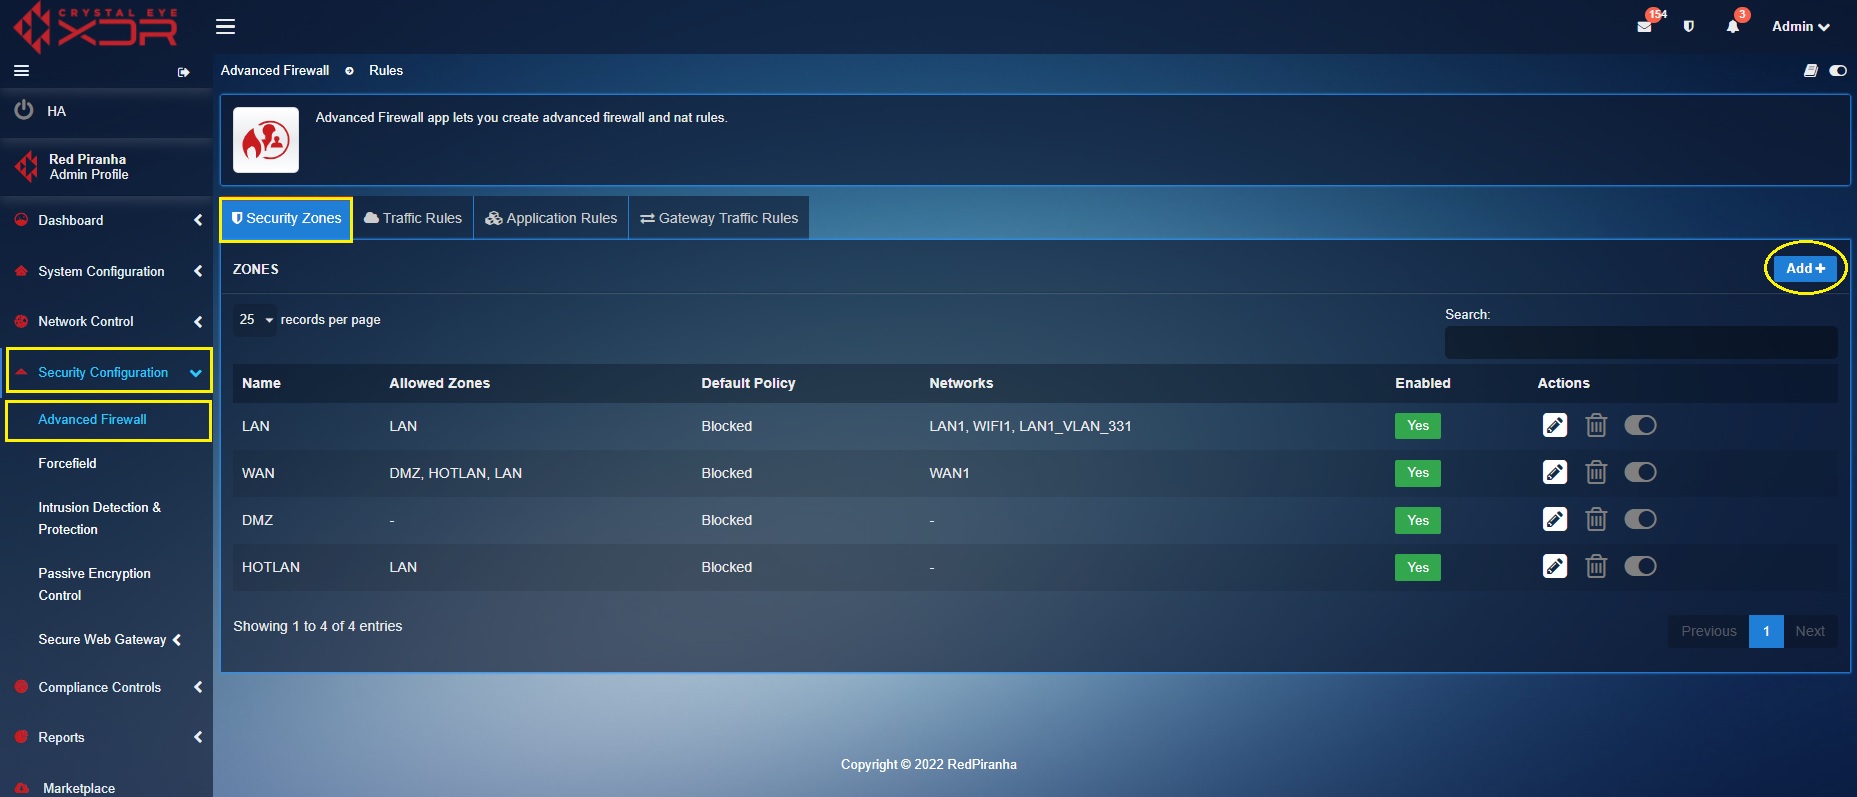
Step 1: Go to Security Configuration > Advanced Firewall > Security Zones and click the Add button.
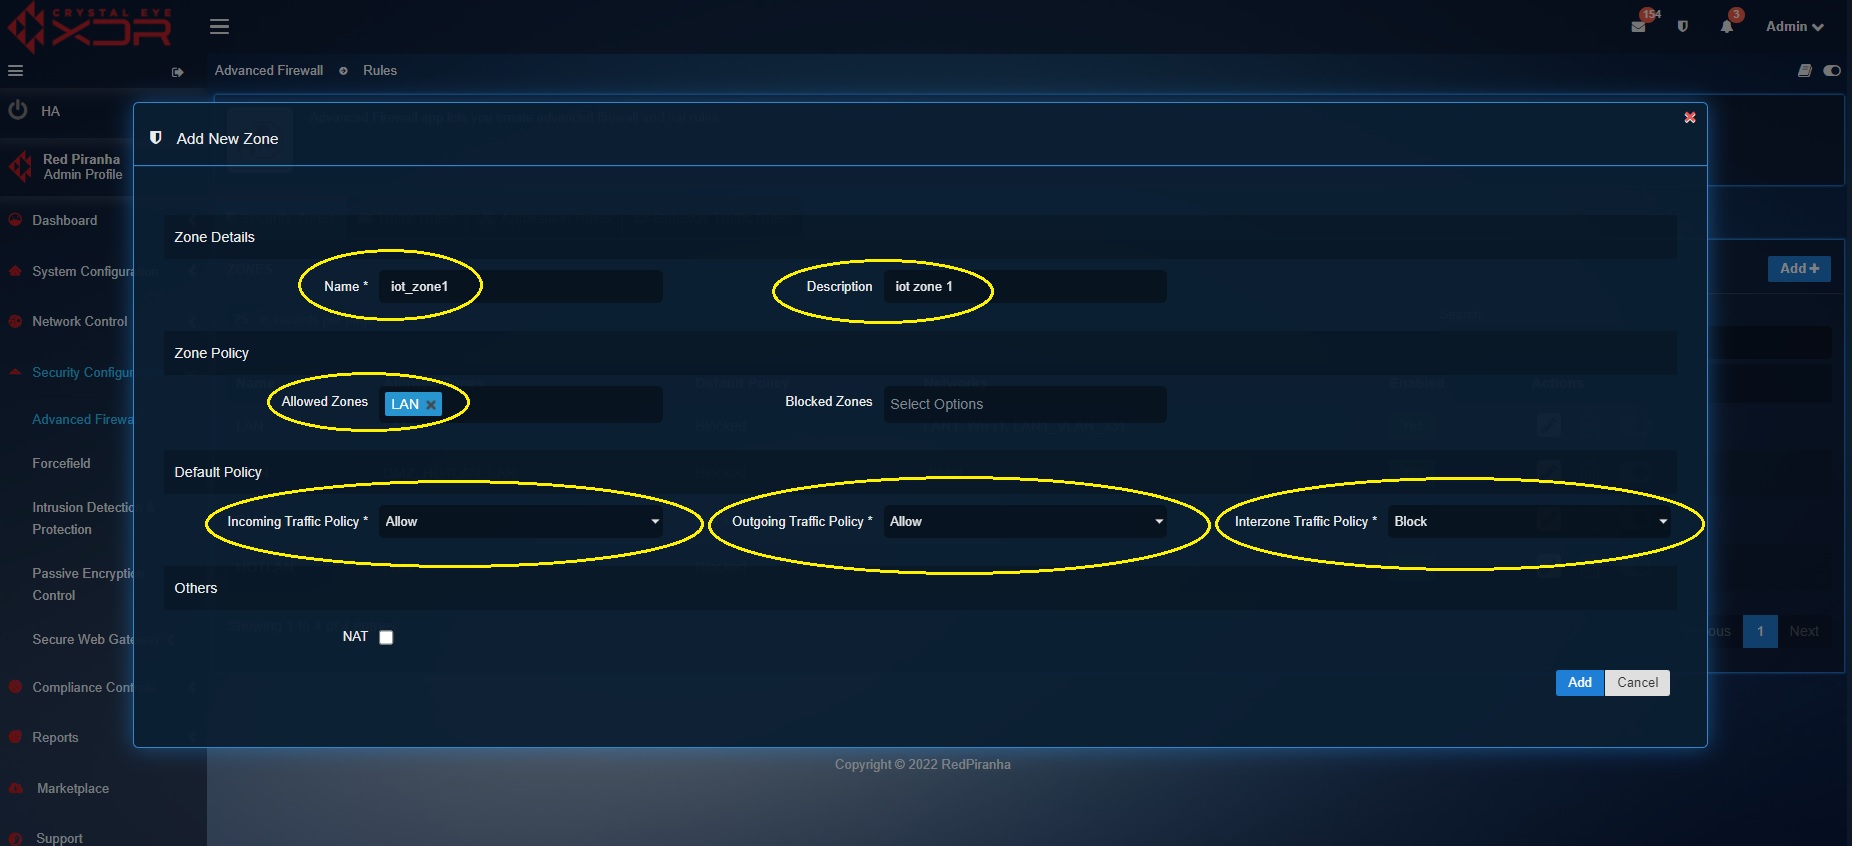
Step 2: You will now see the Add New Zone pop-up. Enter the following details in the Zone Details section, Zone Policy section, and Default Policy section as shown in the screenshot below and click the Add button.
Step 3: Go to Network Control > Infrastructure > Network Settings and click the Edit button in the Actions Column of LAN2. You will see the Update Interface pop-up. Select iot_zone2 from the Zones dropdown and click the Update button. By doing this, you have assigned the custom zone iot_zone1 to the LAN2 interface of the Crystal Eye XDR network and have successfully segregated the IoT network segment.
Note
When creating iot_zone1 we have set inter zone traffic policy to ‘blocked’ preventing lateral movement at the network security zone level.
Now that we have created a separate segmented zone for the IoT device (Nest Thermostat), we will group the Nest thermostat MAC address under the category ‘iot-device’ using the Network Map application.
Use the following steps to group the Nest Thermostat MAC address under the iot-device category.
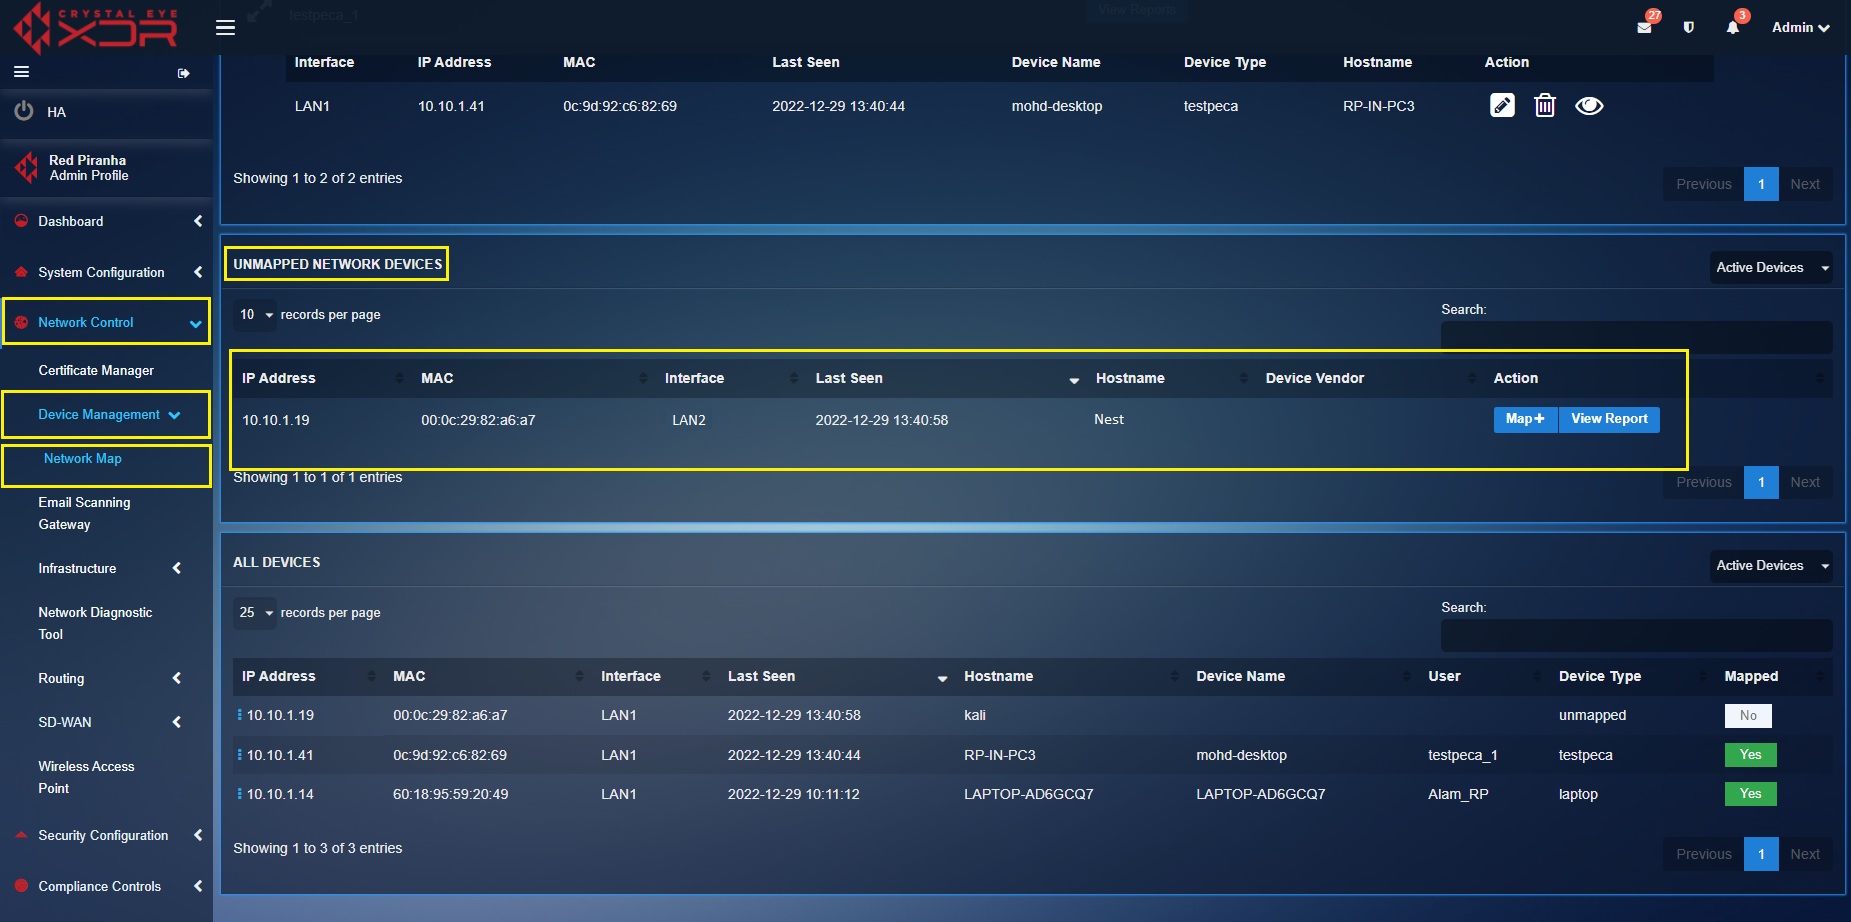
Step 1: Go to Network Control > Device Management > Network Map app. You will see the Nest Thermostat IP Address, MAC Address, Interface, Hostname and Device Vendor under the Unmapped Network Devices section.
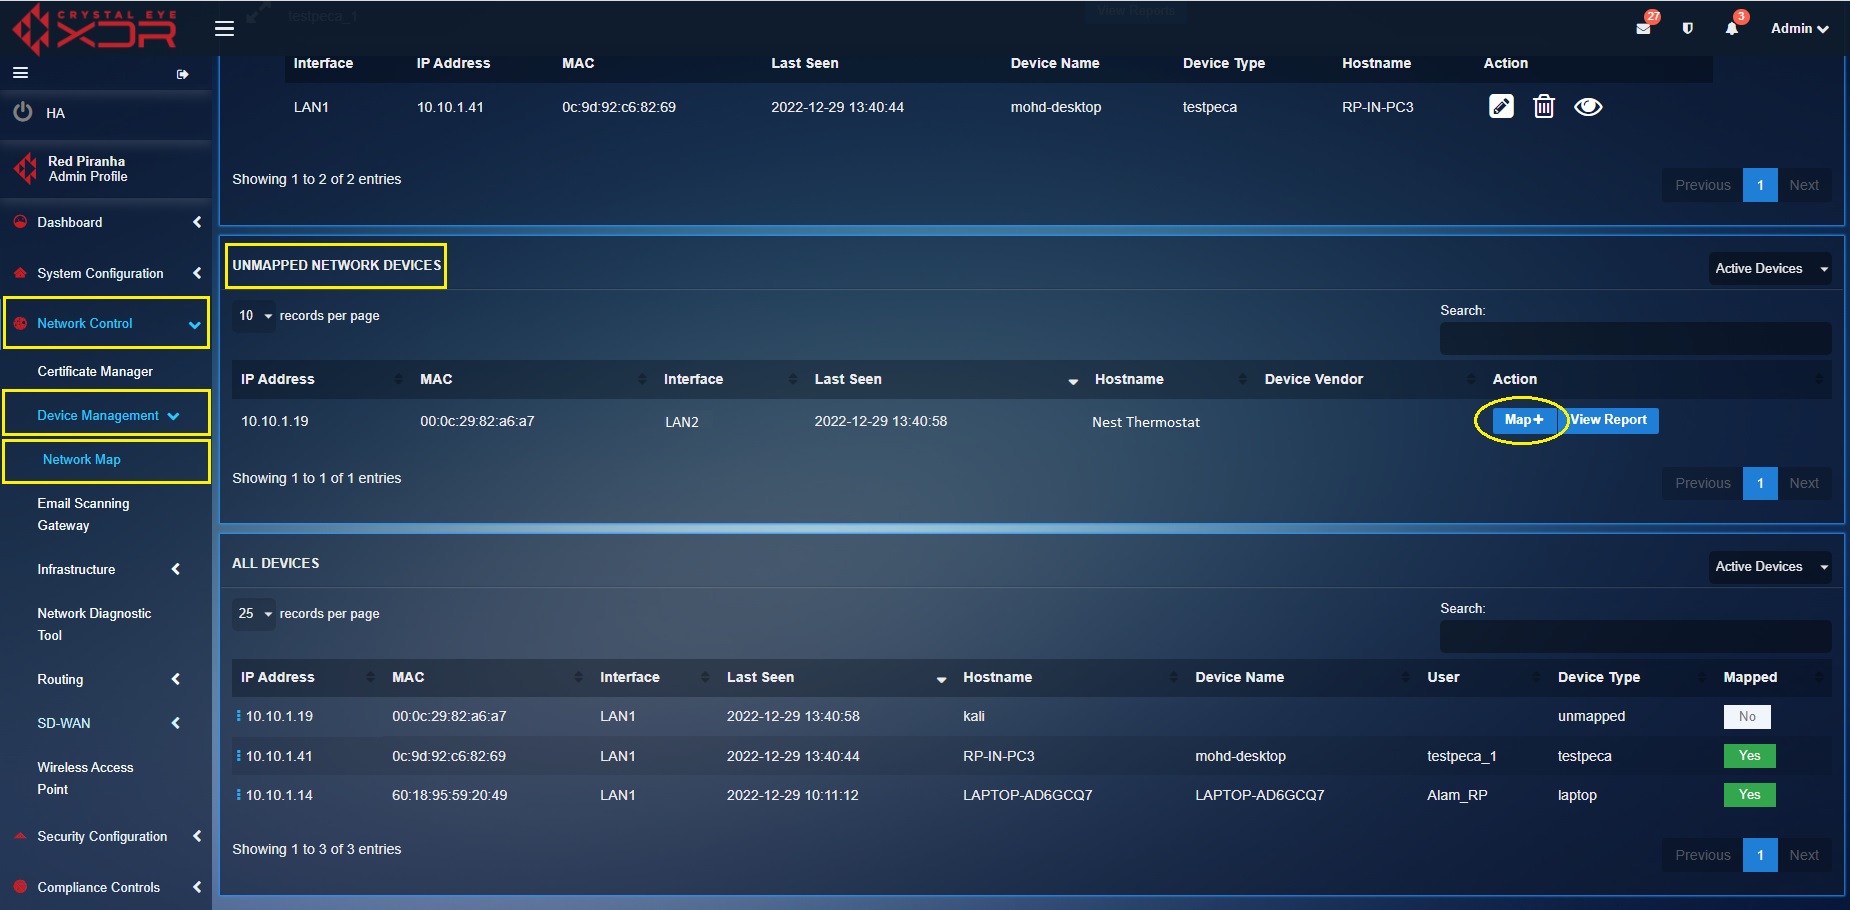
Step 2: Click the Map button under the Unmapped Network Devices section.
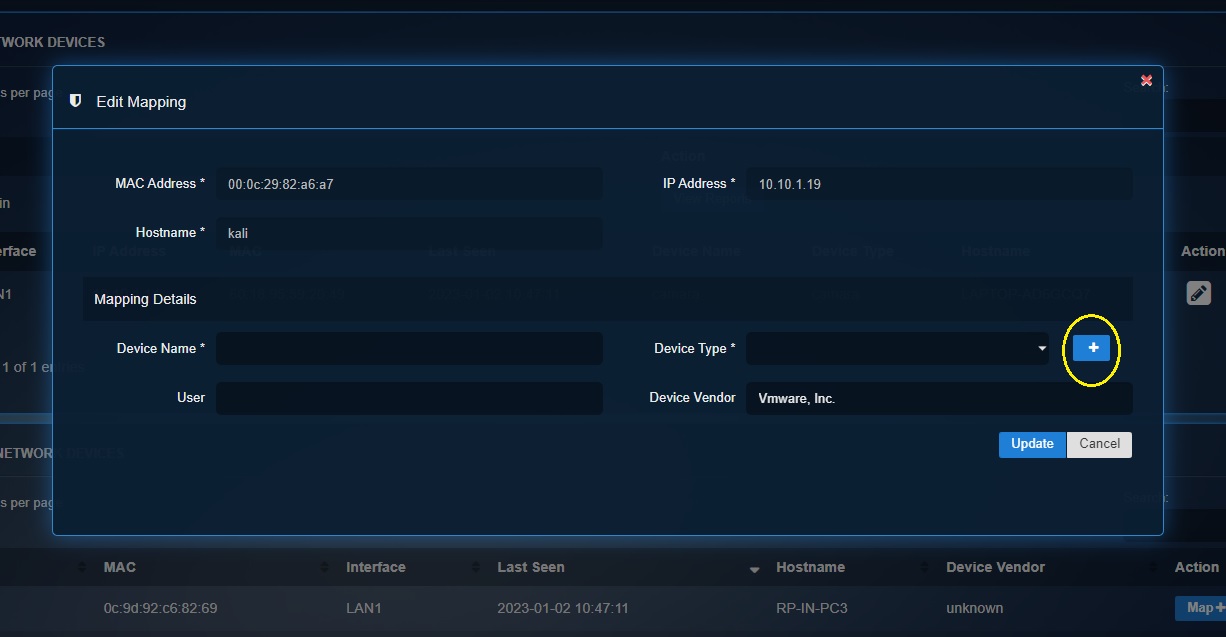
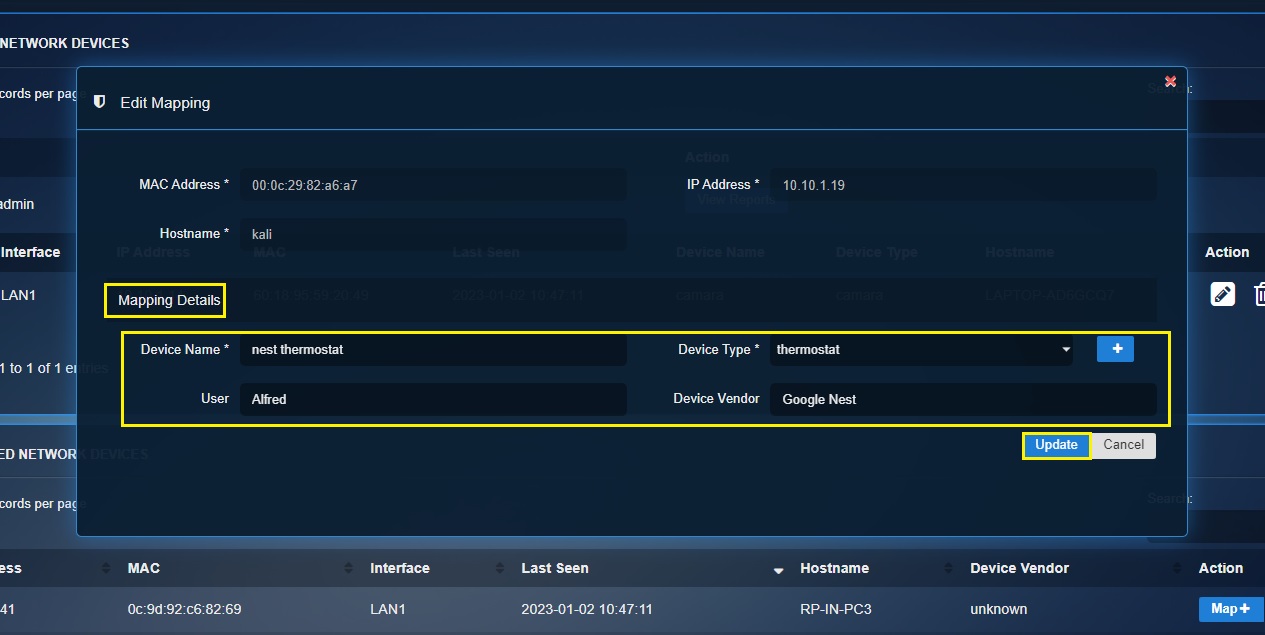
Step 3: You will see the Edit Mapping pop-up. The system will automatically pick the Hostname, MAC Address and IP Address of the Nest Thermostat and display it. Click the ‘+ button’ to create a dedicated category for the Nest Thermostat.
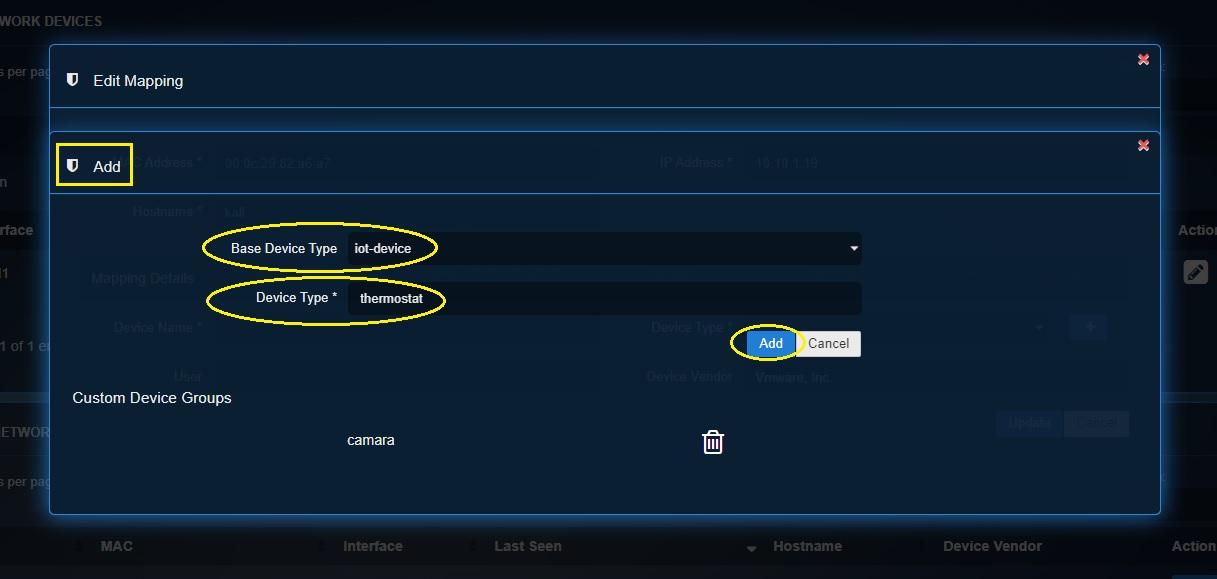
Step 4: You will now see the Add pop-up. Select the Base Device Type as ‘iot-device’, enter the Device Type as ‘thermostat’ and click the Add button.
Step 5: You will again see the Edit Mapping pop-up. Select ‘thermostat’ from the Device Type dropdown and enter the following information under the Mapping Details section and click the Update button.
Device Name – nest thermostat
Device Type – Select ‘iot-device’.
User – Select ‘alfred’. Learn more about how to create a user in the CE XDR and the advantages of doing so here.
Device Vendor – nest
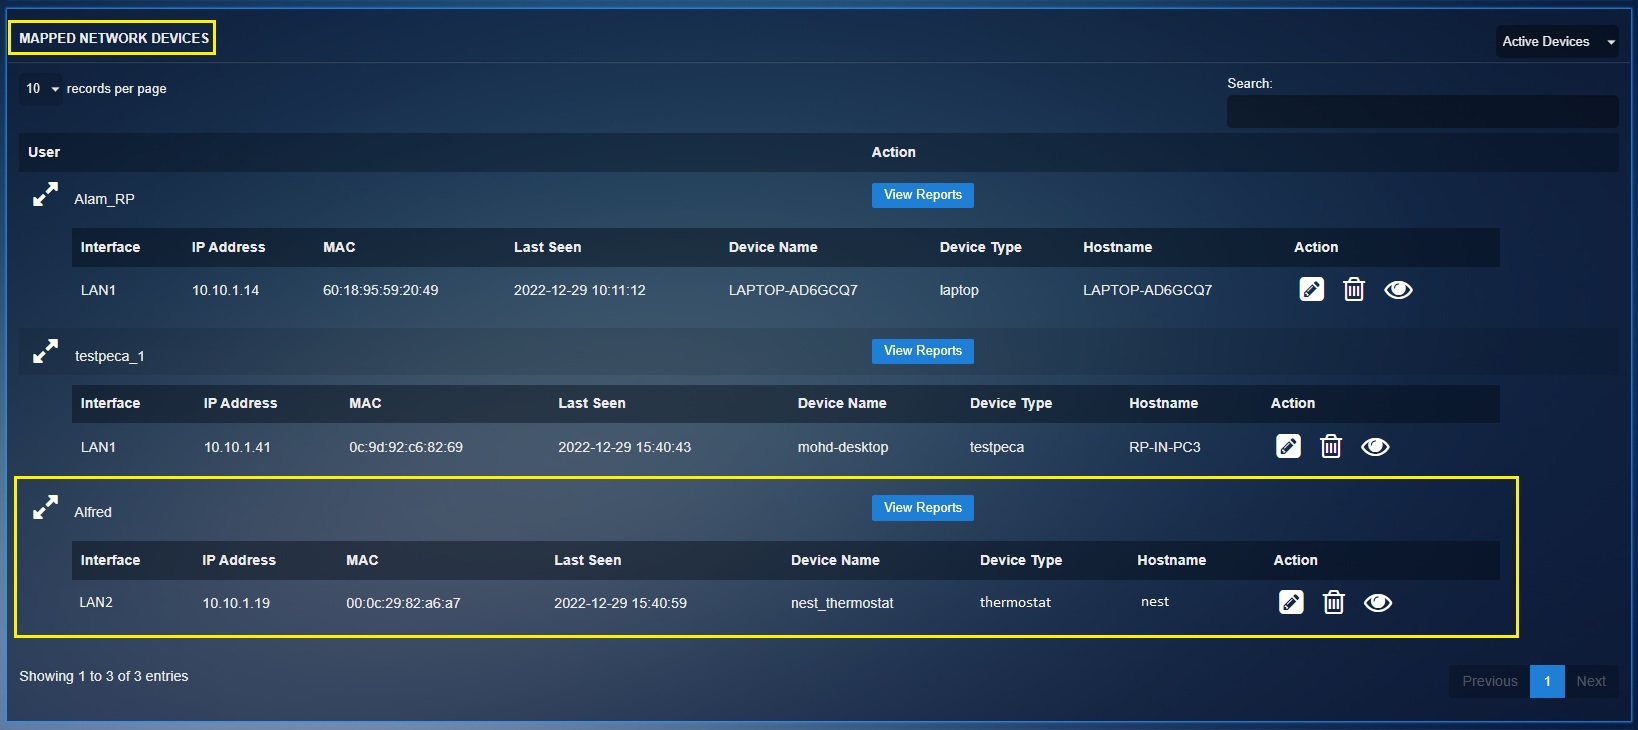
Step 6: You will now see that the nest thermostat MAC address added to the Mapped Network Device section.
Great! We have successfully segmented a dedicated custom zone for the Nest thermostat and have also mapped the thermostat to the IoT device group as the baseline device type and thermostat as the device type.
We will now set up a Network Baseline by pin-holing traffic originating from the Nest Thermostat to specific Nest servers.
We will complete this task in two stages. We will list some authorised Nest servers hostnames that a Nest Thermostat will communicate with and create an object containing all of these servers using the Hosts & Groups application. We will then use this grouped object of Nest servers to create a traffic rule.
This is how we set up a Network Baseline by pin-holing traffic originating from the Nest Thermostat to specific Nest servers.
The following steps show how to create an object for notable nest servers using the Hosts & Groups application and use them to create a traffic rule to set up a Network Baseline by pin-holing traffic originating from the Nest Thermostat to trusted Nest servers:
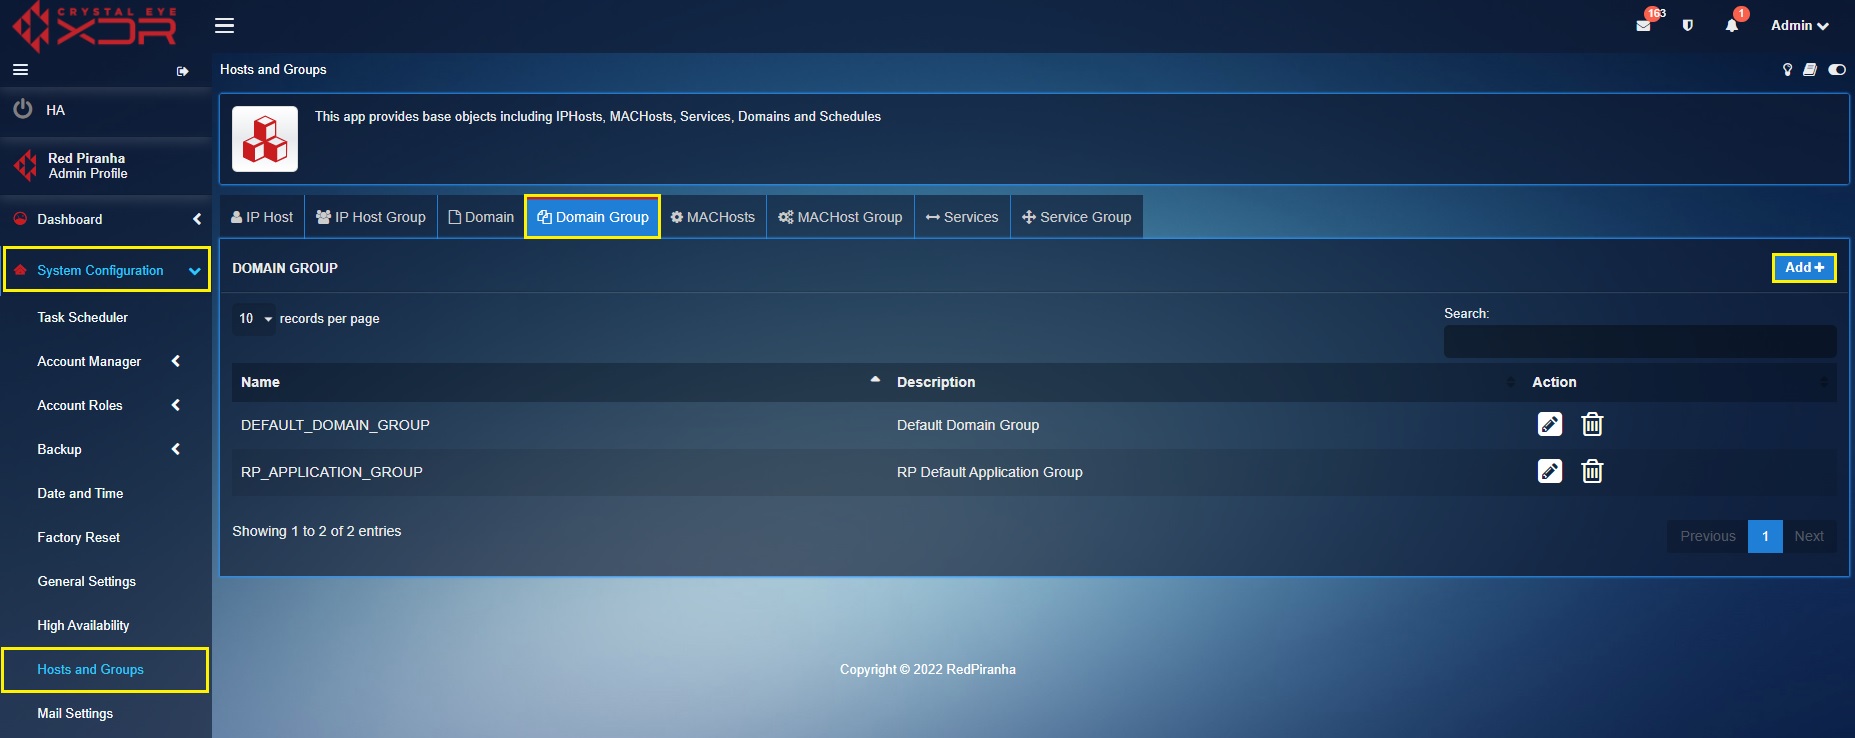
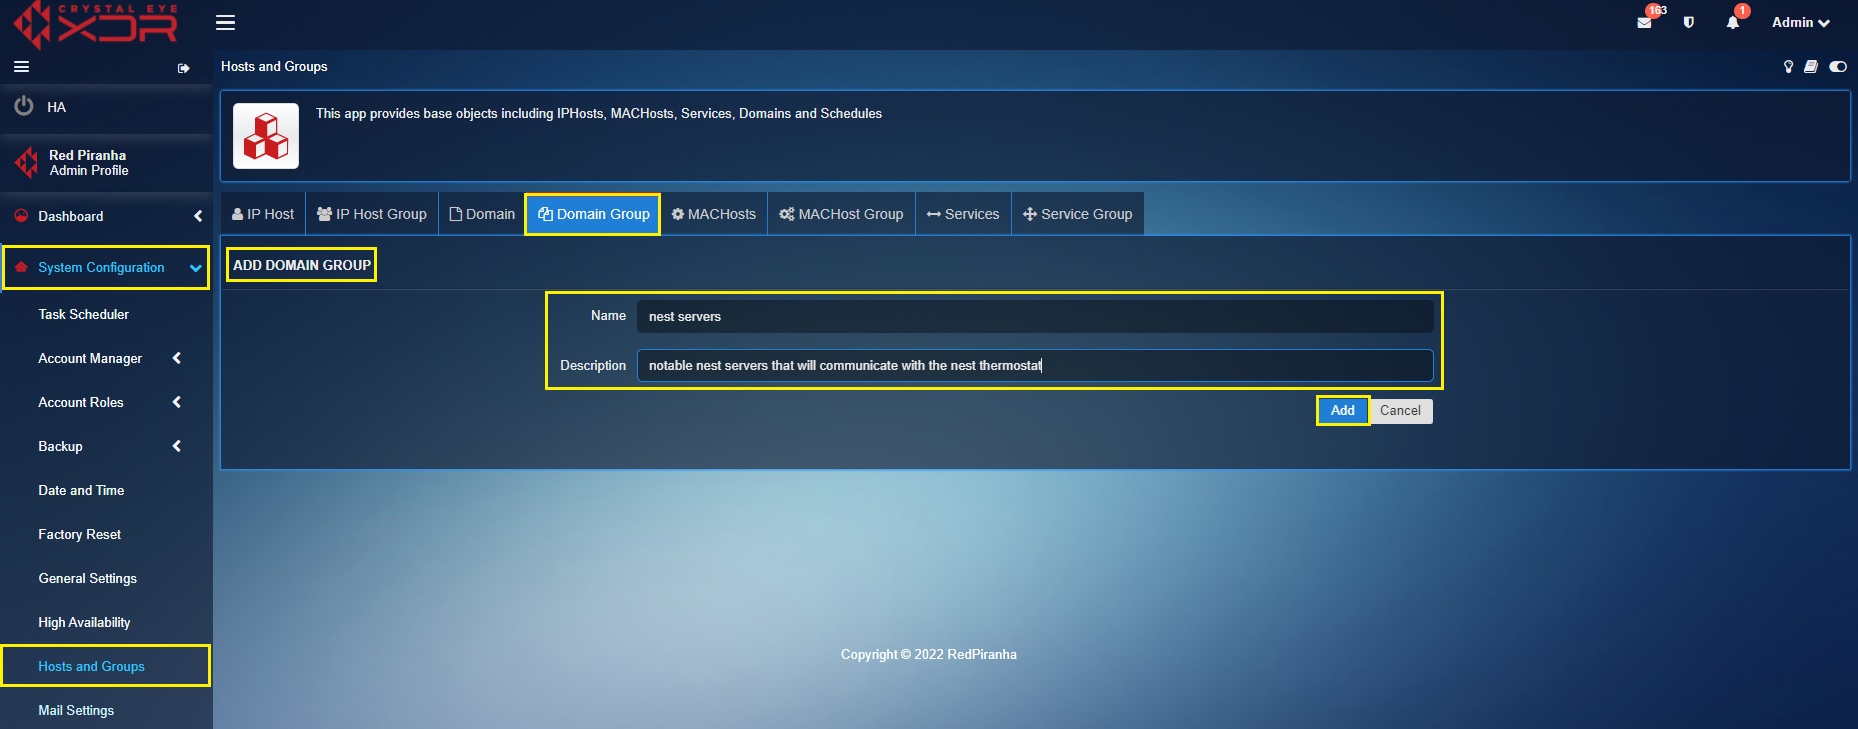
Step 1: Go to System Configuration > Hosts and Groups and click the Add button under the Domain Group tab.
Step 2: You will see the Add Domain Group pop-up. Enter the following and click the Add button:
Name – Nest Servers
Description – Notable Nest Servers that will communicate with the Nest Thermostat.
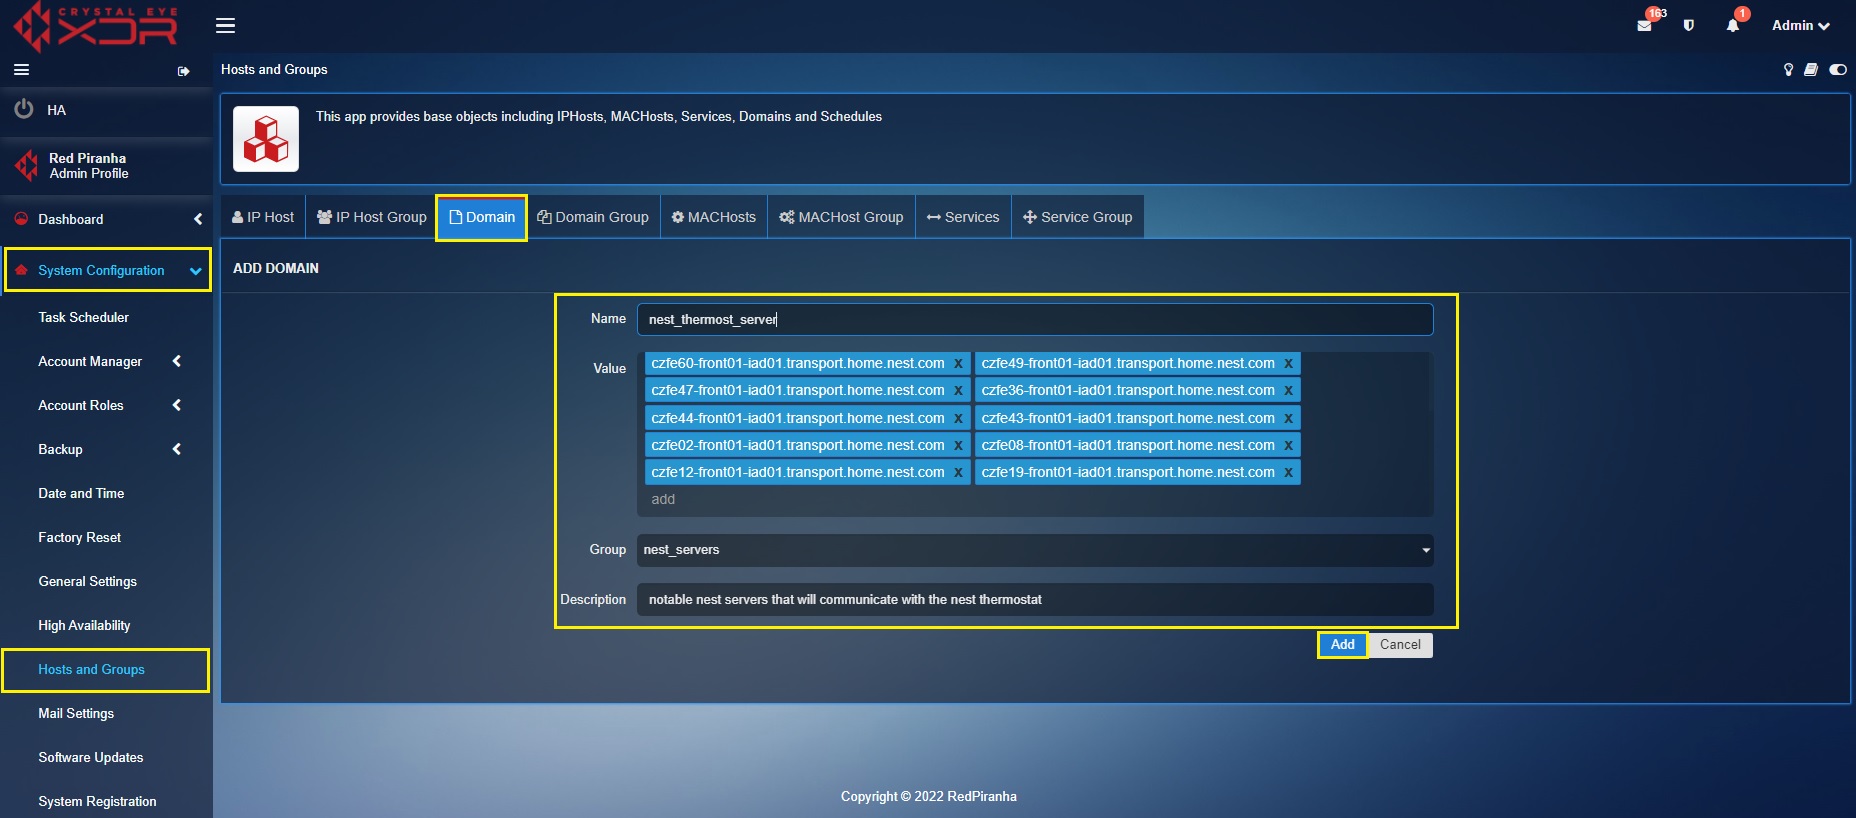
Step 3: Click the Add button under the Domain tab. 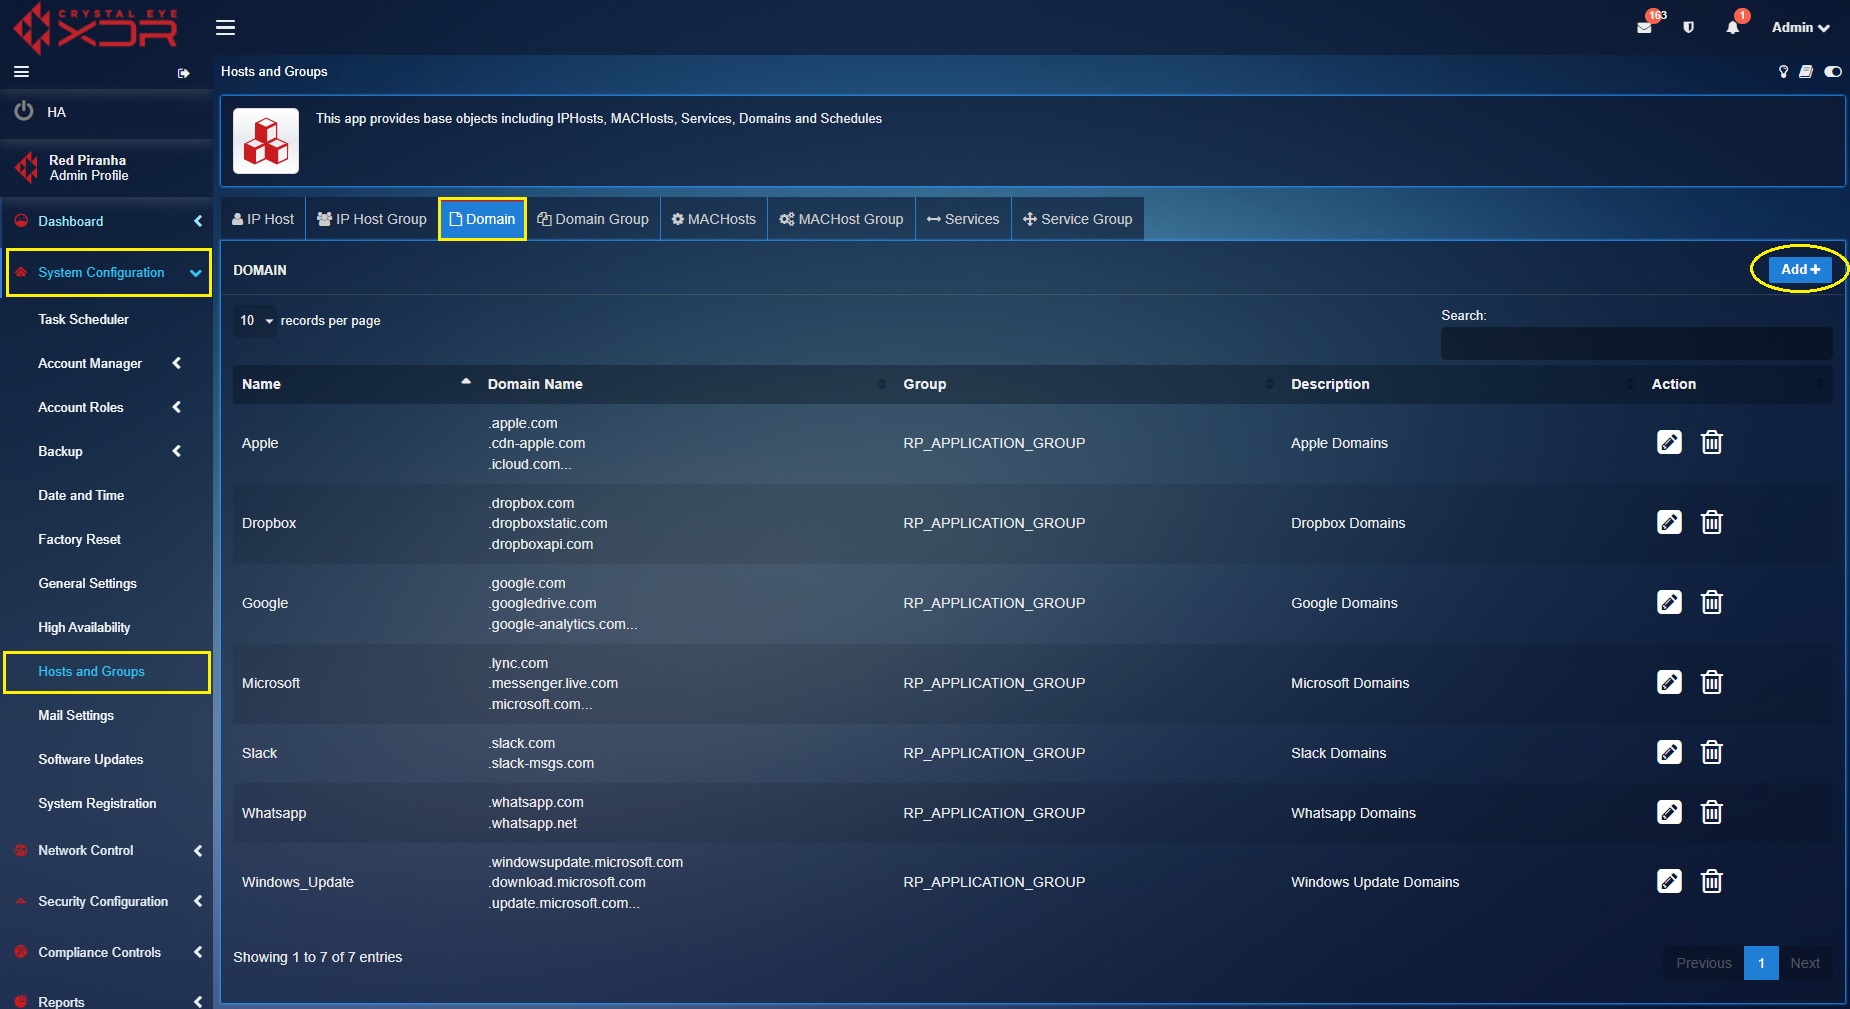
Step 4: You will now see the Add Domain pop-up. Create an object by entering the nest server domain names, select the Group as nest servers and click the Add button.
Note
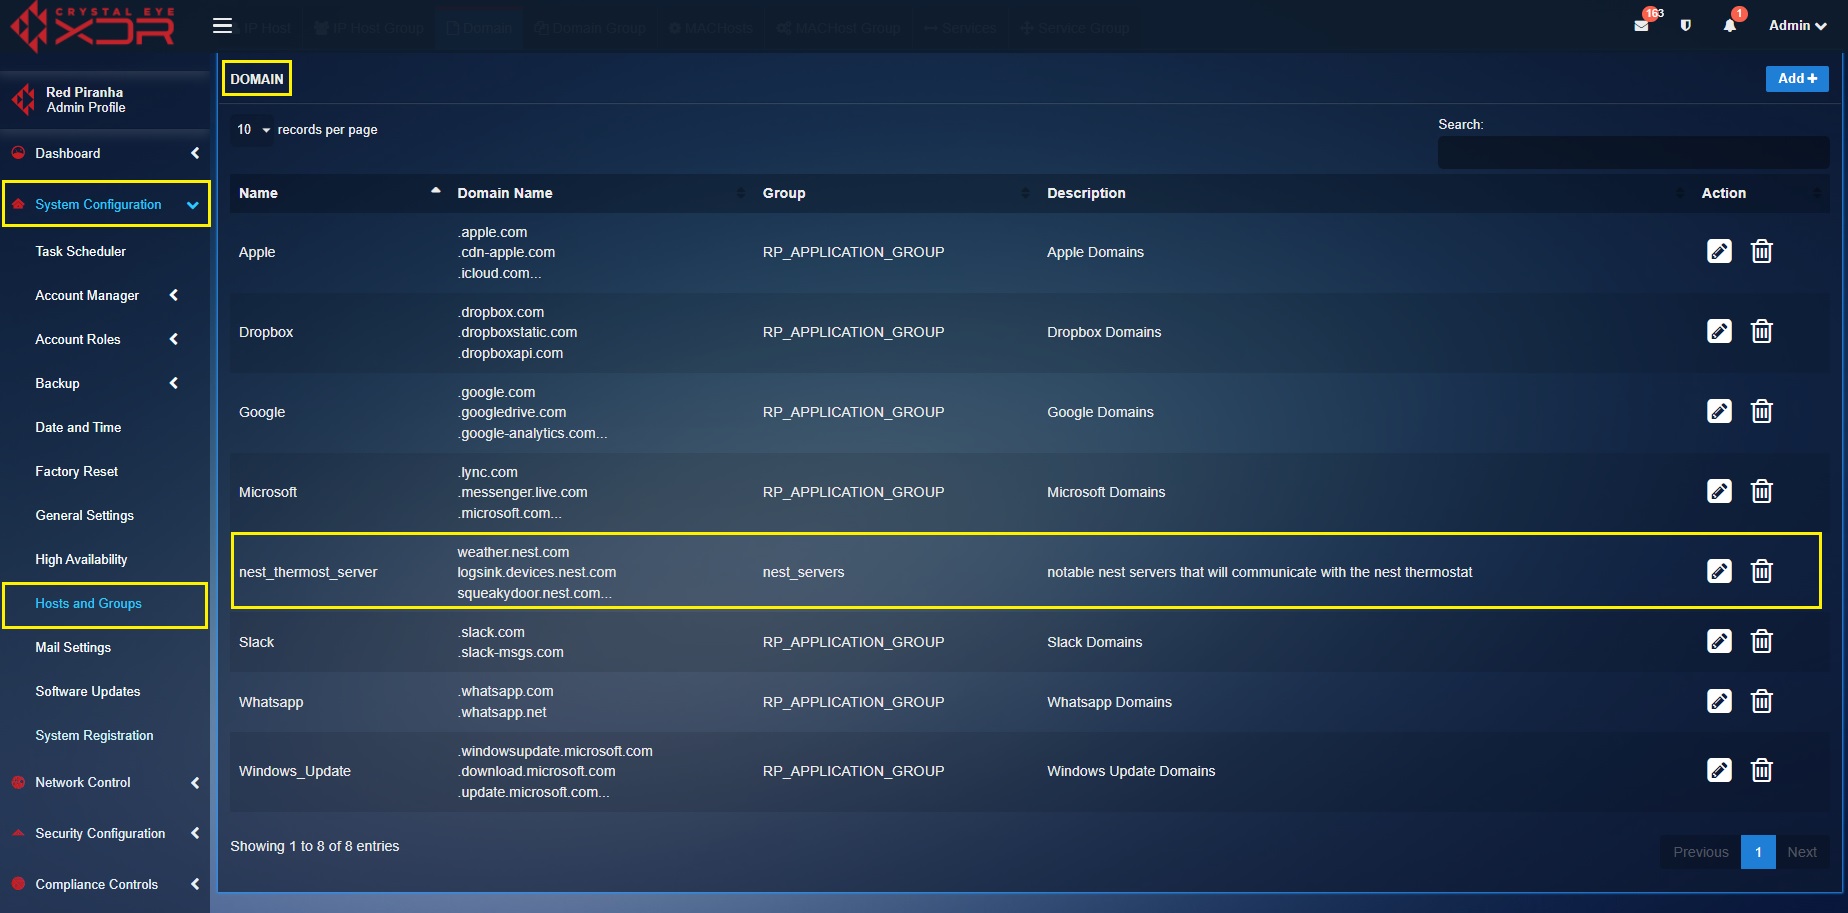
You will now be directed to the Domain dashboard. The object consisting of all the nest server domains will be visible on the domain dashboard as shown on the screenshot below.
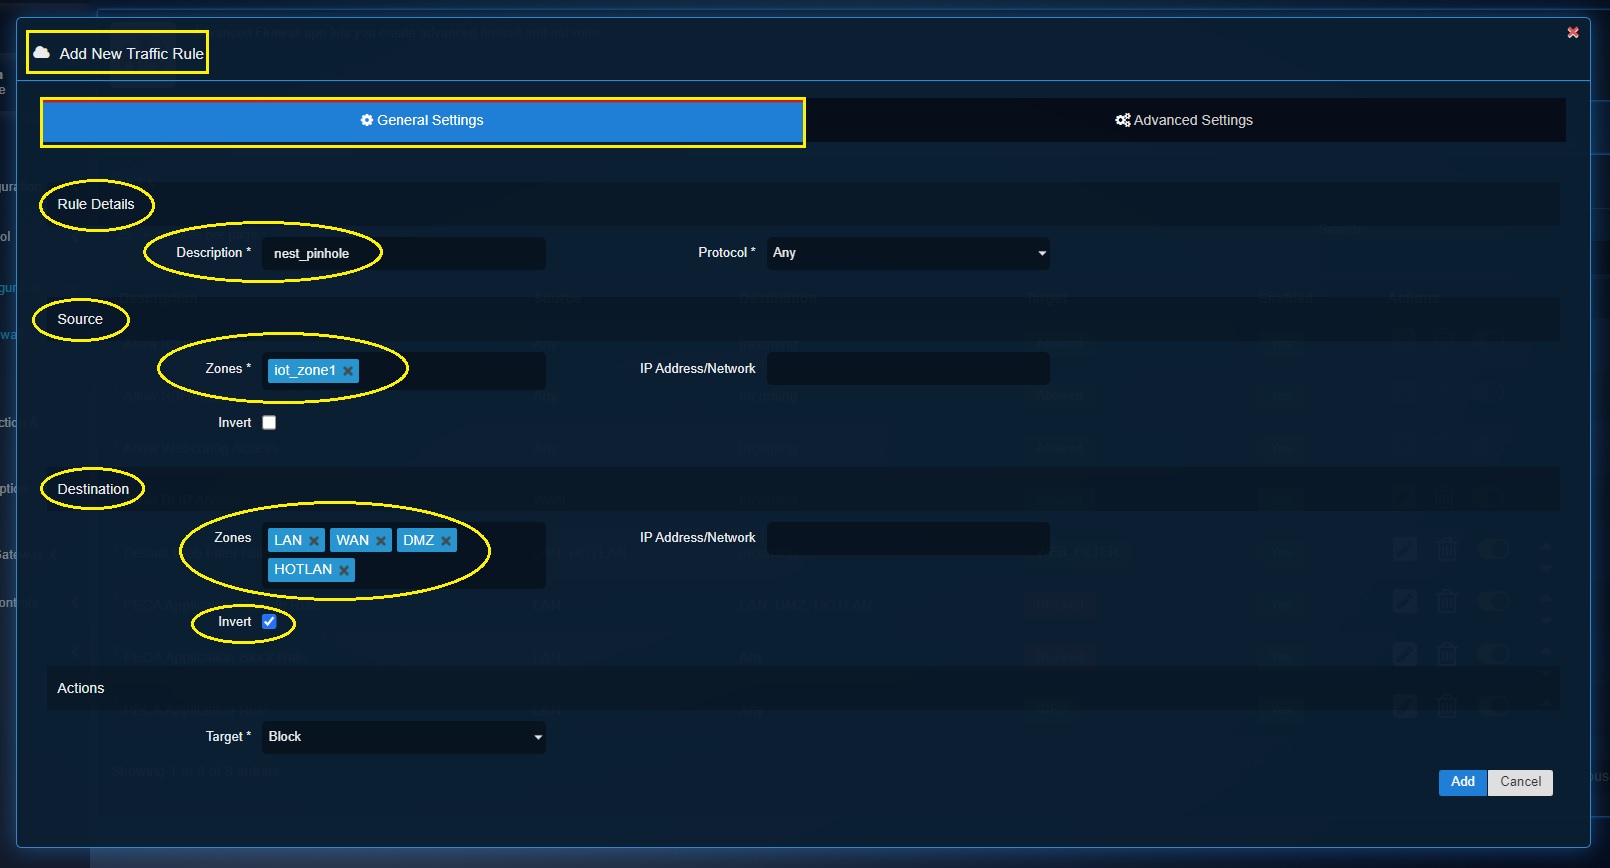
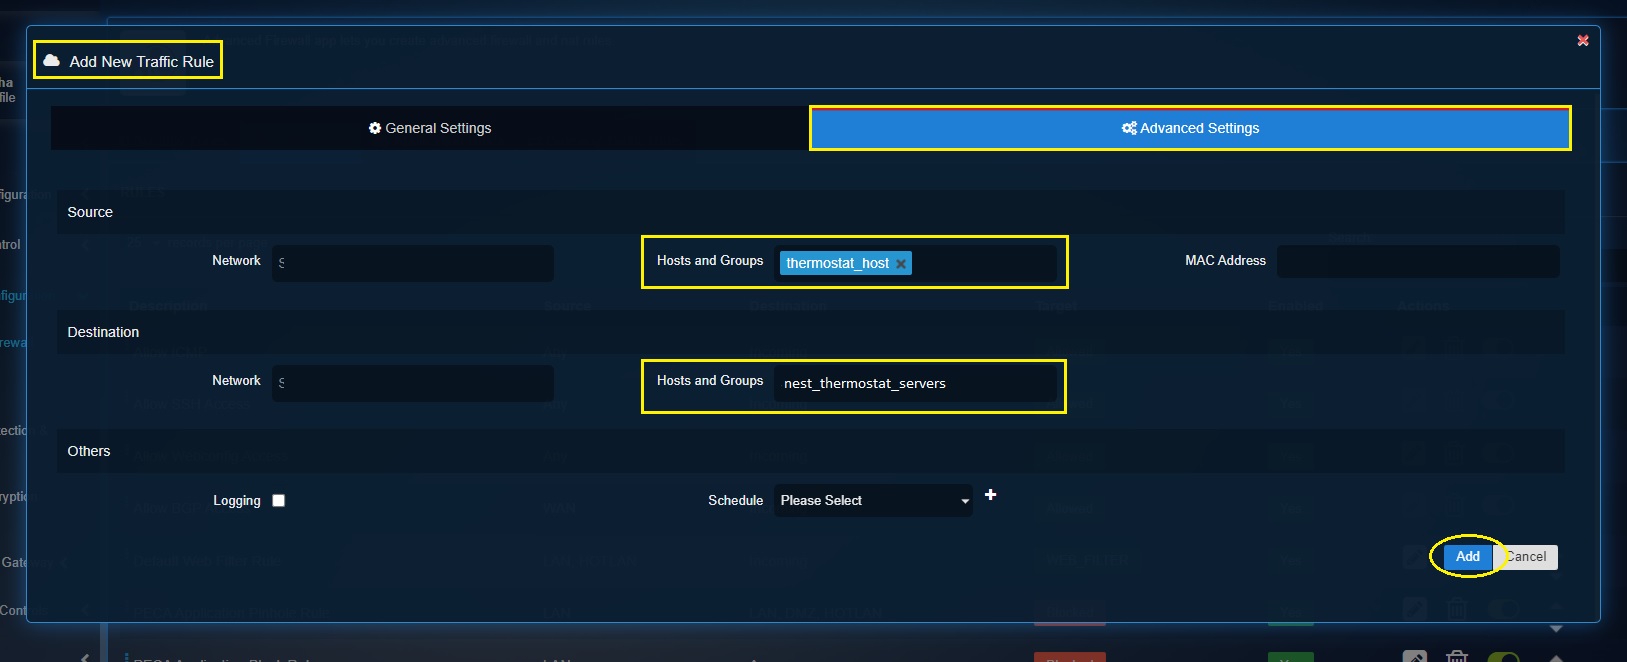
Step 5: Go to Security Configuration > Advanced Firewall application > click the Traffic Rules tab > click the Add button > you will see the Add New Traffic Rule pop-up.
Enter the following details:
-
Source Zone: iot_zone1
-
Destination Zone: LAN, WAN, DMZ, HOTLAN
-
Select Invert tickbox under the Destination section.
-
Advanced Settings (Source Hosts & Groups): thermostat_host (Please note that the iot-devices categorized under thermostat device type will show up as thermostat_host under MAC Hosts tab of the Hosts & Groups application).
-
Advanced Settings (Destination Hosts & Groups): nest_thermostat_server (Please note that this object was created in step 3 & step 4 above)
Encrypted benign traffic can now be monitored using Passive Encrypted Controls after setting up the segment fingerprint on runtime.
The next steps can be used to setup the Passive Encryption Control application so that the state changes of the segmented IoT zone can be monitored against the network baseline set above:
Step 1: Go to Security Configuration > Passive Encryption application and enable the app.
Reminder
The Passive Encryption Control application is not a core application and can be installed from Marketplace found via the left-hand navigation panel. No additional license or subscription is required to install or use Passive Encryption Control.
Step 2: Select Alerts tab. As shown in the screenshot below the source application is communicating with the malicious server with the domain name awrcaverybrstuktdybstr.com. Click the Block icon to block this malicious communication.
Once the traffic of the nest thermostat IoT device is monitored, and any deviations from the network traffic baseline is identified and rectified, the next step of capturing the secure state of network can be executed.
Pursue the following steps to capture the secure state of the network:
Step 1: Select the Profiles tab and click the Add button. Now select the Device Type ‘thermostat’ a provide a Name ‘thermostat’ and Description.
Step 2: Now click the Capture Secure State button under the IoT Devices tab. You will see the Capture Secure State pop-up. Select the profile ‘thermostat’ and provide a suitable description.
You have now captured the secure state of the network.
