Wireguard
Overview
The WireGuard application is a modern VPN solution (as compared to SSL VPN) and it utilizes inbuilt state-of-the-art cryptography.
Crystal Eye XDR offers the capability to implement site-to-site VPN allowing users to connect to resources placed in multiple sites. The app can be switched to both split-tunnel mode and full tunnel mode to create a secure tunnel between multiple sites.
The WireGuard application also allows CE XDR administrators to configure VPN servers and create WireGuard VPN users. This setup essentially creates a tunnel between the user's device and the Crystal Eye XDR network offering VPN services for remote users. This configuration is widely used to connect remote workers with the CE XDR network.
The WireGuard application ensures seamless security helping Crystal Eye XDR users to comply with ISO 27001 Control A.13.1.2 Security of Network Services and reduce the risk derived from insecure networks.
Advantages of using the WireGuard application:
a. Control over service levels through quick and reliable connection process.
b. Best download speeds that you can get over a VPN network.
c. The app uses the WireGuard protocol known to be cryptographically sound.
d. Ability to run on both full tunnel and split-tunnel mode.
e. Simple app user interface.
Gartner Peer Reviews
 Explore more Red Piranha Customer Reviews on Gartner Peer Insights
Video Resources
Installation
The WireGuard application is not available by default. It can be installed from Marketplace in the left-hand navigation panel.
Navigation to WireGuard application
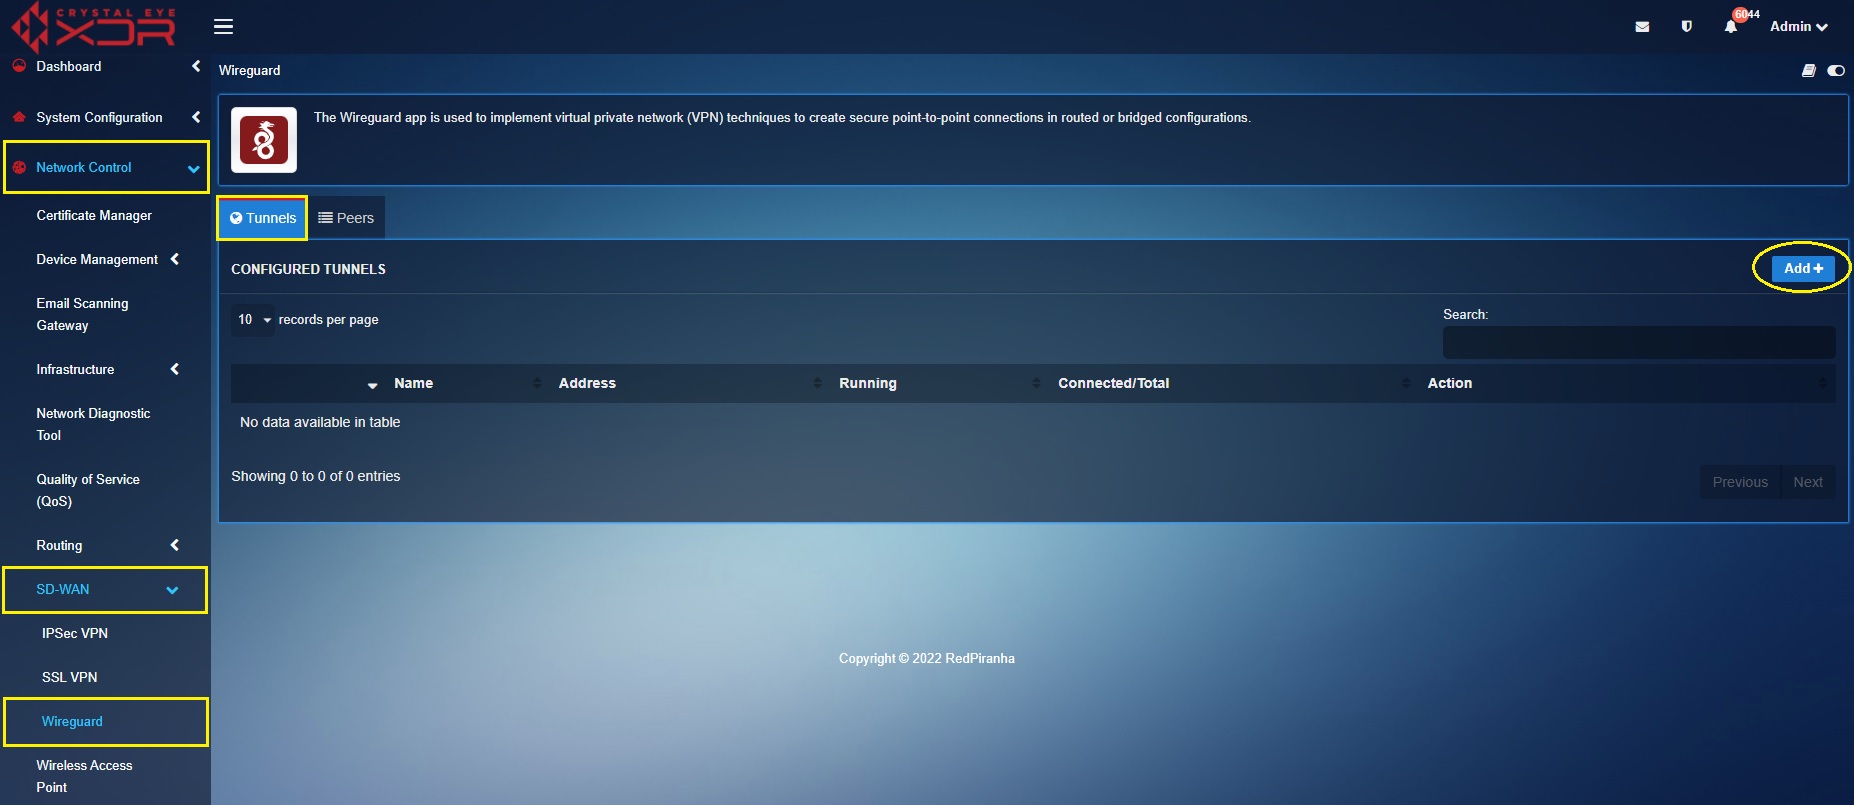
Go to Network Control > SD-WAN > WireGuard
Creating a WireGuard Mesh VPN Network
The Crystal Eye XDR can be used to spin up a WireGuard mesh network to create a secure and fast connection between multiple sites.
WireGuard mesh network can be configured to implement access controls across multiple sites so that only specific devices falling within a particular network subnet get authorized access to specific servers.
Implementing access controls across multiple sites by configuring a WireGuard mesh network improves the ability of an organization to control access to IT resources and applications.
Let’s learn how to configure a WireGuard mesh network with the help of the following scenario.
In the scenario below, we will configure a WireGuard mesh network to connect specific LAN network subnets of Site A, Site B and Site C. Each site has a Crystal Eye XDR configured as a gateway.
Tunnel Configuration in ‘Site A’, ‘Site B’ & ‘Site C’
The tunnel configuration in Site A, Site B and Site C must be done in the respective Crystal Eye XDRs.
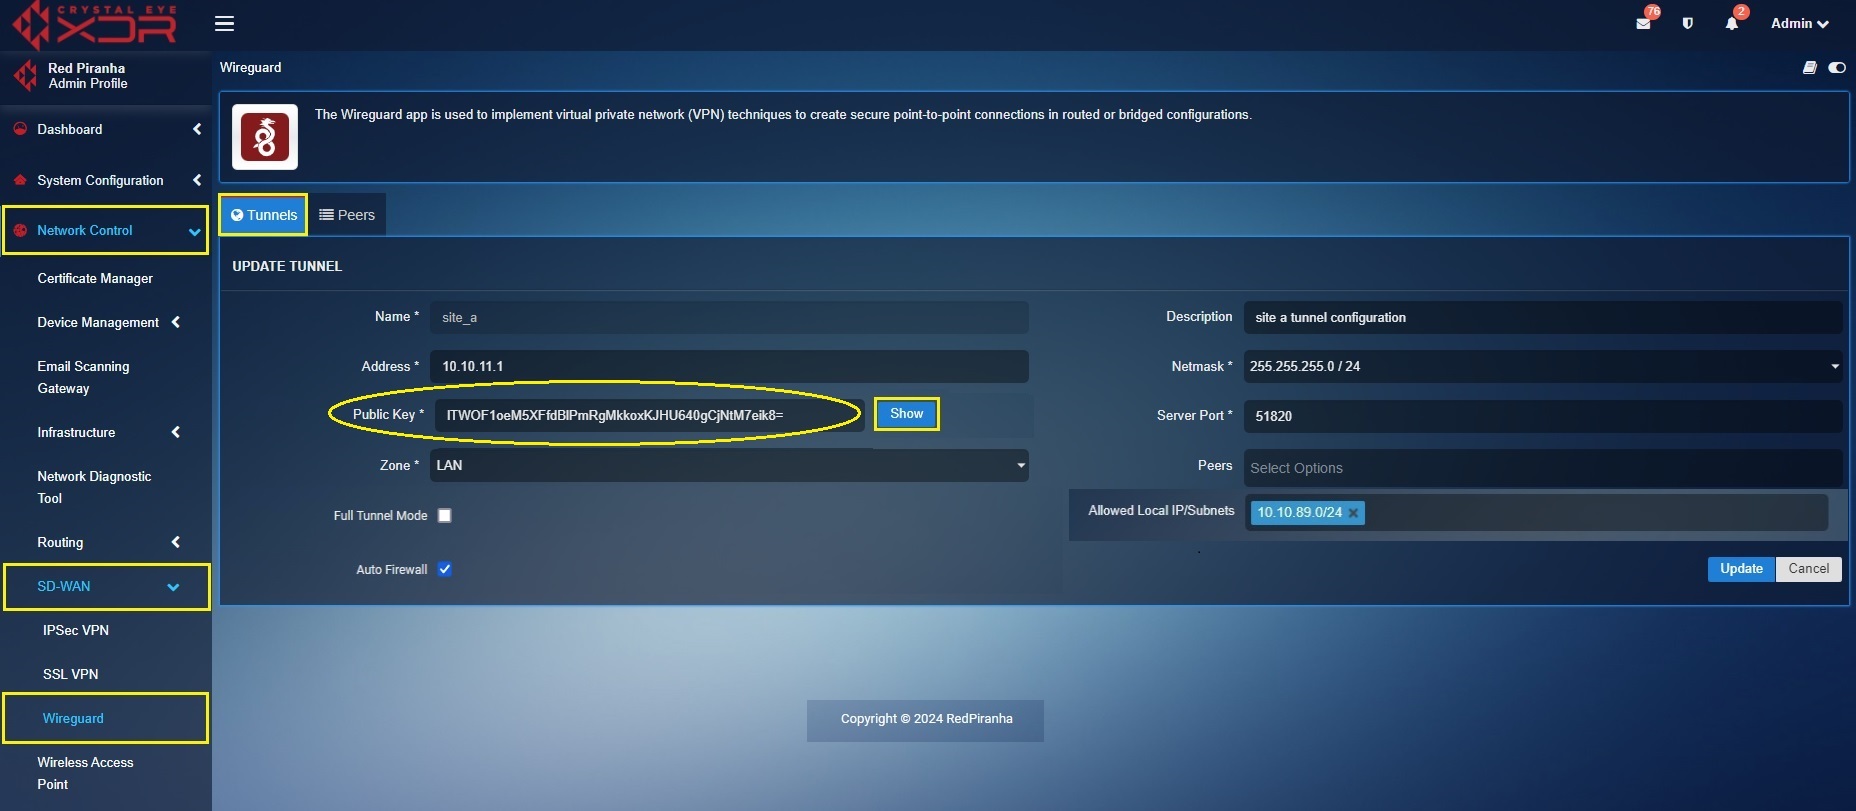
The following screenshot shows the WireGuard tunnel configuration of Site A Crystal Eye XDR:
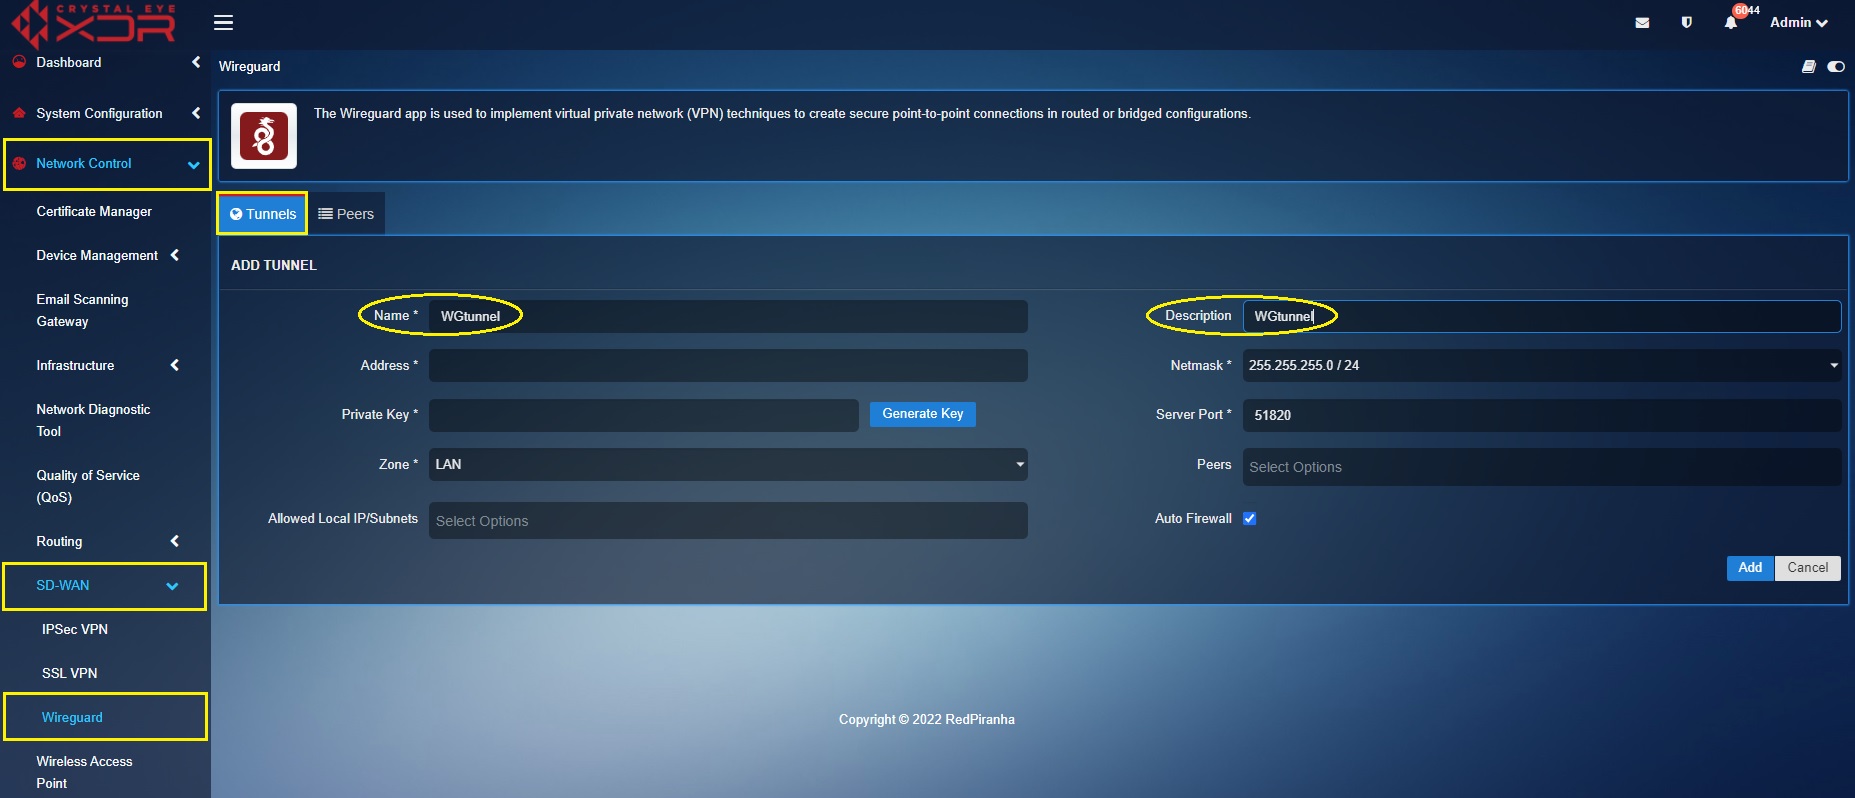
In the ‘Site A’ Crystal Eye XDR, go to Network Control > SD-WAN > WireGuard > click the Tunnel Tab > click the ‘Add+’ button and enter the tunnel configuration entries shown in the screenshot below > click the Add button
In the above screenshot,
a. Enter the Name and Description in the text box with the ‘Site A’ details.
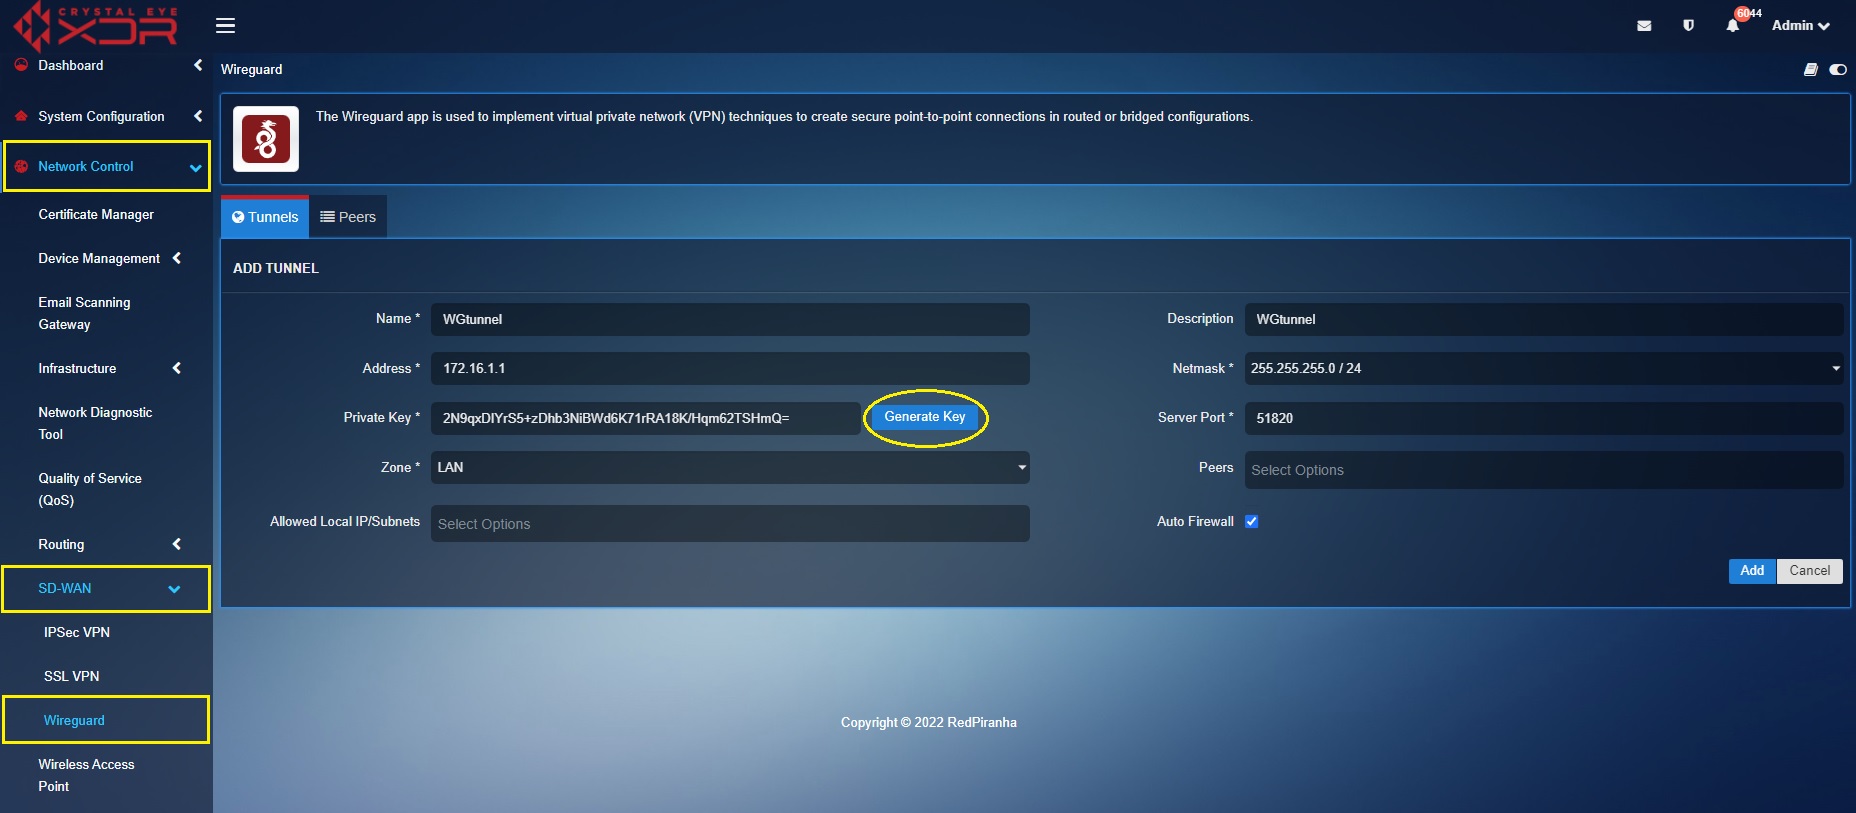
b. Enter the ‘Site A’ WireGuard interface IP address i.e 10.10.11.1 in the Address text box.
c. Select the required Netmask. In our case, we have selected 255.255.255.0/24 as the netmask.
d. Click the Generate Key button to generate the Public Key of Site A CE XDR tunnel.
e. Select the Allowed Local IP address/Subnet from the dropdown. As per our scenario we have selected 10.10.89.0/24. Please note that the selected IP subnets are the ones that needs to be accessed from the other sites.
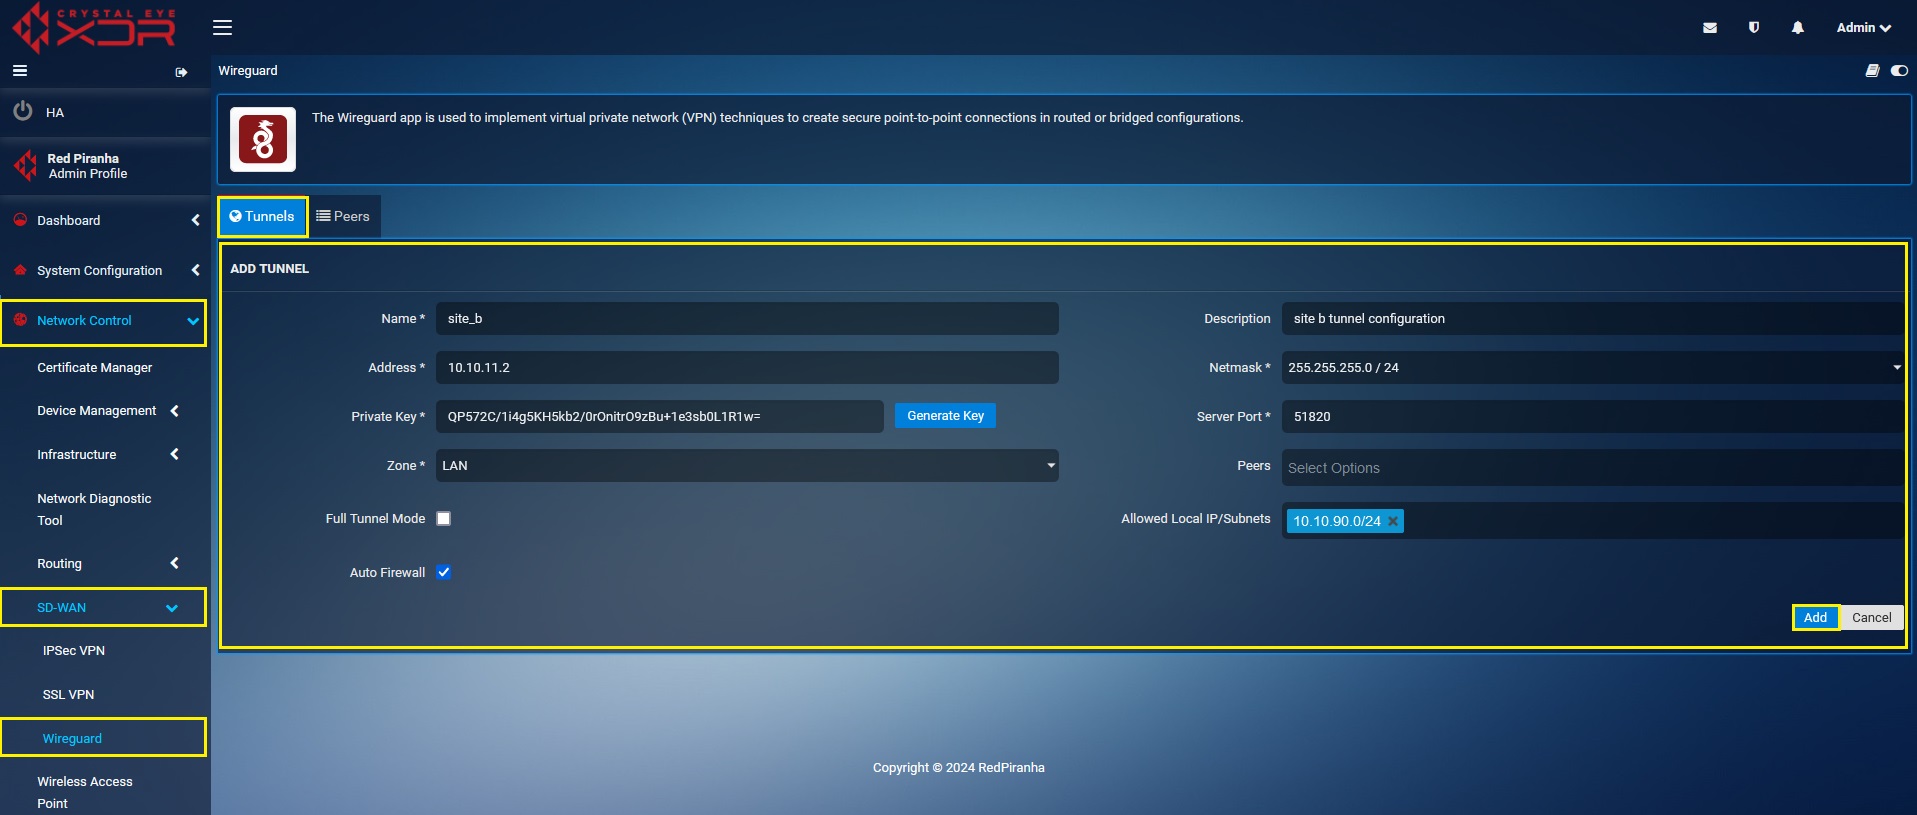
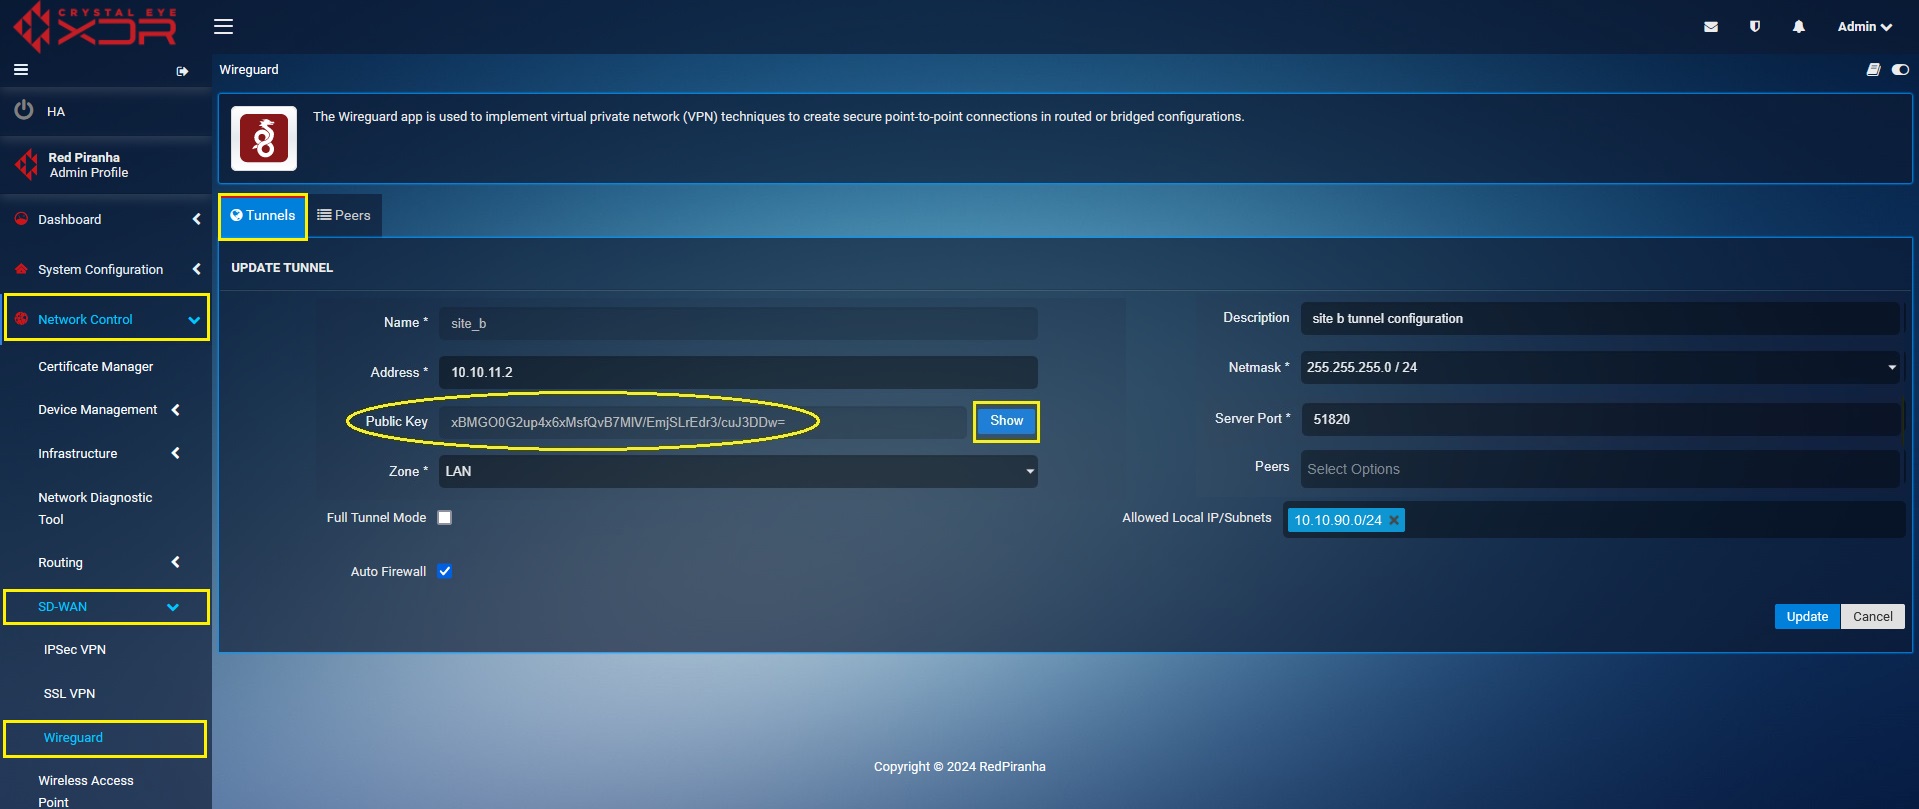
The following screenshot shows the tunnel configuration of Site B Crystal Eye XDR:
In the ‘Site B’ Crystal Eye XDR, go to Network Control > SD-WAN > WireGuard > click the Tunnel Tab > click the ‘Add+’ button and enter the tunnel configuration entries shown in the screenshot below > click the Add button
In the above screenshot,
a. Enter the Name and Description in the text box with the ‘Site B’ details.
b. Enter the ‘Site B’ WireGuard interface IP address i.e 10.10.11.2 in the Address text box.
c. Select the required Netmask. In our case, we have selected 255.255.255.0/24 as the netmask.
d. Click the Generate Key button to generate the Public Key of Site B Crystal Eye XDR tunnel.
e. Select the Allowed Local IP address/Subnet from the dropdown. As per our scenario we have selected 10.10.90.0/24. Please note that the selected IP subnets are the ones that needs to be accessed from the other sites.
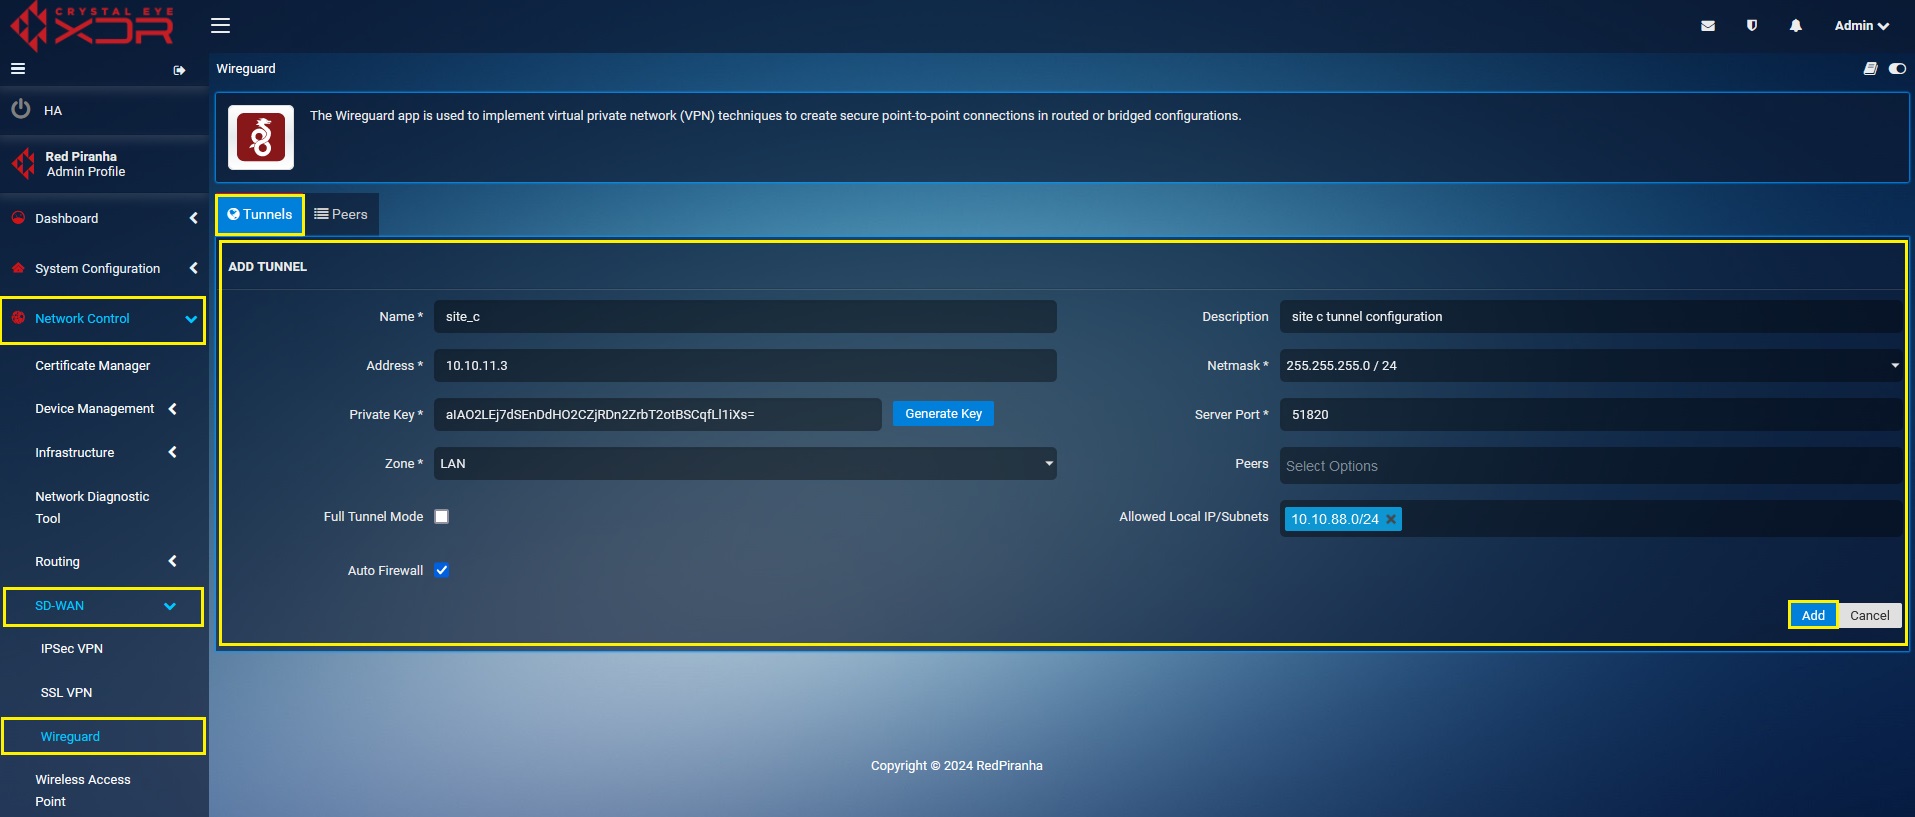
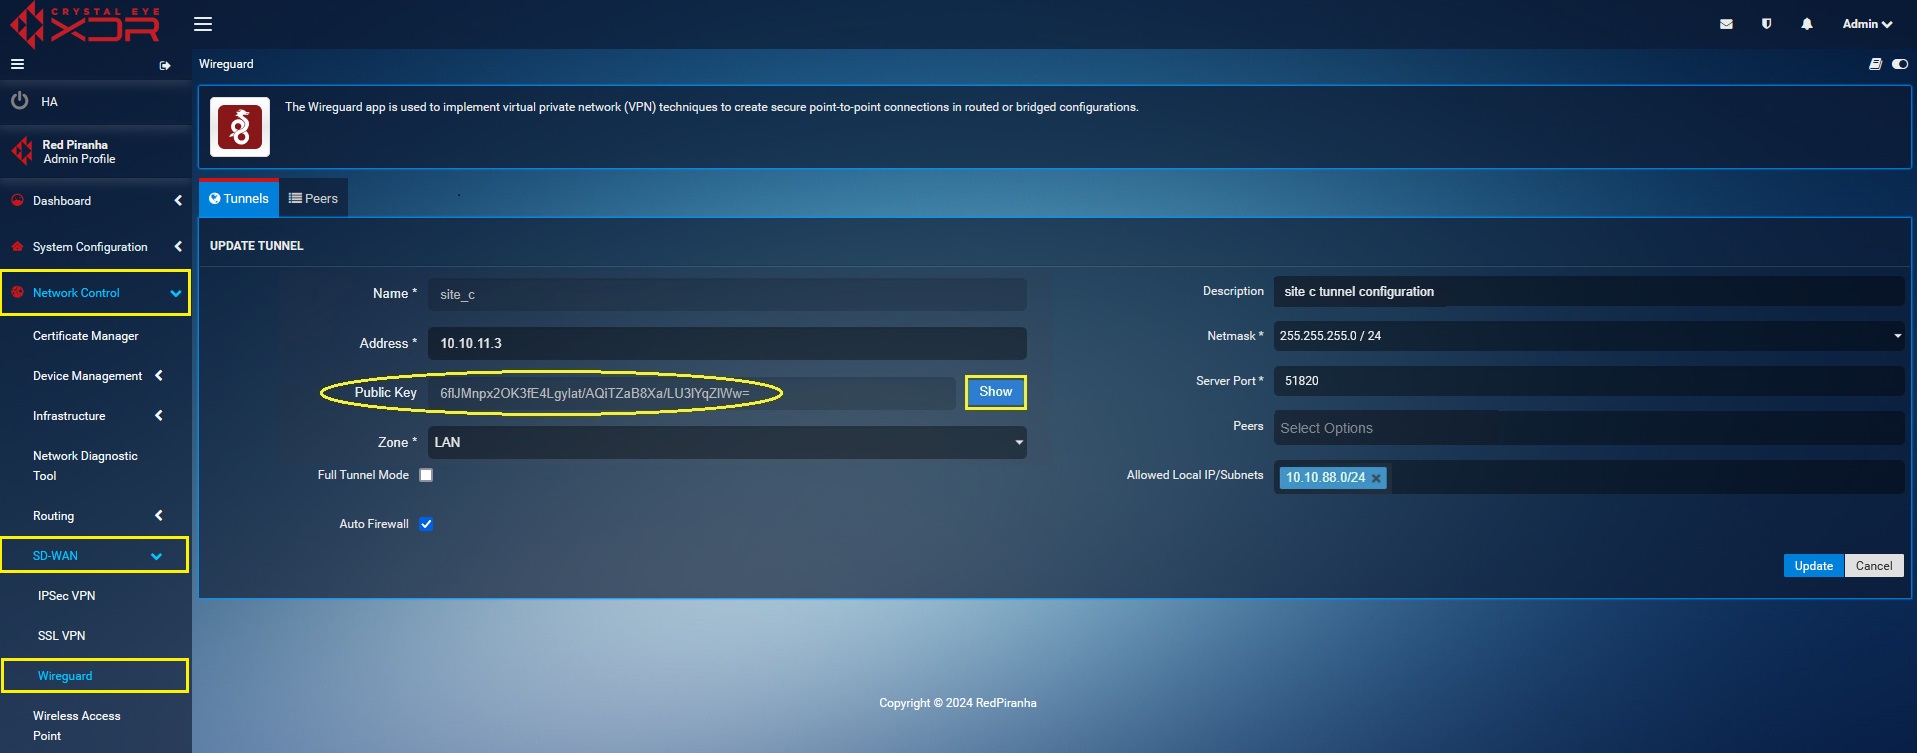
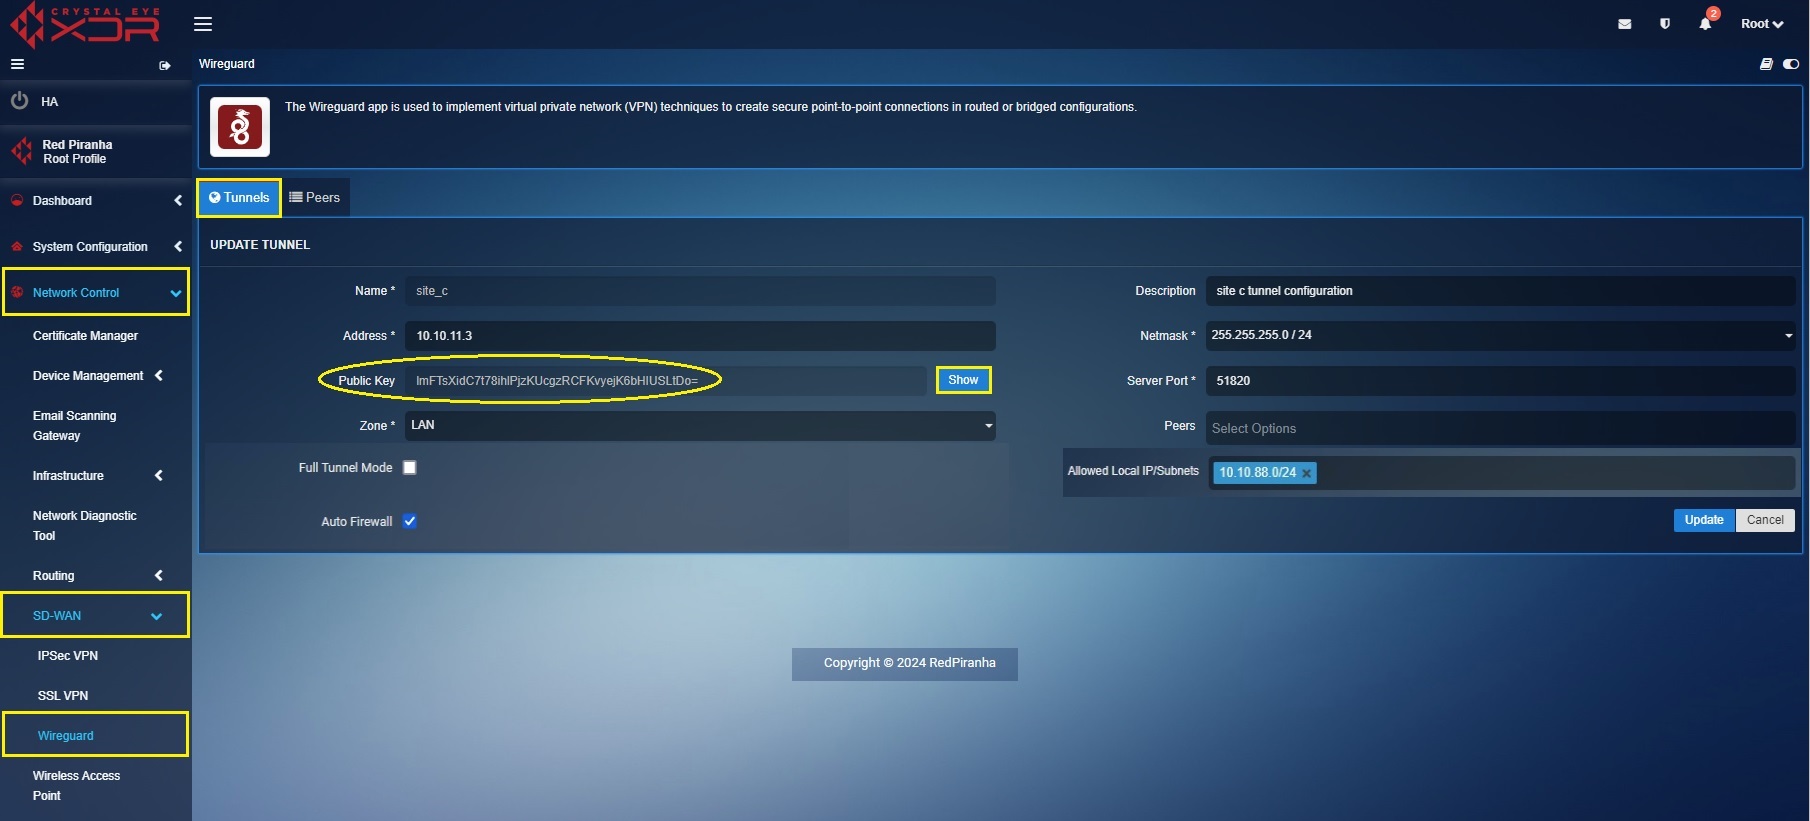
The following screenshot shows the tunnel configuration of Site C Crystal Eye XDR:
In the ‘Site C’ Crystal Eye XDR, go to Network Control > SD-WAN > WireGuard > click the Tunnel Tab > click the ‘Add+’ button and enter the tunnel configuration entries shown in the screenshot below > click the Add button
In the above screenshot,
a. Enter the Name and Description in the text box with the ‘Site C’ details.
b. Enter the ‘Site C’ WireGuard interface IP address i.e 10.10.11.3 in the Address text box.
c. Select the required Netmask. In our case, we have selected 255.255.255.0/24 as the netmask.
d. Click the Generate Key button to generate the Public Key of ‘Site C’ Crystal Eye XDR tunnel.
e. Select the Allowed Local IP address/Subnet from the dropdown. As per our scenario we have selected 10.10.88.0/24. Please note that the selected IP subnets are the ones that needs to be accessed from the other sites.
Peer Configuration in ‘Site A’ Crystal Eye XDR
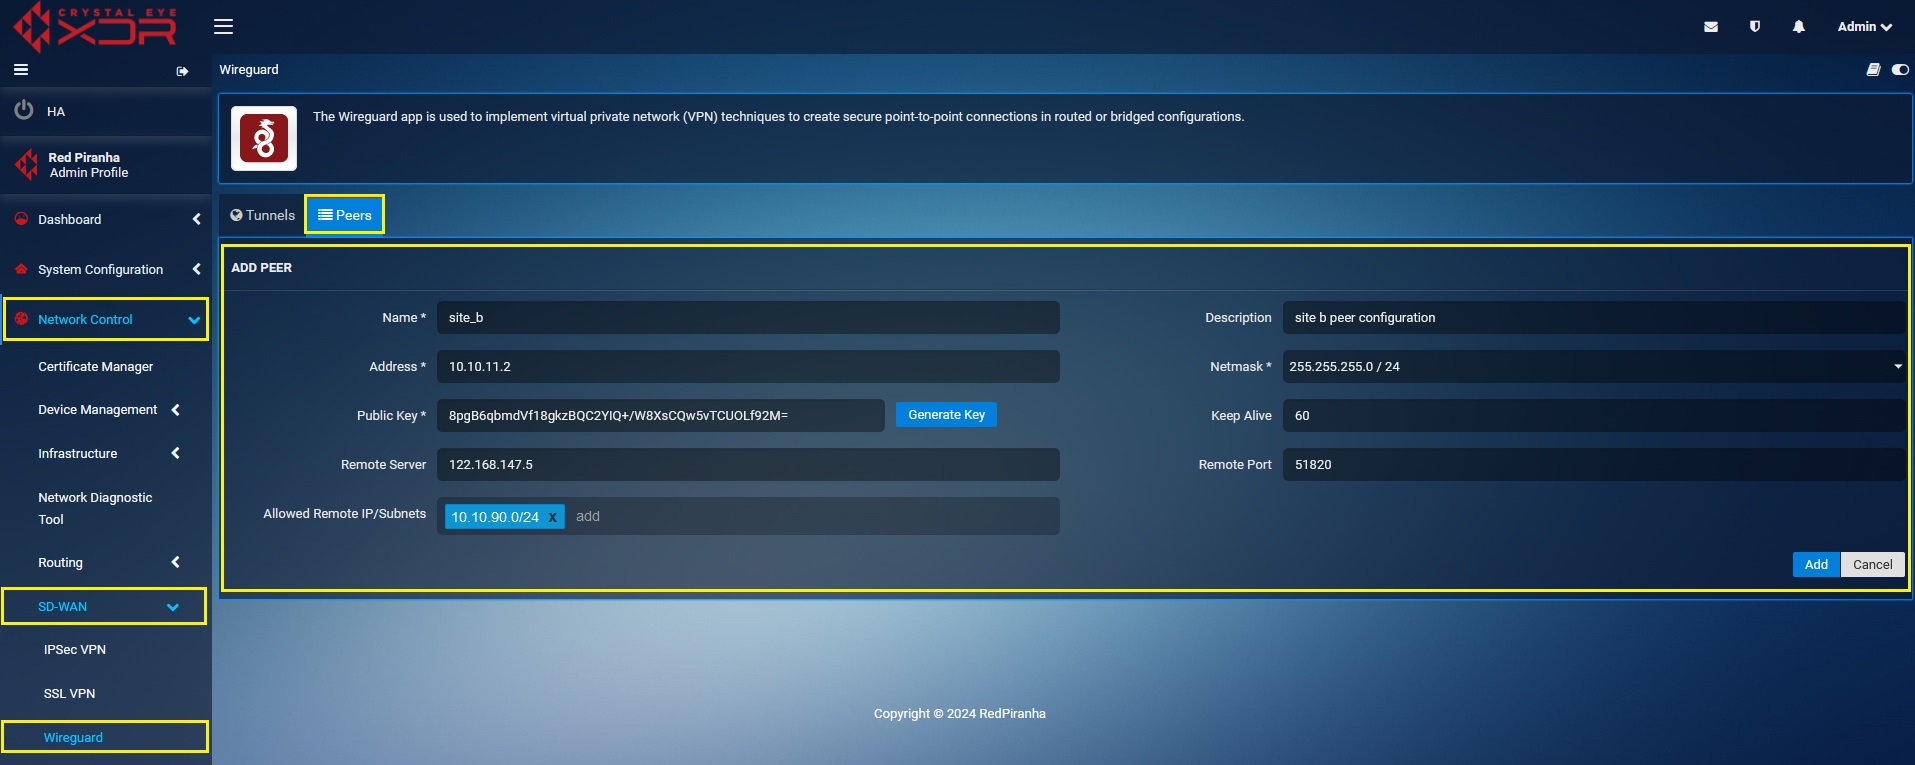
Create a ‘Site B’ Peer in the ‘Site A’ Crystal Eye XDR
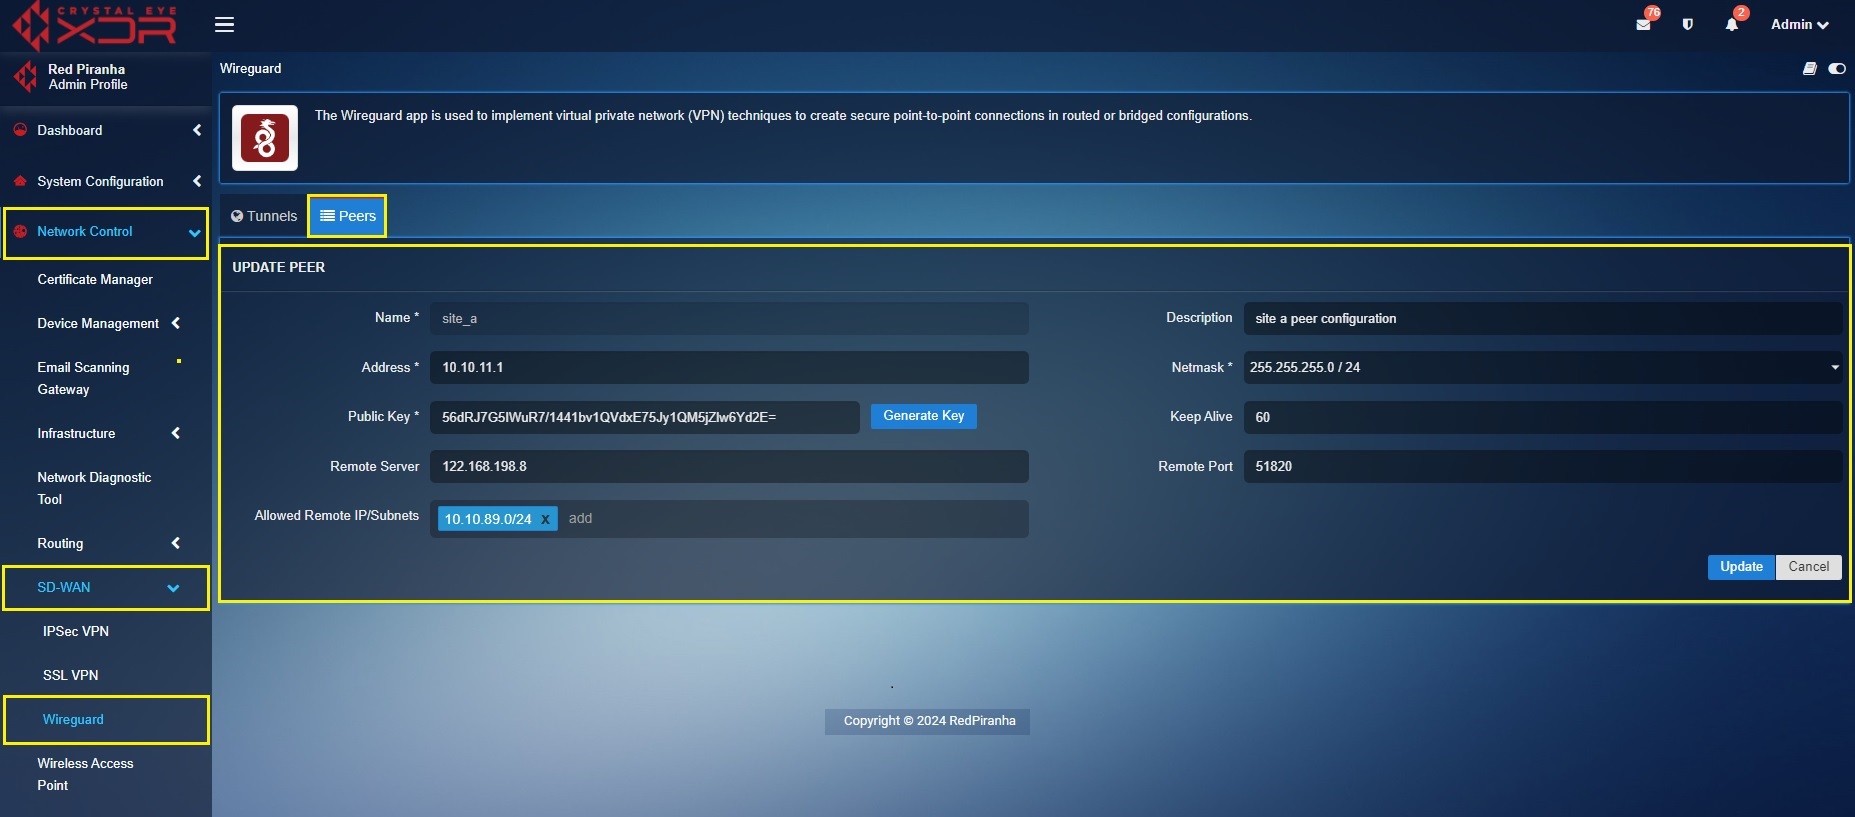
In the ‘Site A’ Crystal Eye XDR, go to Network Control > SD-WAN > WireGuard > click the Peer Tab > click the ‘Add+’ button and enter the peer configuration entries shown in the screenshot below > click the Add button
In the above screenshot,
a. Enter the Name and Description in the text box with the ‘Site B’ details.
b. Enter the ‘Site B’ WireGuard interface IP address i.e 10.10.11.2 in the Address text box.
c. Select the required Netmask. In our case, we have selected 255.255.255.0/24 as the netmask.
d. Click the Generate Key button to generate the Public Key.
e. Enter the WAN IP of ‘Site B’ Crystal Eye XDR in the Remote Server text box. In our case, the WAN IP address of ‘Site B’ is 122.168.147.5
f. Select the Allowed Local IP address/Subnet from the dropdown. As per our scenario we have selected 10.10.90.0/24. Please note that the selected IP subnets are the ones that need’s to be accessed from the other sites.
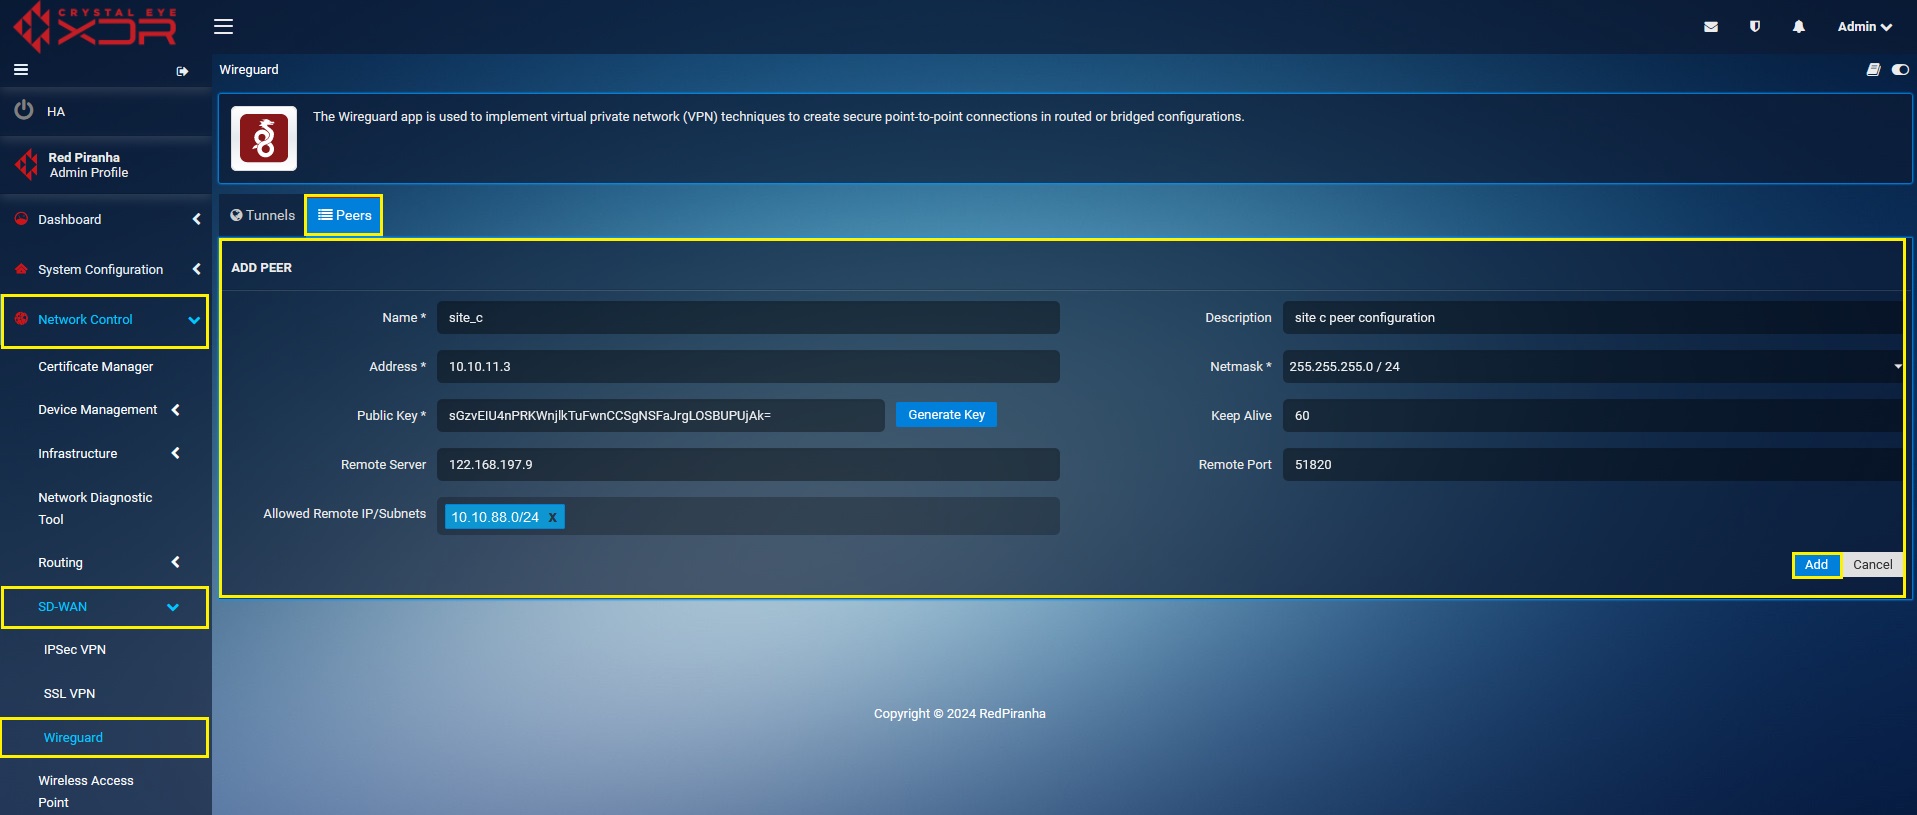
Create a ‘Site C’ Peer in the ‘Site A’ Crystal Eye XDR
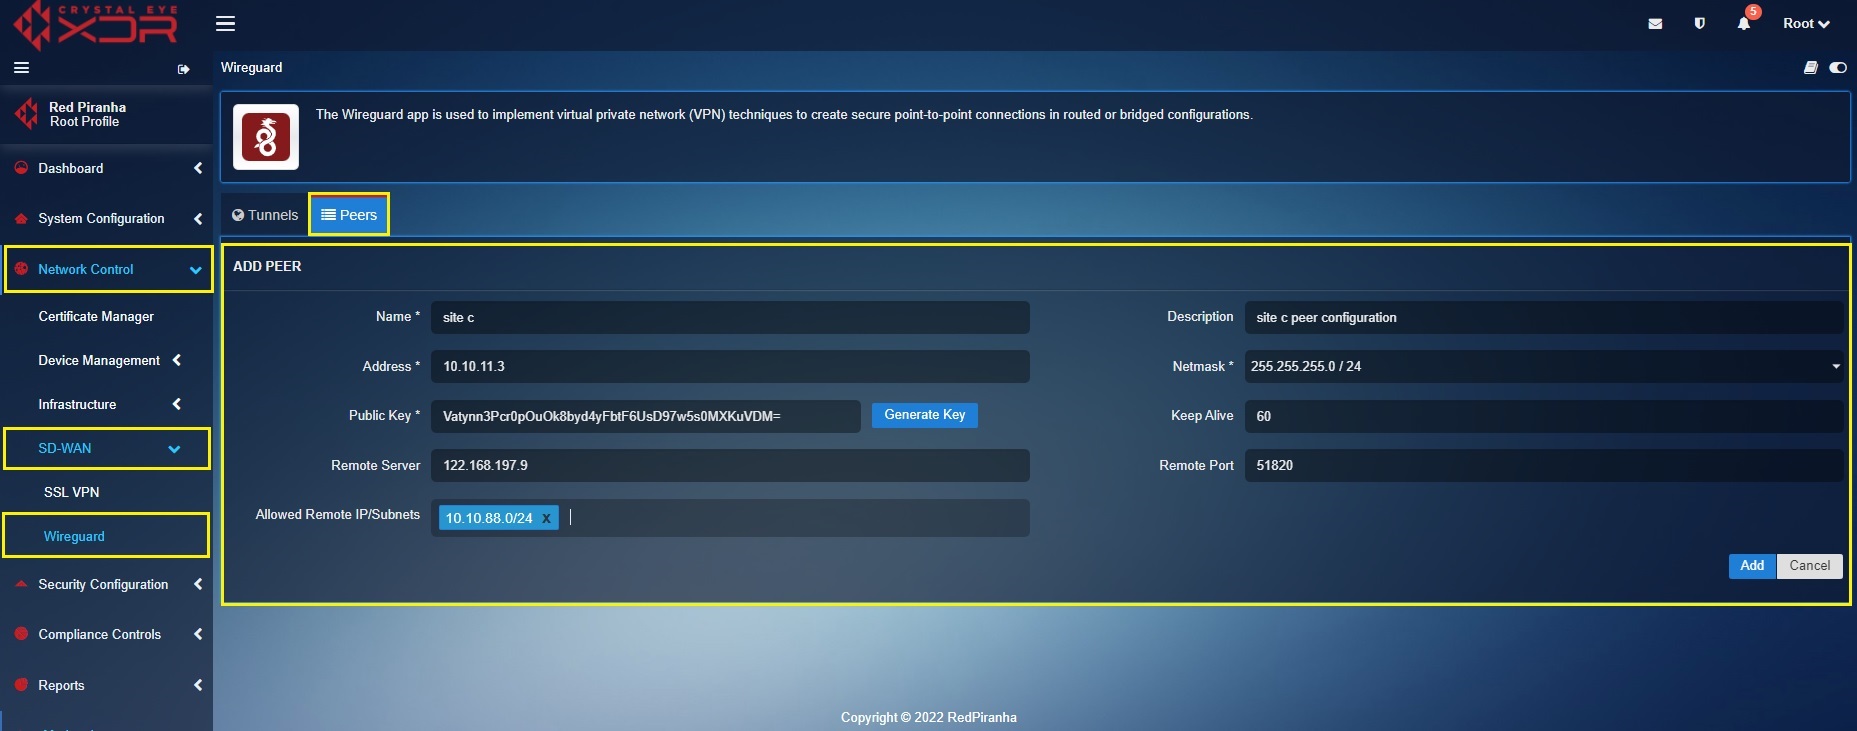
In the ‘Site A’ Crystal Eye XDR, go to Network Control > SD-WAN > WireGuard > click the Peer Tab > click the ‘Add+’ button and enter the peer configuration entries shown in the screenshot below > click the Add button.
In the above screenshot,
a. Enter the Name and Description in the text box with the ‘Site C’ details.
b. Enter the ‘Site C’ WireGuard interface IP address i.e 10.10.11.3 in the Address text box.
c. Select the required Netmask. In our case, we have selected 255.255.255.0/24 as the netmask.
d. Click the Generate Key button to generate the Public Key.
e. Enter the WAN IP of ‘Site C’ Crystal Eye XDR in the Remote Server text box. In our case, the WAN IP address of ‘Site B’ is 122.168.197.9
f. Select the Allowed Local IP address/Subnet from the dropdown. As per our scenario we have selected 10.10.88.0/24. Please note that the selected IP subnets are the ones that need’s to be accessed from the other sites.
Key exchange between ‘Site B’ tunnel (in ‘Site B’ Crystal Eye XDR) and ‘Site B’ Peer (in ‘Site A’ Crystal Eye XDR)
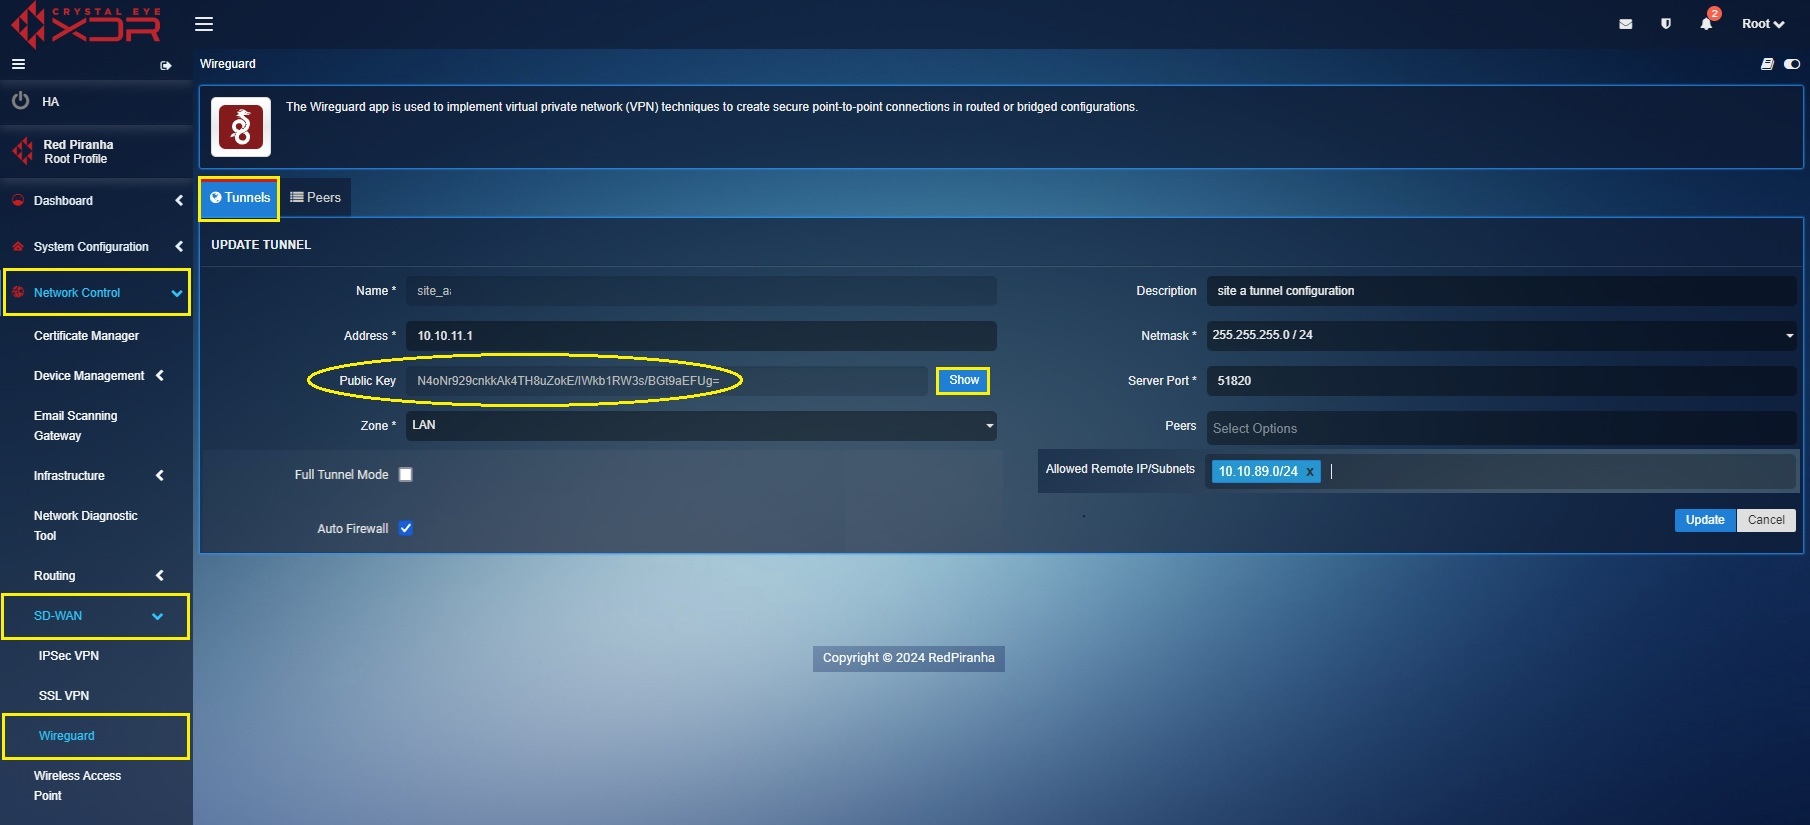
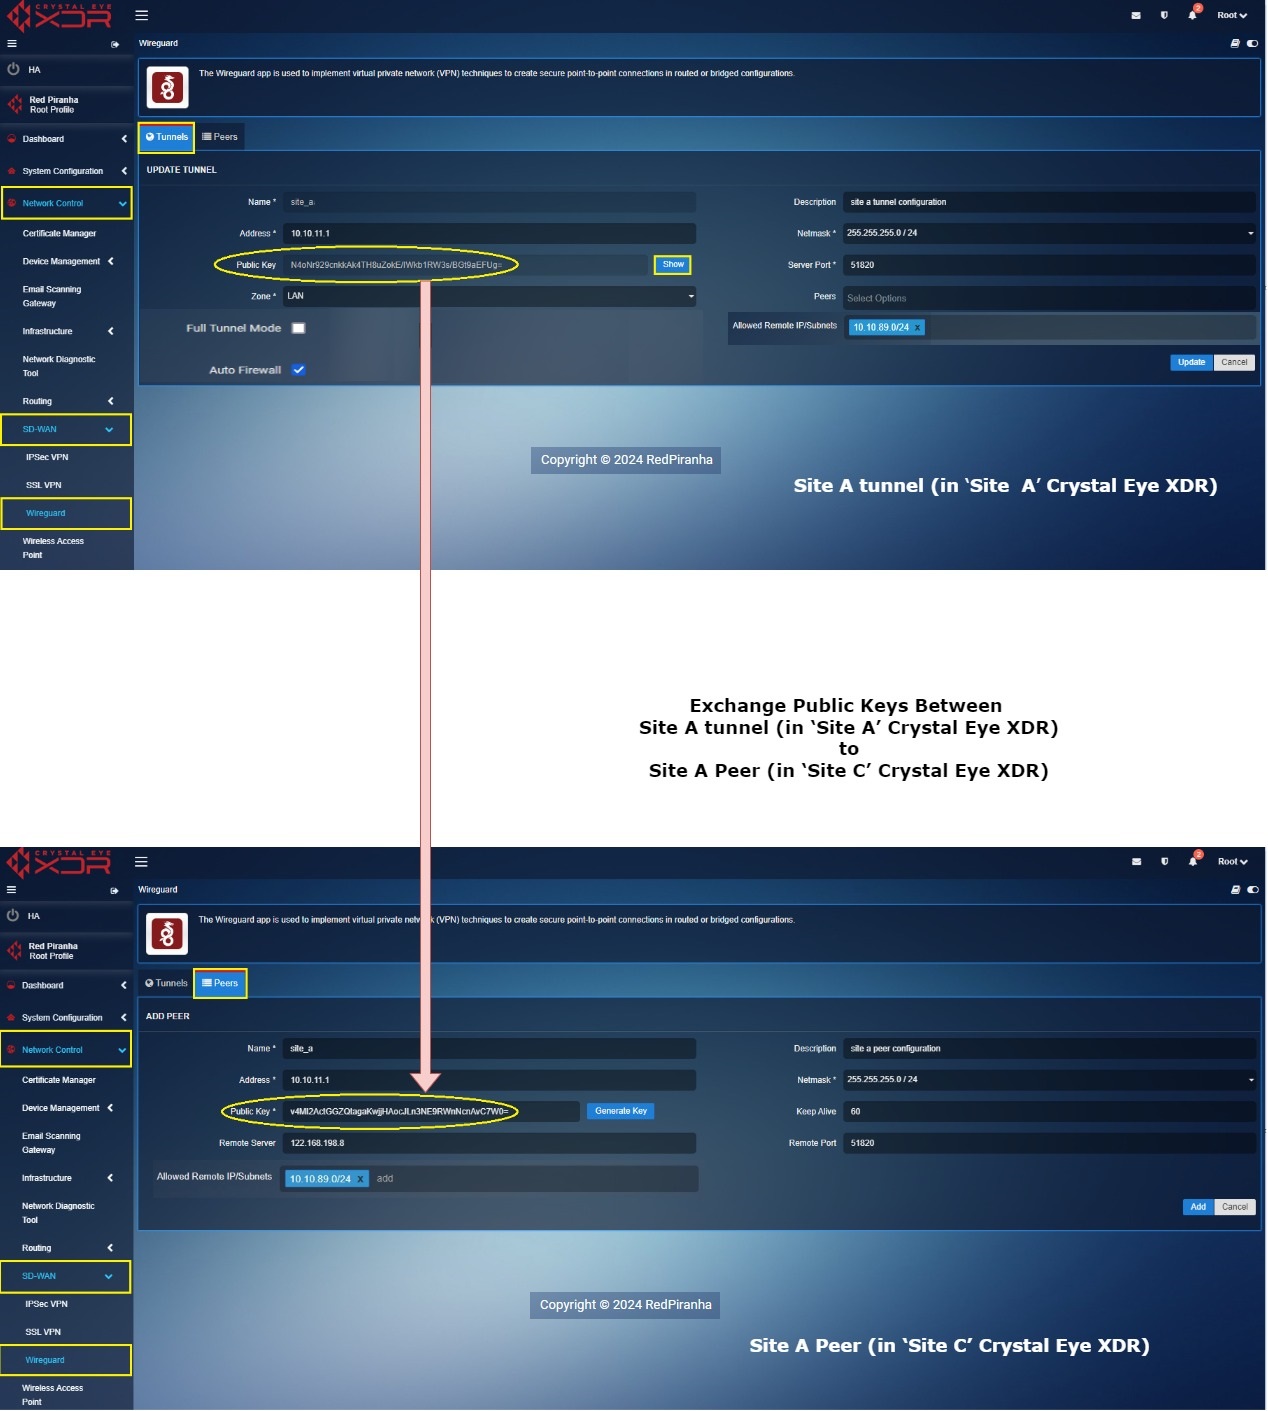
Log into ‘Site B’ Crystal Eye XDR > Go to Network Control > SD-WAN > WireGurad app > click the Tunnel Tab > click the Edit button next to the ‘Site B’ in the Actions column > You will see the Update Tunnel page, click the Show button, and copy the Public Key.
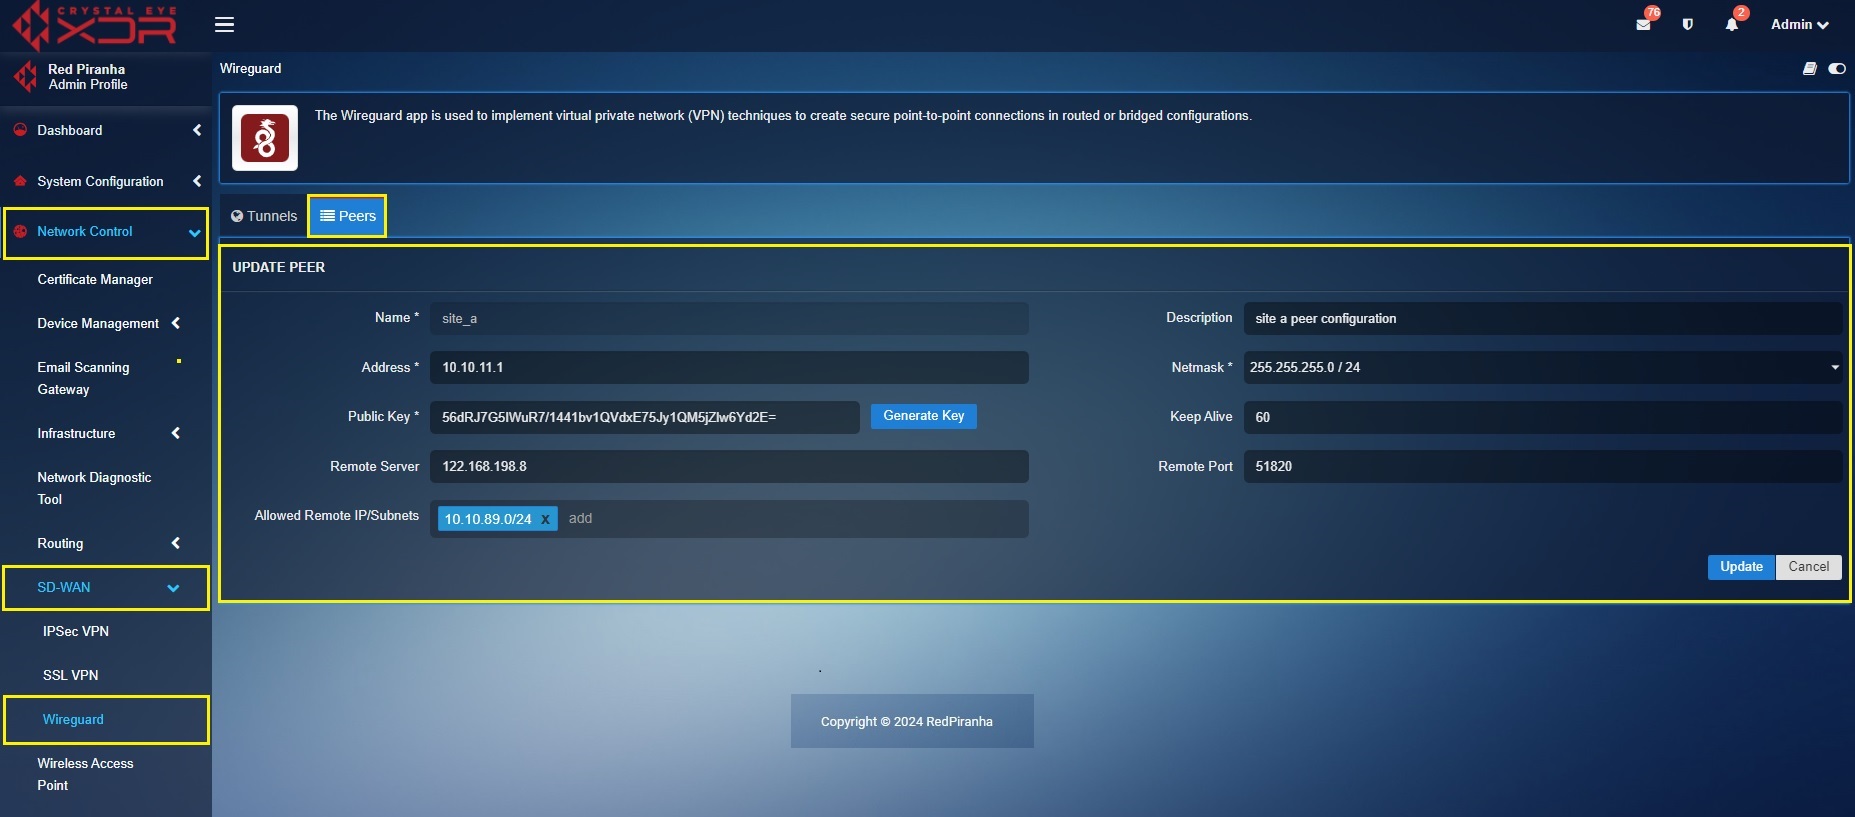
Now Log in to ‘Site A’ Crystal Eye XDR > Go to Network Control > SD-WAN > WireGuard app > click the Peers tab > you will see the Update Peer page, click the Edit button next to the ‘Site B Peer’ in the Actions column > You will see the Update Peer page, paste the Public Key copied in the previous step (from Site B tunnel configuration) to the Public Key text box.
Key exchange between Site C tunnel (in ‘Site C’ Crystal Eye XDR) and ‘Site C’ Peer (in ‘Site A’ Crystal Eye XDR)
Log into ‘Site C’ Crystal Eye XDR > Go to Network Control > SD-WAN > WireGurad app > click the Tunnel Tab > click the Edit button next to the ‘Site C’ in the Actions column > You will see the Update Tunnel page, click the Show button, and copy the Public Key.
Now Log in to ‘Site A’ Crystal Eye XDR > Go to Network Control > SD-WAN > WireGuard app > click the Peers tab > you will see the Update Peer page, click the Edit button next to the ‘Site C Peer’ in the Actions column > You will see the Update Peer page, paste the Public Key copied in the previous step (from Site C tunnel configuration) to the Public Key text box.
Peer Configuration in ‘Site B’ Crystal Eye XDR
Create a ‘Site A’ Peer in the ‘Site B’ Crystal Eye XDR
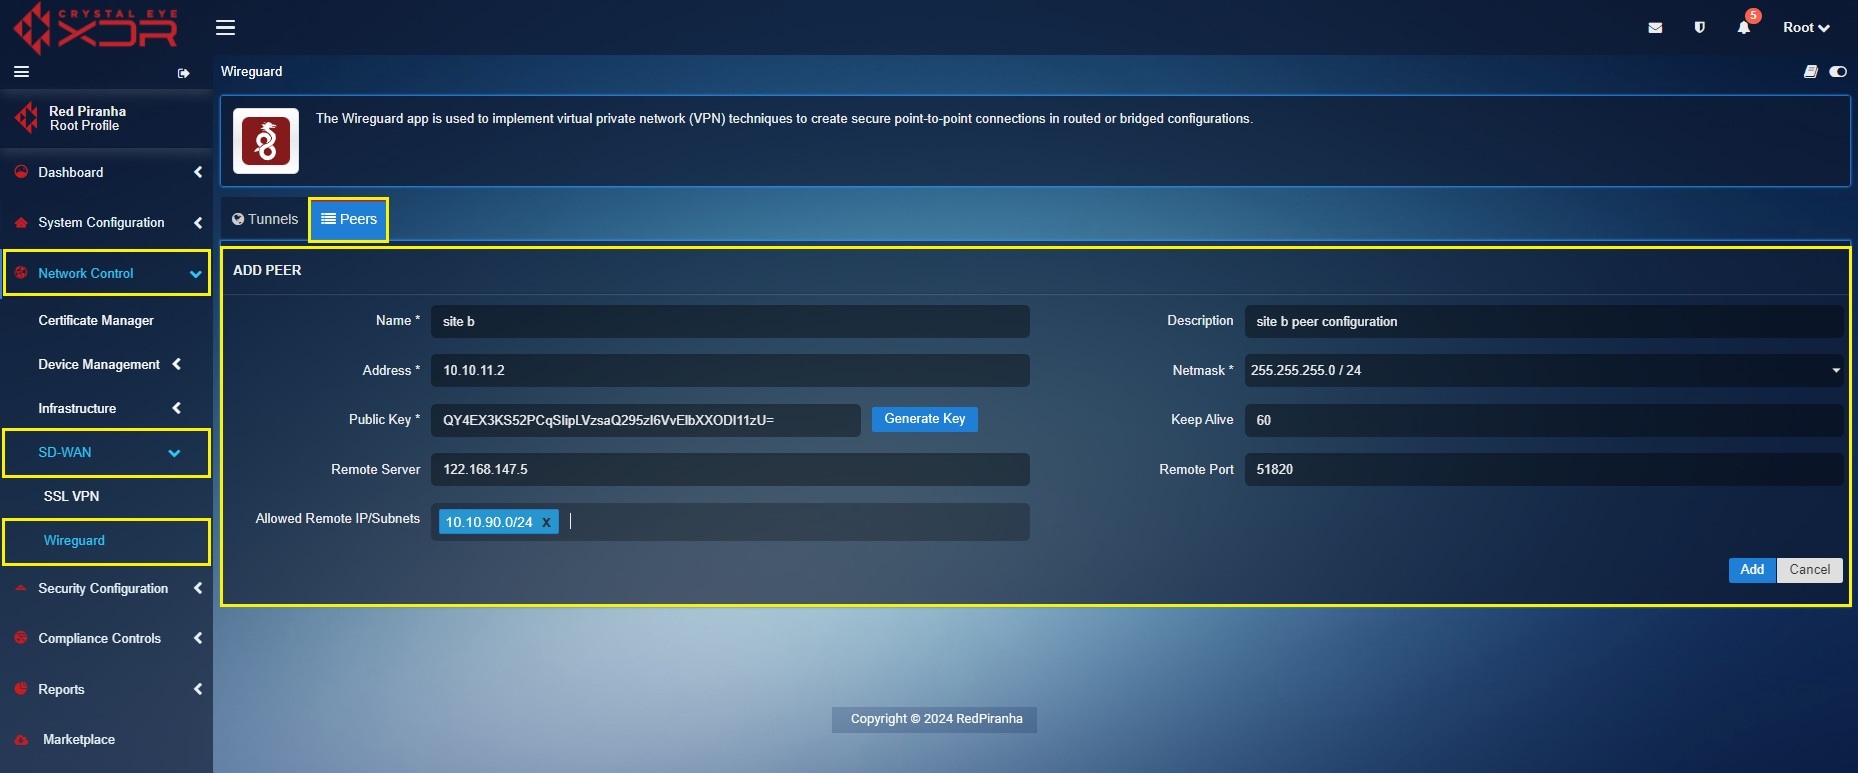
In the ‘Site B’ Crystal Eye XDR, go to Network Control > SD-WAN > WireGuard > click the Peer Tab > click the ‘Add+’ button and enter the peer configuration entries shown in the screenshot below > click the Add button
In the above screenshot,
a. Enter the Name and Description in the text box with the ‘Site A’ details.
b. Enter the ‘Site A’ WireGuard interface IP address i.e 10.10.11.1 in the Address text box.
c. Select the required Netmask. In our case, we have selected 255.255.255.0/24 as the netmask.
d. Click the Generate Key button to generate the Public Key.
e. Enter the WAN IP of ‘Site A’ Crystal Eye XDR in the Remote Server text box. In our case, the WAN IP address of ‘Site A’ is 122.168.198.8
f. Select the Allowed Local IP address/Subnet from the dropdown. As per our scenario we have selected 10.10.89.0/24. Please note that the selected IP subnets are the ones that need’s to be accessed from the other sites.
Create a ‘Site C’ Peer in the ‘Site B’ Crystal Eye XDR
In the ‘Site B’ Crystal Eye XDR, go to Network Control > SD-WAN > WireGuard > click the Peer Tab > click the ‘Add+’ button and enter the peer configuration entries shown in the screenshot below > click the Add button.
In the above screenshot,
a. Enter the Name and Description in the text box with the ‘Site C’ details.
b. Enter the ‘Site C’ WireGuard interface IP address i.e 10.10.11.3 in the Address text box.
c. Select the required Netmask. In our case, we have selected 255.255.255.0/24 as the netmask.
d. Click the Generate Key button to generate the Public Key.
e. Enter the WAN IP of ‘Site C’ Crystal Eye XDR in the Remote Server text box. In our case, the WAN IP address of ‘Site C’ is 122.168.197.9
f. Select the Allowed Local IP address/Subnet from the dropdown. As per our scenario we have selected 10.10.88.0/24. Please note that the selected IP subnets are the ones that need’s to be accessed from the other sites.
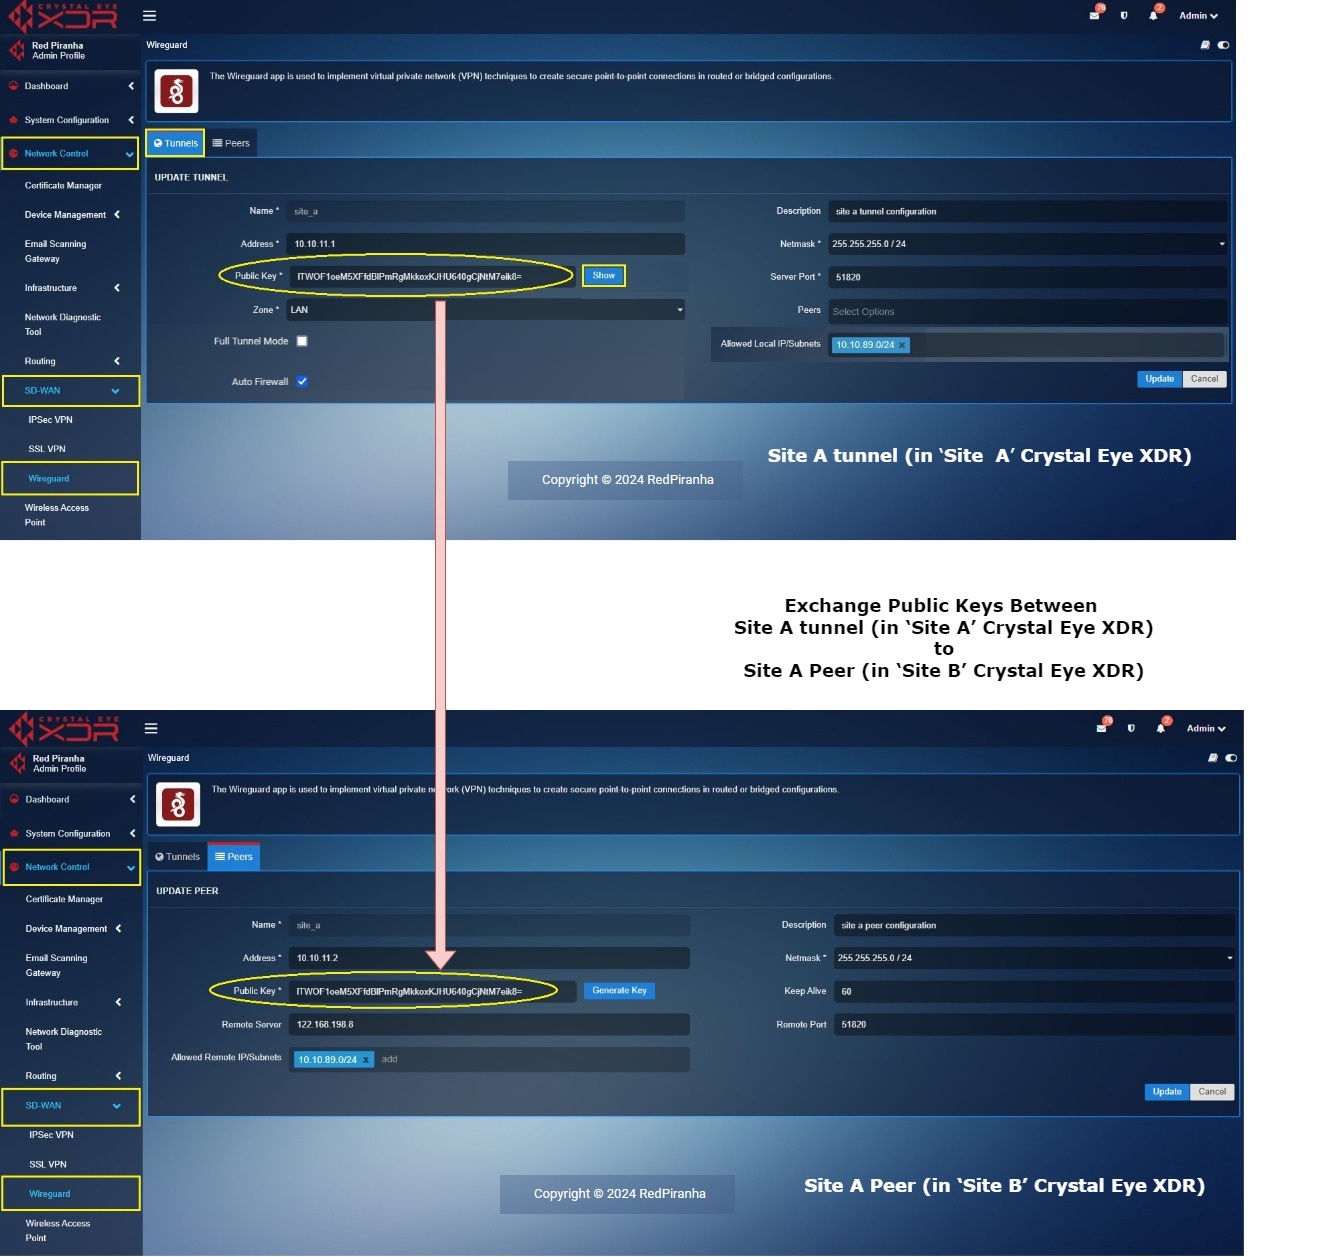
Key exchange between ‘Site A’ tunnel (in Site A Crystal Eye XDR) and ‘Site A’ Peer (in Site B Crystal Eye XDR)
Log into ‘Site A’ Crystal Eye XDR > Go to Network Control > SD-WAN > WireGurad app > click the Tunnel Tab > click the Edit button next to the ‘Site A’ in the Actions column > You will see the Update Tunnel page, click the Show button, and copy the Public Key.
Now Login to ‘Site B’ Crystal Eye XDR > Go to Network Control > SD-WAN > WireGuard app > click the Peers tab > you will see the Update Peer page, click the Edit button next to the ‘Site A Peer’ in the Actions column > You will see the Update Peer page, paste the Public Key copied in the previous step (from Site A tunnel configuration) to the Public Key text box.
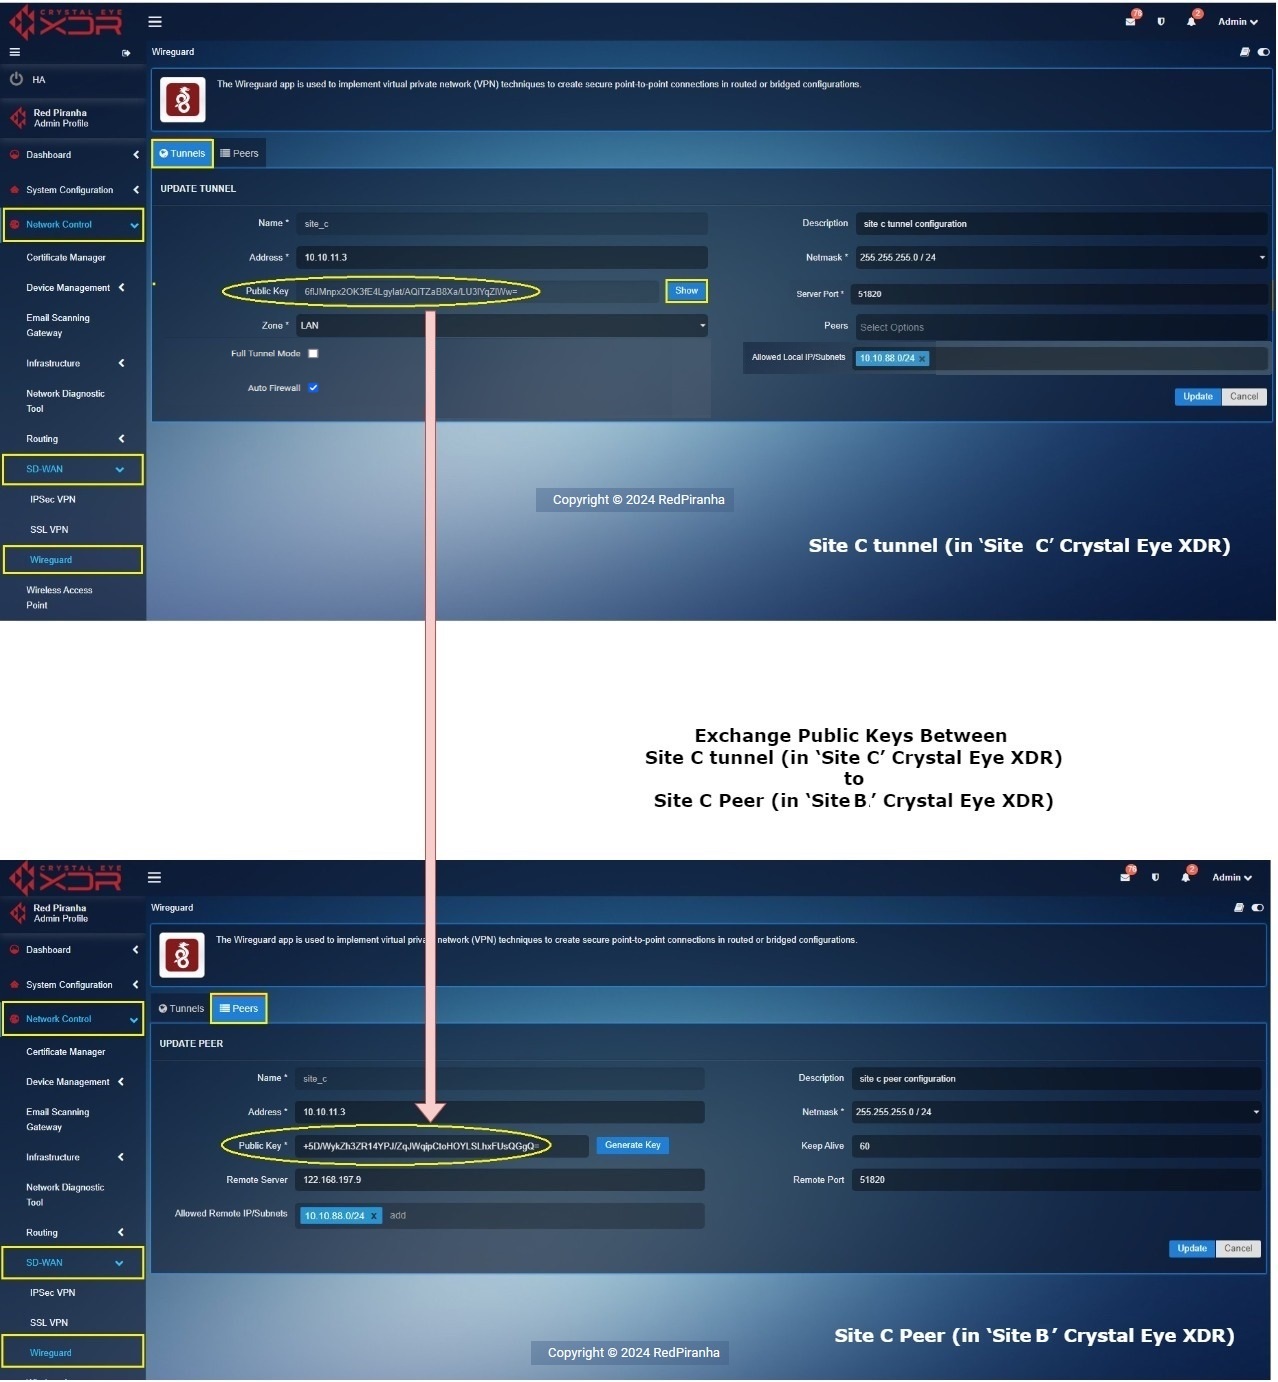
Key exchange between ‘Site C’ tunnel (in ‘Site C’ Crystal Eye XDR) and ‘Site C’ Peer (in ‘Site B’ Crystal Eye XDR)
Log into ‘Site C’ Crystal Eye XDR > Go to Network Control > SD-WAN > WireGurad app > click the Tunnel Tab > click the Edit button next to the ‘Site C’ in the Actions column > You will see the Update Tunnel page, click the Show button, and copy the Public Key.
Now Login to ‘Site B’ Crystal Eye XDR > Go to Network Control > SD-WAN > WireGuard app > click the Peers tab > you will see the Update Peer page, click the Edit button next to the ‘Site C Peer’ in the Actions column > You will see the Update Peer page, paste the Public Key copied in the previous step (from Site C tunnel configuration) to the Public Key text box.
Peer Configuration in ‘Site C’ Crystal Eye XDR
Create a ‘Site A’ Peer in the ‘Site C’ Crystal Eye XDR
In the ‘Site C’ Crystal Eye XDR, go to Network Control > SD-WAN > WireGuard > click the Peer Tab > click the ‘Add+’ button and enter the peer configuration entries shown in the screenshot below > click the Add button
In the above screenshot,
a. Enter the Name and Description in the text box with the ‘Site A’ details.
b. Enter the ‘Site A’ WireGuard interface IP address i.e 10.10.11.1 in the Address text box.
c. Select the required Netmask. In our case, we have selected 255.255.255.0/24 as the netmask.
d. Click the Generate Key button to generate the Public Key.
e. Enter the WAN IP of ‘Site A’ Crystal Eye XDR in the Remote Server text box. In our case, the WAN IP address of ‘Site A’ is 122.168.198.8
f. Select the Allowed Local IP address/Subnet from the dropdown. As per our scenario we have selected 10.10.89.0/24. Please note that the selected IP subnets are the ones that needs to be accessed from the other sites.
Create a ‘Site B’ Peer in the ‘Site C’ Crystal Eye XDR
In the ‘Site C’ Crystal Eye XDR, go to Network Control > SD-WAN > WireGuard > click the Peer Tab > click the ‘Add+’ button and enter the peer configuration entries shown in the screenshot below > click the Add button
In the above screenshot,
a. Enter the Name and Description in the text box with the ‘Site B’ details.
b. Enter the ‘Site B’ WireGuard interface IP address i.e 10.10.11.2 in the Address text box.
c. Select the required Netmask. In our case, we have selected 255.255.255.0/24 as the netmask.
d. Click the Generate Key button to generate the Public Key.
e. Enter the WAN IP of ‘Site B’ Crystal Eye XDR in the Remote Server text box. In our case, the WAN IP address of ‘Site B’ is 122.168.147.5
f. Select the Allowed Local IP address/Subnet from the dropdown. As per our scenario we have selected 10.10.90.0/24. Please note that the selected IP subnets are the ones that needs to be accessed from the other sites.
Key exchange between ‘Site A’ tunnel (in ‘Site A’ Crystal Eye XDR) and ‘Site A’ Peer (in ‘Site C’ Crystal Eye XDR)
Log into ‘Site A’ Crystal Eye XDR > Go to Network Control > SD-WAN > WireGurad app > click the Tunnel Tab > click the Edit button next to the ‘Site A’ in the Actions column > You will see the Update Tunnel page, click the Show button, and copy the Public Key.
Now Log in to ‘Site C’ Crystal Eye XDR > Go to Network Control > SD-WAN > WireGuard app > click the Peers tab > you will see the Update Peer page, click the Edit button next to the ‘Site A Peer’ in the Actions column > You will see the Update Peer page, paste the Public Key copied in the previous step (from Site A tunnel configuration) to the Public Key text box.
Key exchange between ‘Site B’ tunnel (in ‘Site B’ Crystal Eye XDR) and ‘Site B’ Peer (in ‘Site C’ Crystal Eye XDR)
Log into ‘Site B’ Crystal Eye XDR > Go to Network Control > SD-WAN > WireGurad app > click the Tunnel Tab > click the Edit button next to the ‘Site B’ in the Actions column > You will see the Update Tunnel page, click the Show butto, and copy the Public Key.
Now Log in to ‘Site C’ Crystal Eye XDR > Go to Network Control > SD-WAN > WireGuard app > click the Peers tab > you will see the Update Peer page, click the Edit button next to the ‘Site B Peer’ in the Actions column > You will see the Update Peer page, paste the Public Key copied in the previous step (from Site B tunnel configuration) to the Public Key text box.
Peer Selection in Site A Tunnel
Login to ‘Site A’ Crystal Eye XDR > Go to Network Control > SD-WAN > WireGuard app > select the Tunnels tab > Select ‘Site B’ & ‘Site C’ from the Peers dropdown.
Peer Selection in Site B Tunnel
Login to ‘Site B’ Crystal Eye XDR > Go to Network Control > SD-WAN > WireGuard app > select the Tunnels tab > Select ‘Site A’ & ‘Site C’ from the Peers dropdown.
Peer Selection in Site C Tunnel
Login to ‘Site C’ Crystal Eye XDR > Go to Network Control > SD-WAN > WireGuard app > select the Tunnels tab > Select ‘Site A’ & ‘Site B’ from the Peers dropdown.
WireGuard for Remote Users (Split Tunnel Mode)
The client to site configurations of WireGuard allows remote users to connect to resources in the Crystal Eye XDR network. This feature can be configured on PCs and laptops running on Microsoft Windows, Linux and MAC OS. Android phones are also compatible with the WireGuard VPN.
Note
As a default feature, the WG VPN service works on split-tunnel mode. However, explicit peer configurations can be done to run the WG VPN service on full tunnel mode.
Let’s learn how remote users can be connected with resources on the CE XDR network with the help of WireGuard end-client application.
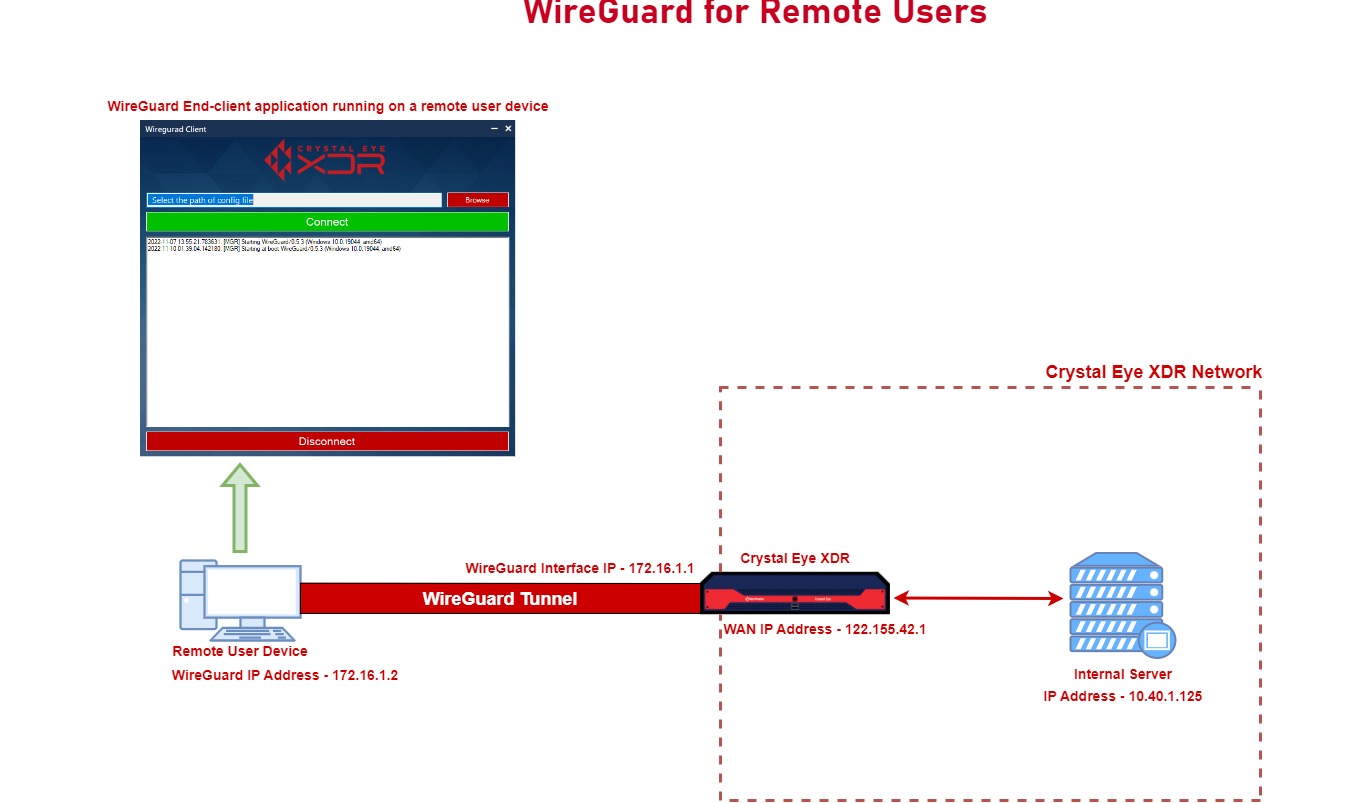
In the scenario depicted in the diagram below, a remote worker’s PC is connected to the Crystal Eye XDR network with the help of a WireGuard VPN tunnel. The WireGuard IP address assigned to the remote device is 172.16.1.2 and this device has access to the internal server (IP address: 10.40.1.125) in the CE XDR network.
Perform the following steps to establish a WireGuard tunnel between a remote workers computer to the CE XDR network:
Peer Configuration of the Remote Users
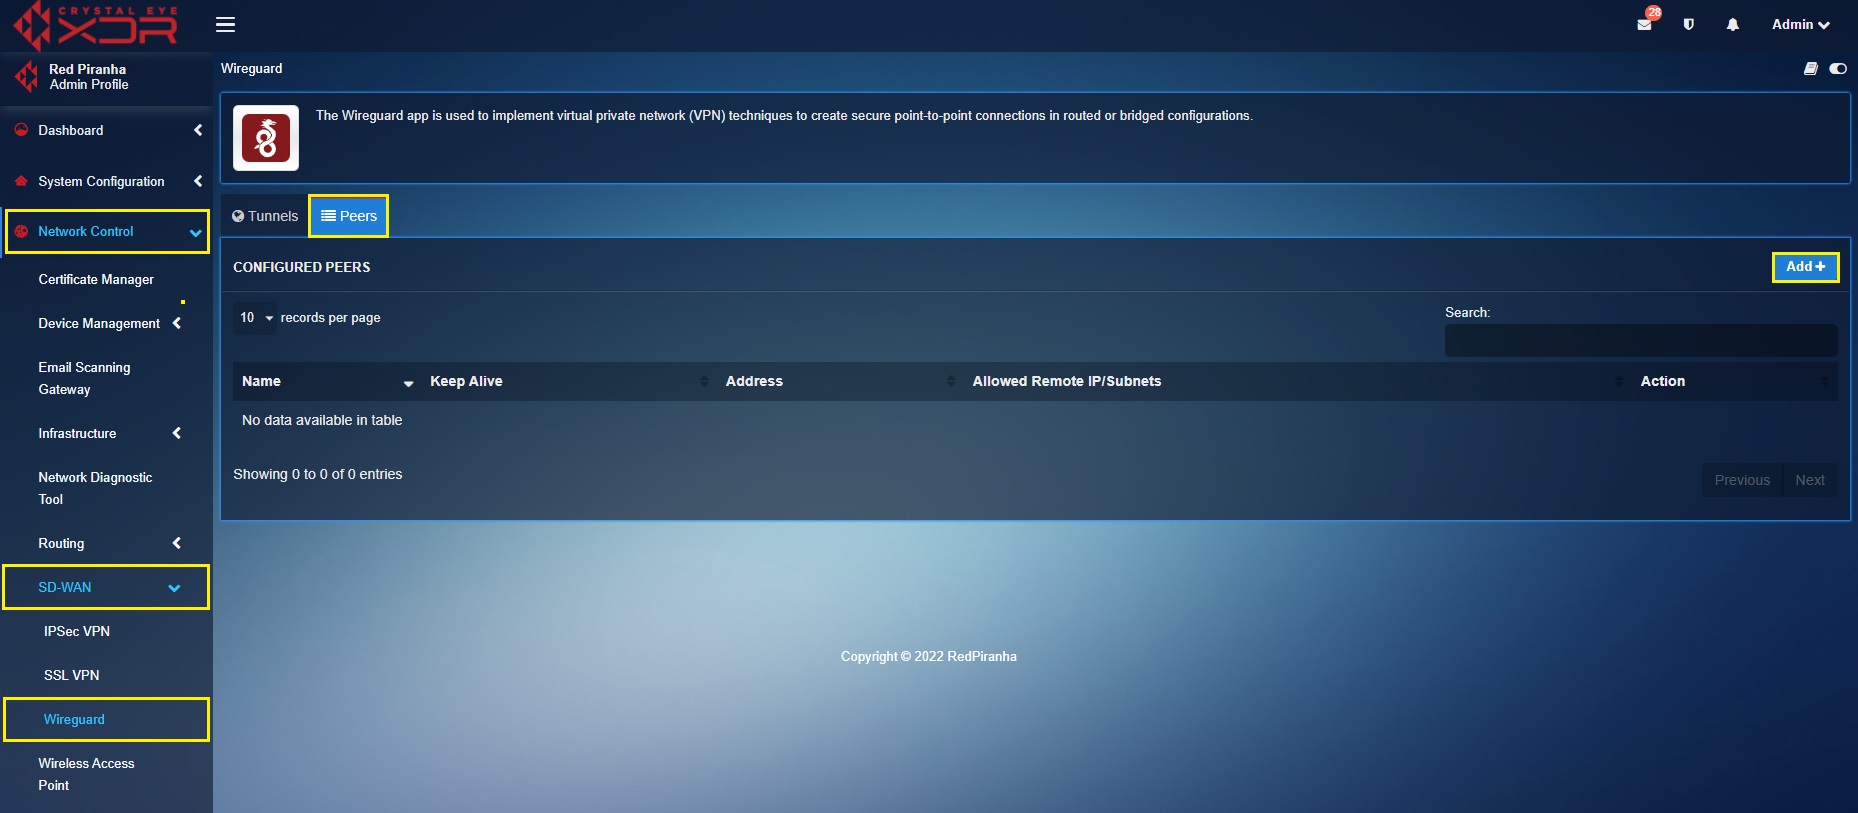
Step 1: Go to Network Control > SD-WAN > WireGuard > select the Peers tab > click the Add button.
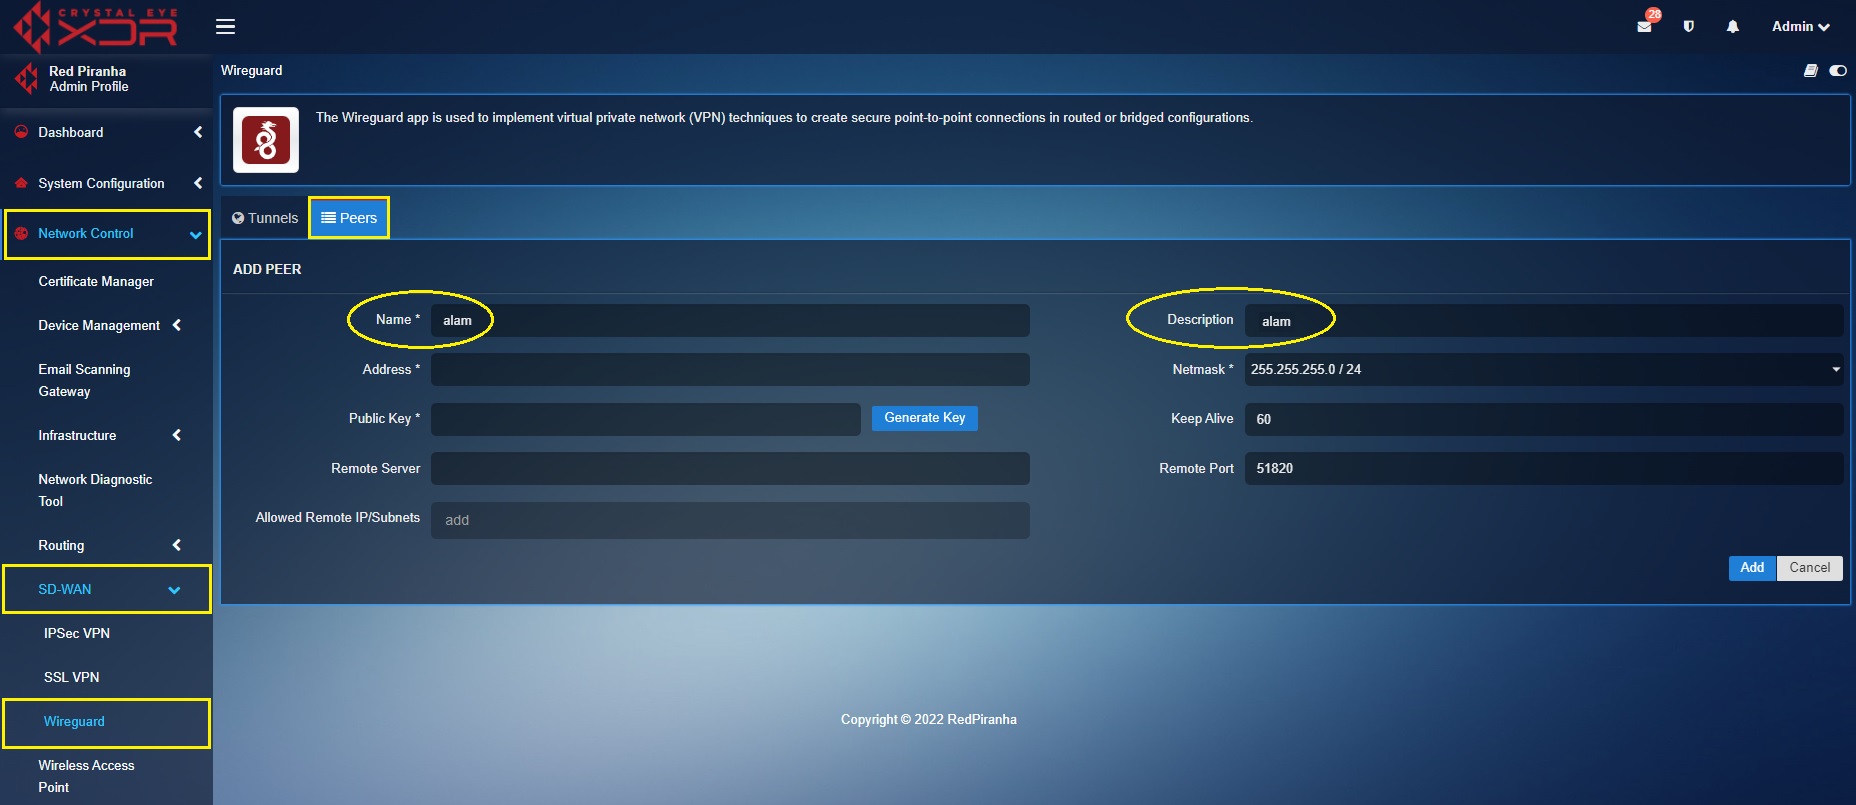
Step 2: You will now see the Add Peer page. Enter the name of the WireGuard VPN user in the Name textbox.
Step 3: Enter the IP address of the remote device. Please note that the self-assigned IP address of the remote device must be of the same range as that of the self-assigned WireGuard interface address.
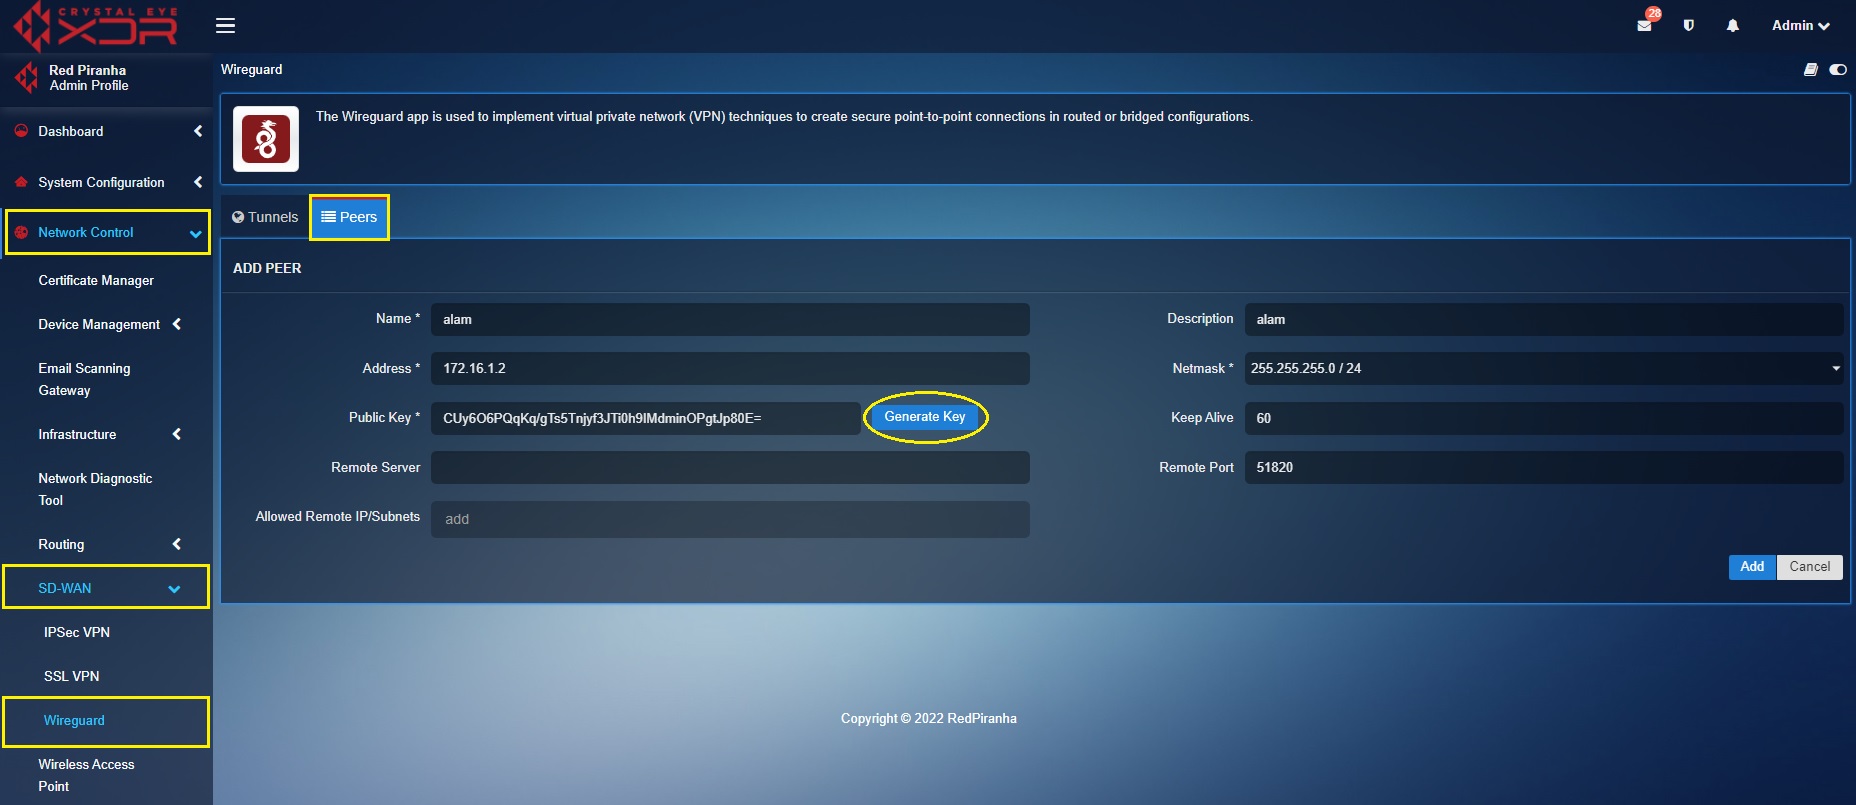
Step 4: Click the Generate Key button.
Step 5: As per our scenario, enter the subnet of the zone of the internal servers which needs to be allowed for explicit access in the Allowed Remote IP/Subnets. In our case the Allowed Remote subnet is 10.40.1.0/24.
Step 6: Delete the Remote Port, keep the text box empty and then click the Add button.
Tunnel Configuration of WireGuard Remote Users
Step 7: Select the Tunnels tab and click the Add button.
Step 8: You will see the Add Tunnel page. Assign a Name and Description.
Step 9: Enter the Wireguard interface IP address in the Address textbox. As per our scenario the WireGuard interface IP assigned by us is 172.16.1.1
Step 10: Click the Generate Key button.
Step 11: Select the user created in the peers configuration from the Peers dropdown. In our case we had created the user ‘alam’ (refer to step 1 to step 6). Click the Add button.
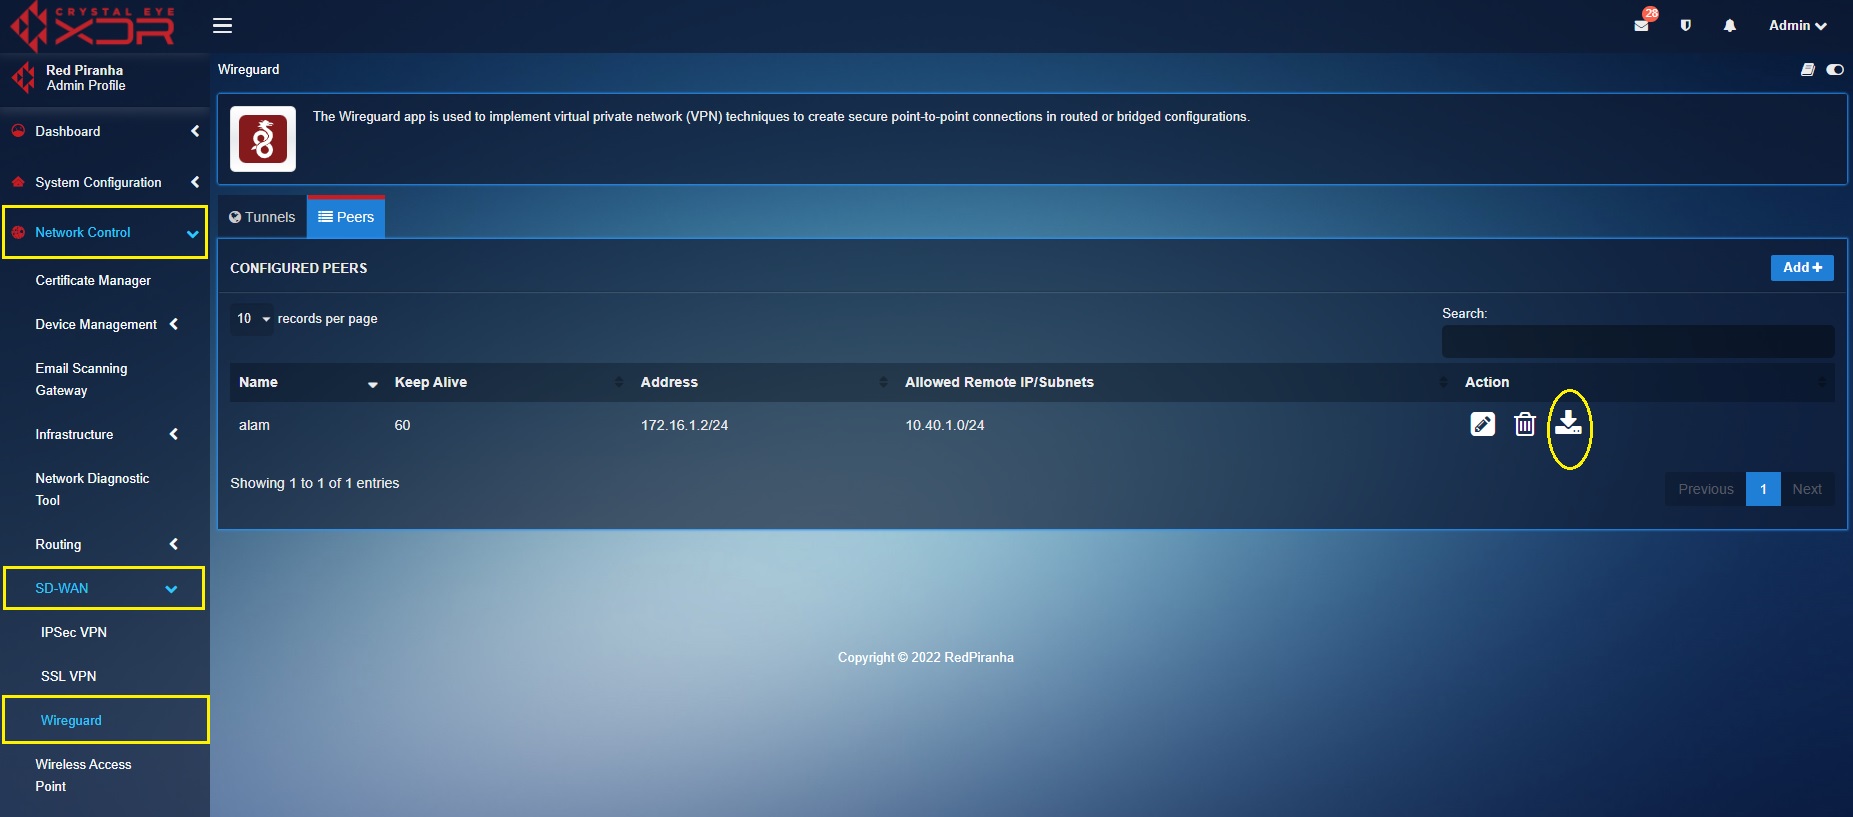
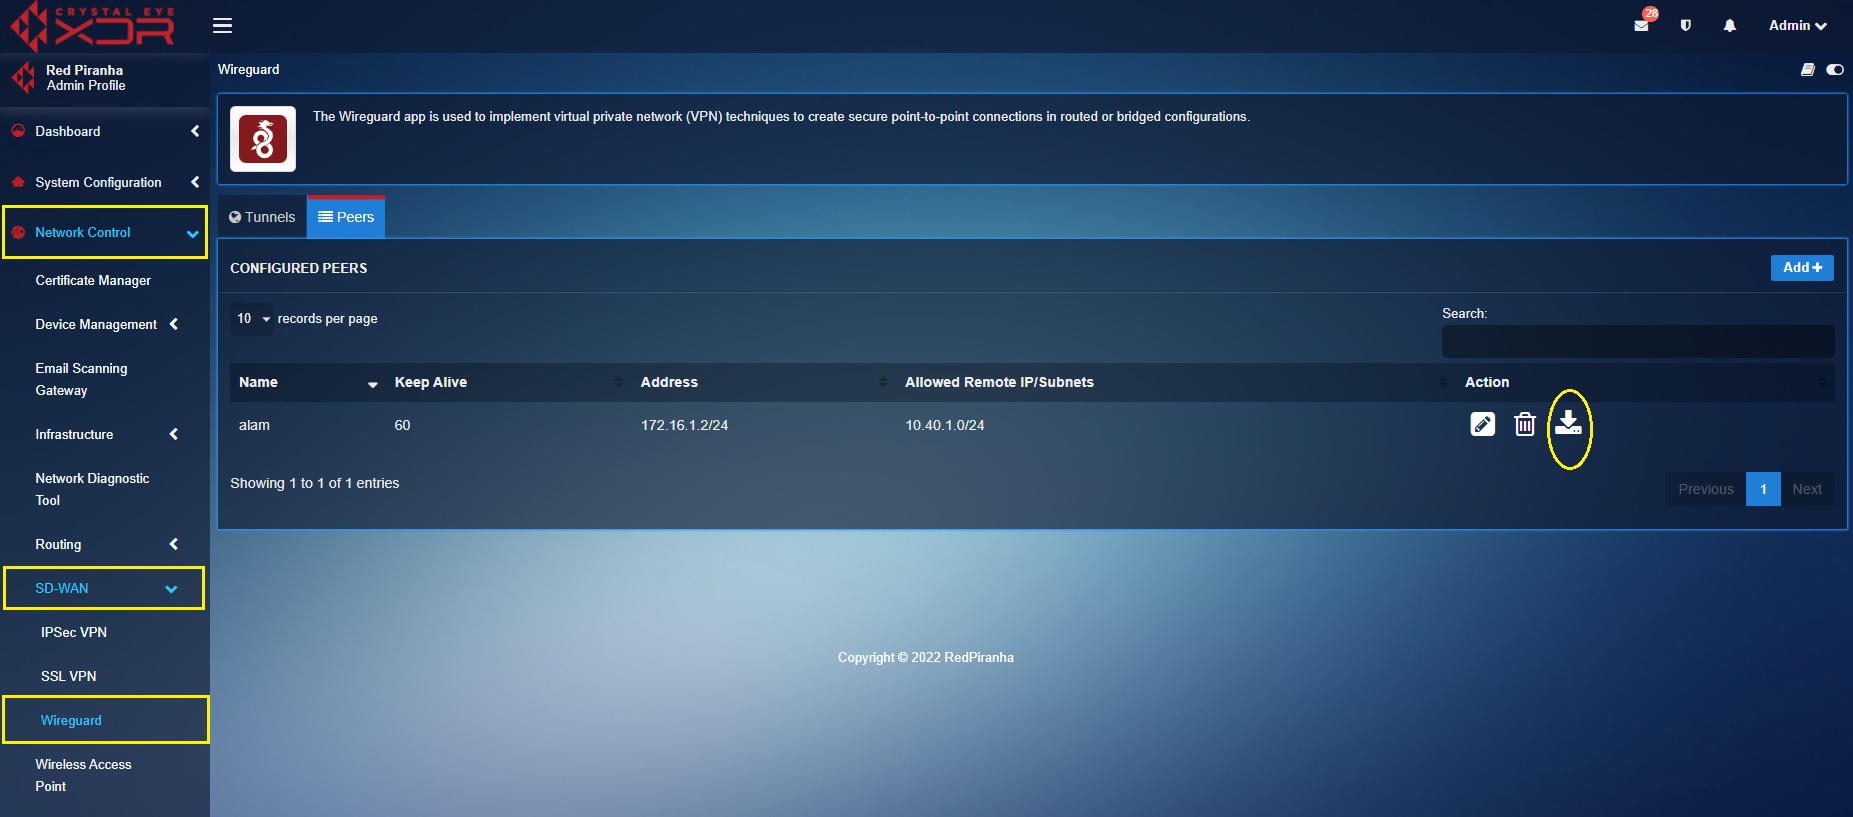
Step 12: You will now be directed to the Configured Tunnels dashboard. Now click the Peers tab and download the user configuration file and import it to WireGuard end-point application.
Review the steps to import the WireGuard user configuration file to the WireGuard end-point app below. Please note that these steps vary according to the operating system running on the PC or laptop.
Installing WireGuard End-client application on PCs running on Microsoft Windows OS and importing WireGuard Configuration File
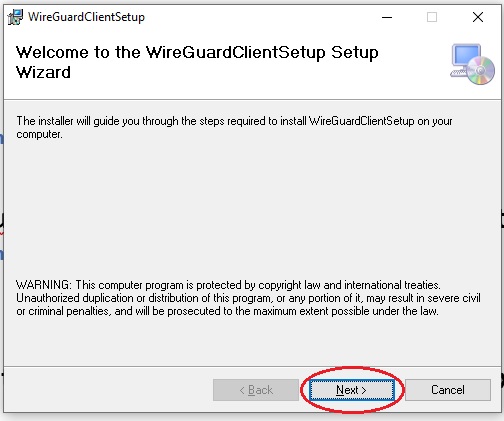
Step 1: Double click the WireGuard setup file after downloading it.
Step 2: You will see the WireGuard Setup Wizard. Click the Next button.
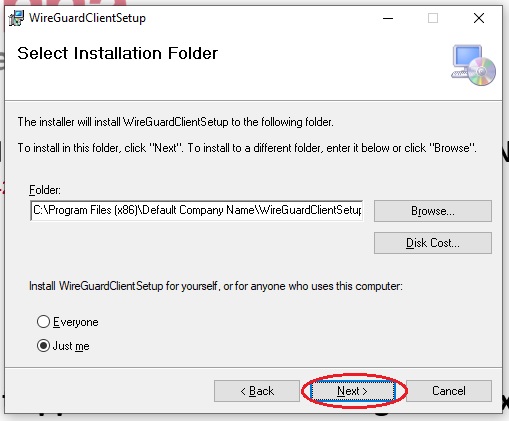
Step 3: You will see the Select Installation Folder pop-up. Click the Next button.
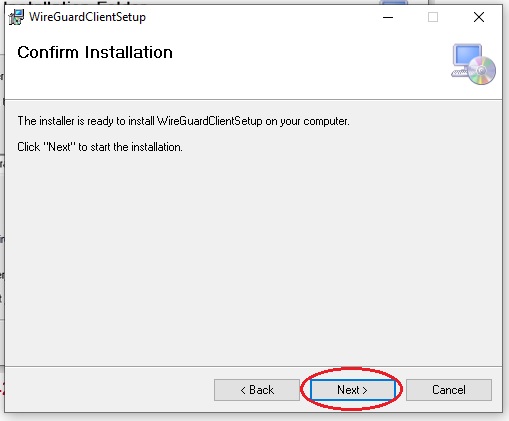
Step 4: Click the Next button and confirm installation.
Note
WireGuard end-point app will get installed automatically and you will see the app icon in your desktop. 
Step 5: Download the WireGuard Config file from the CE XDR from the Peers section. Click the download icon.
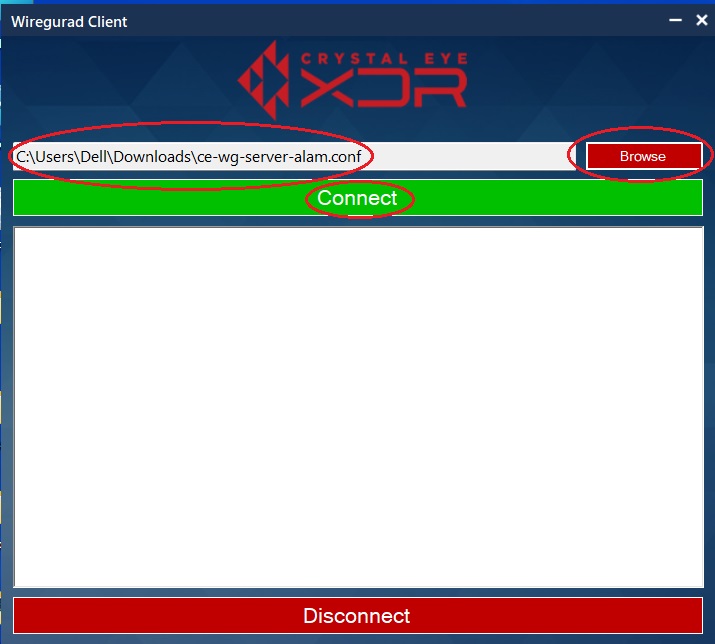
Step 6: Double-click the WireGuard icon on the Desktop. You will see Red Piranha’s WireGuard end-point application user interface. Click the Browse button, import the WireGuard configuration file (downloaded in the previous step) and then click the Connect button.
Note
Once the WireGuard Connection has been established you will see the Startup complete log message on the WireGuard end-point application user interface. 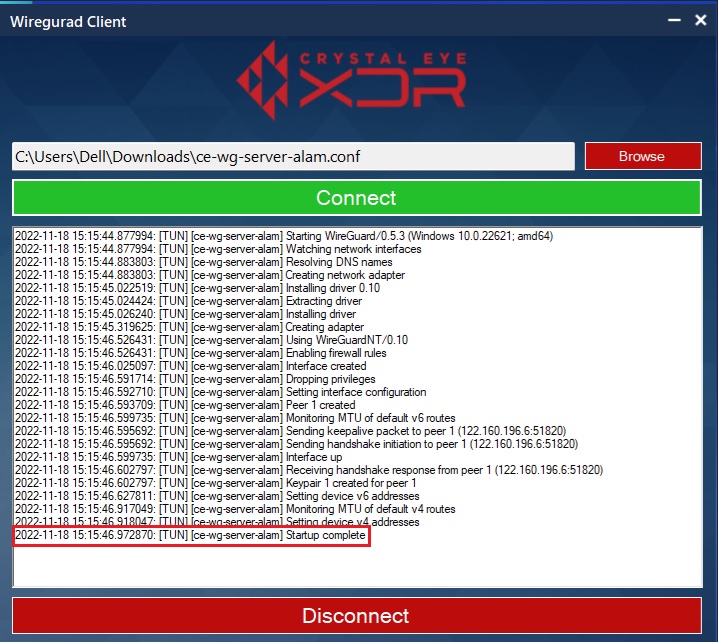
Installing WireGuard End-client application on PCs running on Linux and importing WireGuard Configuration File
Step 1: Open command line and execute the command below to check whether WireGuard app is installed in your PC.
Note
After executing the above command you’ll see the below output (if WireGuard is not installed). Enter ‘Y’ to install (highlighted in the screenshot below). 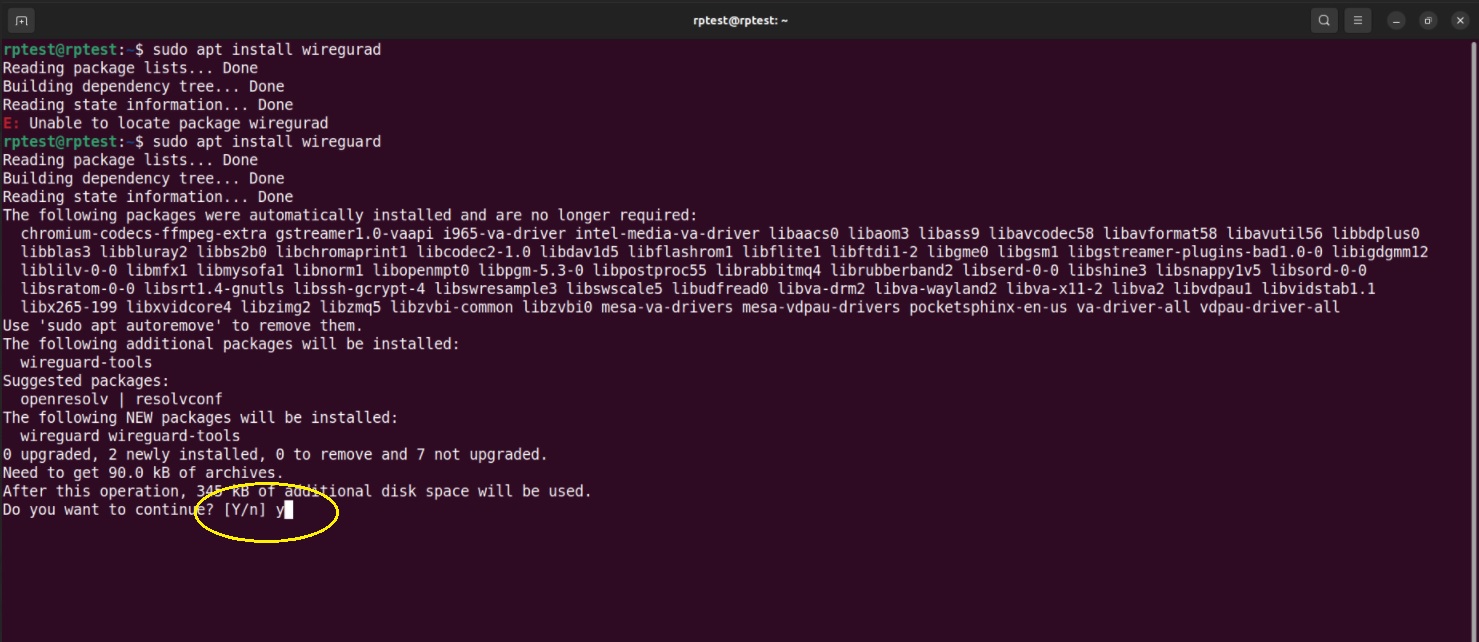
Step 2: Download the WireGuard Config file from the CE XDR from the Peers section. Click the download icon.
Note
Refer to the Peer Configurations below to generate the WireGuard Config File.
Step 3: After downloading the WireGuard config file, rename it to wg0.conf
Step 4: Execute the following command to copy config file on WireGuard directory.
Step 5: Execute the following command to verify whether the WireGuard config file is copied to wireguard directory.
Step 6: Execute the following command to establish the WireGuard Tunnel.
Step 7: Verify successful connection status in the Crystal Eye XDR WireGuard app Tunnel Configuration section.
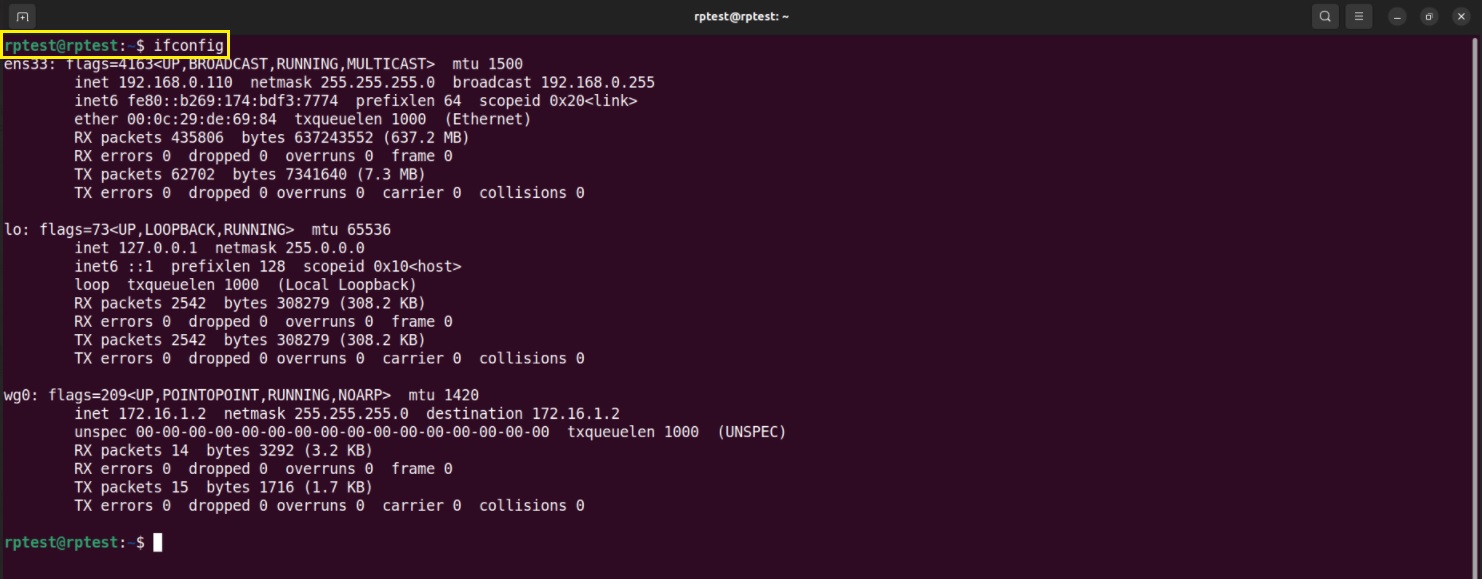
Step 8: Verify successful connection on the Linux PC by executing the following command.
Installing WireGuard End-client application on PCs running on Mac OS and importing WireGuard Configuration File
Step 1: Download WireGurad end-client application from app store.
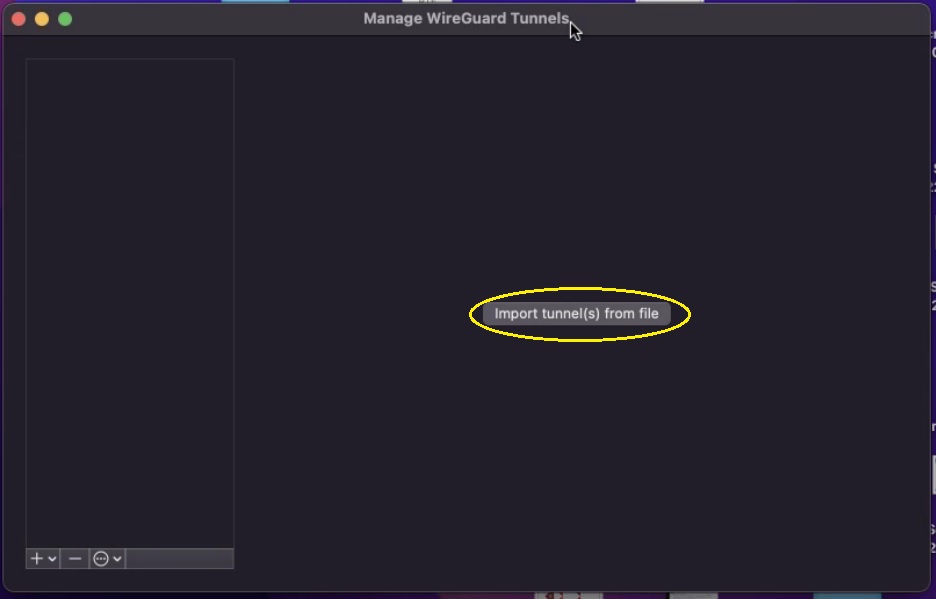
Step 2: After installation, you will see the WireGuard end-point application user interface. Click the Import button.
Step 3: Download the WireGuard Config file from the CE XDR from the Peers section. Click the download icon.
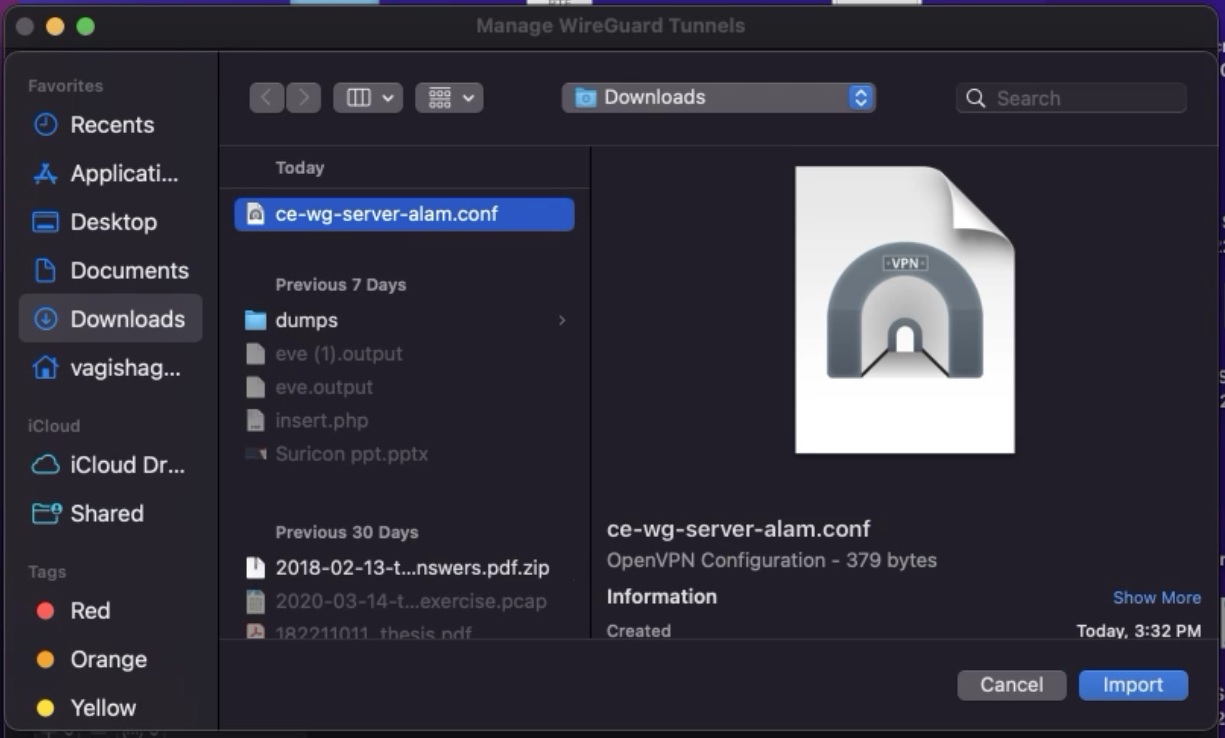
Step 4: Browse and import the WireGuard configuration file.
Step 5: You will see a pop-up with the message, “Would you like to Add VPN Configuration”. Click the Allow button.
Step 6: Click the Activate button to establish the WireGuard tunnel.


