Email Scanning Gateway
Overview
The Email Scanning Gateway app is an excellent setup for virus protection and spam filtering. It scans emails for malware, viruses, phishing against know security vulnerabilities thereby playing an important role in network security. This solution is designed to serve organisations of all sizes with its capability to be deployed in various operational modes to best match the security requirements.
Operation Modes of the Email Scanning Gateway
The Email Scanning Gateway app can be configured to run in one of the following 4 operation modes mentioned below.
- CE XDR as an SMTP Server
- Custom Relay Host
- O365 as a Relay Host
- O365 (OAuth2) as a Relay Host
Note
As per ISO 27002:2022 framework (control 8.5 Secure Authentication), to reduce the risk access token theft using Cross-Site Scripting vulnerability, it is recommended to opt for O365 (OAuth2) as a Relay Host as an operation mode of the Email Scanning Gateway.
Navigation to Email Scanning Gateway application
Left-hand Navigation Panel > Network Control > Email Scanning Gateway
Using the Crystal Eye XDR as a SMTP Server
This operation mode allows the Crystal Eye XDR to be configured as an email server with in-built SMTP server functionality. This mode also supports secure IMAP and POP3 enabling spam, virus and malware scanning of both incoming and outgoing emails.
Note
Port forwarding will be required as a pre-requisite if you have a router in front of the CE XDR. Allow these ports on your router – 25 (SMTP), 587 (SMTPS), 110 (POP), 995 (Secure POP), 143 (IMAP), 993 (Secure IMAP). Ensure that the CE XDR is pointed to a public IP address.
Step 1: Use your business (example – www.securityspecialist.in) and then create a sub-domain (example – mail.securityspecialist.in). Ensure that the domain name and the sub-domain points to the public IP address of the Crystal Eye XDR.
Step 2: Click the Configure Security Certificates button, enter the relevant details in the Certificate Authority page and click the Create Certificates button.

Step 3: You will now see the security certificates message. Click the Continue button.
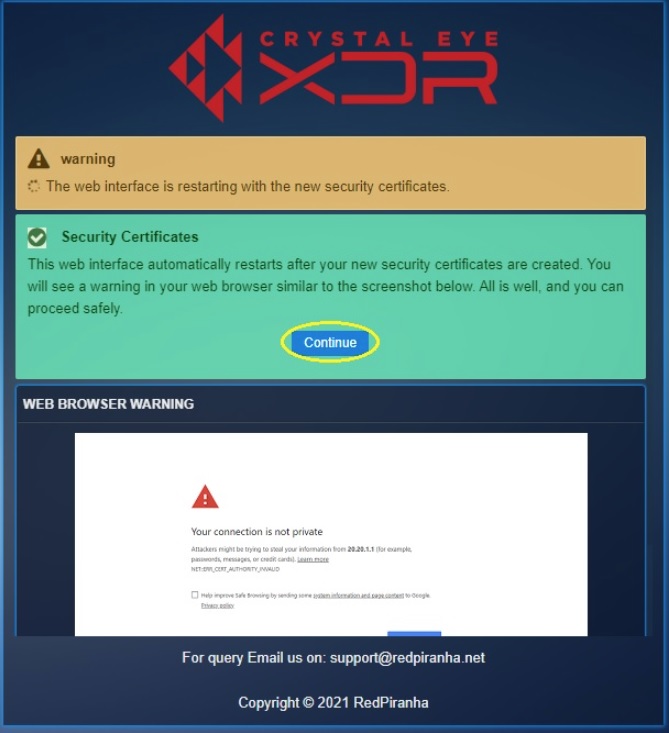
Step 4: You will see a web browser warning; bypass using the advanced settings and proceed.
Step 5: You will now be directed to the Certificate Manager app page. Go to Network Control > Email Scanning Gateway
Step 6: Enable all three services (Mail Scanner, SMTP Server, and IMAP Server) under the Email Services tab.

Step 7: Select the SMTP Configuration tab and click the Edit icon.
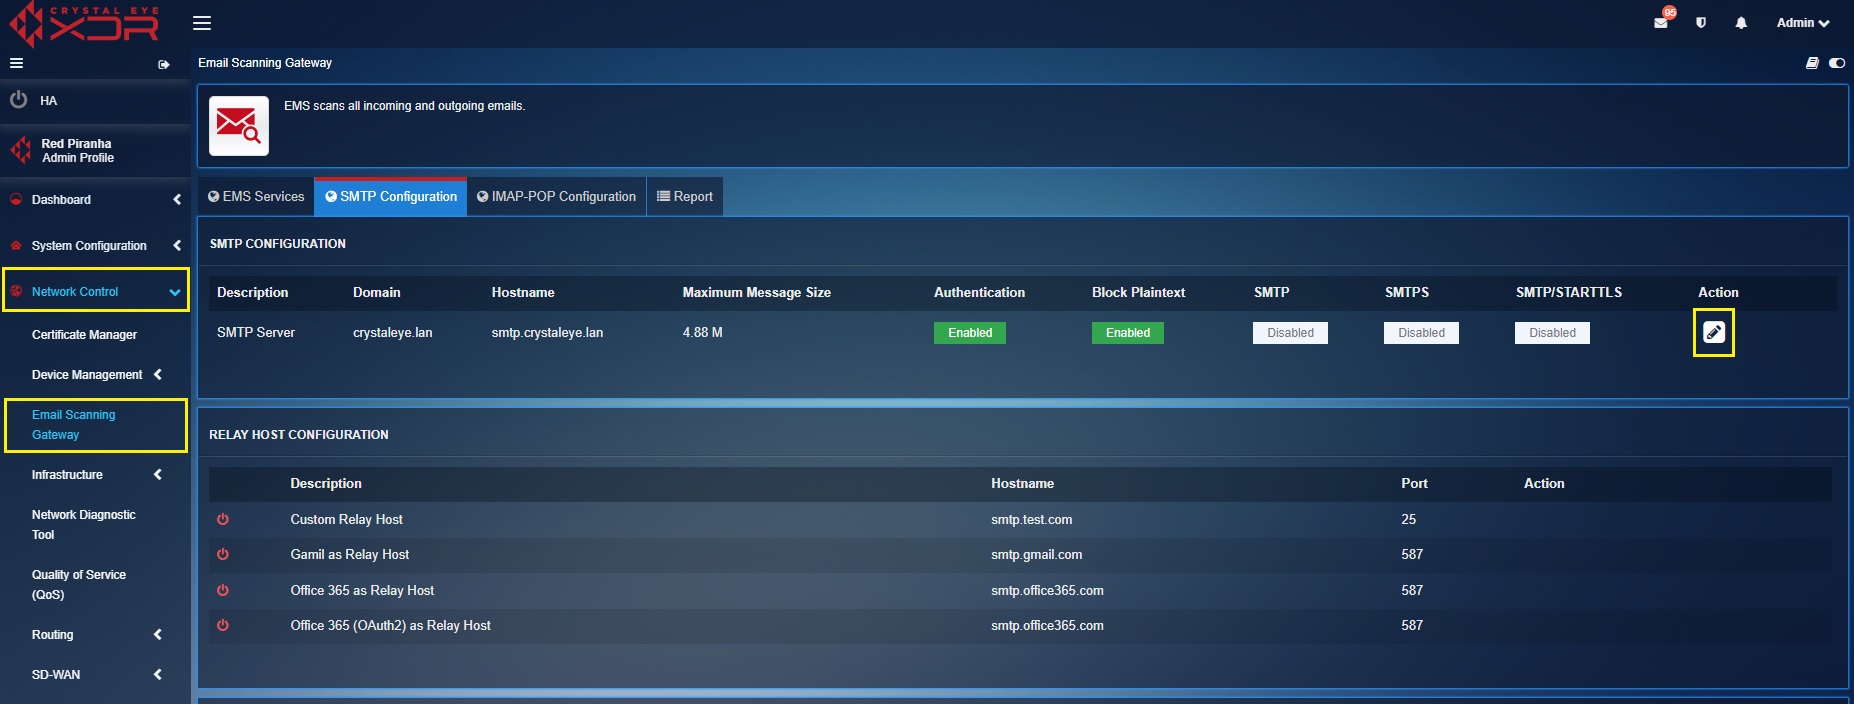
Step 8: You will be directed to the SMTP Configuration page. Select None from the Select Relay Host dropdown.
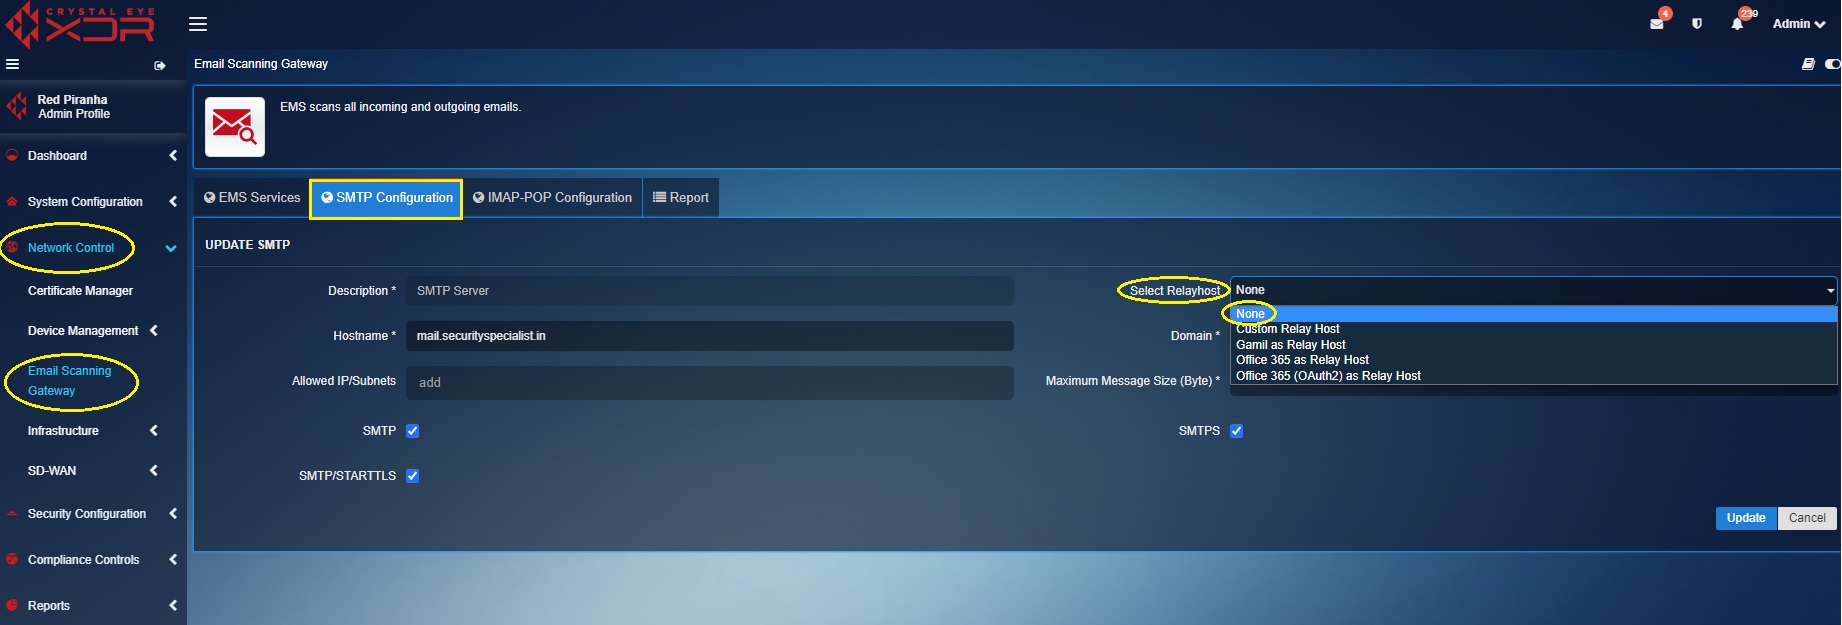
Step 9: Enter the sub-domain that was created in Step 1. In this scenario we have created the sub-domain as mail.securityspecialist.in
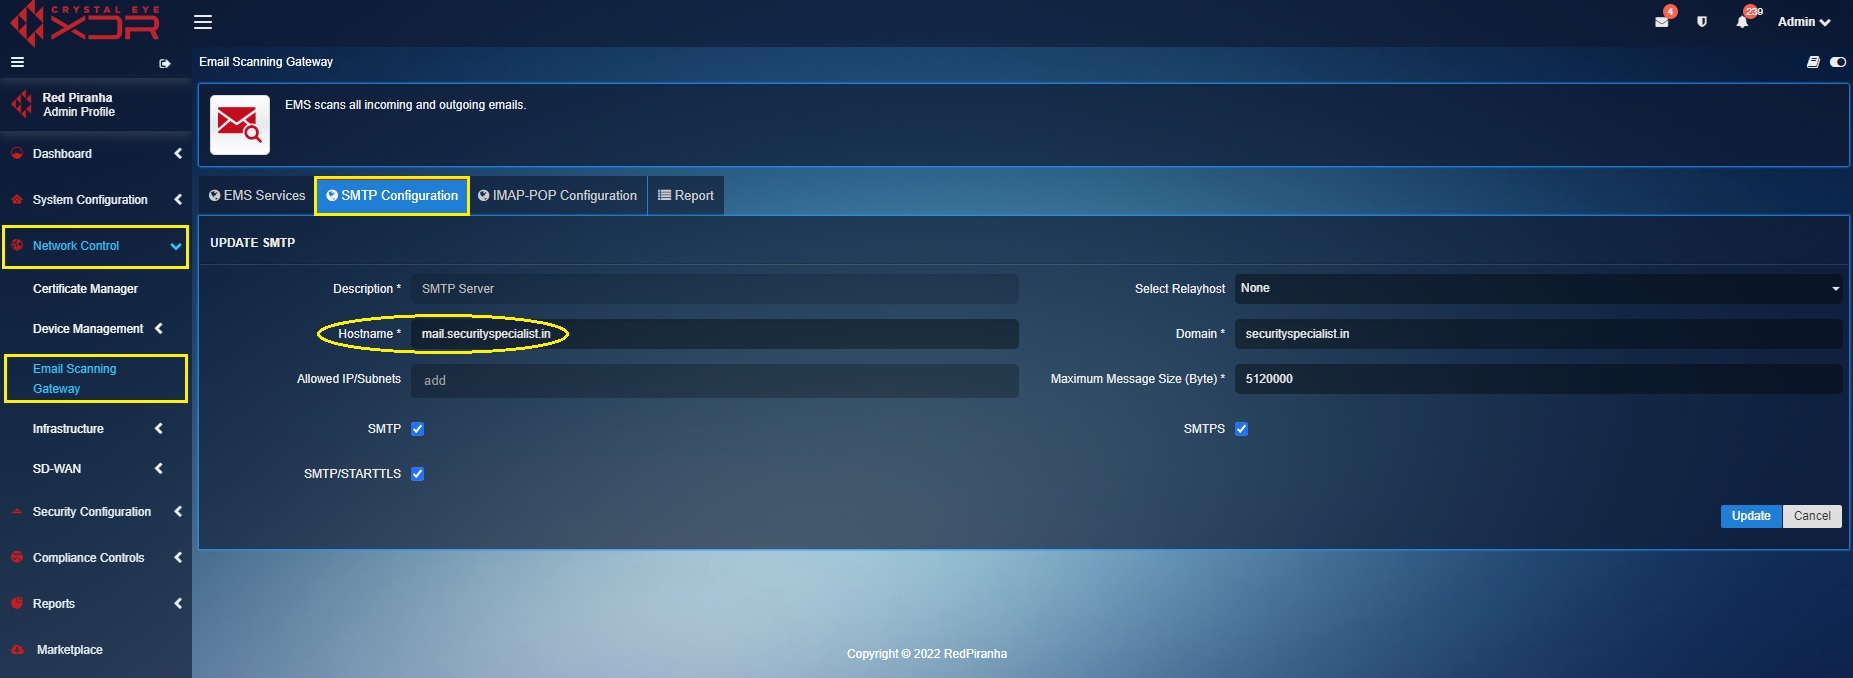
Step 10: Enter the Domain name in the text box and click the Add button.

Note
Ensure that the SMTP tick box, SMTP/STARTTLS tick box and the SMTPS tick box is checked.
Step 11: Now select the IMAP-POP Configuration tab and enable Secure IMAP Server, IMAP Server, Secure POP Server, and POP Server.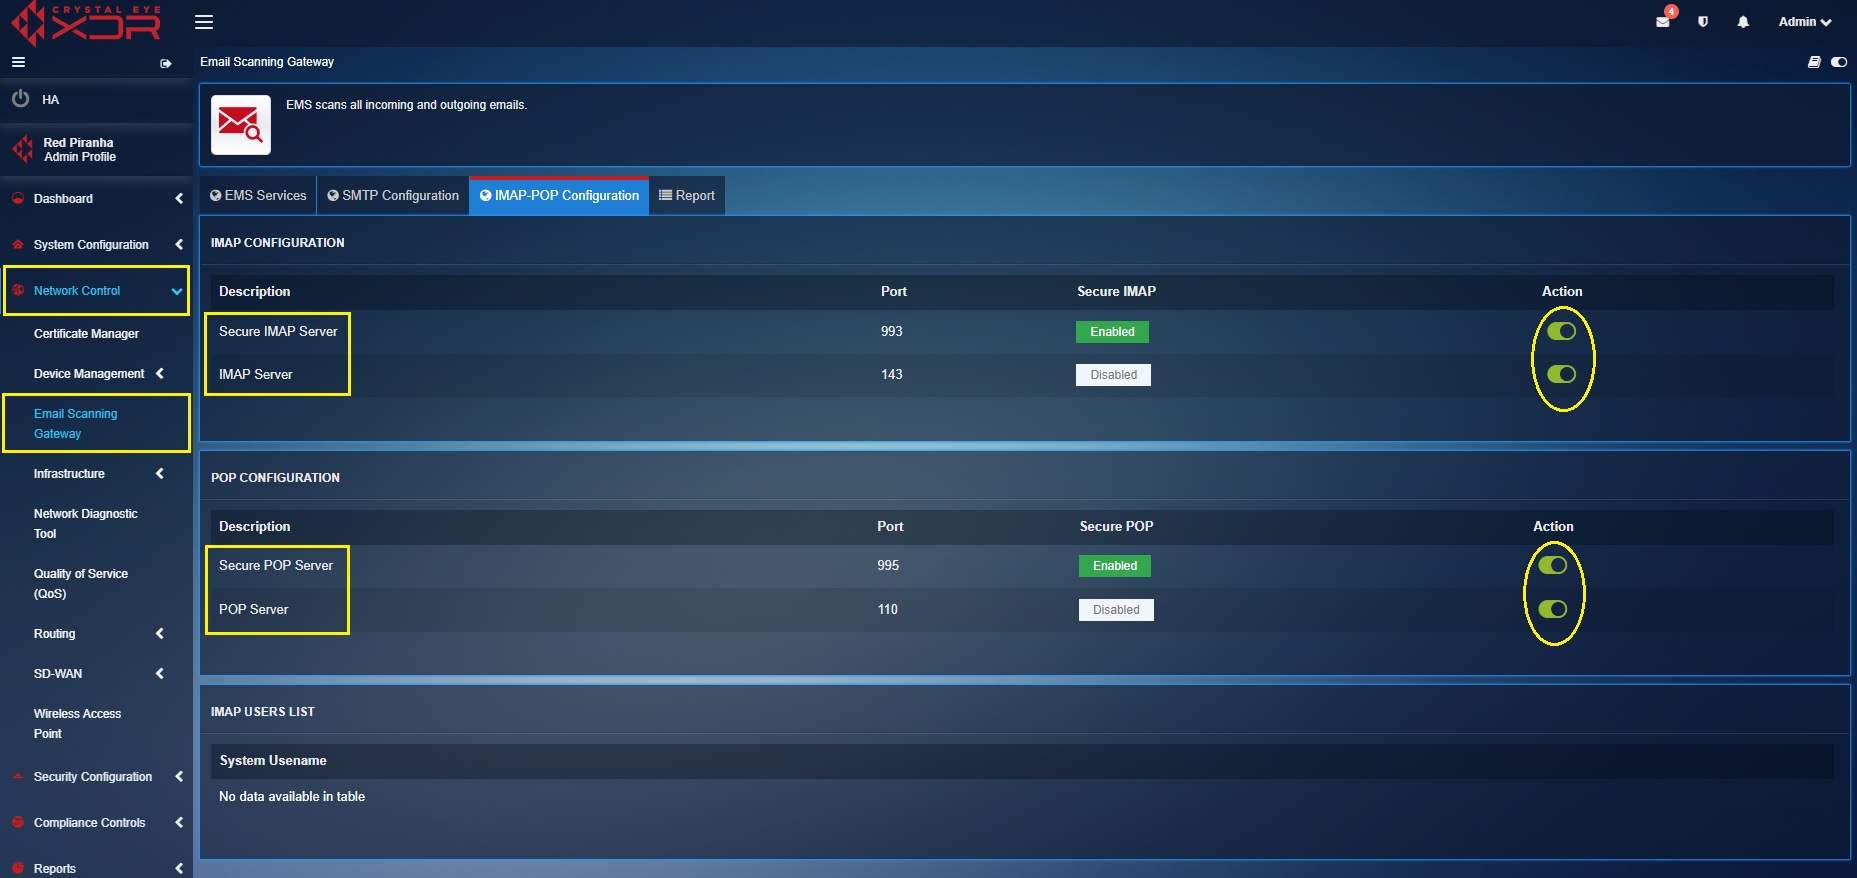
Important
Now create a CE XDR user with the help of the User application that matches the username of the email address that needs to be scanned by the email scanning gateway app (CE XDR user creation steps mentioned in Step 12, Step 13 and Step 14). 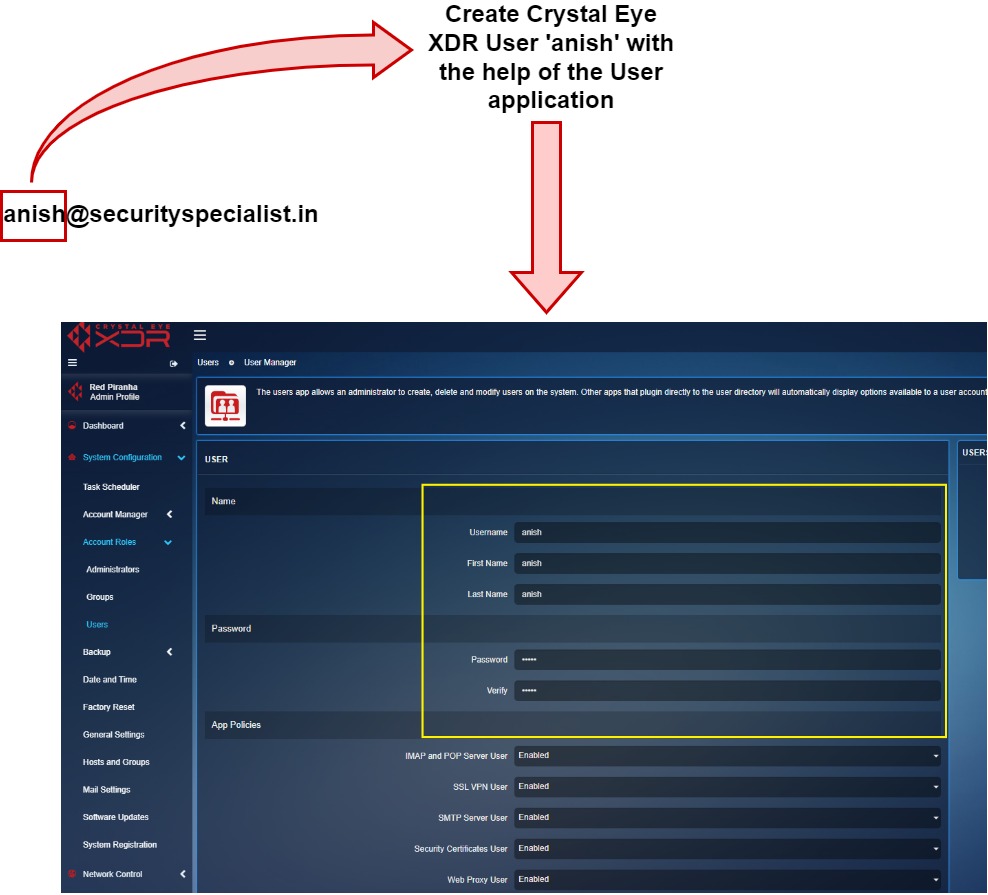
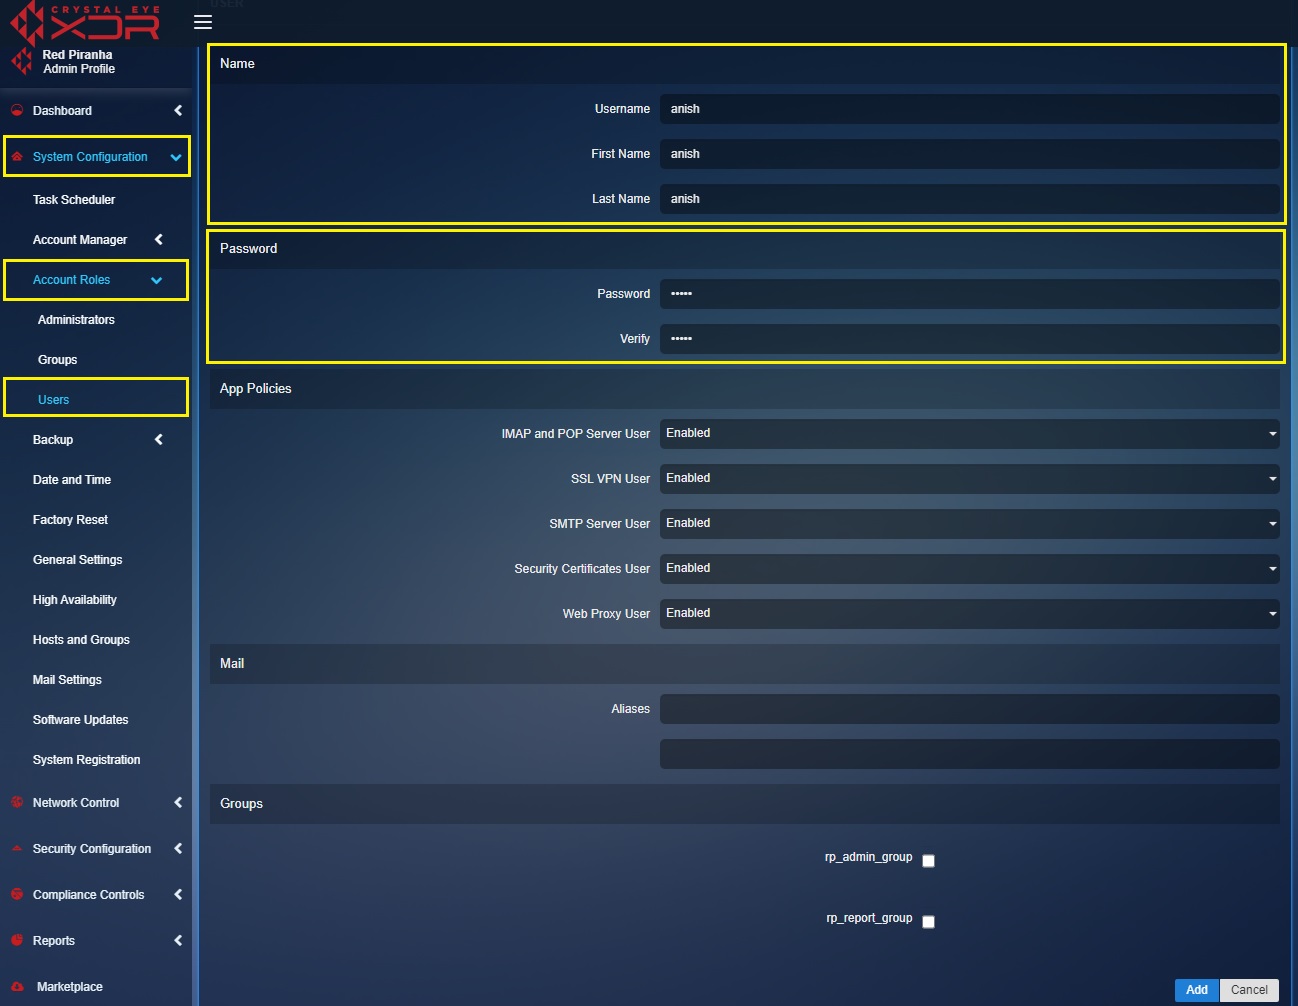
Step 12: Go to System Configuration > Account Roles > Users and click the Add button.

Step 13: You will be directed to the user edit page. Enter the **Username, First name, Last Name, assign a Password and verify it.
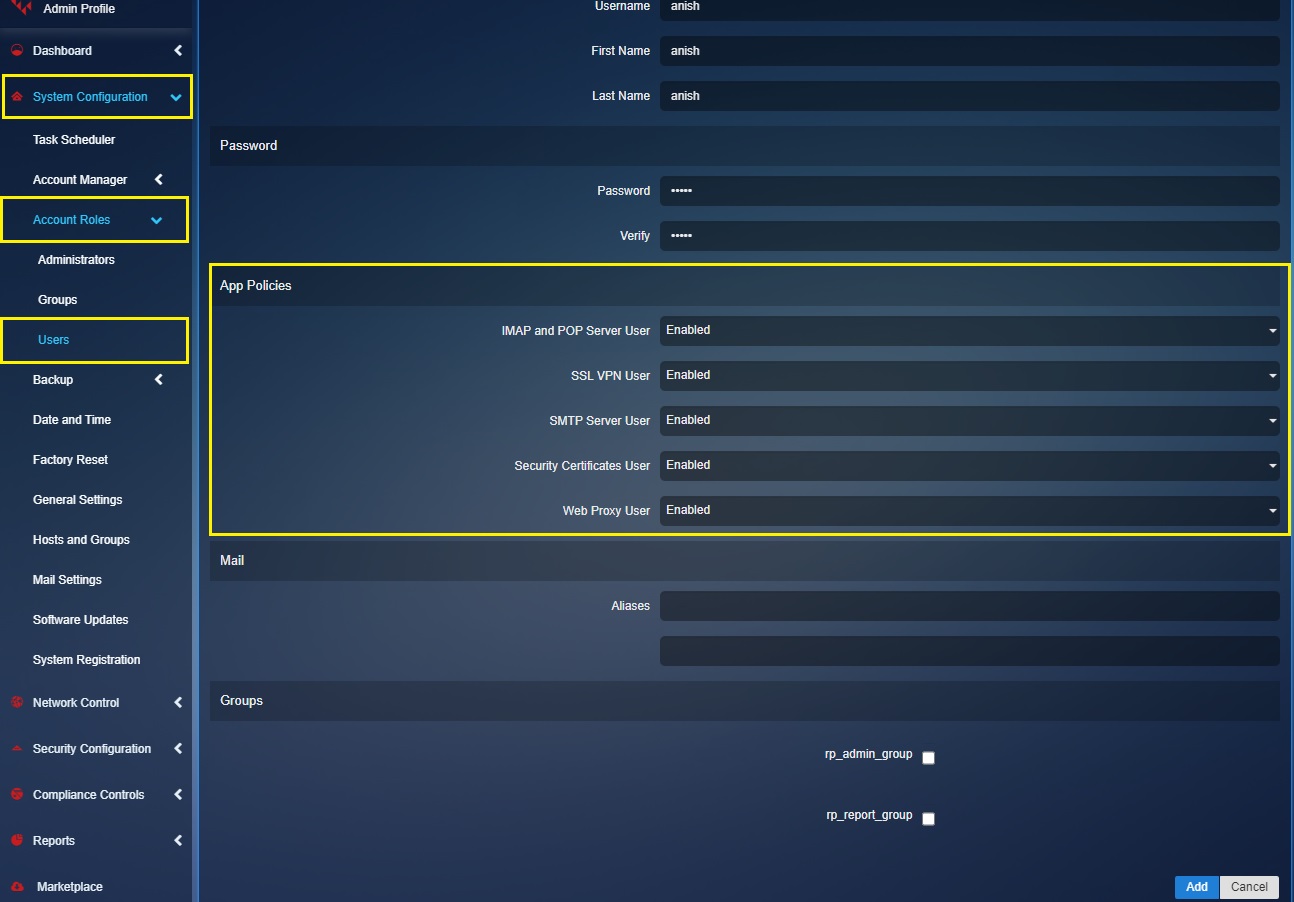
Step 14: Ensure that the IMAP & POP Server User option and the SMTP Server User option is enabled. As a default feature these settings are enabled. Click the Add button after entering the details.
Note
You will now see the IMAP user displayed in the IMAP User List section under the IMAP-POP Configuration tab of the Email Scanning App page. 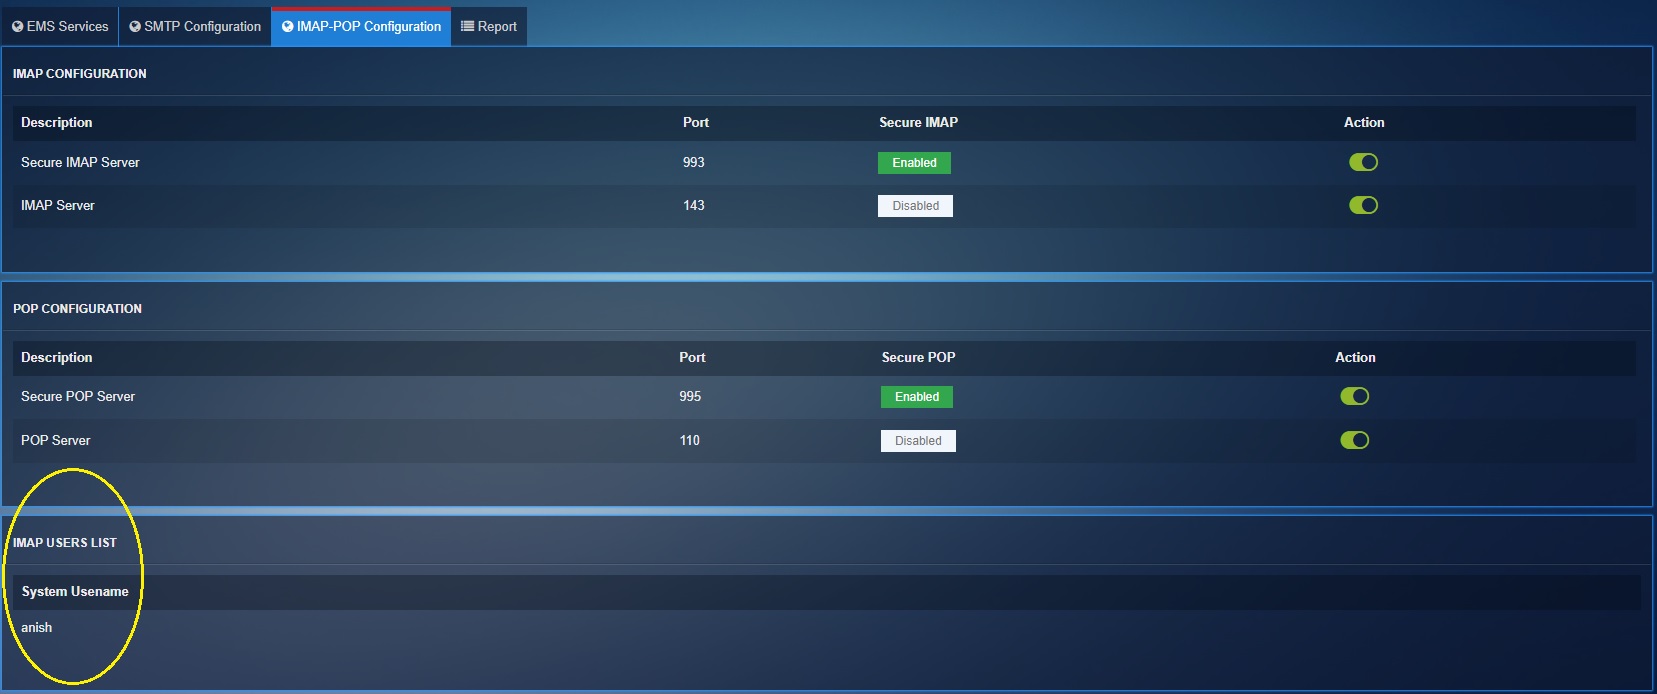
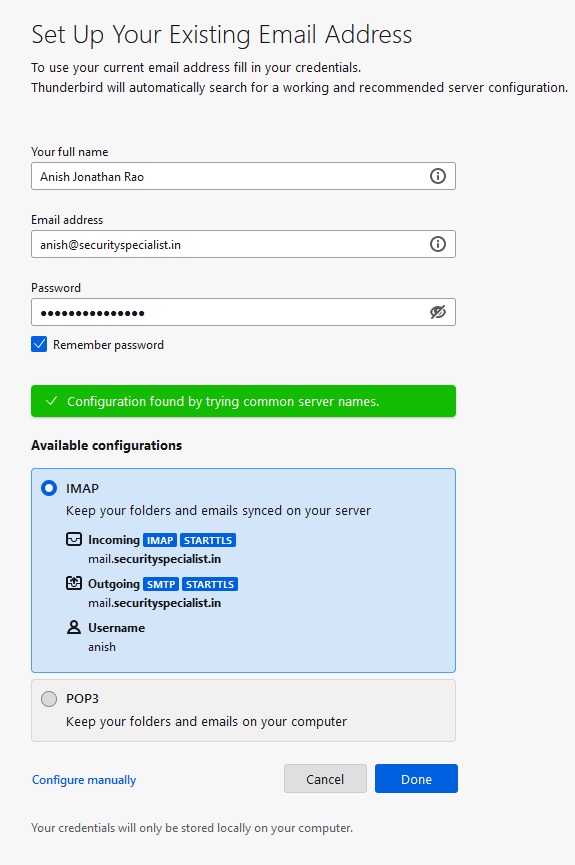
Step 15: Setup an email client on the end-point device which will be used to access the emails (in this case we have used thunderbird as our email client). Enter the Display Name in the text box highlighted in the screenshot below.

Step 16: Enter the email address and password and click Continue. Use the same password assigned to the CE XDR user created in step 12 and step 13.
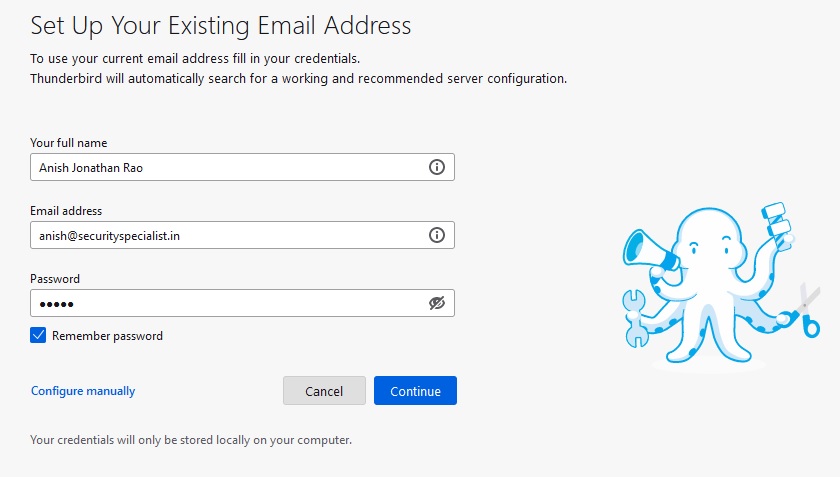
Step 17: You will see a message in a green box saying that the “Configuration found by trying common server names”. Click the Done button.
Email Scanning Gateway Reports
There are three reports generated in the email scanning gateway app which helps in analysing data related to the malware that has been quarantined. The following are the reports that help in analysing and detecting cyber security threats originating from various types of malicious emails.
Mail Traffic Stats
The mail traffic stats provide a detailed graphical view of the total number of emails scanned by the app every minute. If there are any Virus or spams detected it will reflect in the Mail Traffic Stats under Total Virus and Total Spam category.
The data can also be segregated by clicking on Total Mail, Total Virus and Total Spam. The x-axis shows count of the scanned emails, virus, and spams. On the other hand, the y-axis shows the exact time these emails, virus and spams were scanned.
Today's Stats
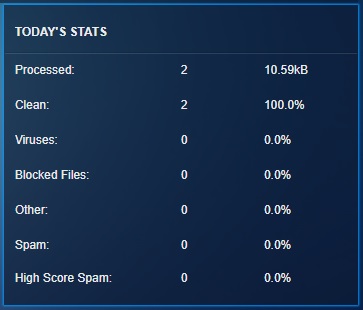
The Today’s Stats table provides an overview of the entire scanning related activities of the day. The information that appears on this table are as follows:
- Processed: The total file size of the scanned emails.
- Clean: The number of emails that have been scanned and cleaned-up.
- Viruses: The number of Viruses that have been detected.
- Blocked Files: The number of files that have been blocked post scanning.
- Spam: The number of spam emails scanned and blocked by Crystal Eye is mentioned here.
Mail Reports
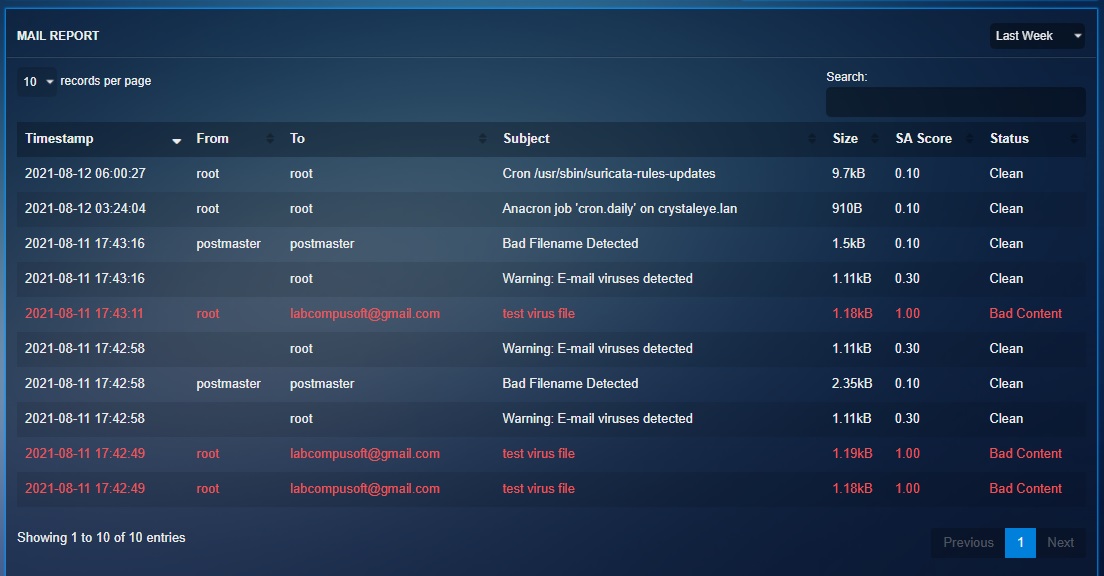
The Mail Reports provide details regarding the emails that have been deemed malicious because of any virus/malware detected in it. The details that are provided in this section about the blocked emails are as follows.
- Timestamp: The date and time at which the email was received and scanned.
- From: Where the scanned email originated.
- To: To whom the scanned email was sent to in the CE network.
- Subject: The subject of the blocked email.
- Size: The total size of the scanned email.
- SpamAssasin Score: The SA Score outlined in this section is determined after analysing several parameters to detect spam. These include DNS blocklists, text analysis etc. The email header and email body are also analysed, and then the auto scoring system provides the SpamAssasin Score outlining how the email performed against these checks.
- Status: The final result specifying whether the scanned email is clean or contains malware/bad content.


