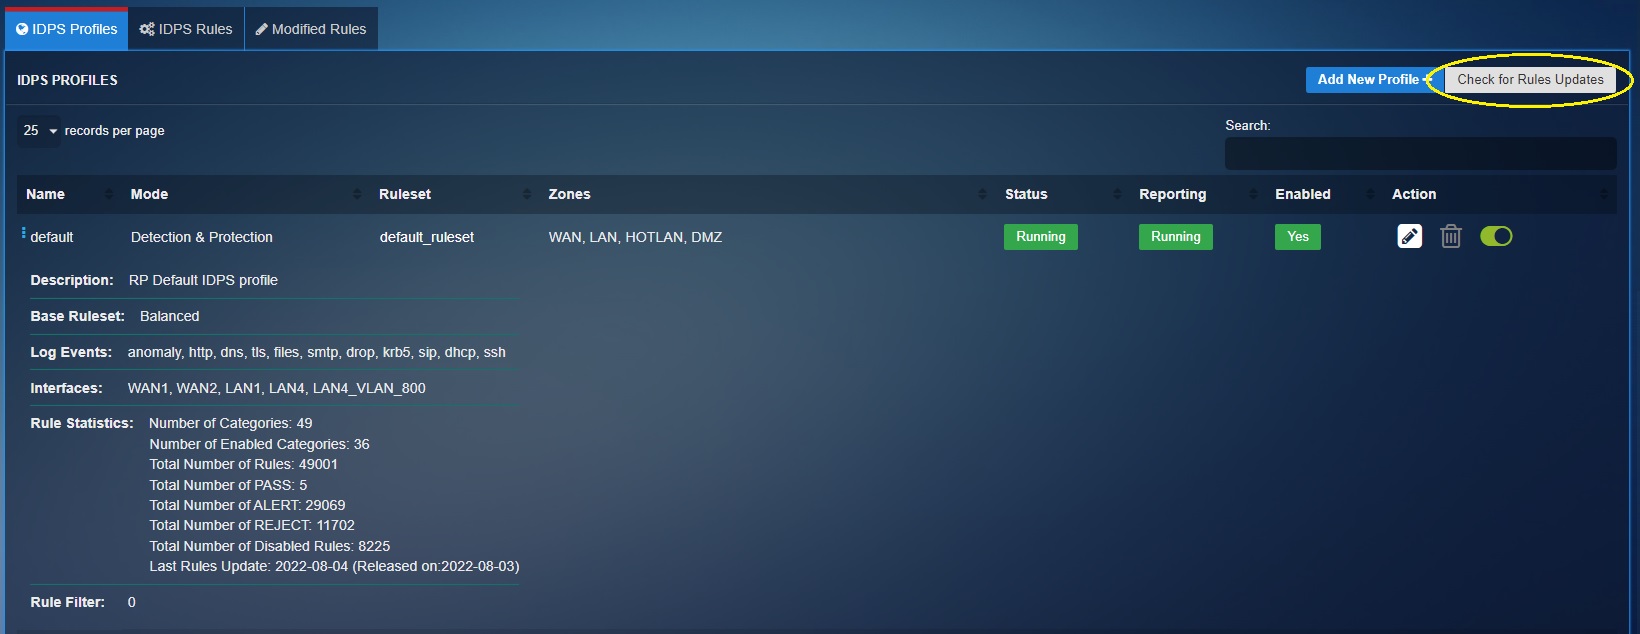
Intrusion Protection & Detection
Overview
The Intrusion Detection and Protection application is built into the in-depth holistic security framework of the Crystal Eye XDR extending its capabilities to protect the network against threats. The IDPS component of the CE XDR actively monitors network traffic and detects anomalies based on the backend and local IDPS rules.
Note
The backend IDPS rules are the rules developed by the security operations team of Red Piranha and the local rules are created on the CE XDR by the user.
CE XDR’s IDPS has in-built features that allows it to operate in Network Security Monitoring (NSM) mode, Inline mode and Detection & Protection mode. By default, the CE XDR runs on detection and protection mode which only generates alerts and logs suspicious traffic. The app configurations are designed to allow users to create IDPS profiles that can then be assigned to a segmented interface of the CE XDR network. The IDPS policies assigned to each IDPS profile are pre-dominantly a collection of rulesets and base rulesets.
Integration of Multi-tenancy with IDPS Profiles, Rulesets, base rulesets and other parameters of CE XDR’s IDPS application:
The IDPS application is designed to ensure that it supports multi-tenancy in its true sense. The user-friendly application GUI allows CE administrators to create multiple IDPS profiles and then assign them to multiple default or custom security zones. Apart from this, the administrator can also create multiple rulesets and define a base ruleset for them. These rulesets can then be assigned to the IDPS profiles defining the baseline for muti-tenancy characteristics of the application in its true sense.
Gartner Peer Review
 Explore more Red Piranha Customer Reviews on Gartner Peer Insights
Installation
The Intrusion Detection and Protection application is installed by default and can be accessed from the left-hand navigation panel.
Navigation to Intrusion Detection and Protection application
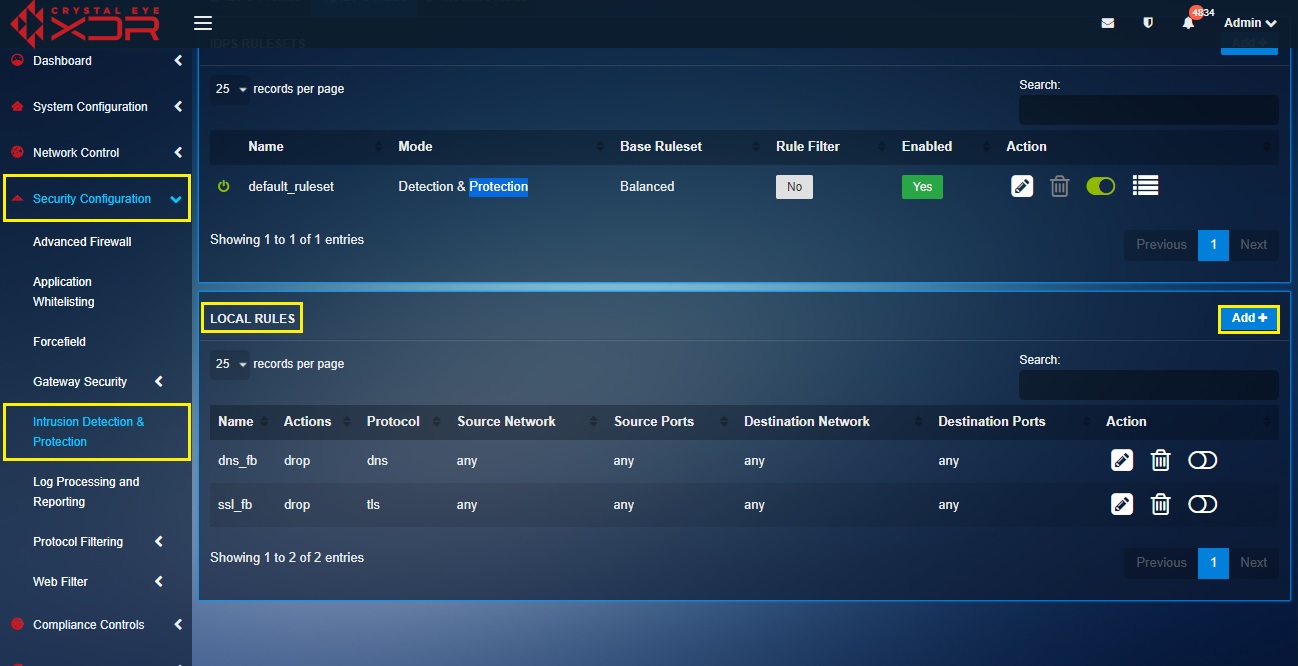
Left-hand navigation Panel > Security Configuration > Intrusion Detection and Protection application 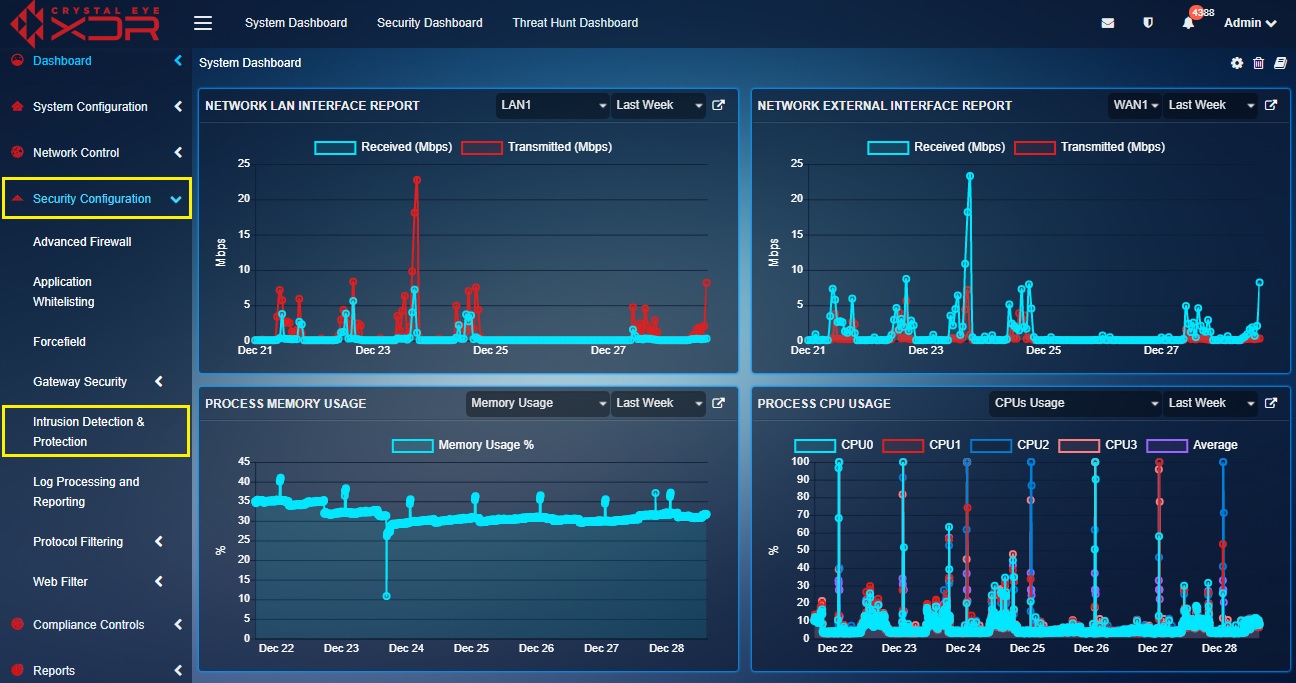
Understanding IDPS Configuration
The improved GUI of the IDPS application supports multiple configurations for various internal IDPS related deployment across the CE XDR network. The configuration elements and parameters are spread over various components of the configuration hierarchy such a IDPS profiles, rulesets, base rulesets, local rules development component etc.
The IDPS Configuration Hierarchy can be best understood with the following flowchart:
The flow chart above shows various stages of deploying IDPS in the CE XDR network. These stages are described in greater detail below.
Stage 1 Configuration—Network Segmentation
The newly developed CE XDR software version (4.0 onwards) features the new IDPS application which propagates multi-tenancy in its true sense.
This also means that now you can create different IDPS profiles with different types of rulesets and apply it to both internal and external network traffic.
The blue section of the flow chart above shows that you can either create a custom security zone or use default security zones and then assign it to a network interface.
We create these zones so that we can apply multiple types of IDPS profiles to the CE XDR network traffic.
Know how to create custom security zone?
Know more about the default security zones of the CE XDR?
Stage 2 Configuration—Creating Custom Rulesets & Adding Local Rules
The IDPS application has an elaborative capability to accommodate multiple rulesets for various network security requirements.
These rulesets are then aligned to a custom IDPS profiles which can be applied to a particular type of network traffic.
Note
You may use default rulesets or create a custom ruleset and then align it with a IDPS profile. In addition, you may also create Local rules and then align it to a custom ruleset.
How to create a custom ruleset?
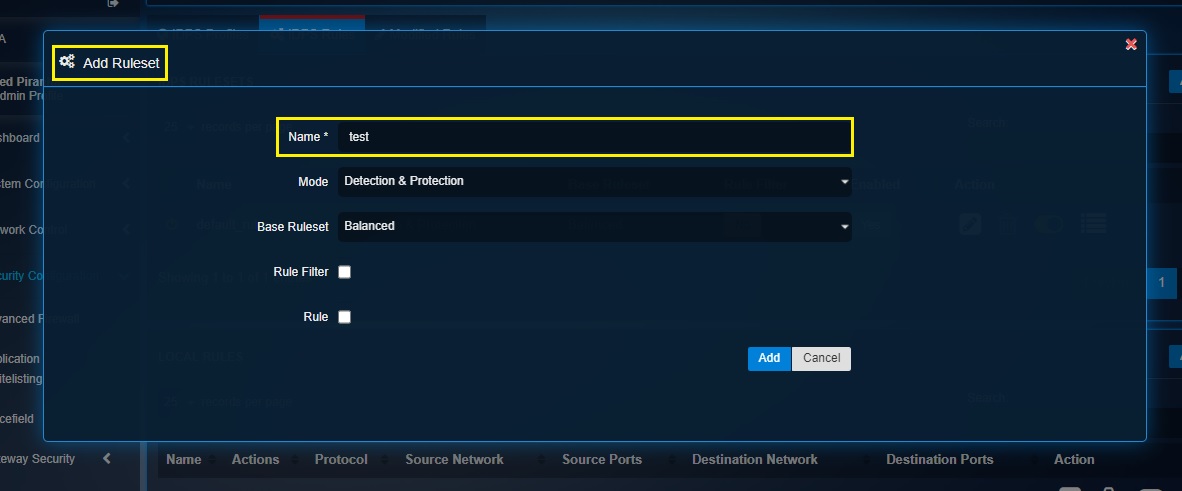
Step 1: In the IDPS application page, click the Add button in the IDPS Rulesets section under the IDPS Rules tab.

Step 2: You will now see the Add Ruleset pop-up. Give a Name for the ruleset.
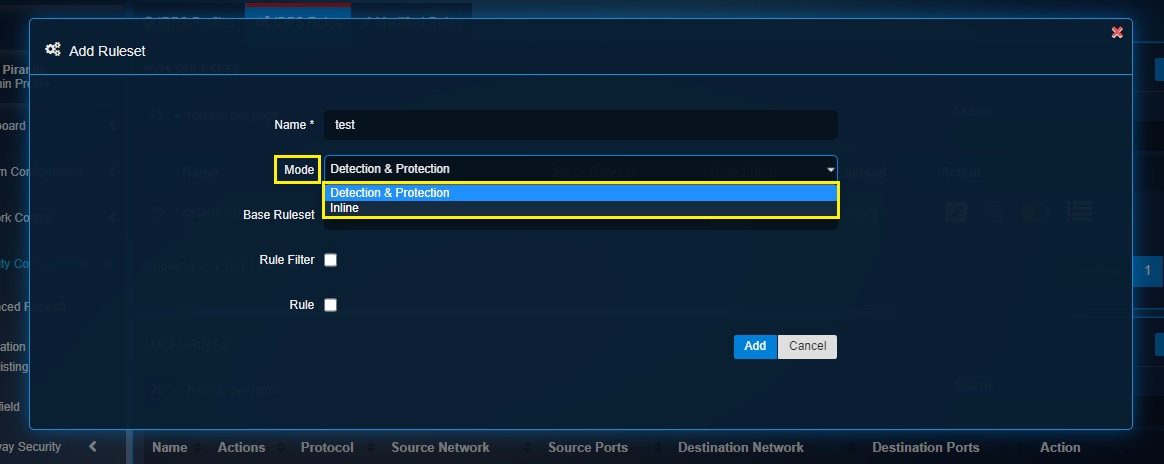
Step 3: Select the desired IDPS mode (Detection & Protection and Inline).
Step 4: Select the required Base Ruleset as per requirements.

Note
The rules in the base rulesets are created by Red Piranha’s security operations team and are synced with the CE XDR through its service delivery network (SDN). The different base rulesets that can be selected are Balanced, Connectivity, Custom, OT, Security and WAF.
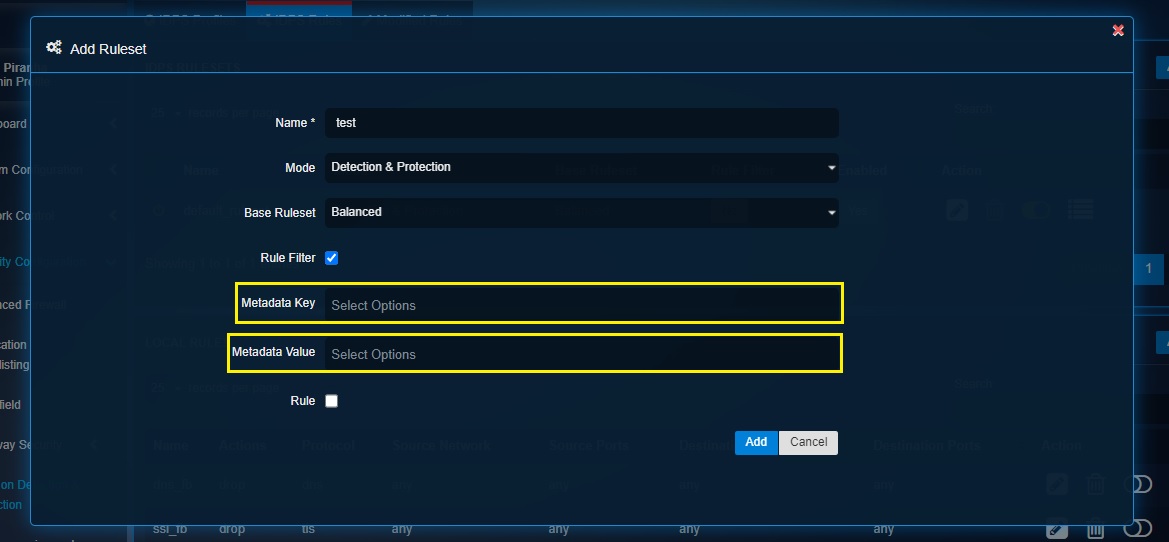
Step 5: Check the Rule Filter checkbox and select the required Meta Key and Meta Value.
Note
A ruleset can be filtered based on meta value and meta key. Meta tags filters a larger ruleset to a smaller ruleset based on the meta data key value. Meta data as a key value offers a better schema to the rule. So, if there is a requirement to fine tune the rule performance to reduce false positives (due to a larger ruleset) in the IDPS alerts then the ruleset can be sliced and diced to customize it for a deployment.
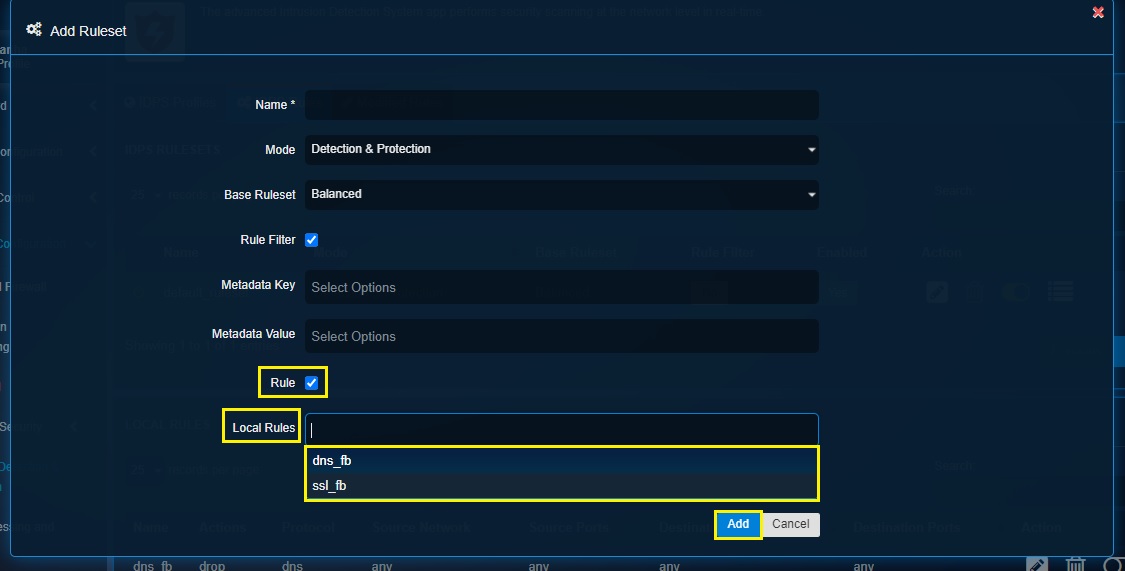
Step 6: Select the Rule checkbox if there is a requirement to add rules that are created locally using the Local Rules feature and click the Add button.
Stage 3 Configuration—Creating a Local Rule and Assigning it to a Custom Ruleset & IDPS Profile
A Crystal Eye administrator can create IDPS rules locally using the Local Rules feature of the IDPS application. This feature comes with a user-friendly UI which works as a flawless local rules developer.
The configuration hierarchy while creating local rules are such that there is an option to configure general settings and advanced settings. The sub-sections that fall under general and advanced settings are discussed in detail below.
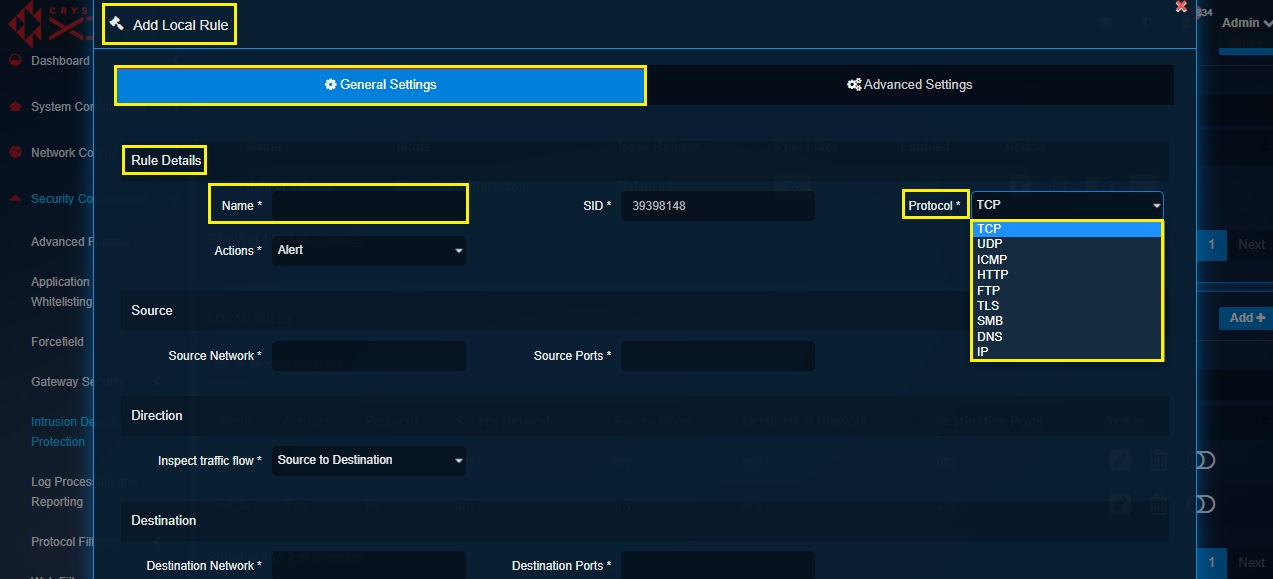
Rule Details Section: This section includes fields defining the name of the local rule, signature identity (SID), protocol (TCP, UDP, ICMP, HTTP, FTP, TLS, SMB, DNS and IP) and Actions (Alert, Reject, Drop, Pass).
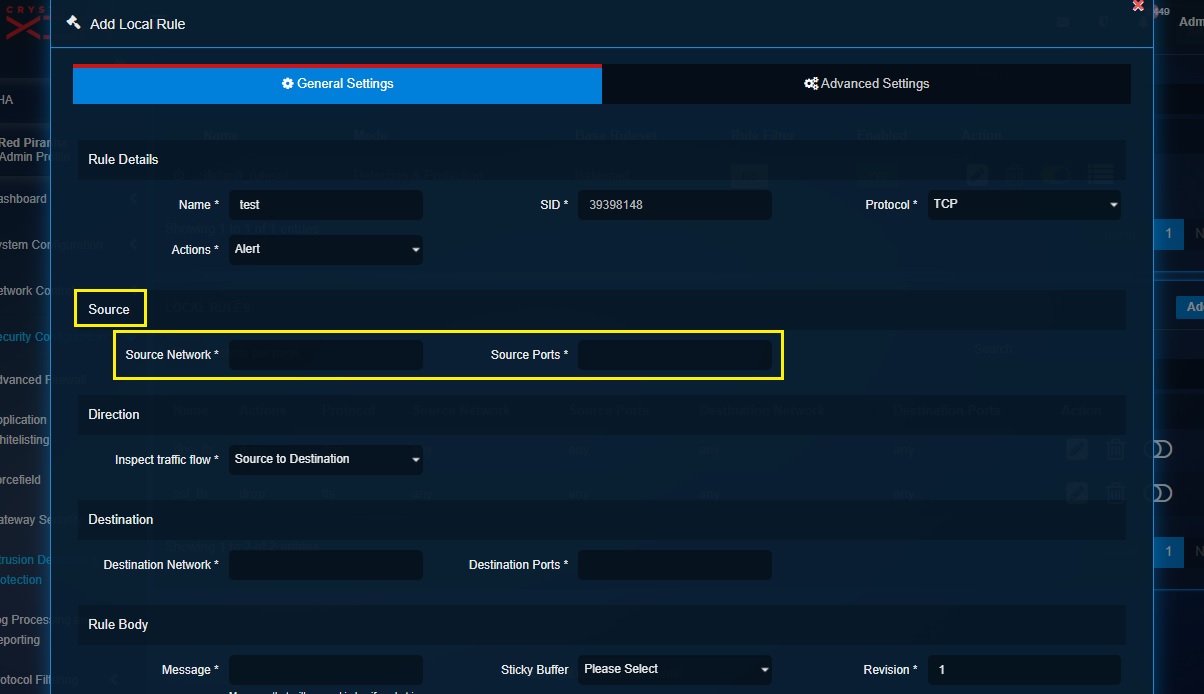
Source Section: The source section allows to assign a source network and source port to ensure that the local rule applies to a specific source network traffic. The Host and Groups application can be used to create an IP network group (for networks) and service group (for ports). The required IP network group (for networks) and service group (for ports) can then be selected from the source network dropdown and the source port dropdown respectively. You can comma separate the source network IP address and source port to enter it directly to the textboxes. Learn how to create IP network group object and service group objects (for ports).
Direction Section: This dropdown option allows users to select the traffic type the local rule must be applied to further inspect the traffic flow. The traffic can either be inspected source to destination or both directions.
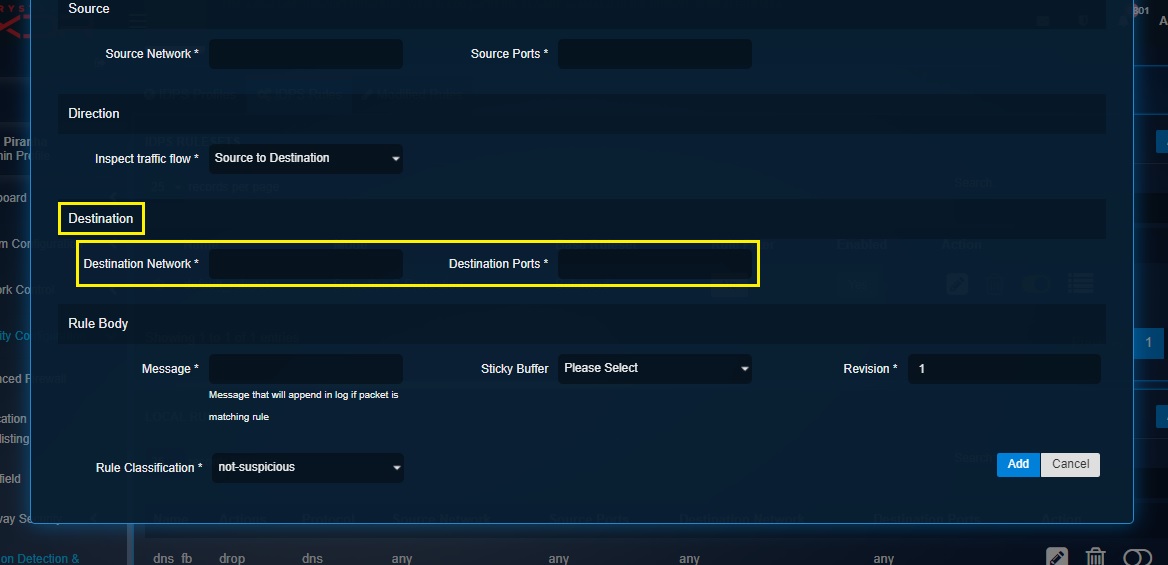
Destination Section: The destination section allows to assign a destination network and destination port to ensure that the local rule applies to a specific destination network traffic. The Host and Groups application can be used to create an IP network group (for networks) and service group (for ports). The required IP network group (for networks) and service group (for ports) can then be selected from the destination network dropdown and the destination port dropdown respectively. You can comma separate the source network IP address and source port to enter it directly to the textboxes.
Rule Body: This section consists of a message textbox which is meant to create a custom message that will append in log if the packet matches the rule.
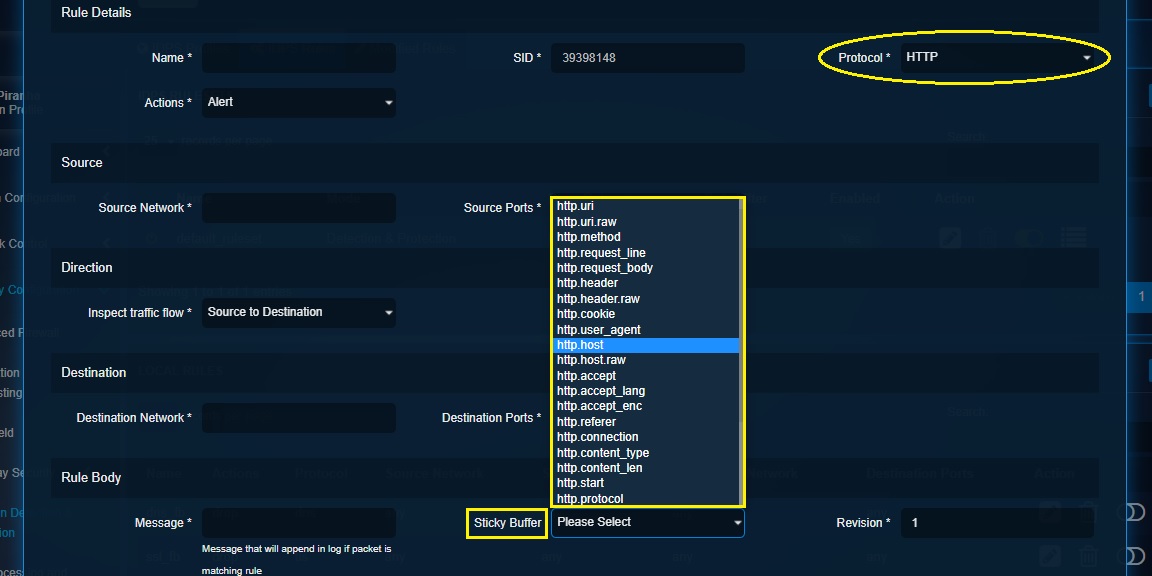
Sticky Buffer: The sticky buffers are the modifier keywords that provides an efficient way to inspect a specific field of protocols. The functionality of sticky buffers can be best explained by selecting a protocol in the Rules Details section and then selecting the corresponding sticky buffer from the dropdown.
Revision:
Rule Classification:
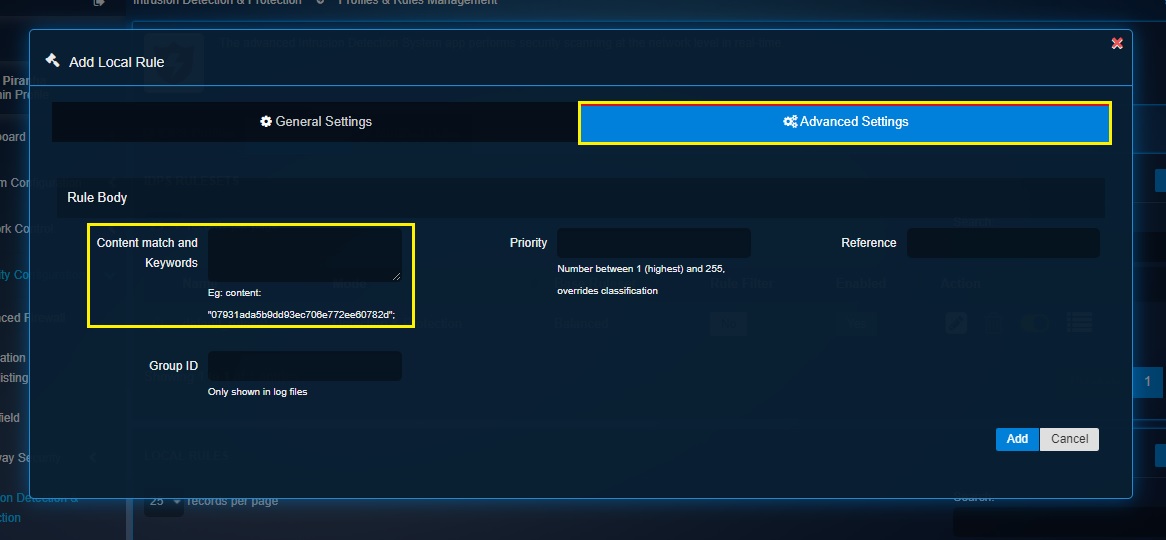
Rule Body: This section has fields that defines the rule body by allowing users to enter content match and keywords, assign priority, reference, and group ID.
Note
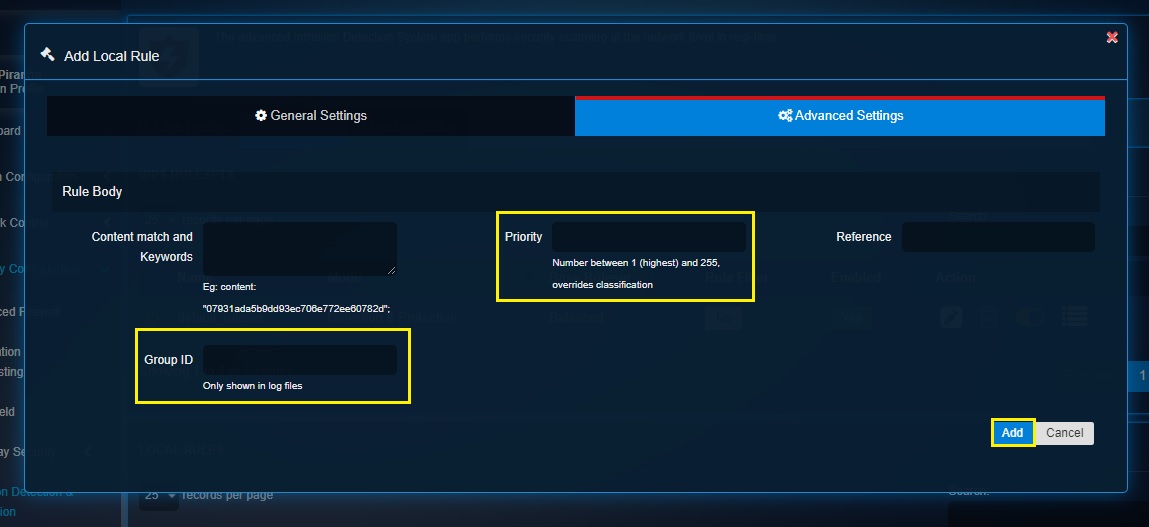
The Priority number must be a number between 1-255 (1 being the highest priority). If priority is assigned it overrides the rule classification.
**How to Create a Local Rule and Assign it to a Ruleset & IDPS Profile? **
Step 1: Click the Add button in the Local Rules section of the IDPS Rules tab.
Note
You’ll now see the Add Local Rule pop-up. The system will automatically assign a SID to the rule which will be visible under the Rule details section under the General Settings Tab. 
Step 2: Assign a name of the rule in the Name textbox and select the desired protocol that needs to be inspected in the Protocol dropdown.
Step 3: Select the Actions from the dropdown menu.
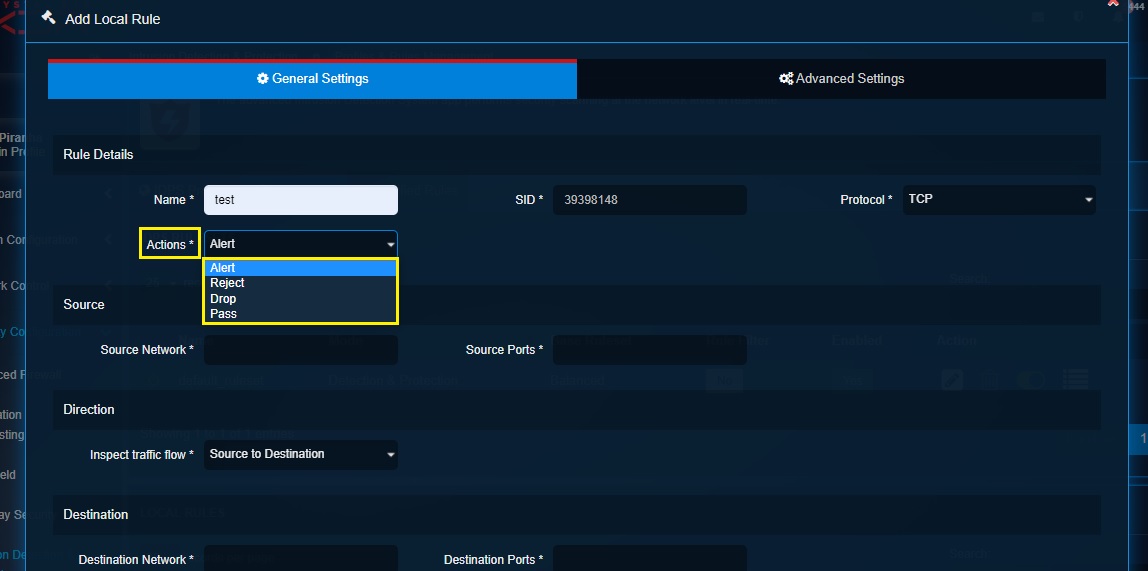
Step 4: Enter the Source Network details and the Source Ports details under the Source section.
Note
You can enter the IP address and the port number in the Source Network and the Source Ports directly in the textbox. Alternatively, you may create an IP Host Group object to club multiple IPs under one umbrella and then select it from the source network and source port dropdown.
Step 5: Select the inspection flow of the traffic from the Inspect Traffic Flow dropdown under the Direction section.

Note
The traffic flow can be inspected using two methodologies, namely, Source to Destination or Both Directions.
Step 6: Enter the Destination Network details and the Destination Ports details under the Destination section.
Note
You can enter the IP address and the port number in the Destination Network and the Destination Ports directly in the textbox. Alternatively, you may create an IP Host Group object to club multiple IPs under one umbrella and then select it from the Destination network and Destination port dropdown.
Step 7: Enter the message that will append in log if packet is matching rule in the Message textbox.
Step 8: Select Sticky Buffer from the dropdown. Sticky buffers provide an efficient way to inspect specific fields of the protocol selected in the Rules Details section under the Protocol dropdown.
Note
If you have selected HTTP protocol in the Rules Details section, HTTP specific sticky buffers will be displayed in the Sticky Buffers dropdown which can be used to efficiently inspect specific fields of the HTTP protocol.
Step 9: Select the classification criteria from the Rules Classification dropdown.
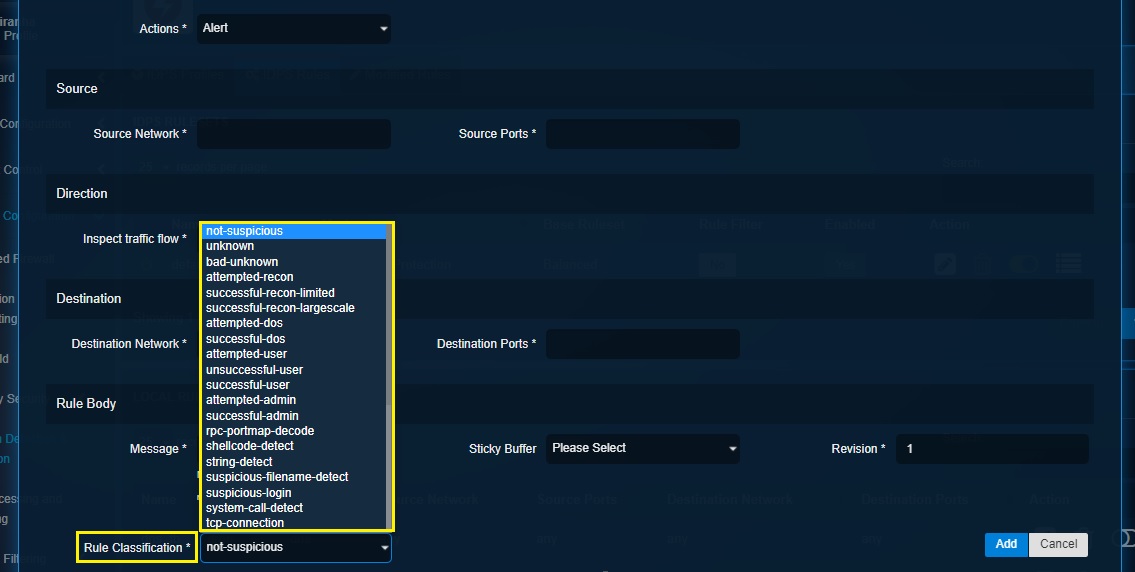
Step 10: Click the Advanced Settings tab and then enter the content match and keywords in the designated textbox.
Step 11: Enter the rule priority (Number between 1 (highest) and 255, overrides classification) in the Priority textbox, enter the Group ID in the textbox and click the Add button.
Note
Once the local rule is created, it will show up in the Local Rules section. In fact you will be directed to the Local Rules section after clicking the Add button in the screenshot above. 
Now that you have created the Local IDPS Rule, you will now have to add this rule to the ruleset. You can either add the local rule to a default ruleset or a custom ruleset. In the screenshots below, we will add the local IDPS rule to a custom ruleset. Please note that the local rule can be added to the custom ruleset while creating the custom ruleset of after it is created.
Step 12: To add the local IDPS rule to a custom ruleset, click on the Add button in the IDPS Ruleset section. Please note that we are adding the local IDPS rule to the custom ruleset in this step.

Step 13: You will now see the Add Ruleset popup. Click the Rule tick box then select the local rule created previously from the dropdown and click the Add button.

By following the above 13 steps’, you’ll be able to create a Local Rule and then assign it to a custom or default ruleset. This ruleset can then be assigned to a IDPS profile (both custom or default IDPS profiles)
Stage 4 Configuration—Create IDPS Profile (Detection & Protection Mode)
Crystal Eye XDR’s IDPS profile enables CE administrators to implement a variety of attack detection and prevention techniques on selective security zones and traffic across the CE XDR network.
The Detection & Protection mode of the Crystal Eye XDR’s IDPS application ensures that the traffic flowing through from devices connected to the network is monitored. In this mode, auto-analysis is performed on the traffic and this traffic is further passed through a database of known attacks to match anomalies and threats. These abnormal behaviors are identified and flagged in the real time IDPS alerts section of the security dashboard of the CE XDR.
Note
All drop rules will be automatically converted to reject in detection and protection IDPS mode.
The CE XDR administrator can then quickly act upon the anomaly by setting up a quick mitigation strategy or by using the in-built escalation feature that allows admins to escalate a triggered IDPS alert to the security operations team of Red Piranha for further analysis.
How to create an IDPS profile on detection and protection mode and assign it to a security zone?
Step 1: In the IDPS application page, click the IDPS Rules tab and then click the Add button.
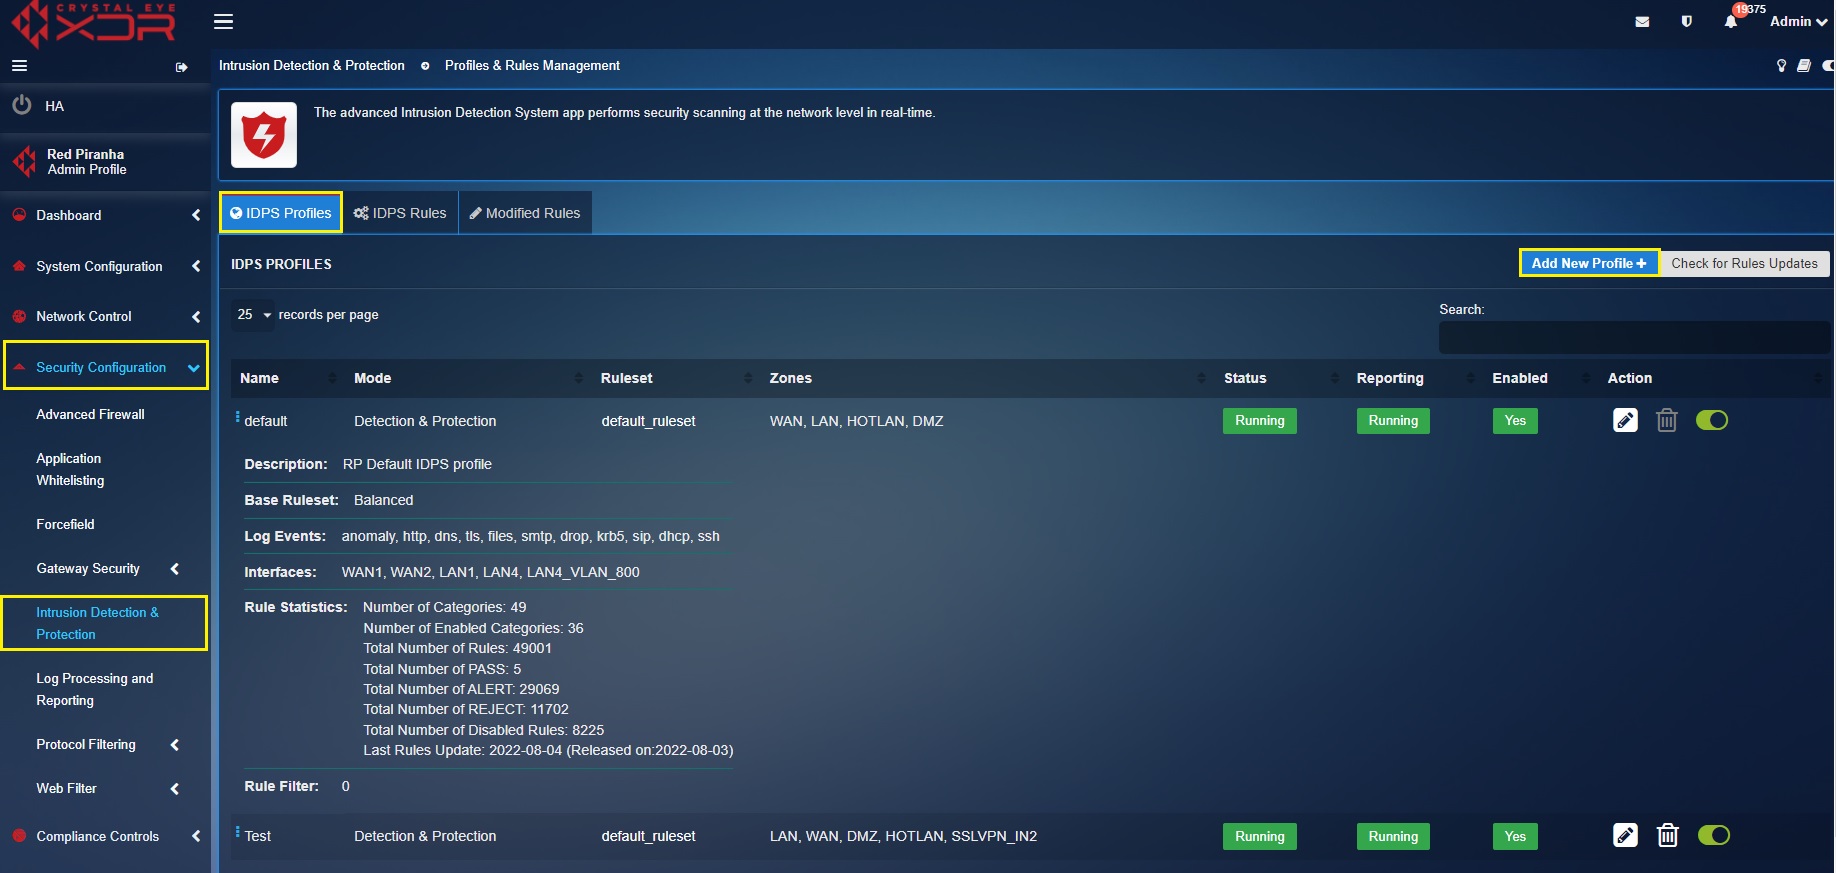
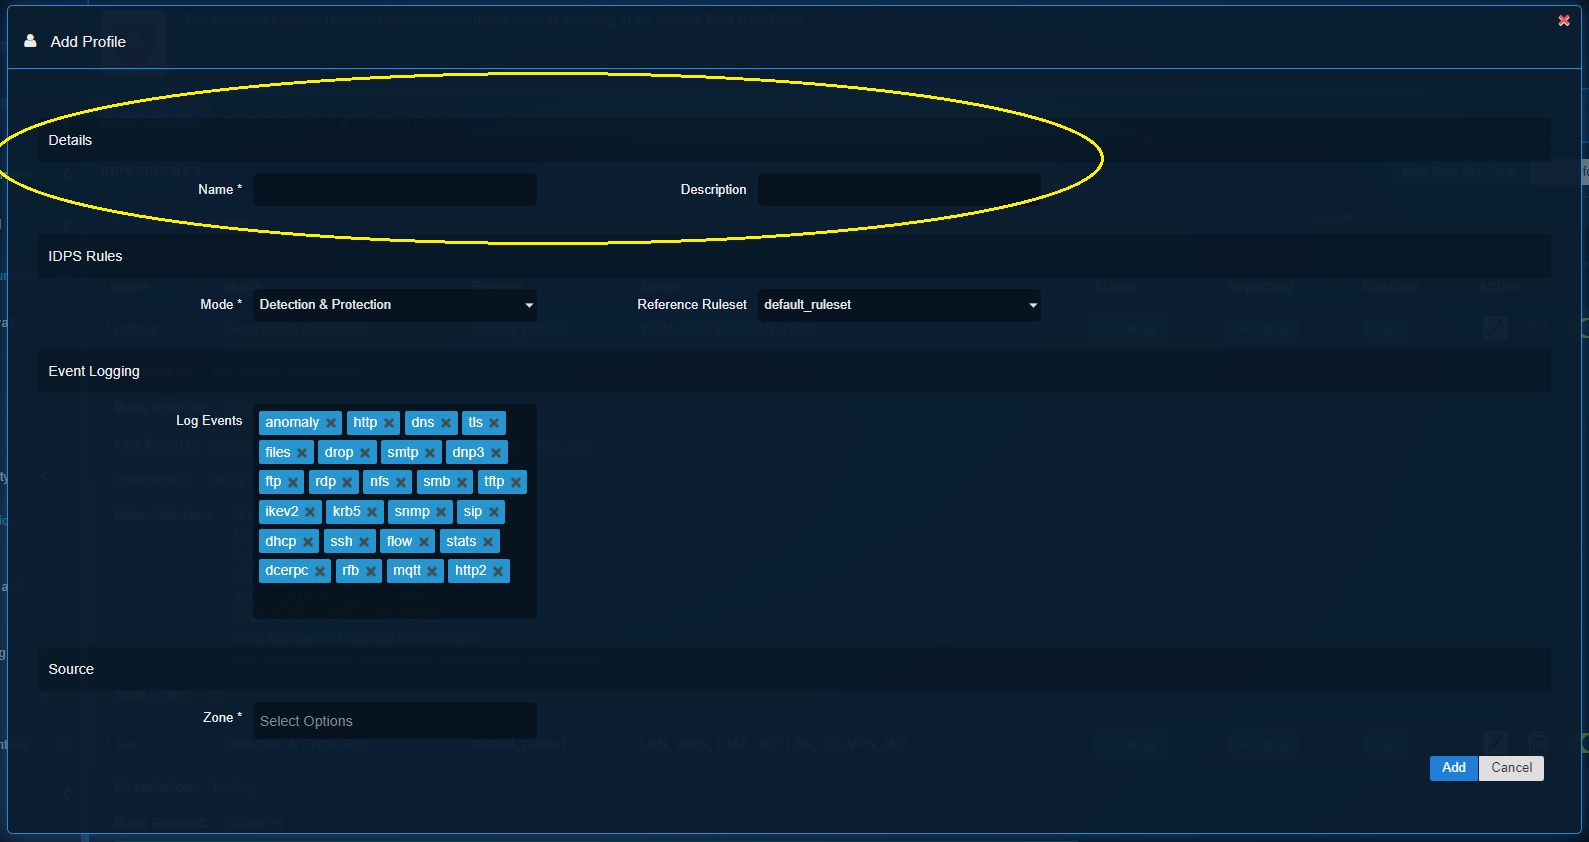
Step 2: You’ll now see the Add Ruleset pop-up. Enter the Name and Description of the custom IDPS profile.
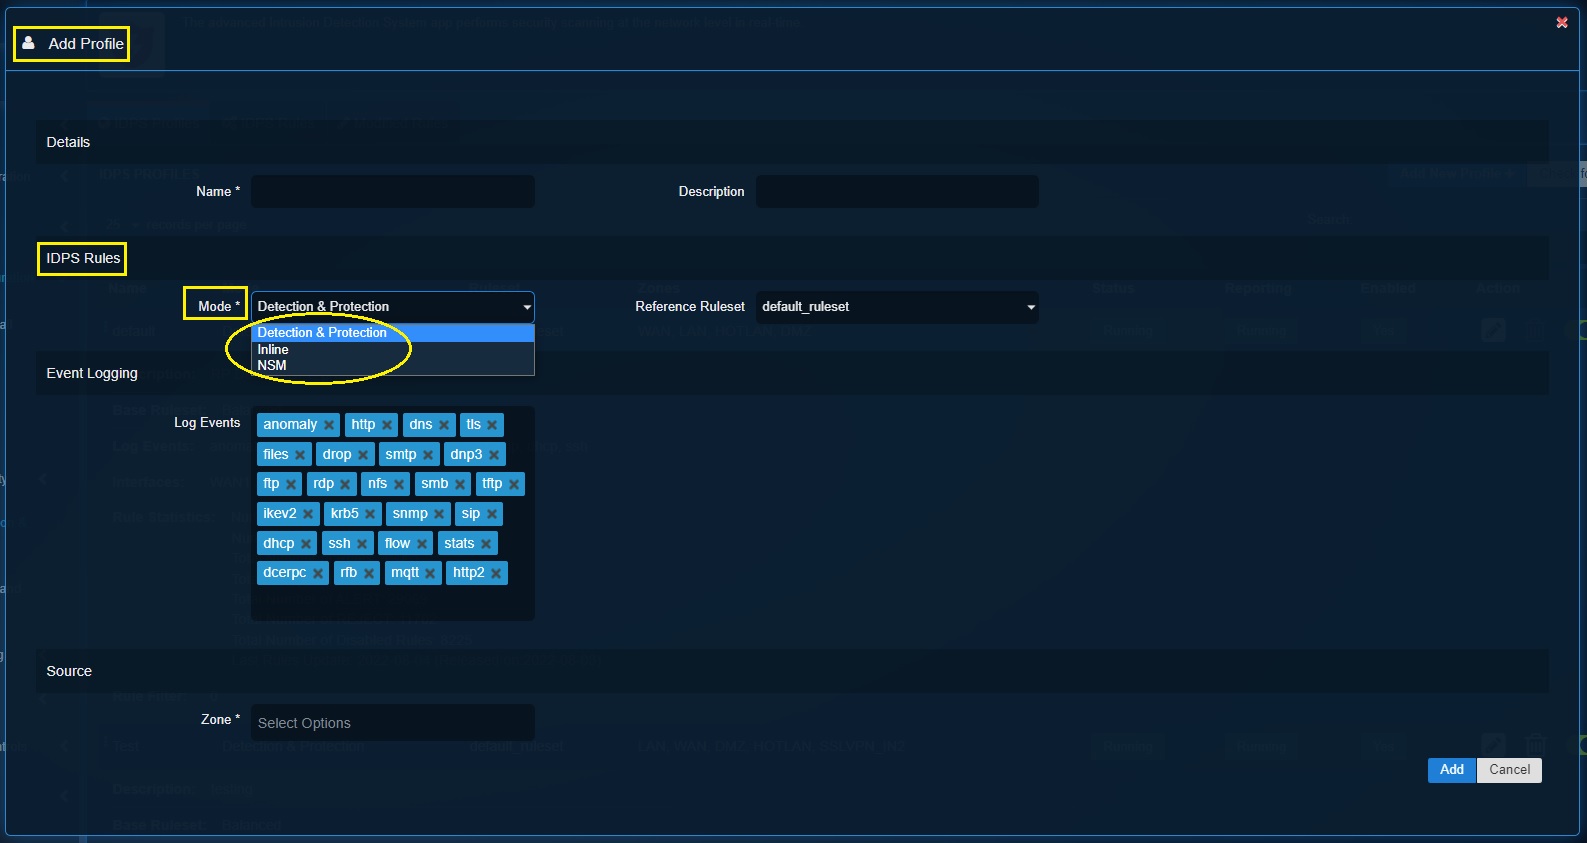
Step 3: Select Detection and Protection mode from the Mode dropdown under the IDPS Rules section.
Step 4: Select the Reference Ruleset from the dropdown.

Note
In this scenario, we have already created a detection & protection ruleset (test_rule_set). This ruleset has been selected in Step 4.
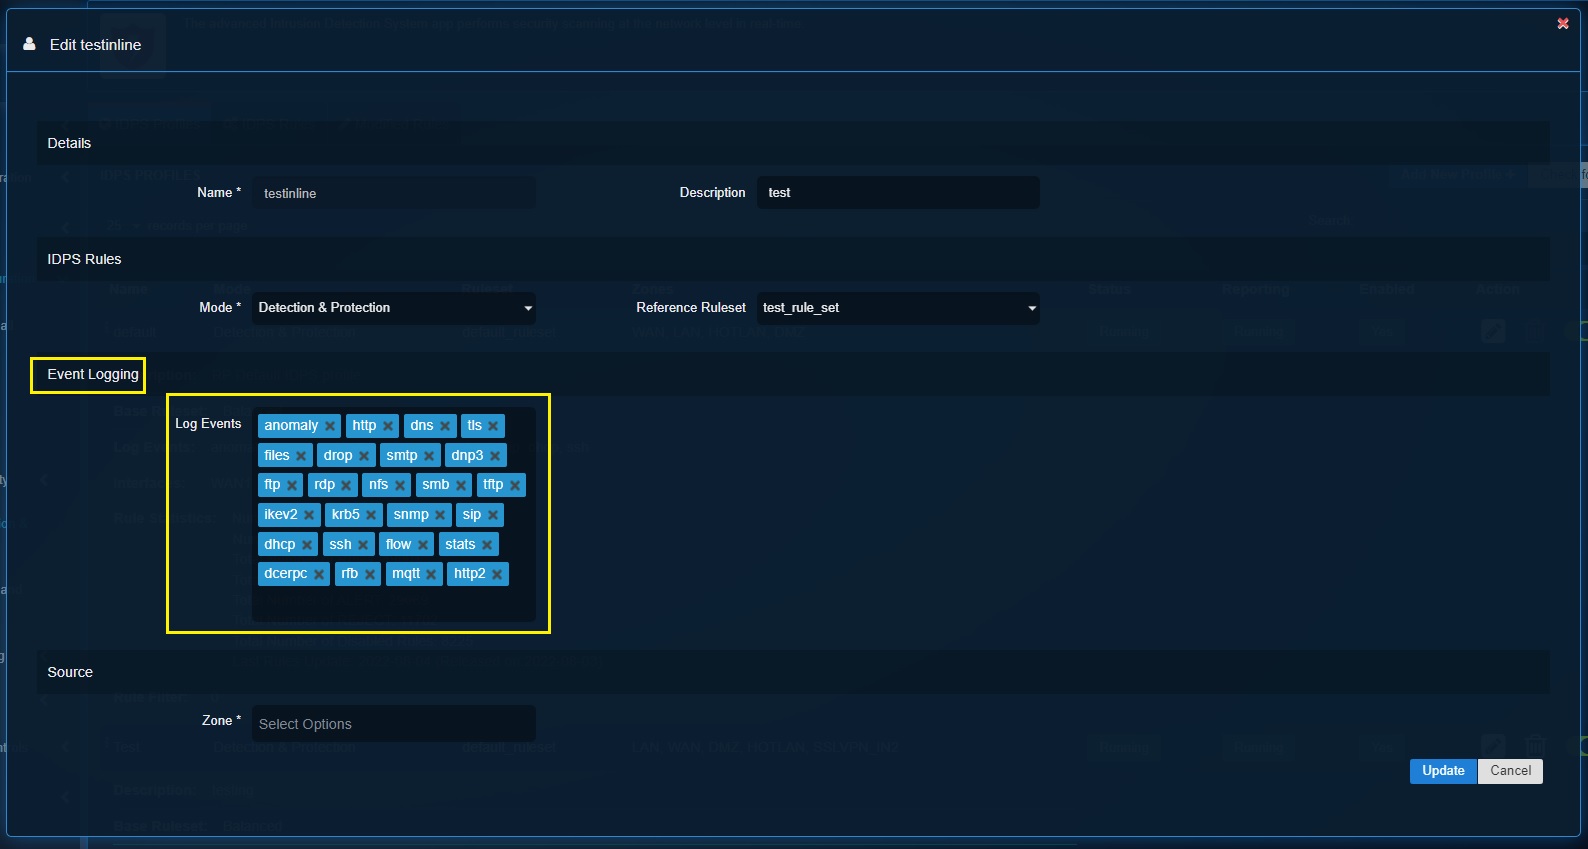
Step 5: Define the security events to be logged in the Threat Hunt in the Log Events textbox under the Event logging section.
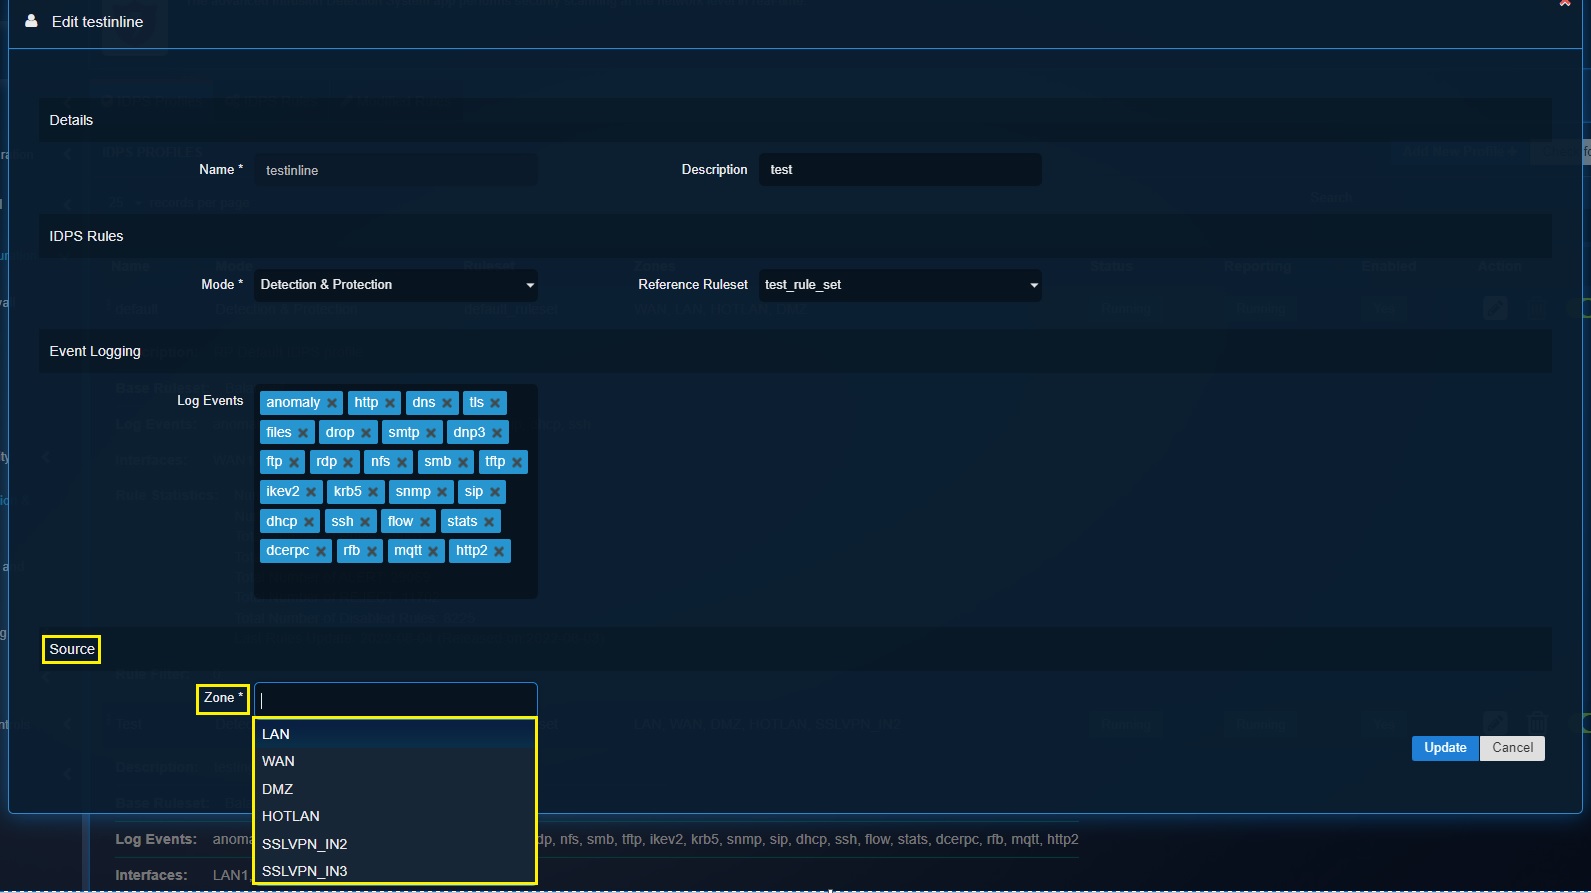
Step 6: Select the network security zones that needs to be logged by the IDPS. Click the Add button.
Stage 5 Configuration—Create IDPS Profile (Inline Mode)
The Inline mode of the IDPS module of the Crystal Eye XDR drops suspicious network traffic based on the rules in addition to generating alerts. This also means that if a drop rule action is triggered it would drop illegitimate traffic based on the malicious signature match.
How to create an IDPS Profile on Inline mode and assign it to a network traffic?
Step 1: In the IDPS application page, click the IDPS Rules tab and then click the Add button.
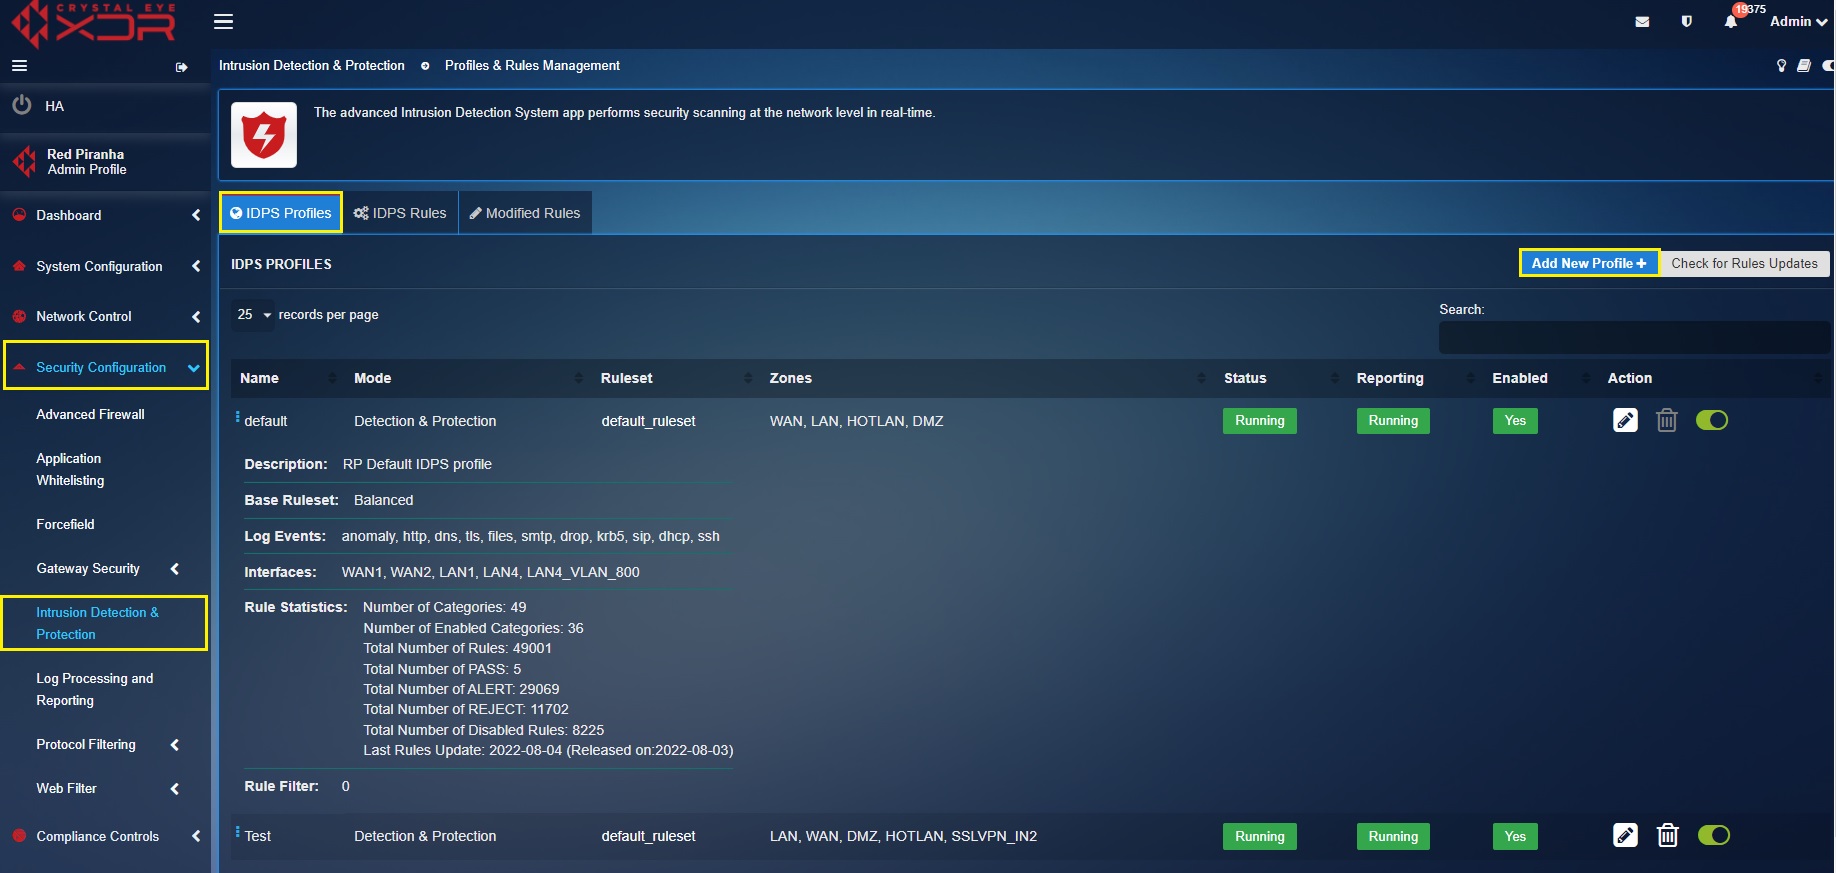
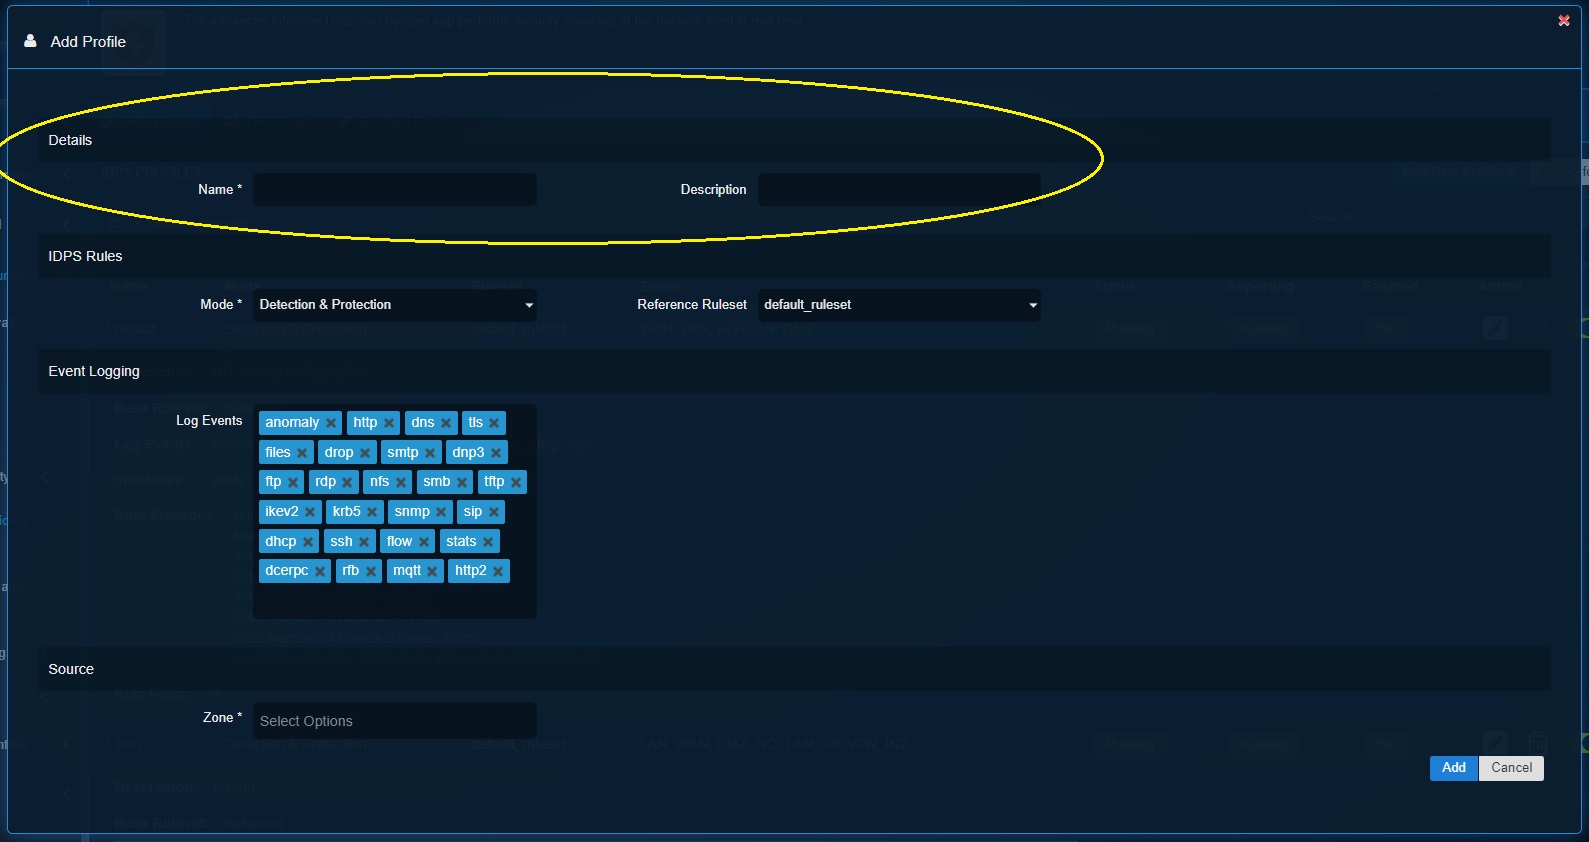
Step 2: You’ll now see the Add Ruleset pop-up. Enter the Name and Description of the custom IDPS profile.
Step 3: Select Inline Mode from the dropdown.
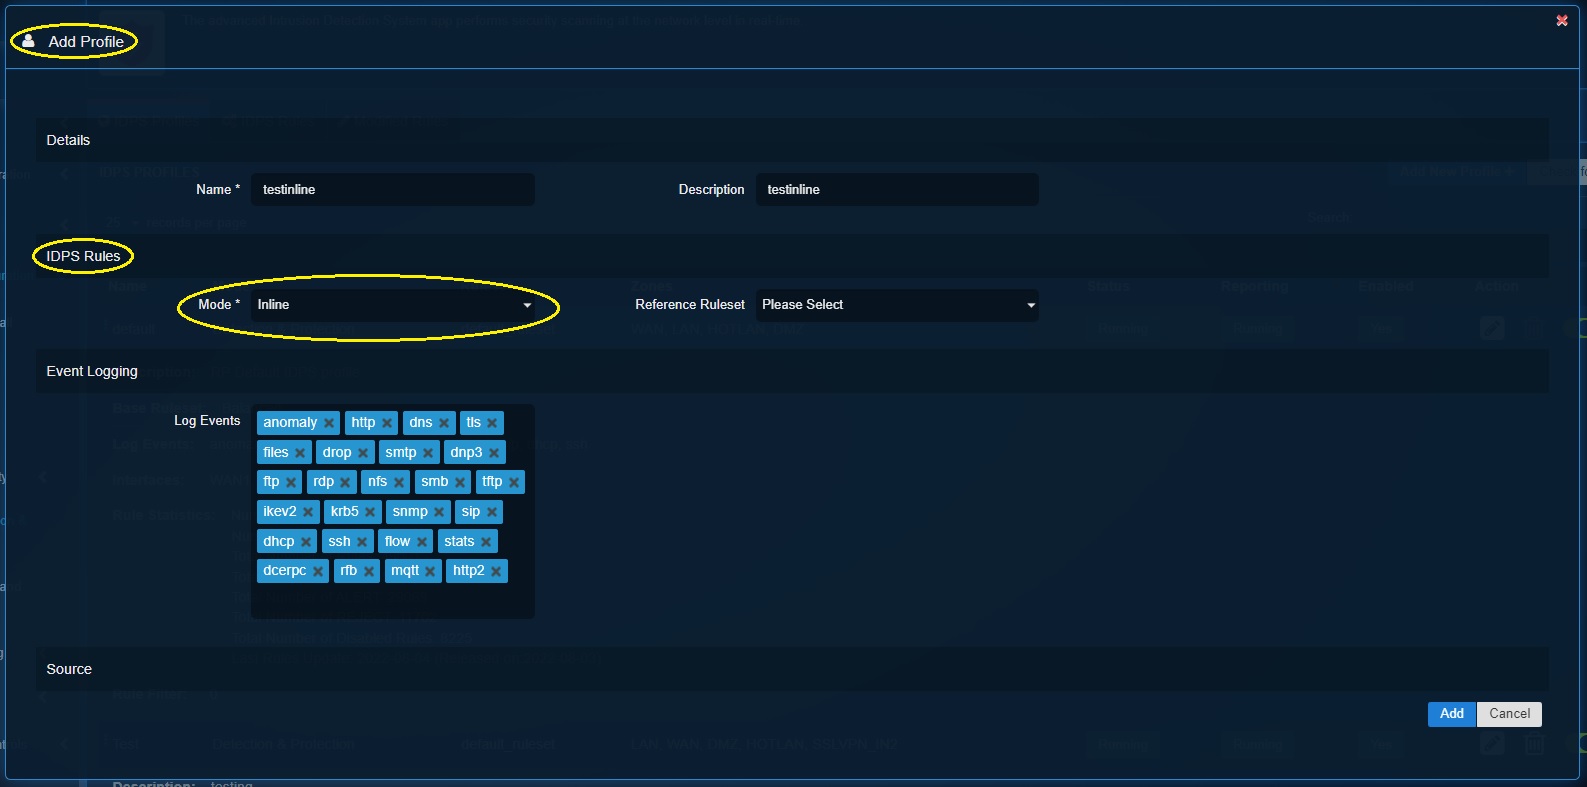
Step 4: Select the Reference Ruleset from the dropdown.

Note
In our scenario we have created a custom inline ruleset named ‘test_rule_set’.
Step 5: Define the security events to be logged in the Threat Hunt in the Log Events textbox under the Event logging section and click the Add button.

Step 6: Create a traffic rule in the Advanced Firewall with the Target = IDPS and the profile as the current inline profile.
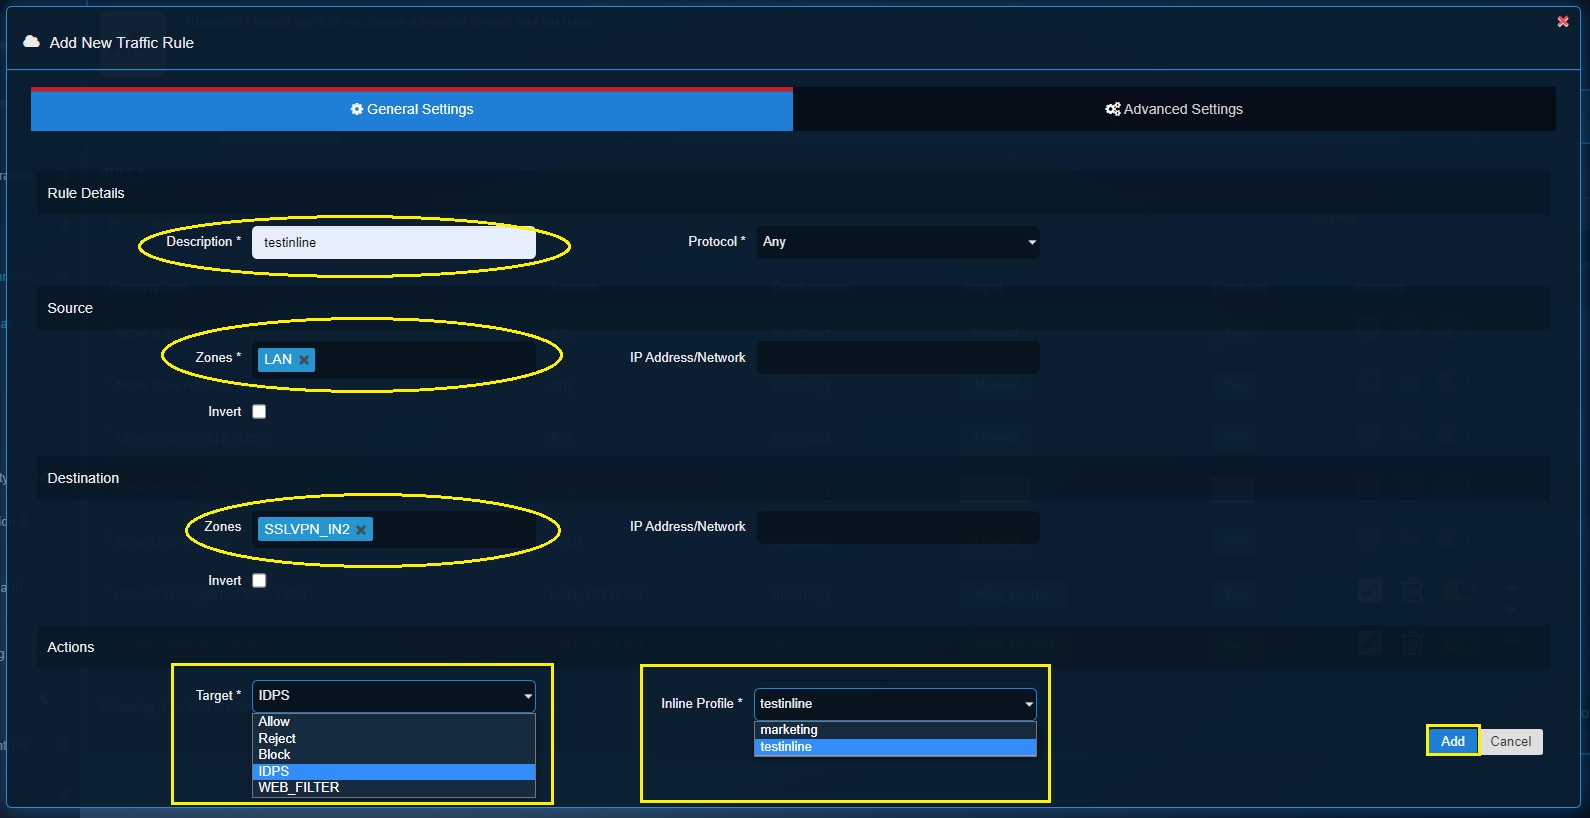
Note
Know more about advanced firewall app’s Traffic Rules here
Stage 6 Configuration—Create IDPS Profile (NSM Mode)
When the Crystal Eye XDR is run on NSM mode, it provides traceability of various processes and activities that takes place in the network. In a typical NSM deployment the CE XDR acts as the hardware element that collects logs of network events and makes it available for further analysis.
Note
The NSM mode is highly recommended when the CE XDR is deployed in-line with another security solution. When the CE XDR is switched to NSM mode, it would display all IDPS events except for alerts and will not drop or reject the packets.
How to create an IDPS Profile when NSM mode is selected?
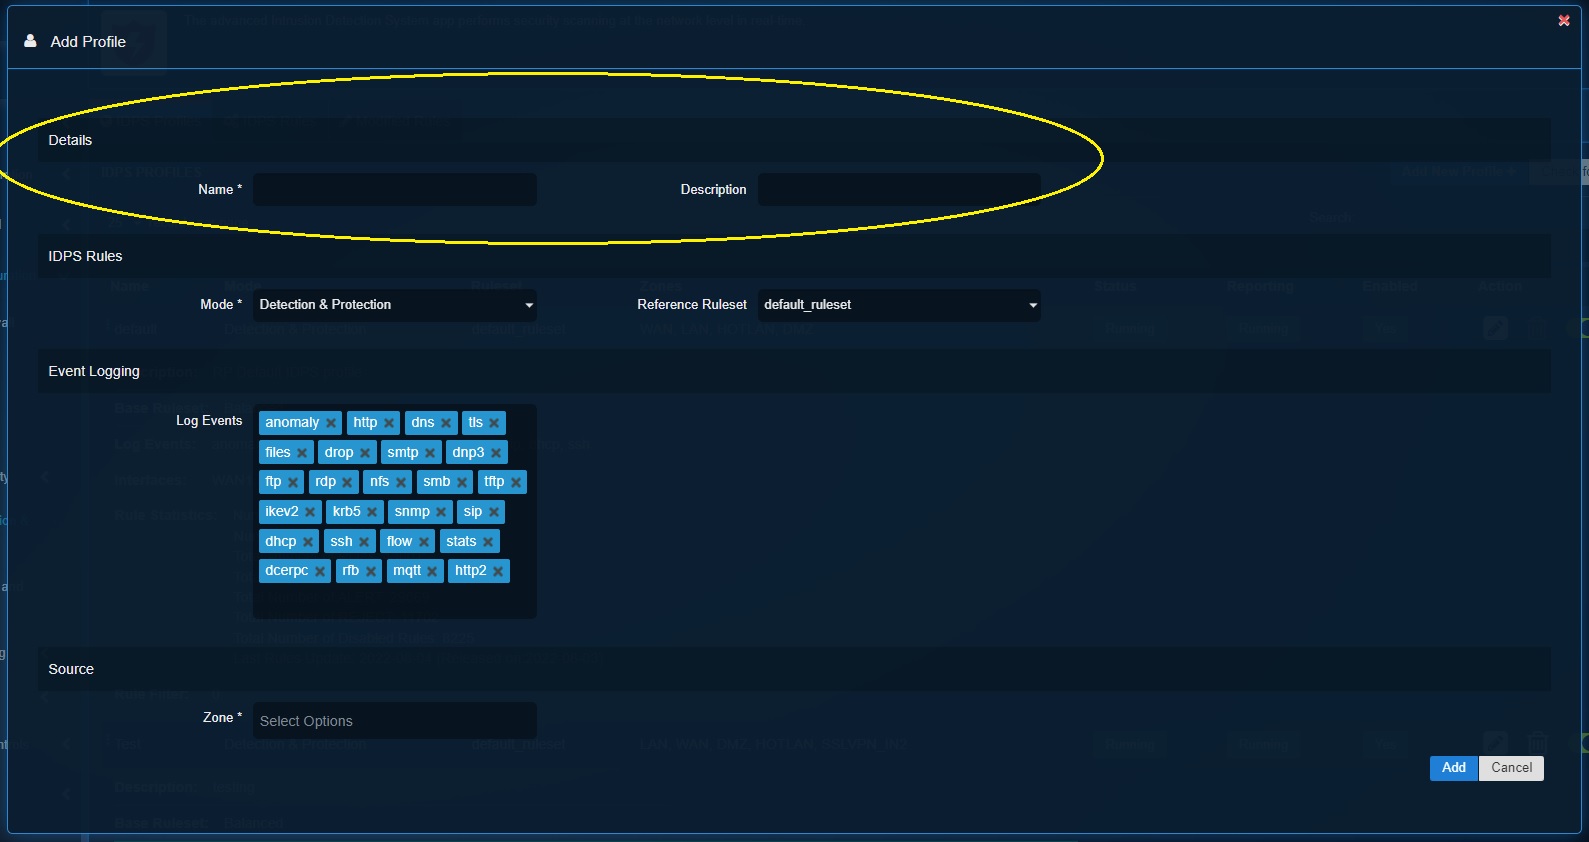
Step 1: In the IDPS application page, click the IDPS Rules tab and then click the Add button.

Step 2: You’ll now see the Add Ruleset pop-up. Enter the Name and Description of the custom IDPS profile.
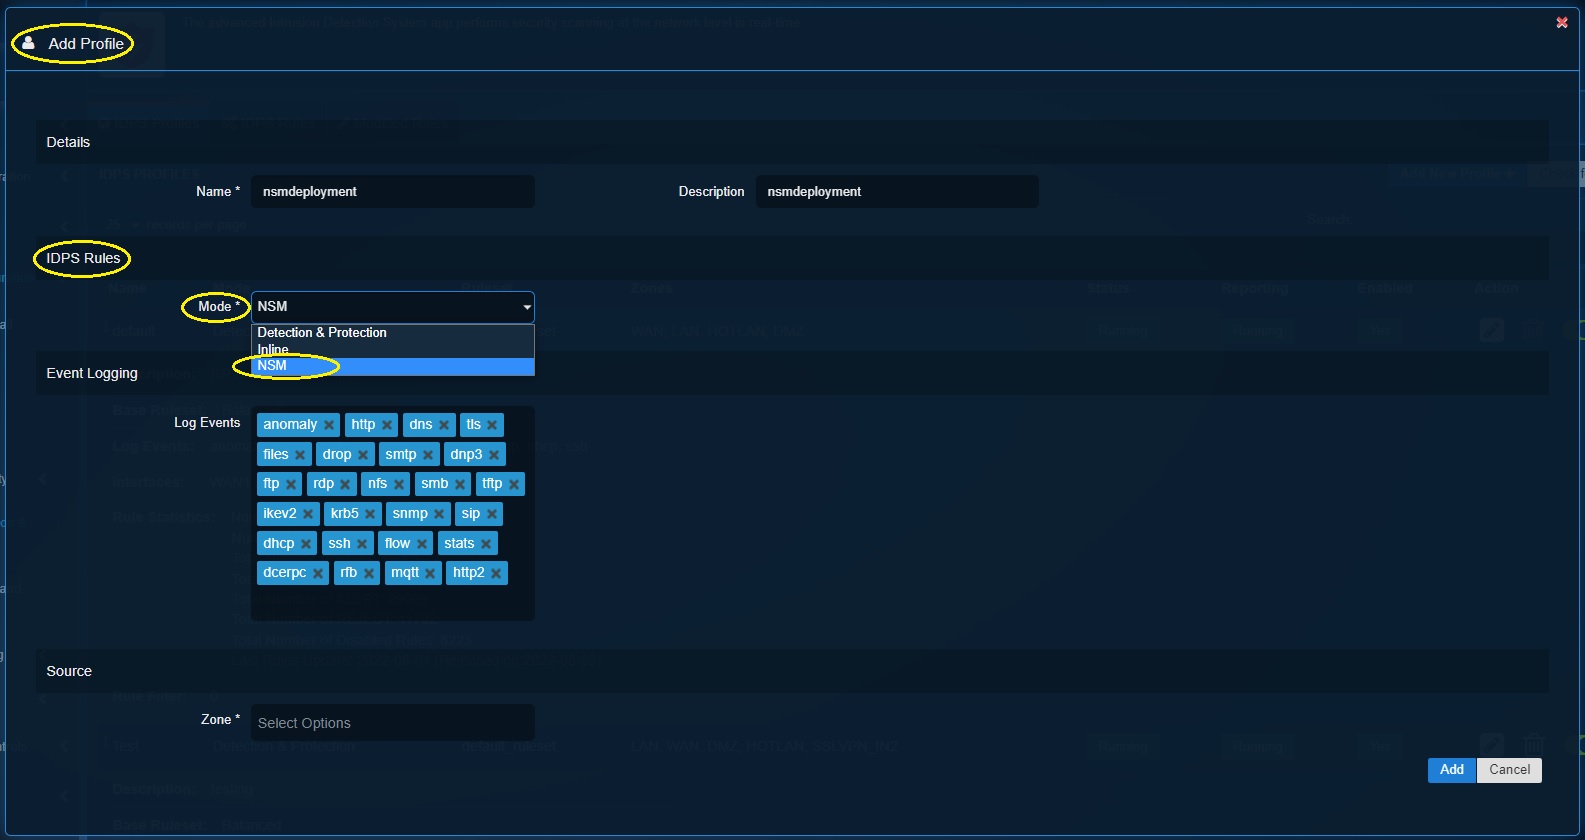
Step 3: Select NSM mode from the dropdown.
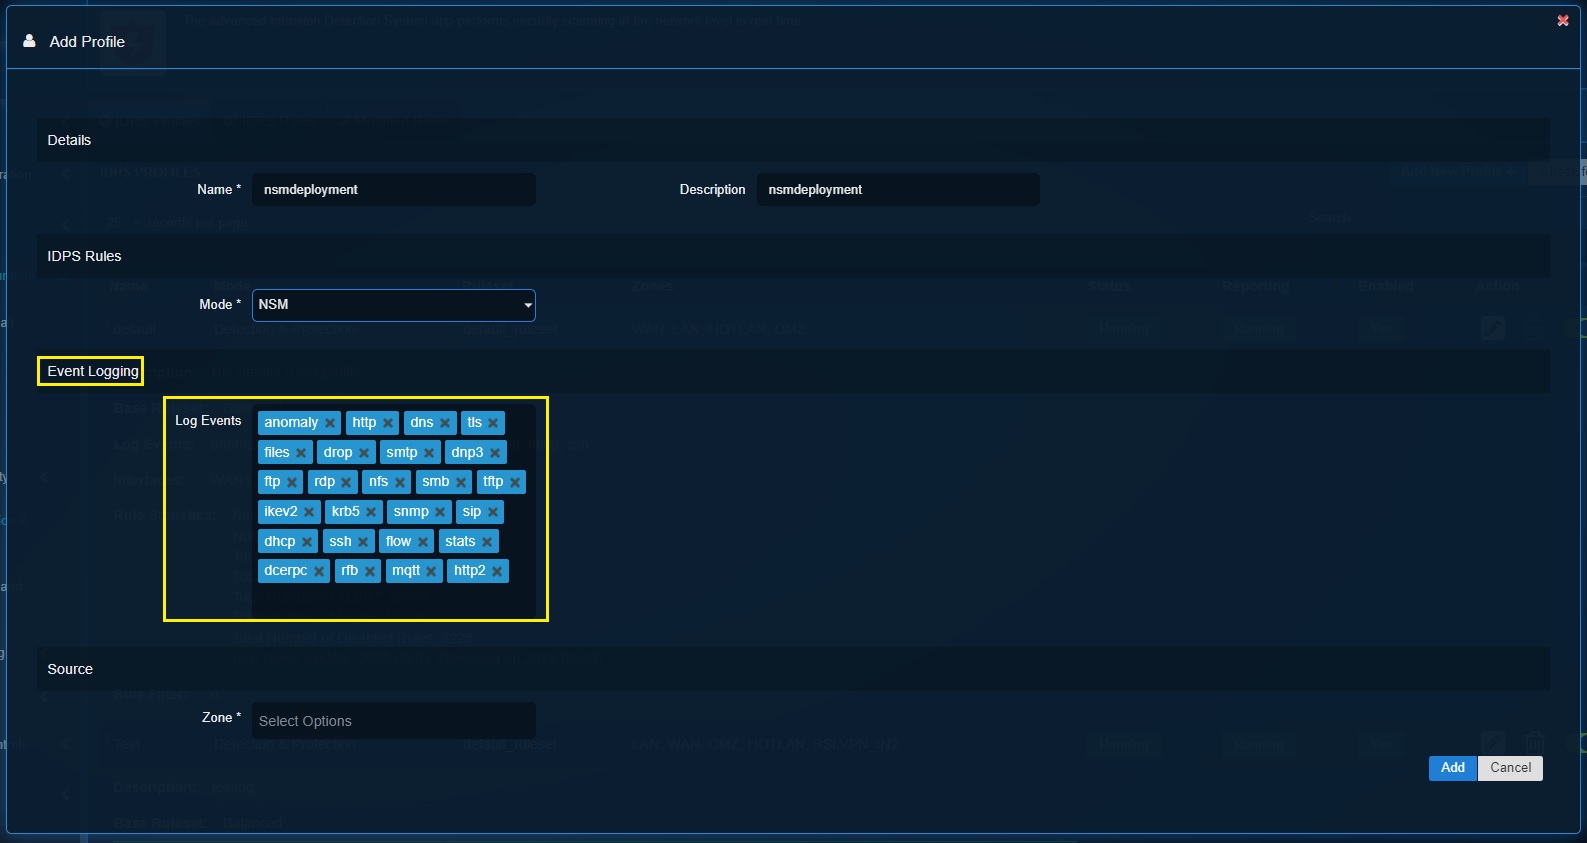
Step 4: Define the security events to be logged in the Threat Hunt in the Log Events textbox under the Event logging section and click the Add button.
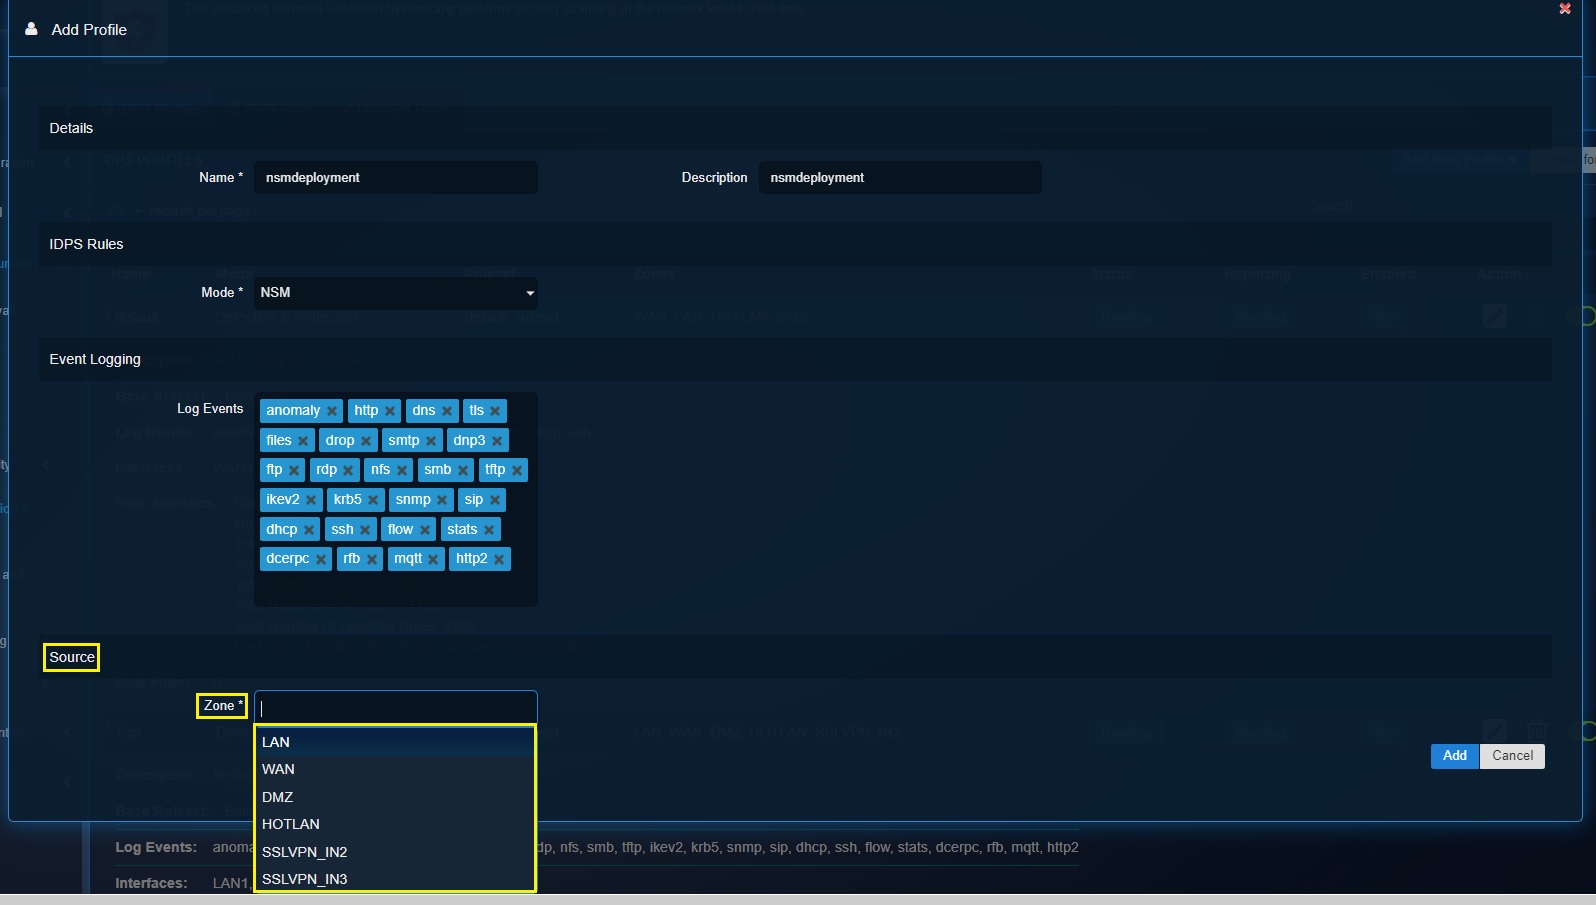
Step 5: Select the network security zones that needs to be logged by the IDPS. Click the Add button.
IDPS Rule Update
The “Check for Rules Updates” option in Intrusion Detection and Response application enables the users to manually update the IDPS rulesets.
As shown in the diagram above, the IDPS rulesets are developed inhouse by Red Piranha’s Global Security Operations Team and the Security Operations Server is updated with the new rules at regular intervals. Subsequently they are enforced in all the CE XDR appliances globally.
However, a CE XDR user may choose to manually update the rulesets in the appliance with the latest rules by just clicking the "Check for rules updates button".


